2019 CHEVROLET MALIBU ECU
[x] Cancel search: ECUPage 24 of 382
Chevrolet Malibu Owner Manual (GMNA-Localizing-U.S./Canada/Mexico-
12461813) - 2019 - crc - 12/11/18
24 In Brief
High Voltage Safety
Information
{Warning
Exposure to high voltage can
cause shock, burns, and even
death. The high voltage
components in the vehicle can
only be serviced by technicians
with special training.
High voltage components are
identified by labels. Do not
remove, open, take apart,
or modify these components.
High voltage cable or wiring has
orange covering or labels. Do not
probe, tamper with, cut, or modify
high voltage cable or wiring.
This vehicle has a high voltage
battery and a standard 12-volt
battery.
If the vehicle is in a crash, the
sensing system may shut down the
high voltage system. When this
occurs, the high voltage battery isdisconnected and the vehicle will
not start. The SERVICE VEHICLE
SOON message in the Driver
Information Center (DIC) will be
displayed. Before the vehicle can be
operated again, it must be serviced
at your dealer.
{Warning
Damage to the high voltage
battery or high voltage system
can create a risk of electric shock,
overheating, or fire.
If the vehicle is damaged from a
moderate to severe crash, flood,
fire, or other event, the vehicle
should be inspected as soon as
possible. Until the vehicle has
been inspected, store it outside at
least 15 m (50 ft) from any
structure or anything that can
burn. Ventilate the vehicle by
opening a window or a door.
(Continued)
Warning (Continued)
Contact Customer Assistance as
soon as possible to determine
whether an inspection is needed.
SeeCustomer Assistance Offices
0348.
SeeBattery - North America0257
for important safety information.
If an airbag has inflated, seeWhat
Will You See after an Airbag
Inflates?079.
Only a trained service technician
with the proper knowledge and tools
should inspect, test, or replace the
high voltage battery. See your
dealer if the high voltage battery
needs service.
Regenerative Braking
(Hybrid Only)
Regenerative braking takes some of
the energy from the moving vehicle
and turns it back into electrical
energy. This energy is then stored in
the high voltage battery system,
Page 29 of 382
Chevrolet Malibu Owner Manual (GMNA-Localizing-U.S./Canada/Mexico-
12461813) - 2019 - crc - 12/11/18
Keys, Doors, and Windows 29
Keys, Doors, and
Windows
Keys and Locks
Keys . . . . . . . . . . . . . . . . . . . . . . . . . . . 29
Remote Keyless Entry (RKE)
System . . . . . . . . . . . . . . . . . . . . . . . 30
Remote Keyless Entry (RKE)
System Operation . . . . . . . . . . . . 30
Remote Vehicle Start . . . . . . . . . . 37
Door Locks . . . . . . . . . . . . . . . . . . . . 39
Power Door Locks . . . . . . . . . . . . . 41
Delayed Locking . . . . . . . . . . . . . . . 41
Automatic Door Locks . . . . . . . . . 42
Lockout Protection . . . . . . . . . . . . . 42
Safety Locks . . . . . . . . . . . . . . . . . . . 42
Doors
Trunk . . . . . . . . . . . . . . . . . . . . . . . . . . 43
Vehicle Security
Vehicle Security . . . . . . . . . . . . . . . . 45
Vehicle Alarm System . . . . . . . . . 45
Immobilizer . . . . . . . . . . . . . . . . . . . . 46
Immobilizer Operation . . . . . . . . . 46
Exterior Mirrors
Convex Mirrors . . . . . . . . . . . . . . . . 47
Power Mirrors . . . . . . . . . . . . . . . . . . 48Folding Mirrors . . . . . . . . . . . . . . . . . 48
Heated Mirrors . . . . . . . . . . . . . . . . . 48
Reverse Tilt Mirrors . . . . . . . . . . . . 48
Interior Mirrors
Interior Rearview Mirrors . . . . . . . 49
Manual Rearview Mirror . . . . . . . . 49
Automatic Dimming Rearview
Mirror . . . . . . . . . . . . . . . . . . . . . . . . . 49
Windows
Windows . . . . . . . . . . . . . . . . . . . . . . . 49
Power Windows . . . . . . . . . . . . . . . 49
Sun Visors . . . . . . . . . . . . . . . . . . . . . 51
Roof
Sunroof . . . . . . . . . . . . . . . . . . . . . . . . 51
Keys and Locks
Keys
{Warning
Leaving children in a vehicle with
a Remote Keyless Entry (RKE)
transmitter is dangerous and
children or others could be
seriously injured or killed. They
could operate the power windows
or other controls or make the
vehicle move. The windows will
function with the RKE transmitter
in the vehicle, and children or
others could be caught in the path
of a closing window. Do not leave
children in a vehicle with an RKE
transmitter.
Page 41 of 382
Chevrolet Malibu Owner Manual (GMNA-Localizing-U.S./Canada/Mexico-
12461813) - 2019 - crc - 12/11/18
Keys, Doors, and Windows 41
5. Check that the cap is secure.
Free-Turning Locks
The door key lock cylinder turns
freely when either the wrong key is
used, or the correct key is not fully
inserted. The free-turning door lock
feature prevents the lock from being
forced open. To reset the lock, turn
it to the vertical position with the
correct key fully inserted. Remove
the key and insert it again. If this
does not reset the lock, turn the key
halfway around in the cylinder and
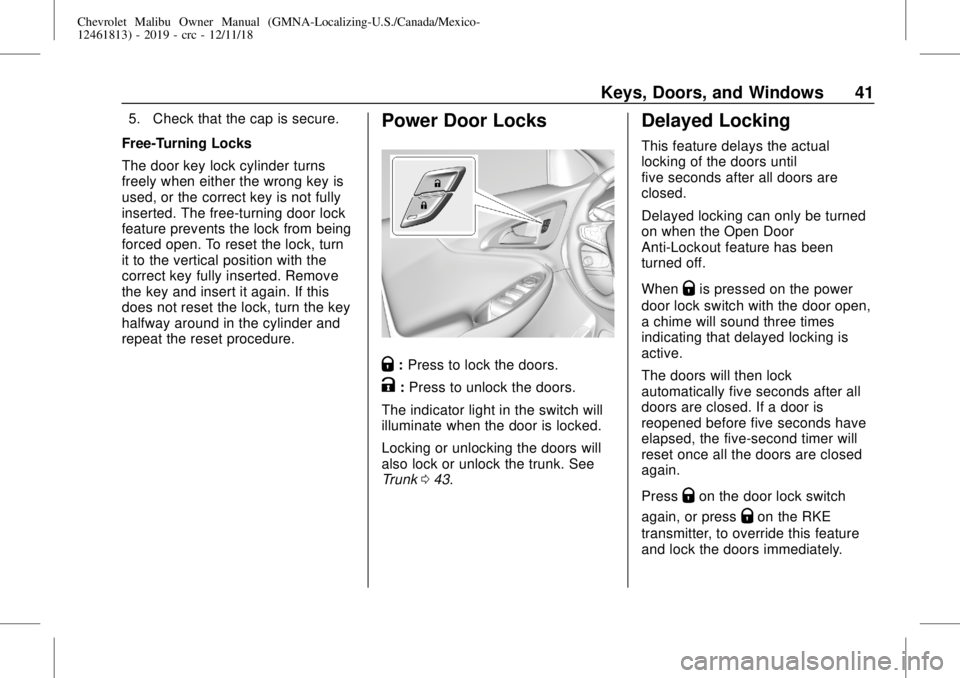
repeat the reset procedure.Power Door Locks
Q:Press to lock the doors.
K:Press to unlock the doors.
The indicator light in the switch will
illuminate when the door is locked.
Locking or unlocking the doors will
also lock or unlock the trunk. See
Trunk043.
Delayed Locking
This feature delays the actual
locking of the doors until
five seconds after all doors are
closed.
Delayed locking can only be turned
on when the Open Door
Anti-Lockout feature has been
turned off.
When
Qis pressed on the power
door lock switch with the door open,
a chime will sound three times
indicating that delayed locking is
active.
The doors will then lock
automatically five seconds after all
doors are closed. If a door is
reopened before five seconds have
elapsed, the five-second timer will
reset once all the doors are closed
again.
Press
Qon the door lock switch
again, or press
Qon the RKE
transmitter, to override this feature
and lock the doors immediately.
Page 44 of 382
Chevrolet Malibu Owner Manual (GMNA-Localizing-U.S./Canada/Mexico-
12461813) - 2019 - crc - 12/11/18
44 Keys, Doors, and Windows
Warning (Continued)
and set the fan speed to the
highest setting. See
“Climate Control Systems”
in the Index.
.
If the vehicle is equipped
with a power liftgate, disable
the power liftgate function.
For more information about
carbon monoxide, seeEngine
Exhaust0184.
Trunk Release
To open the trunk the vehicle must
be off or the shift lever must be in
P (Park).
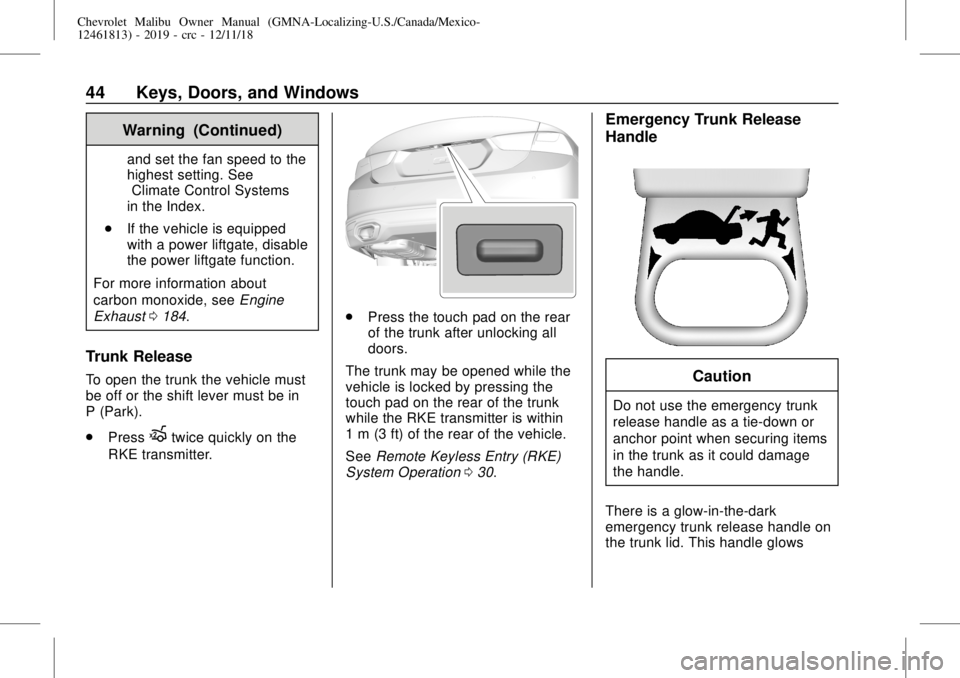
.
Press
Xtwice quickly on the
RKE transmitter.
.
Press the touch pad on the rear
of the trunk after unlocking all
doors.
The trunk may be opened while the
vehicle is locked by pressing the
touch pad on the rear of the trunk
while the RKE transmitter is within
1 m (3 ft) of the rear of the vehicle.
SeeRemote Keyless Entry (RKE)
System Operation030.
Emergency Trunk Release
Handle
Caution
Do not use the emergency trunk
release handle as a tie-down or
anchor point when securing items
in the trunk as it could damage
the handle.
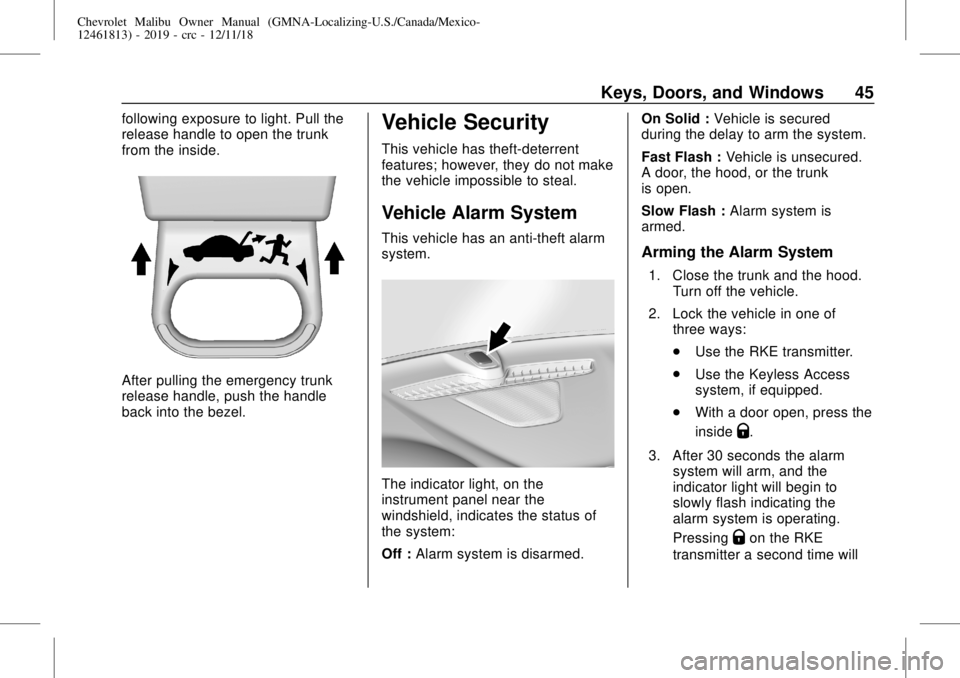
There is a glow-in-the-dark
emergency trunk release handle on
the trunk lid. This handle glows
Page 45 of 382
Chevrolet Malibu Owner Manual (GMNA-Localizing-U.S./Canada/Mexico-
12461813) - 2019 - crc - 12/11/18
Keys, Doors, and Windows 45
following exposure to light. Pull the
release handle to open the trunk
from the inside.
After pulling the emergency trunk
release handle, push the handle
back into the bezel.
Vehicle Security
This vehicle has theft-deterrent
features; however, they do not make
the vehicle impossible to steal.
Vehicle Alarm System
This vehicle has an anti-theft alarm
system.
The indicator light, on the
instrument panel near the
windshield, indicates the status of
the system:
Off :Alarm system is disarmed.On Solid :Vehicle is secured
during the delay to arm the system.
Fast Flash :Vehicle is unsecured.
A door, the hood, or the trunk
is open.
Slow Flash :Alarm system is
armed.
Arming the Alarm System
1. Close the trunk and the hood.
Turn off the vehicle.
2. Lock the vehicle in one of
three ways:
.
Use the RKE transmitter.
.
Use the Keyless Access
system, if equipped.
.
With a door open, press the
inside
Q.
3. After 30 seconds the alarm
system will arm, and the
indicator light will begin to
slowly flash indicating the
alarm system is operating.
Pressing
Qon the RKE
transmitter a second time will
Page 47 of 382
Chevrolet Malibu Owner Manual (GMNA-Localizing-U.S./Canada/Mexico-
12461813) - 2019 - crc - 12/11/18
Keys, Doors, and Windows 47
The security light on the instrument
cluster comes on when there is a
problem with arming or disarming
the theft-deterrent system.
The system has one or more
transmitters matched to an
immobilizer control unit in the
vehicle. Only a correctly matched
transmitter will start the vehicle.
If the transmitter is ever damaged,
you may not be able to start your
vehicle.
When trying to start the vehicle, the
security light comes on briefly when
the ignition is turned on.
If the vehicle does not start and the
security light stays on, there is a
problem with the system. Turn the
vehicle off and try again.
If the RKE transmitter appears to be
undamaged, try another transmitter,
or place the transmitter in the
transmitter pocket. See“Starting the
Vehicle with a Low Transmitter
Battery”underRemote Keyless
Entry (RKE) System Operation030.If the vehicle does not start with the
other transmitter or when the
transmitter is in the transmitter
pocket, the vehicle needs service.
See your dealer who can service
the theft-deterrent system and have
a new transmitter programmed to
the vehicle.
Do not leave the transmitter or
device that disarms or deactivates
the theft-deterrent system in the
vehicle.Exterior Mirrors
Convex Mirrors
{Warning
A convex mirror can make things,
like other vehicles, look farther
away than they really are. If you
cut too sharply into the right lane,
you could hit a vehicle on the
right. Check the inside mirror or
glance over your shoulder before
changing lanes.
The passenger side mirror is convex
shaped. A convex mirror's surface is
curved so more can be seen from
the driver seat.
Page 53 of 382
Chevrolet Malibu Owner Manual (GMNA-Localizing-U.S./Canada/Mexico-
12461813) - 2019 - crc - 12/11/18
Seats and Restraints 53
Seats and
Restraints
Head Restraints
Head Restraints . . . . . . . . . . . . . . . 54
Front Seats
Seat Adjustment . . . . . . . . . . . . . . . 56
Power Seat Adjustment . . . . . . . . 57
Lumbar Adjustment . . . . . . . . . . . . 57
Reclining Seatbacks . . . . . . . . . . . 57
Memory Seats . . . . . . . . . . . . . . . . . 59
Heated and Ventilated Front
Seats . . . . . . . . . . . . . . . . . . . . . . . . . 62
Rear Seats
Rear Seats . . . . . . . . . . . . . . . . . . . . 63
Rear Seat Armrest . . . . . . . . . . . . . 66
Heated Rear Seats . . . . . . . . . . . . 66
Seat Belts
Seat Belts . . . . . . . . . . . . . . . . . . . . . 66
How to Wear Seat Belts
Properly . . . . . . . . . . . . . . . . . . . . . . 68
Lap-Shoulder Belt . . . . . . . . . . . . . 70
Seat Belt Use During
Pregnancy . . . . . . . . . . . . . . . . . . . . 72
Seat Belt Extender . . . . . . . . . . . . . 72
Safety System Check . . . . . . . . . . 72Seat Belt Care . . . . . . . . . . . . . . . . . 73
Replacing Seat Belt System
Parts after a Crash . . . . . . . . . . . 73
Airbag System
Airbag System . . . . . . . . . . . . . . . . . 74
Where Are the Airbags? . . . . . . . 76
When Should an Airbag
Inflate? . . . . . . . . . . . . . . . . . . . . . . . 77
What Makes an Airbag
Inflate? . . . . . . . . . . . . . . . . . . . . . . . 78
How Does an Airbag
Restrain? . . . . . . . . . . . . . . . . . . . . . 78
What Will You See after an
Airbag Inflates? . . . . . . . . . . . . . . 79
Passenger Sensing System . . . 80
Servicing the Airbag-Equipped
Vehicle . . . . . . . . . . . . . . . . . . . . . . . 84
Adding Equipment to the
Airbag-Equipped Vehicle . . . . . 85
Airbag System Check . . . . . . . . . . 86
Replacing Airbag System Parts
after a Crash . . . . . . . . . . . . . . . . . 86
Child Restraints
Older Children . . . . . . . . . . . . . . . . . 86
Infants and Young Children . . . . 88
Child Restraint Systems . . . . . . . 90
Where to Put the Restraint . . . . . 92
Lower Anchors and Tethers for
Children (LATCH System) . . . . 93Replacing LATCH System Parts
After a Crash . . . . . . . . . . . . . . . . . 99
Securing Child Restraints (With
the Seat Belt in the
Rear Seat) . . . . . . . . . . . . . . . . . . . 99
Securing Child Restraints (With
the Seat Belt in the
Front Seat) . . . . . . . . . . . . . . . . . . 101
Page 55 of 382
Chevrolet Malibu Owner Manual (GMNA-Localizing-U.S./Canada/Mexico-
12461813) - 2019 - crc - 12/11/18
Seats and Restraints 55
To lower the head restraint, press
the button, located on the top of the
seatback, and push the head
restraint down. Try to move the
head restraint after the button is
released to make sure that it is
locked in place.
The rear seat outboard head
restraints are not intended to be
removed. If removal is required see
your dealer for assistance with
removal. In the event of an
emergency, the following can be
used as removal and installation
instructions. Store the removed
head restraints in a secure place.
Reinstall the head restraints before
the seating position is occupied.
Head Restraint Removal and
Reinstallation
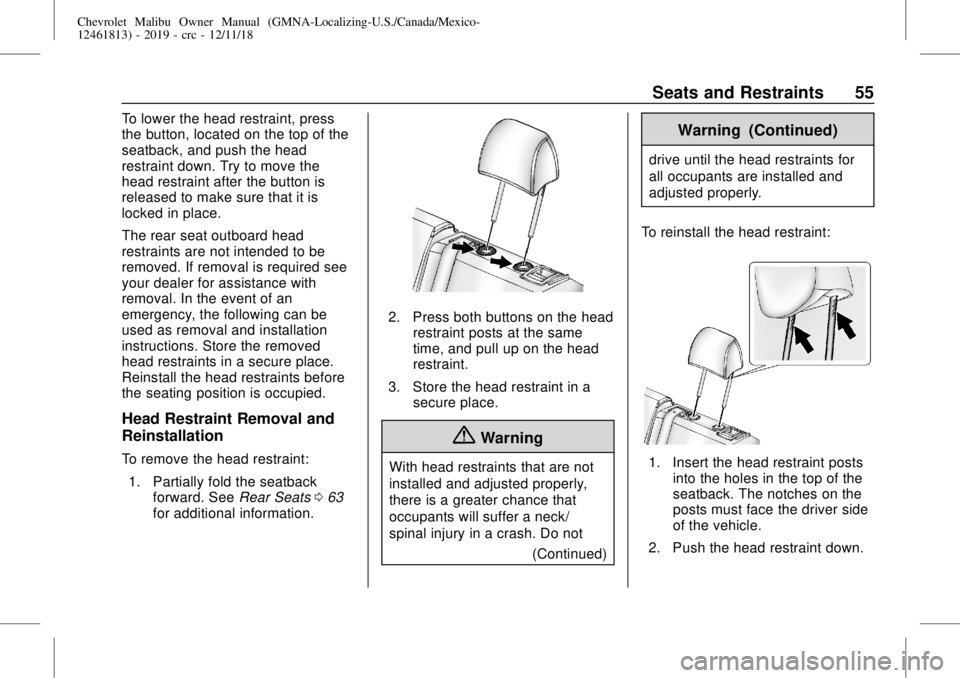
To remove the head restraint:
1. Partially fold the seatback
forward. SeeRear Seats063
for additional information.
2. Press both buttons on the head
restraint posts at the same
time, and pull up on the head
restraint.
3. Store the head restraint in a
secure place.
{Warning
With head restraints that are not
installed and adjusted properly,
there is a greater chance that
occupants will suffer a neck/
spinal injury in a crash. Do not
(Continued)
Warning (Continued)
drive until the head restraints for
all occupants are installed and
adjusted properly.
To reinstall the head restraint:
1. Insert the head restraint posts
into the holes in the top of the
seatback. The notches on the
posts must face the driver side
of the vehicle.
2. Push the head restraint down.