2019 CHEVROLET MALIBU ignition
[x] Cancel search: ignitionPage 190 of 382
Chevrolet Malibu Owner Manual (GMNA-Localizing-U.S./Canada/Mexico-
12461813) - 2019 - crc - 12/11/18
190 Driving and Operating
Information Center) message will
display. Release the EPB and try to
apply it again. If the light does not
come on, or keeps flashing, have
the vehicle serviced. Do not drive
the vehicle if the
for PARK light is
flashing. See your dealer. See
Electric Parking Brake Light0127.
If the
8light is on, pull the EPB
switch and hold it. Continue to hold
the switch until the
for PARK light
remains on. If the
8light remains
on, see your dealer.
If the EPB is applied while the
vehicle is moving, the vehicle will
decelerate as long as the switch is
pressed. If the switch is pressed
until the vehicle comes to a stop,
the EPB will remain applied.
The vehicle may automatically apply
the EPB in some situations when
the vehicle is not moving. This is
normal, and is done to periodically
check the correct operation of the
EPB system.If the EPB fails to apply, block the
rear wheels to prevent vehicle
movement.
EPB Release
To release the EPB:
1. Turn the ignition on or to ACC/
ACCESSORY.
2. Apply and hold the brake
pedal.
3. Press the EPB switch
momentarily.
The EPB is released when the
for
PARK light is off.
If the
8light is on, release the EPB
by pressing and holding the EPB
switch. Continue to hold the switch
until the
for PARK light is off.
If either light stays on after release
is attempted, see your dealer.
Caution
Driving with the parking brake on
can overheat the brake system
and cause premature wear or
damage to brake system parts.
Make sure that the parking brake
is fully released and the brake
warning light is off before driving.
Automatic EPB Release
The EPB will automatically release if
the vehicle is running, placed into
gear, and an attempt is made to
drive away. Avoid rapid acceleration
when the EPB is applied, to
preserve parking brake lining life.
Brake Assist
The Brake Assist feature assists in
stopping or decreasing vehicle
speed in emergency driving
conditions. This feature uses the
Electronic Brake Control Module
(EBCM) which controls the hydraulic
brake circuits to detect when the
driver has quickly and forcefully
Page 201 of 382
Chevrolet Malibu Owner Manual (GMNA-Localizing-U.S./Canada/Mexico-
12461813) - 2019 - crc - 12/11/18
Driving and Operating 201
Notification to Resume ACC
ACC will maintain a following gap
behind a detected vehicle and slow
your vehicle to a stop behind that
vehicle.
If the stopped vehicle ahead has
driven away and ACC has not
resumed, the vehicle ahead
indicator will flash as a reminder to
check traffic before proceeding. In
addition, three beeps will sound.
See“Adaptive Cruise Go Notifier”in
“Collision/Detection Systems”under
Vehicle Personalization0142.
When the vehicle ahead drives
away, press +RES or the
accelerator pedal to resume ACC.
If stopped for more than
two minutes or if the driver door is
opened and the driver seat belt is
unbuckled, the ACC automatically
applies the Electric Parking Brake
(EPB) to hold the vehicle. The EPB
status light will turn on. SeeParking
Brake0188. To release the EPB,
press the accelerator pedal.A DIC warning message may
display indicating to shift to P (Park)
before exiting the vehicle. See
Vehicle Messages0141.
{Warning
If ACC has stopped the vehicle,
and if ACC is disengaged, turned
off, or canceled, the vehicle will
no longer be held at a stop. The
vehicle can move. When ACC is
holding the vehicle at a stop,
always be prepared to manually
apply the brakes.
{Warning
Leaving the vehicle without
placing it in P (Park) can be
dangerous. Do not leave the
vehicle while it is being held at a
stop by ACC. Always place the
vehicle in P (Park) and turn off
the ignition before leaving the
vehicle.ACC Override
If using the accelerator pedal while
ACC is active, the ACC indicator
turns blue on the instrument cluster
to indicate that automatic braking
will not occur. ACC will resume
operation when the accelerator
pedal is not being pressed.
{Warning
The ACC will not automatically
apply the brakes if your foot is
resting on the accelerator pedal.
You could crash into a vehicle
ahead of you.
Curves in the Road
{Warning
On curves, ACC may not detect a
vehicle ahead in your lane. You
could be startled if the vehicle
accelerates up to the set speed,
especially when following a
vehicle exiting or entering exit
(Continued)
Page 203 of 382
Chevrolet Malibu Owner Manual (GMNA-Localizing-U.S./Canada/Mexico-
12461813) - 2019 - crc - 12/11/18
Driving and Operating 203
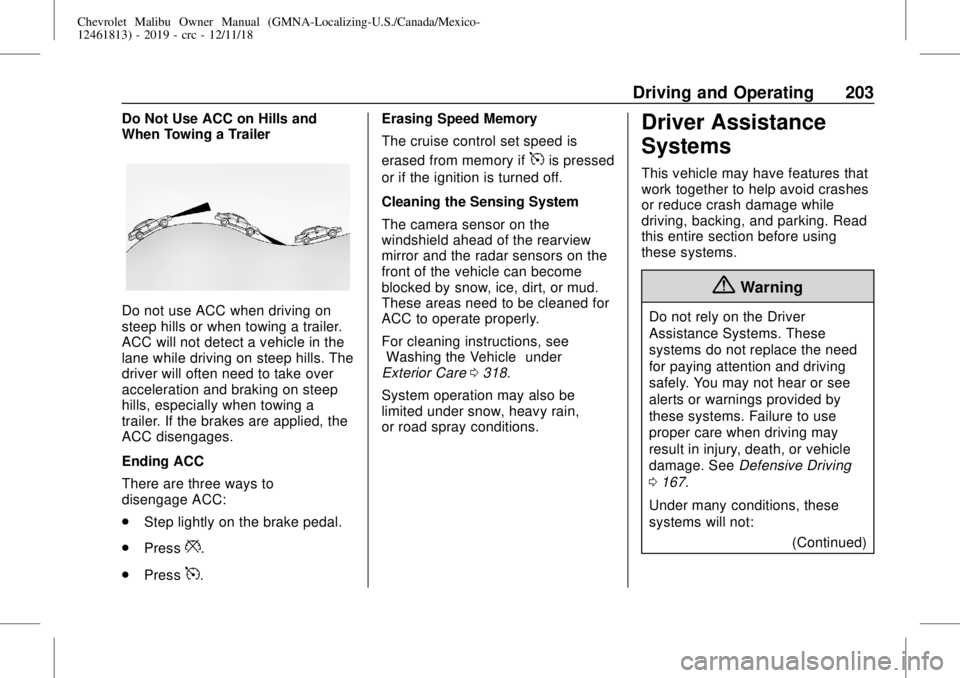
Do Not Use ACC on Hills and
When Towing a Trailer
Do not use ACC when driving on
steep hills or when towing a trailer.
ACC will not detect a vehicle in the
lane while driving on steep hills. The
driver will often need to take over
acceleration and braking on steep
hills, especially when towing a
trailer. If the brakes are applied, the
ACC disengages.
Ending ACC
There are three ways to
disengage ACC:
.
Step lightly on the brake pedal.
.
Press
*.
.
Press
5.Erasing Speed Memory
The cruise control set speed is
erased from memory if
5is pressed
or if the ignition is turned off.
Cleaning the Sensing System
The camera sensor on the
windshield ahead of the rearview
mirror and the radar sensors on the
front of the vehicle can become
blocked by snow, ice, dirt, or mud.
These areas need to be cleaned for
ACC to operate properly.
For cleaning instructions, see
“Washing the Vehicle”under
Exterior Care0318.
System operation may also be
limited under snow, heavy rain,
or road spray conditions.
Driver Assistance
Systems
This vehicle may have features that
work together to help avoid crashes
or reduce crash damage while
driving, backing, and parking. Read
this entire section before using
these systems.
{Warning
Do not rely on the Driver
Assistance Systems. These
systems do not replace the need
for paying attention and driving
safely. You may not hear or see
alerts or warnings provided by
these systems. Failure to use
proper care when driving may
result in injury, death, or vehicle
damage. SeeDefensive Driving
0167.
Under many conditions, these
systems will not:
(Continued)
Page 259 of 382
Chevrolet Malibu Owner Manual (GMNA-Localizing-U.S./Canada/Mexico-
12461813) - 2019 - crc - 12/11/18
Vehicle Care 259
Negative Battery Cable
Disconnection
{Warning
Before disconnecting the negative
battery cable, turn off all features,
turn the ignition off, and remove
the key, if equipped, from the
vehicle. If this is not done, you or
others could be injured, and the
vehicle could be damaged.
Caution
If the battery is disconnected with
the ignition on or the vehicle in
Retained Accessory Power
(RAP), the OnStar back-up
battery will be permanently
discharged and will need to be
replaced.
1. Make sure the lamps, features,
and accessories are turned off.
2. Turn the ignition off and
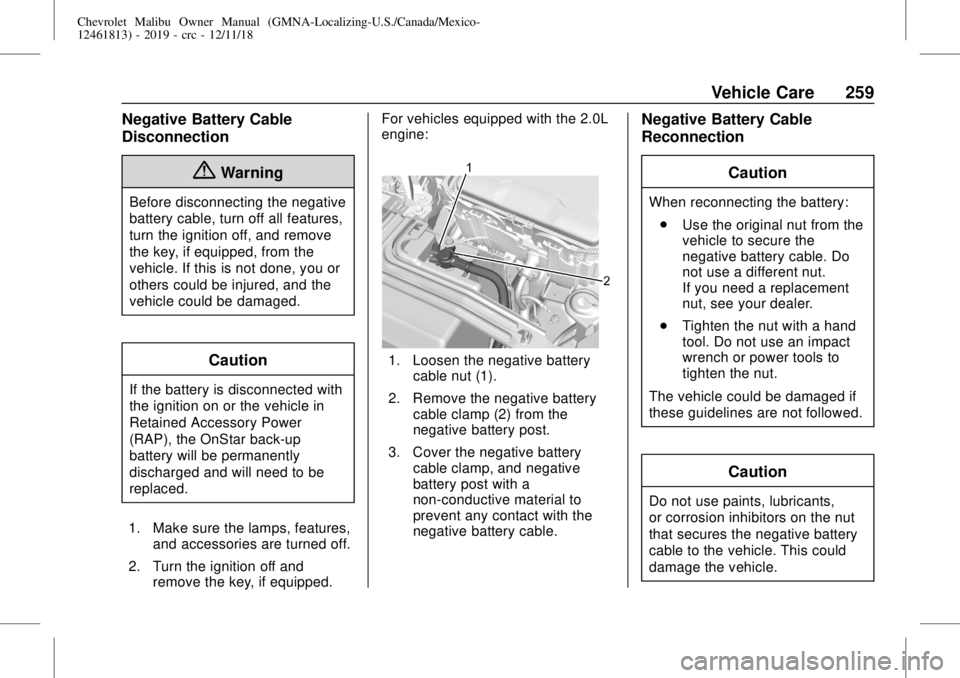
remove the key, if equipped.For vehicles equipped with the 2.0L
engine:
1. Loosen the negative battery
cable nut (1).
2. Remove the negative battery
cable clamp (2) from the
negative battery post.
3. Cover the negative battery
cable clamp, and negative
battery post with a
non-conductive material to
prevent any contact with the
negative battery cable.
Negative Battery Cable
Reconnection
Caution
When reconnecting the battery:
.
Use the original nut from the
vehicle to secure the
negative battery cable. Do
not use a different nut.
If you need a replacement
nut, see your dealer.
.
Tighten the nut with a hand
tool. Do not use an impact
wrench or power tools to
tighten the nut.
The vehicle could be damaged if
these guidelines are not followed.
Caution
Do not use paints, lubricants,
or corrosion inhibitors on the nut
that secures the negative battery
cable to the vehicle. This could
damage the vehicle.
Page 260 of 382
Chevrolet Malibu Owner Manual (GMNA-Localizing-U.S./Canada/Mexico-
12461813) - 2019 - crc - 12/11/18
260 Vehicle Care
For vehicles equipped with the 2.0L
engine:
1. Install the negative battery
cable clamp to the negative
battery post.
2. Tighten the negative battery
cable nut.
3. Turn the ignition on.
Starter Switch Check
{Warning
When you are doing this
inspection, the vehicle could
move suddenly. If the vehicle
moves, you or others could be
injured.
1. Before starting this check, be
sure there is enough room
around the vehicle.
2. Apply both the parking brake
and the regular brake.Do not use the accelerator
pedal, and be ready to turn off
the engine immediately if it
starts.
3. Try to start the engine in each
gear. The vehicle should start
only in P (Park) or N (Neutral).
If the vehicle starts in any other
position, contact your dealer for
service.
Automatic Transmission
Shift Lock Control
Function Check
{Warning
When you are doing this
inspection, the vehicle could
move suddenly. If the vehicle
moves, you or others could be
injured.
1. Before starting this check, be
sure there is enough room
around the vehicle. It should be
parked on a level surface.2. Apply the parking brake. Be
ready to apply the regular
brake immediately if the vehicle
begins to move.
3. With the engine off, turn the
ignition on, but do not start the
engine. Without applying the
regular brake, try to move the
shift lever out of P (Park) with
normal effort. If the shift lever
moves out of P (Park), contact
your dealer for service.
Park Brake and P (Park)
Mechanism Check
{Warning
When you are doing this check,
the vehicle could begin to move.
You or others could be injured
and property could be damaged.
Make sure there is room in front
of the vehicle in case it begins to
roll. Be ready to apply the regular
brake at once should the vehicle
begin to move.
Page 271 of 382
Chevrolet Malibu Owner Manual (GMNA-Localizing-U.S./Canada/Mexico-
12461813) - 2019 - crc - 12/11/18
Vehicle Care 271
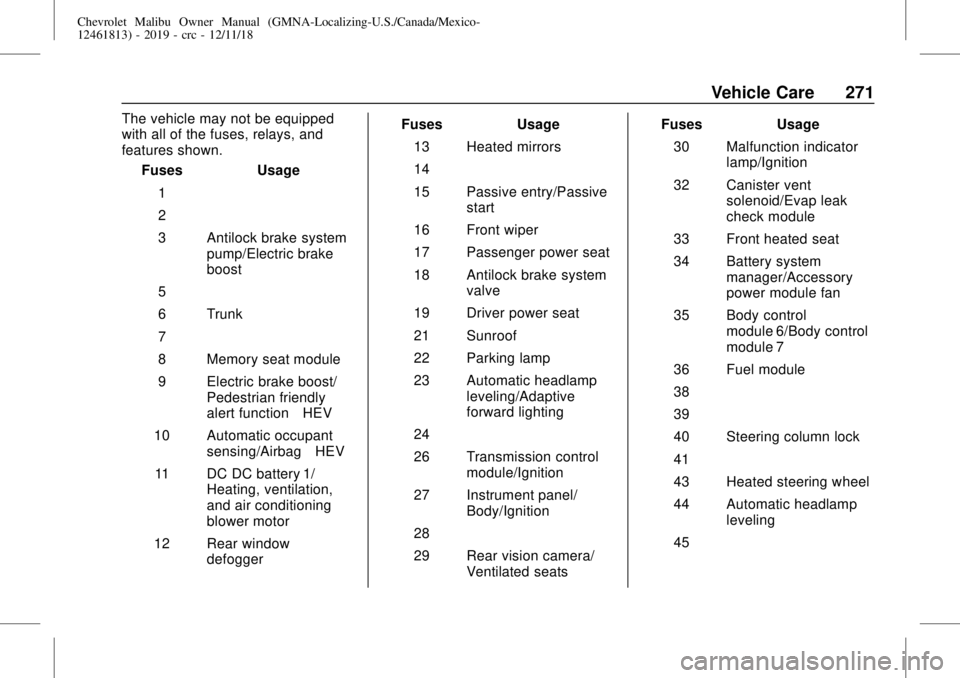
The vehicle may not be equipped
with all of the fuses, relays, and
features shown.
Fuses Usage
1–
2–
3 Antilock brake system
pump/Electric brake
boost
5–
6 Trunk
7–
8 Memory seat module
9 Electric brake boost/
Pedestrian friendly
alert function–HEV
10 Automatic occupant
sensing/Airbag–HEV
11 DC DC battery 1/
Heating, ventilation,
and air conditioning
blower motor
12 Rear window
defoggerFuses Usage
13 Heated mirrors
14–
15 Passive entry/Passive
start
16 Front wiper
17 Passenger power seat
18 Antilock brake system
valve
19 Driver power seat
21 Sunroof
22 Parking lamp
23 Automatic headlamp
leveling/Adaptive
forward lighting
24–
26 Transmission control
module/Ignition
27 Instrument panel/
Body/Ignition
28–
29 Rear vision camera/
Ventilated seatsFuses Usage
30 Malfunction indicator
lamp/Ignition
32 Canister vent
solenoid/Evap leak
check module
33 Front heated seat
34 Battery system
manager/Accessory
power module fan
35 Body control
module 6/Body control
module 7
36 Fuel module
38–
39–
40 Steering column lock
41–
43 Heated steering wheel
44 Automatic headlamp
leveling
45–
Page 272 of 382
Chevrolet Malibu Owner Manual (GMNA-Localizing-U.S./Canada/Mexico-
12461813) - 2019 - crc - 12/11/18
272 Vehicle Care
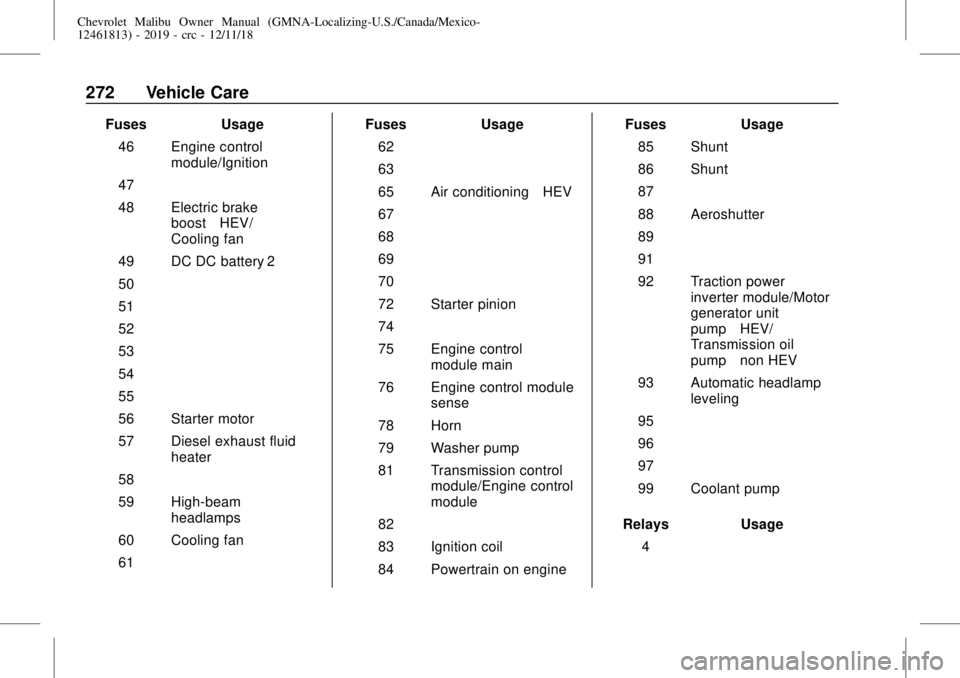
Fuses Usage
46 Engine control
module/Ignition
47–
48 Electric brake
boost–HEV/
Cooling fan
49 DC DC battery 2
50–
51–
52–
53–
54–
55–
56 Starter motor
57 Diesel exhaust fluid
heater
58–
59 High-beam
headlamps
60 Cooling fan
61–Fuses Usage
62–
63–
65 Air conditioning–HEV
67–
68–
69–
70–
72 Starter pinion
74–
75 Engine control
module main
76 Engine control module
sense
78 Horn
79 Washer pump
81 Transmission control
module/Engine control
module
82–
83 Ignition coil
84 Powertrain on engineFuses Usage
85 Shunt
86 Shunt
87–
88 Aeroshutter
89–
91–
92 Traction power
inverter module/Motor
generator unit
pump–HEV/
Transmission oil
pump–non HEV
93 Automatic headlamp
leveling
95–
96–
97–
99 Coolant pump
Relays Usage
4–
Page 287 of 382
Chevrolet Malibu Owner Manual (GMNA-Localizing-U.S./Canada/Mexico-
12461813) - 2019 - crc - 12/11/18
Vehicle Care 287
When a low tire pressure condition
is detected, the TPMS illuminates
the low tire pressure warning light
located on the instrument cluster.
If the warning light comes on, stop
as soon as possible and inflate the
tires to the recommended pressure
shown on the Tire and Loading
Information label. SeeVehicle Load
Limits0172.
A message to check the pressure in
a specific tire displays in the Driver
Information Center (DIC). The low
tire pressure warning light and the
DIC warning message come on at
each ignition cycle until the tires are
inflated to the correct inflation
pressure. Using the DIC, tire
pressure levels can be viewed. For
additional information and details
about the DIC operation anddisplays seeDriver Information
Center (DIC) (Base Level)0134or
Driver Information Center (DIC)
(Uplevel)0137.
The low tire pressure warning light
may come on in cool weather when
the vehicle is first started, and then
turn off as the vehicle is driven. This
could be an early indicator that the
air pressure is getting low and
needs to be inflated to the proper
pressure.
A Tire and Loading Information
label, attached to your vehicle,
shows the size of the original
equipment tires and the correct
inflation pressure for the tires when
they are cold. SeeVehicle Load
Limits0172, for an example of the
Tire and Loading Information label
and its location. Also seeTire
Pressure0284.
The TPMS can warn about a low
tire pressure condition but it does
not replace normal tire
maintenance. SeeTire Inspection
0291,Tire Rotation0291and
Tires0276.
Caution
Tire sealant materials are not all
the same. A non-approved tire
sealant could damage the TPMS
sensors. TPMS sensor damage
caused by using an incorrect tire
sealant is not covered by the
vehicle warranty. Always use only
the GM approved tire sealant
available through your dealer or
included in the vehicle.
Factory-installed Tire Inflator Kits
use a GM-approved liquid tire
sealant. Using non-approved tire
sealants could damage the TPMS
sensors. SeeTire Sealant and
Compressor Kit0299for
information regarding the inflator kit
materials and instructions.
TPMS Malfunction Light and
Message
The TPMS will not function properly
if one or more of the TPMS sensors
are missing or inoperable. When the
system detects a malfunction, the