2019 CHEVROLET MALIBU ECU
[x] Cancel search: ECUPage 259 of 382
Chevrolet Malibu Owner Manual (GMNA-Localizing-U.S./Canada/Mexico-
12461813) - 2019 - crc - 12/11/18
Vehicle Care 259
Negative Battery Cable
Disconnection
{Warning
Before disconnecting the negative
battery cable, turn off all features,
turn the ignition off, and remove
the key, if equipped, from the
vehicle. If this is not done, you or
others could be injured, and the
vehicle could be damaged.
Caution
If the battery is disconnected with
the ignition on or the vehicle in
Retained Accessory Power
(RAP), the OnStar back-up
battery will be permanently
discharged and will need to be
replaced.
1. Make sure the lamps, features,
and accessories are turned off.
2. Turn the ignition off and
remove the key, if equipped.For vehicles equipped with the 2.0L
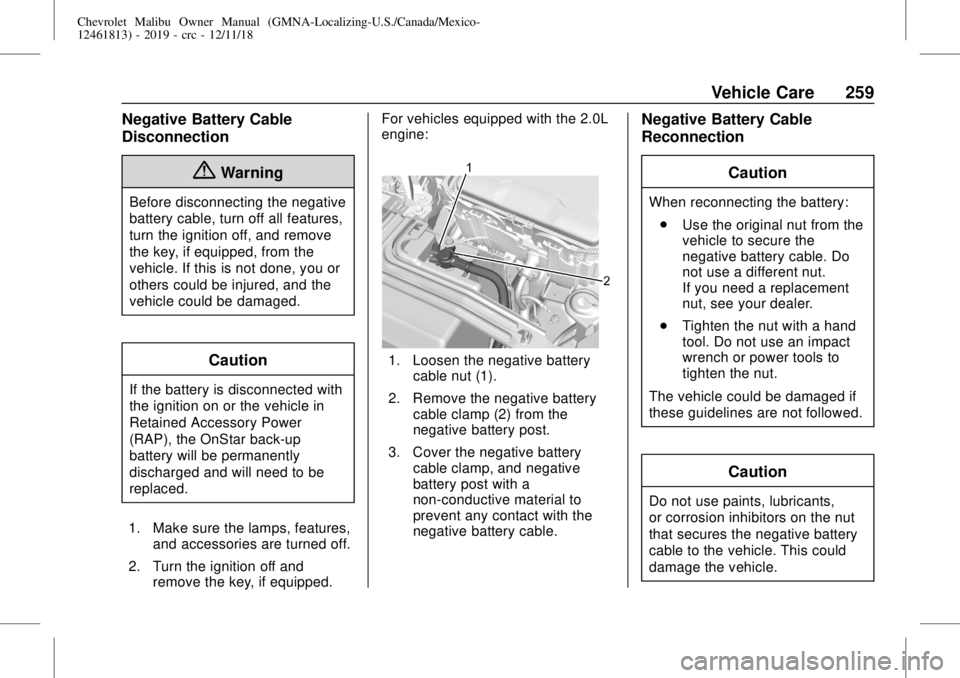
engine:
1. Loosen the negative battery
cable nut (1).
2. Remove the negative battery
cable clamp (2) from the
negative battery post.
3. Cover the negative battery
cable clamp, and negative
battery post with a
non-conductive material to
prevent any contact with the
negative battery cable.
Negative Battery Cable
Reconnection
Caution
When reconnecting the battery:
.
Use the original nut from the
vehicle to secure the
negative battery cable. Do
not use a different nut.
If you need a replacement
nut, see your dealer.
.
Tighten the nut with a hand
tool. Do not use an impact
wrench or power tools to
tighten the nut.
The vehicle could be damaged if
these guidelines are not followed.
Caution
Do not use paints, lubricants,
or corrosion inhibitors on the nut
that secures the negative battery
cable to the vehicle. This could
damage the vehicle.
Page 298 of 382
Chevrolet Malibu Owner Manual (GMNA-Localizing-U.S./Canada/Mexico-
12461813) - 2019 - crc - 12/11/18
298 Vehicle Care
Caution (Continued)
inner sidewall. Use chains that
are the proper size for the tires.
Install them on the tires of the
front axle. Don't use chains on the
tires of the rear axle. Tighten
them as tightly as possible with
the ends securely fastened. Drive
slowly and follow the chain
manufacturer's instructions. If the
chains contact the vehicle, stop
and retighten them. If the contact
continues, slow down until it
stops. Driving too fast or spinning
the wheels with chains on will
damage the vehicle.
If a Tire Goes Flat
It is unusual for a tire to blow out
while driving, especially if the tires
are maintained properly. SeeTires
0276. If air goes out of a tire, it is
much more likely to leak out slowly.
But if there is ever a blowout, here
are a few tips about what to expect
and what to do:If a front tire fails, the flat tire
creates a drag that pulls the vehicle
toward that side. Take your foot off
the accelerator pedal and grip the
steering wheel firmly. Steer to
maintain lane position, and then
gently brake to a stop, well off the
road, if possible.
A rear blowout, particularly on a
curve, acts much like a skid and
may require the same correction as
used in a skid. Stop pressing the
accelerator pedal and steer to
straighten the vehicle. It may be
very bumpy and noisy. Gently brake
to a stop, well off the road,
if possible.
{Warning
Driving on a flat tire will cause
permanent damage to the tire.
Re-inflating a tire after it has been
driven on while severely
underinflated or flat may cause a
blowout and a serious crash.
Never attempt to re-inflate a tire
(Continued)
Warning (Continued)
that has been driven on while
severely underinflated or flat.
Have your dealer or an authorized
tire service center repair or
replace the flat tire as soon as
possible.
{Warning
Lifting a vehicle and getting under
it to do maintenance or repairs is
dangerous without the
appropriate safety equipment and
training. If a jack is provided with
the vehicle, it is designed only for
changing a flat tire. If it is used for
anything else, you or others could
be badly injured or killed if the
vehicle slips off the jack. If a jack
is provided with the vehicle, only
use it for changing a flat tire.
Page 311 of 382
Chevrolet Malibu Owner Manual (GMNA-Localizing-U.S./Canada/Mexico-
12461813) - 2019 - crc - 12/11/18
Vehicle Care 311
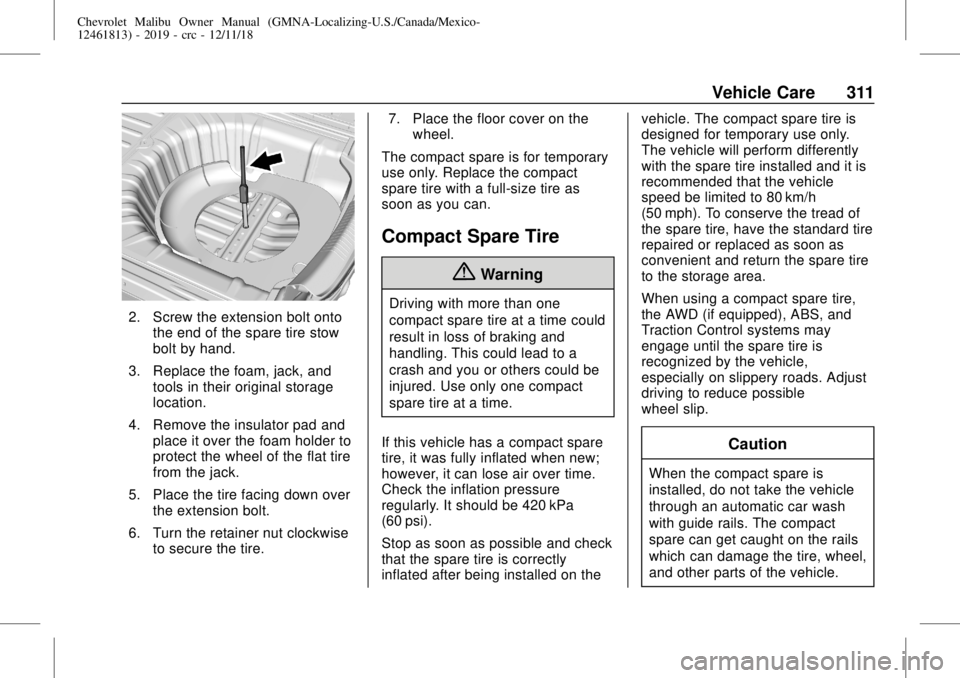
2. Screw the extension bolt onto
the end of the spare tire stow
bolt by hand.
3. Replace the foam, jack, and
tools in their original storage
location.
4. Remove the insulator pad and
place it over the foam holder to
protect the wheel of the flat tire
from the jack.
5. Place the tire facing down over
the extension bolt.
6. Turn the retainer nut clockwise
to secure the tire.7. Place the floor cover on the
wheel.
The compact spare is for temporary
use only. Replace the compact
spare tire with a full-size tire as
soon as you can.
Compact Spare Tire
{Warning
Driving with more than one
compact spare tire at a time could
result in loss of braking and
handling. This could lead to a
crash and you or others could be
injured. Use only one compact
spare tire at a time.
If this vehicle has a compact spare
tire, it was fully inflated when new;
however, it can lose air over time.
Check the inflation pressure
regularly. It should be 420 kPa
(60 psi).
Stop as soon as possible and check
that the spare tire is correctly
inflated after being installed on thevehicle. The compact spare tire is
designed for temporary use only.
The vehicle will perform differently
with the spare tire installed and it is
recommended that the vehicle
speed be limited to 80 km/h
(50 mph). To conserve the tread of
the spare tire, have the standard tire
repaired or replaced as soon as
convenient and return the spare tire
to the storage area.
When using a compact spare tire,
the AWD (if equipped), ABS, and
Traction Control systems may
engage until the spare tire is
recognized by the vehicle,
especially on slippery roads. Adjust
driving to reduce possible
wheel slip.
Caution
When the compact spare is
installed, do not take the vehicle
through an automatic car wash
with guide rails. The compact
spare can get caught on the rails
which can damage the tire, wheel,
and other parts of the vehicle.
Page 315 of 382
Chevrolet Malibu Owner Manual (GMNA-Localizing-U.S./Canada/Mexico-
12461813) - 2019 - crc - 12/11/18
Vehicle Care 315
10. Start the vehicle with the good
battery and run the engine at
idle speed for at least
four minutes.
11. Try to start the vehicle that had
the dead battery. If it will not
start after a few tries, it
probably needs service.
For hybrid vehicles, the engine will
only start if needed after pressing
ENGINE START/STOP. The vehicle
ready light will come on when the
propulsion system is on and ready.
In cold temperatures, the engine will
not run with the hood open. Close
the hood.
Caution
For hybrid vehicles, repeatedly
trying to start the vehicle can
drain and damage the high
voltage battery, requiring
replacement. This would not be
covered by the vehicle warranty.
Caution
If the jumper cables are
connected or removed in the
wrong order, electrical shorting
may occur and damage the
vehicle. The repairs would not be
covered by the vehicle warranty.
Always connect and remove the
jumper cables in the correct order,
making sure that the cables do
not touch each other or other
metal.
Jumper Cable Removal
Reverse the sequence exactly when
removing the jumper cables.
After starting the disabled vehicle
and removing the jumper cables,
allow it to idle for several minutes.
Towing the Vehicle
Caution
Incorrectly towing a disabled
vehicle may cause damage. The
damage would not be covered by
the vehicle warranty. Do not lash
or hook to suspension
components. Use the proper
straps around the tires to secure
the vehicle. Do not drag a locked
wheel/tire while loading the
vehicle. Do not use a sling type
lift to tow the vehicle. This could
damage the vehicle.
GM recommends a flatbed tow truck
to transport a disabled vehicle. Use
ramps to help reduce approach
angles, if necessary. A towed
vehicle should have its drive wheels
off the ground. Contact Roadside
Assistance or a professional towing
service if the disabled vehicle must
be towed.
Page 317 of 382
Chevrolet Malibu Owner Manual (GMNA-Localizing-U.S./Canada/Mexico-
12461813) - 2019 - crc - 12/11/18
Vehicle Care 317
Caution
If the vehicle is towed with all four
wheels on the ground, the drive
unit could be damaged. Repairs
would not be covered by the
vehicle warranty. Do not tow the
vehicle with all four wheels on the
ground.
This vehicle is not designed to be
towed with all four wheels on the
ground.
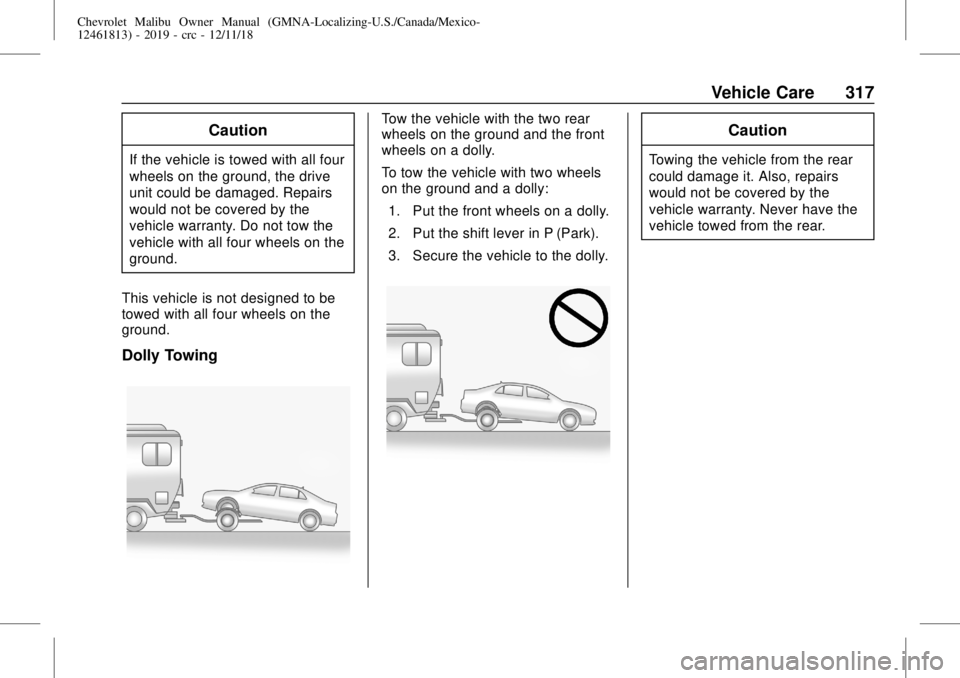
Dolly Towing
Tow the vehicle with the two rear
wheels on the ground and the front
wheels on a dolly.
To tow the vehicle with two wheels
on the ground and a dolly:
1. Put the front wheels on a dolly.
2. Put the shift lever in P (Park).
3. Secure the vehicle to the dolly.Caution
Towing the vehicle from the rear
could damage it. Also, repairs
would not be covered by the
vehicle warranty. Never have the
vehicle towed from the rear.
Page 326 of 382
Chevrolet Malibu Owner Manual (GMNA-Localizing-U.S./Canada/Mexico-
12461813) - 2019 - crc - 12/11/18
326 Vehicle Care
Floor Mats
{Warning
If a floor mat is the wrong size or
is not properly installed, it can
interfere with the pedals.
Interference with the pedals can
cause unintended acceleration
and/or increased stopping
distance which can cause a crash
and injury. Make sure the floor
mat does not interfere with the
pedals.
Use the following guidelines for
proper floor mat usage:
.
The original equipment floor
mats were designed for your
vehicle. If the floor mats need
replacing, it is recommended
that GM certified floor mats be
purchased. Non-GM floor mats
may not fit properly and may
interfere with the pedals. Always
check that the floor mats do not
interfere with the pedals..
Do not use a floor mat if the
vehicle is not equipped with a
floor mat retainer on the driver
side floor.
.
Use the floor mat with the
correct side up. Do not turn
it over.
.
Do not place anything on top of
the driver side floor mat.
.
Use only a single floor mat on
the driver side.
.
Do not place one floor mat on
top of another.
Removing and Replacing the
Floor Mats
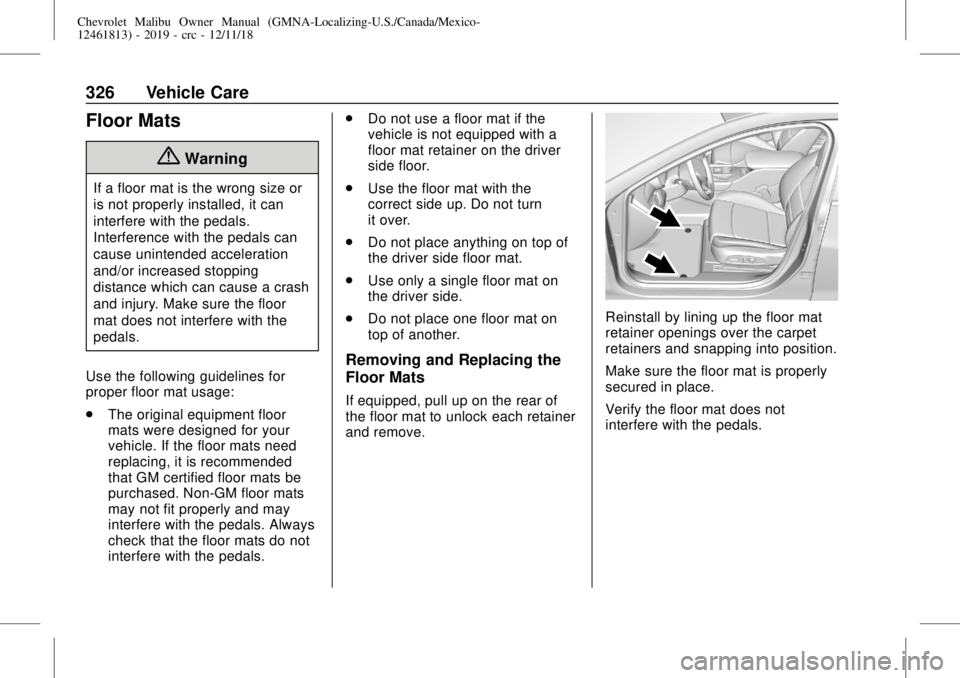
If equipped, pull up on the rear of
the floor mat to unlock each retainer
and remove.
Reinstall by lining up the floor mat
retainer openings over the carpet
retainers and snapping into position.
Make sure the floor mat is properly
secured in place.
Verify the floor mat does not
interfere with the pedals.
Page 351 of 382
Chevrolet Malibu Owner Manual (GMNA-Localizing-U.S./Canada/Mexico-
12461813) - 2019 - crc - 12/11/18
Customer Information 351
driver if they decide the claims are
made too often, or the same type of
claim is made many times.
Services Provided
.
Emergency Fuel Delivery:
Delivery of enough fuel for the
vehicle to get to the nearest
service station.
.
Lock-Out Service:Service to
unlock the vehicle if you are
locked out. A remote unlock may
be available if you have OnStar.
For security reasons, the driver
must present identification
before this service is given.
.
Emergency Tow from a Public
Road or Highway:Tow to the
nearest Chevrolet dealer for
warranty service, or if the vehicle
was in a crash and cannot be
driven. Assistance is not given
when the vehicle is stuck in the
sand, mud, or snow.
.
Flat Tire Change:Service to
change a flat tire with the spare
tire. The spare tire, if equipped,
must be in good condition and
properly inflated. It is the owner'sresponsibility for the repair or
replacement of the tire if it is not
covered by the warranty.
.
Battery Jump Start:Service to
jump start a dead battery.
.
Trip Interruption Benefits and
Assistance:If your trip is
interrupted due to a warranty
event, incidental expenses may
be reimbursed within the
Powertrain warranty period.
Items considered are reasonable
and customary hotel, meals,
rental car, or a vehicle being
delivered back to the customer,
up to 500 miles.
Services Not Included in
Roadside Assistance
.
Impound towing caused by
violation of any laws
.
Legal fines
.
Mounting, dismounting,
or changing of snow tires,
chains, or other traction devices
Service is not provided if a vehicle
is in an area that is not accessible
to the service vehicle or is not aregularly traveled or maintained
public road, which includes ice and
winter roads. Off-road use is not
covered.
Services Specific to
Canadian-Purchased Vehicles
.
Fuel Delivery:Reimbursement
is up to 7 liters. If available,
diesel fuel delivery may be
restricted. Propane and other
fuels are not provided through
this service.
.
Lock-Out Service:Vehicle
registration is required.
.
Trip Interruption Benefits and
Assistance:Must be over
150 km from where your trip was
started to qualify.
Pre-authorization, original
detailed receipts, and a copy of
the repair orders are required.
Once authorization has been
received, the Roadside
Assistance advisor will help to
make arrangements and explain
how to receive payment.
Page 360 of 382
Chevrolet Malibu Owner Manual (GMNA-Localizing-U.S./Canada/Mexico-
12461813) - 2019 - crc - 12/11/18
360 OnStar
OnStar
OnStar Overview
OnStar Overview . . . . . . . . . . . . . 360
OnStar Services
Emergency . . . . . . . . . . . . . . . . . . . 361
Security . . . . . . . . . . . . . . . . . . . . . . 362
OnStar Additional Information
OnStar Additional
Information . . . . . . . . . . . . . . . . . . 362
OnStar Overview
=Voice Command Button
QBlue OnStar Button
>Red Emergency Button
This vehicle may be equipped with a
comprehensive, in-vehicle system
that can connect to an OnStar
Advisor for Emergency, Security,
Navigation, Connections, and
Diagnostics Services. OnStar
services may require a paid service
plan and data plan. OnStar requires
the vehicle battery and electrical
system, cellular service, and GPS
satellite signals to be available and
operating. OnStar acts as a link to
existing emergency service
providers. OnStar may collect
information about you and your
vehicle, including location
information. See OnStar UserTerms, Privacy Statement, and
Software Terms for more details
including system limitations at
www.onstar.com (U.S.) or
www.onstar.ca (Canada).
The OnStar system status light is
next to the OnStar buttons. If the
status light is:
.
Solid Green: System is ready.
.
Flashing Green: On a call.
.
Red: Indicates a problem.
.
Off: System is off. Press
Q
twice to speak with an OnStar
Advisor.
Press
Qor call 1-888-4ONSTAR
(1-888-466-7827) to speak to an
Advisor.
Functionality of the Voice Command
button may vary by vehicle and
region.