2019 CHEVROLET EQUINOX tow
[x] Cancel search: towPage 8 of 426

Chevrolet Equinox Owner Manual (GMNA-Localizing-U.S./Canada/Mexico-
12145779) - 2019 - CRC - 7/30/18
In Brief 7
1.Air Vents 0174.
2. Turn Signal Lever. See Turn
and Lane-Change Signals
0 164.
IntelliBeam
®System Button (If
Equipped). See Exterior Lamp
Controls 0160.
3. Instrument Cluster (Base and
Midlevel) 0120 orInstrument
Cluster (Uplevel) 0124.
Driver Information Center (DIC)
Display. See Driver Information
Center (DIC) (Base Level and
Midlevel) 0141 orDriver
Information Center (DIC)
(Uplevel) 0146.
4. Windshield Wiper/Washer
0112.
5. Infotainment 0168.
6. Light Sensor. See Automatic
Headlamp System 0163.
7. Hazard Warning Flashers
0163. 8.
Climate Control Systems 0169
(If Equipped).
Dual Automatic Climate Control
System 0171 (If Equipped).
9. Heated and Ventilated Front
Seats 064 (If Equipped).
10. Power Outlets 0115.
11. Wireless Charging 0116 (If
Equipped).
12. USB Port. See the infotainment manual.
Auxiliary Input Jack. See the
infotainment manual.
13. All-Wheel Drive 0214 (If
Equipped).
Tow/Haul Mode 0213.
14. Electric Parking Brake 0216.
15. Shift Lever. See Automatic
Transmission 0210.
Manual Mode 0212.
16. ENGINE START/STOP Button. SeeIgnition Positions 0194. 17.
Steering Wheel Controls 0112.
Traction Control/Electronic
Stability Control 0218.
18. Horn 0112.
19. Steering Wheel Adjustment
0112 (Out of View).
20. Cruise Control 0222.
Heated Steering Wheel 0112
(If Equipped).
Forward Collision Alert (FCA)
System 0240 (If Equipped).
Lane Keep Assist (LKA) 0248
(If Equipped).
21. Hood Release. See Hood
0 278.
22. Fog Lamps 0164 (If
Equipped).
23. Exterior Lamp Controls 0160.
24. Data Link Connector (DLC) (Out of View). See Malfunction
Indicator Lamp (Check Engine
Light) 0132.
25. Instrument Panel Illumination
Control 0165.
Page 18 of 426
Chevrolet Equinox Owner Manual (GMNA-Localizing-U.S./Canada/Mexico-
12145779) - 2019 - CRC - 7/30/18
In Brief 17
AUTO :Turns the exterior lamps on
and off automatically depending on
outside lighting.
;: Turns on the parking lamps
including all lamps, except the
headlamps.
5: Turns on the headlamps
together with the parking lamps and
instrument panel lights.
See:
. Exterior Lamp Controls 0160
. Daytime Running Lamps (DRL)
0162
. Fog Lamps 0164
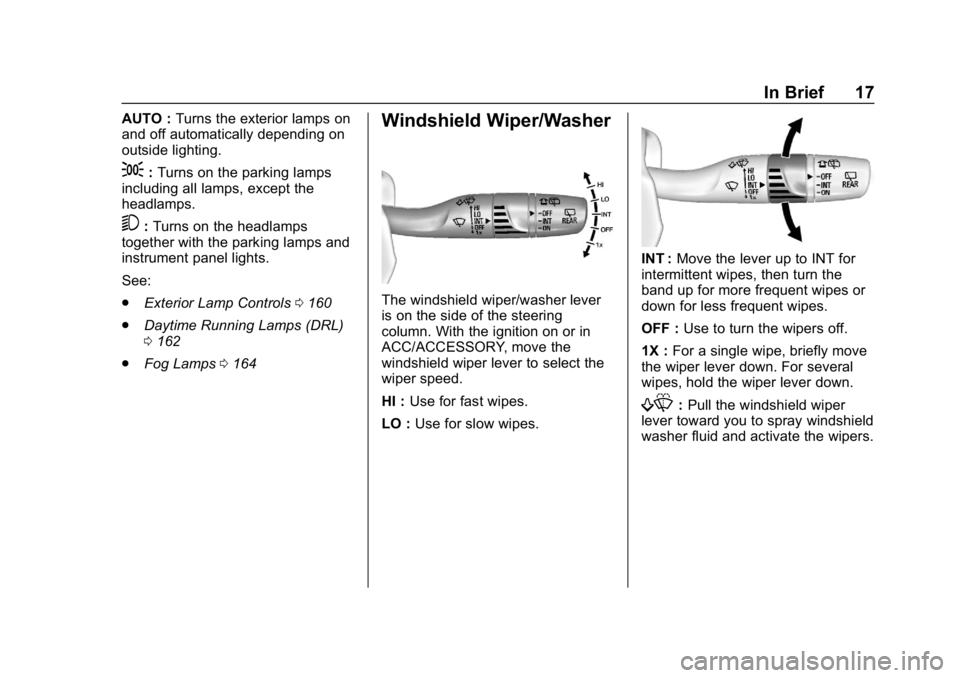
Windshield Wiper/Washer
The windshield wiper/washer lever
is on the side of the steering
column. With the ignition on or in
ACC/ACCESSORY, move the
windshield wiper lever to select the
wiper speed.
HI : Use for fast wipes.
LO : Use for slow wipes.
INT : Move the lever up to INT for
intermittent wipes, then turn the
band up for more frequent wipes or
down for less frequent wipes.
OFF : Use to turn the wipers off.
1X : For a single wipe, briefly move
the wiper lever down. For several
wipes, hold the wiper lever down.
f: Pull the windshield wiper
lever toward you to spray windshield
washer fluid and activate the wipers.
Page 37 of 426
Chevrolet Equinox Owner Manual (GMNA-Localizing-U.S./Canada/Mexico-
12145779) - 2019 - CRC - 7/30/18
36 Keys, Doors, and Windows
Caution
When replacing the battery, do
not touch any of the circuitry on
the transmitter. Static from your
body could damage the
transmitter.
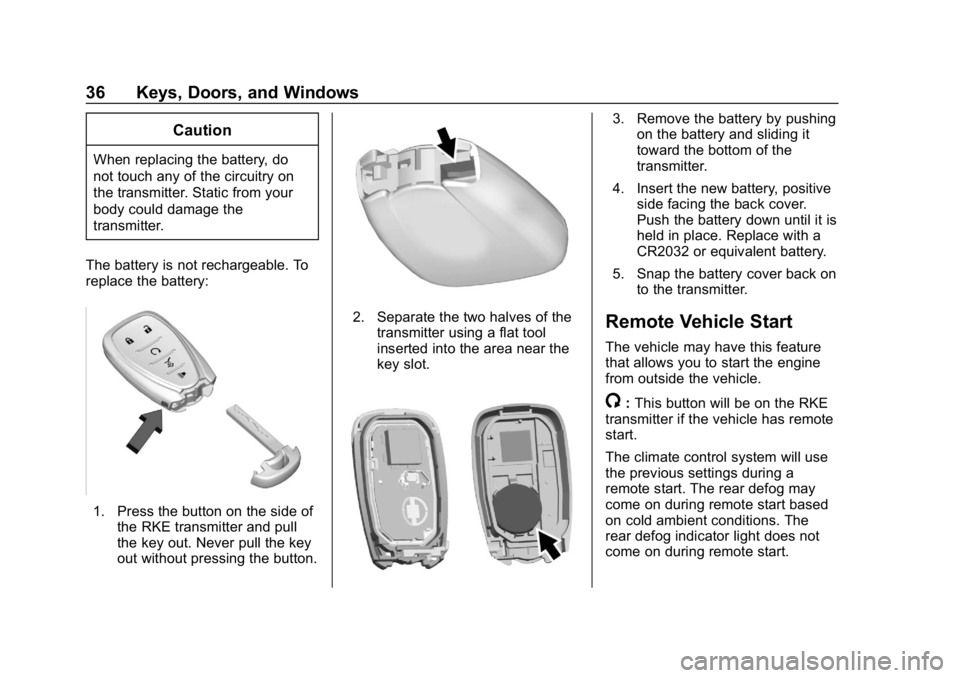
The battery is not rechargeable. To
replace the battery:
1. Press the button on the side of the RKE transmitter and pull
the key out. Never pull the key
out without pressing the button.
2. Separate the two halves of thetransmitter using a flat tool
inserted into the area near the
key slot.
3. Remove the battery by pushingon the battery and sliding it
toward the bottom of the
transmitter.
4. Insert the new battery, positive side facing the back cover.
Push the battery down until it is
held in place. Replace with a
CR2032 or equivalent battery.
5. Snap the battery cover back on to the transmitter.
Remote Vehicle Start
The vehicle may have this feature
that allows you to start the engine
from outside the vehicle.
/:This button will be on the RKE
transmitter if the vehicle has remote
start.
The climate control system will use
the previous settings during a
remote start. The rear defog may
come on during remote start based
on cold ambient conditions. The
rear defog indicator light does not
come on during remote start.
Page 51 of 426
Chevrolet Equinox Owner Manual (GMNA-Localizing-U.S./Canada/Mexico-
12145779) - 2019 - CRC - 7/30/18
50 Keys, Doors, and Windows
Exterior Mirrors
Convex Mirrors
{Warning
A convex mirror can make things,
like other vehicles, look farther
away than they really are. If you
cut too sharply into the right lane,
you could hit a vehicle on the
right. Check the inside mirror or
glance over your shoulder before
changing lanes.
The passenger side mirror is convex
shaped. A convex mirror's surface is
curved so more can be seen from
the driver seat.
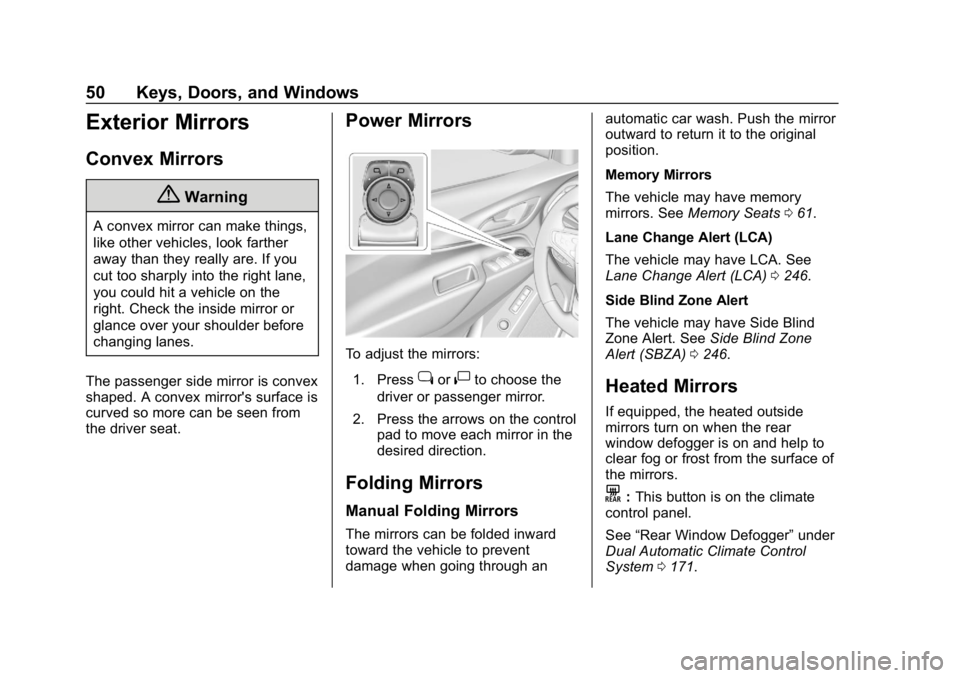
Power Mirrors
To adjust the mirrors: 1. Press
jor|to choose the
driver or passenger mirror.
2. Press the arrows on the control pad to move each mirror in the
desired direction.
Folding Mirrors
Manual Folding Mirrors
The mirrors can be folded inward
toward the vehicle to prevent
damage when going through an automatic car wash. Push the mirror
outward to return it to the original
position.
Memory Mirrors
The vehicle may have memory
mirrors. See
Memory Seats 061.
Lane Change Alert (LCA)
The vehicle may have LCA. See
Lane Change Alert (LCA) 0246.
Side Blind Zone Alert
The vehicle may have Side Blind
Zone Alert. See Side Blind Zone
Alert (SBZA) 0246.
Heated Mirrors
If equipped, the heated outside
mirrors turn on when the rear
window defogger is on and help to
clear fog or frost from the surface of
the mirrors.
K:This button is on the climate
control panel.
See “Rear Window Defogger” under
Dual Automatic Climate Control
System 0171.
Page 52 of 426
Chevrolet Equinox Owner Manual (GMNA-Localizing-U.S./Canada/Mexico-
12145779) - 2019 - CRC - 7/30/18
Keys, Doors, and Windows 51
Automatic Dimming
Mirror
The vehicle has an automatic
dimming outside mirror on the driver
side. The mirror will adjust for the
glare of headlamps behind you.
Reverse Tilt Mirrors
If equipped with memory seats, the
passenger and/or driver mirror tilts
to a preselected position when the
vehicle is in R (Reverse). This
allows the curb to be seen when
parallel parking.
The mirror(s) return to the original
position when:
.The vehicle is shifted out of
R (Reverse), or remains in
R (Reverse) for about
30 seconds.
. The ignition is turned off.
. The vehicle is driven in
R (Reverse) above a set speed.
To turn this feature on or off, see
Vehicle Personalization 0151.
Interior Mirrors
Interior Rearview Mirrors
Adjust the rearview mirror for a clear
view of the area behind the vehicle.
Do not spray glass cleaner directly
on the mirror. Use a soft towel
dampened with water.
Manual Rearview Mirror
If equipped, push the tab forward for
daytime use and pull it rearward for
nighttime use to avoid glare of the
headlamps from behind.
Automatic Dimming
Rearview Mirror
If equipped, automatic dimming
reduces the glare of headlamps
from behind. The dimming feature
comes on when the vehicle is
started.
Windows
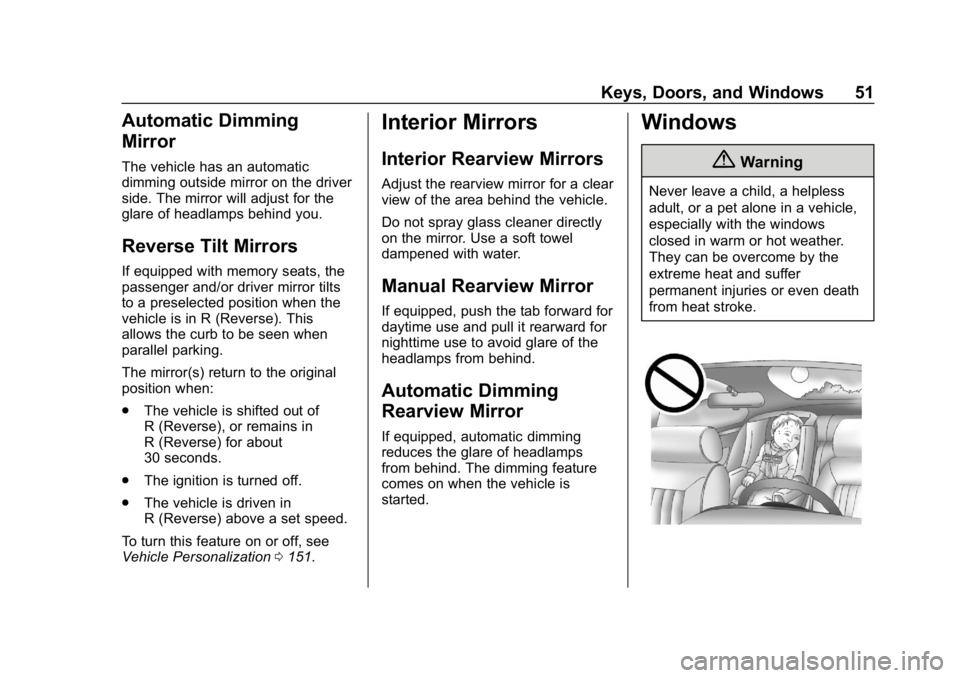
{Warning
Never leave a child, a helpless
adult, or a pet alone in a vehicle,
especially with the windows
closed in warm or hot weather.
They can be overcome by the
extreme heat and suffer
permanent injuries or even death
from heat stroke.
Page 67 of 426
Chevrolet Equinox Owner Manual (GMNA-Localizing-U.S./Canada/Mexico-
12145779) - 2019 - CRC - 7/30/18
66 Seats and Restraints
the vehicle through the rear door
and left the vehicle without the
vehicle being shut off.
The feature can be turned on or off.
SeeVehicle Personalization 0151.
Reclining the Seatback
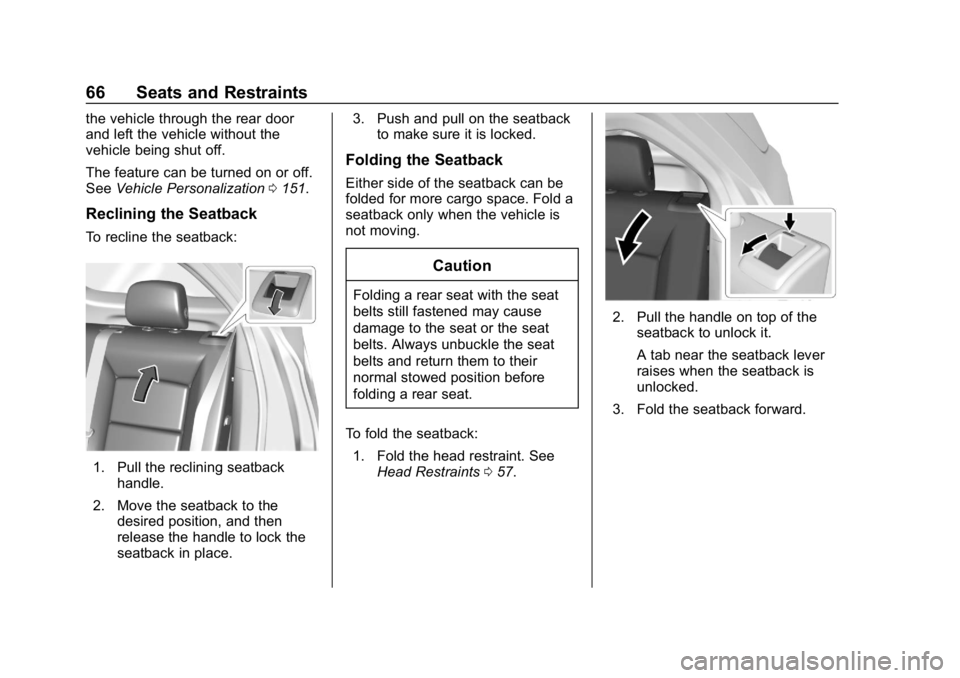
To recline the seatback:
1. Pull the reclining seatback
handle.
2. Move the seatback to the desired position, and then
release the handle to lock the
seatback in place. 3. Push and pull on the seatback
to make sure it is locked.
Folding the Seatback
Either side of the seatback can be
folded for more cargo space. Fold a
seatback only when the vehicle is
not moving.
Caution
Folding a rear seat with the seat
belts still fastened may cause
damage to the seat or the seat
belts. Always unbuckle the seat
belts and return them to their
normal stowed position before
folding a rear seat.
To fold the seatback: 1. Fold the head restraint. See Head Restraints 057.
2. Pull the handle on top of the
seatback to unlock it.
A tab near the seatback lever
raises when the seatback is
unlocked.
3. Fold the seatback forward.
Page 68 of 426
Chevrolet Equinox Owner Manual (GMNA-Localizing-U.S./Canada/Mexico-
12145779) - 2019 - CRC - 7/30/18
Seats and Restraints 67
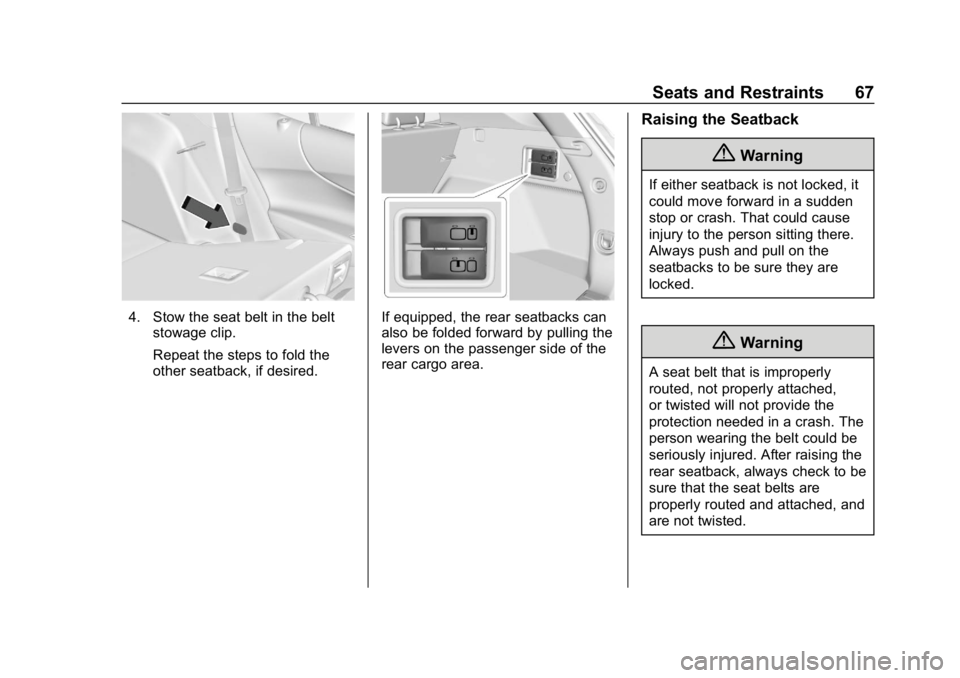
4. Stow the seat belt in the beltstowage clip.
Repeat the steps to fold the
other seatback, if desired.If equipped, the rear seatbacks can
also be folded forward by pulling the
levers on the passenger side of the
rear cargo area.
Raising the Seatback
{Warning
If either seatback is not locked, it
could move forward in a sudden
stop or crash. That could cause
injury to the person sitting there.
Always push and pull on the
seatbacks to be sure they are
locked.
{Warning
A seat belt that is improperly
routed, not properly attached,
or twisted will not provide the
protection needed in a crash. The
person wearing the belt could be
seriously injured. After raising the
rear seatback, always check to be
sure that the seat belts are
properly routed and attached, and
are not twisted.
Page 69 of 426
Chevrolet Equinox Owner Manual (GMNA-Localizing-U.S./Canada/Mexico-
12145779) - 2019 - CRC - 7/30/18
68 Seats and Restraints
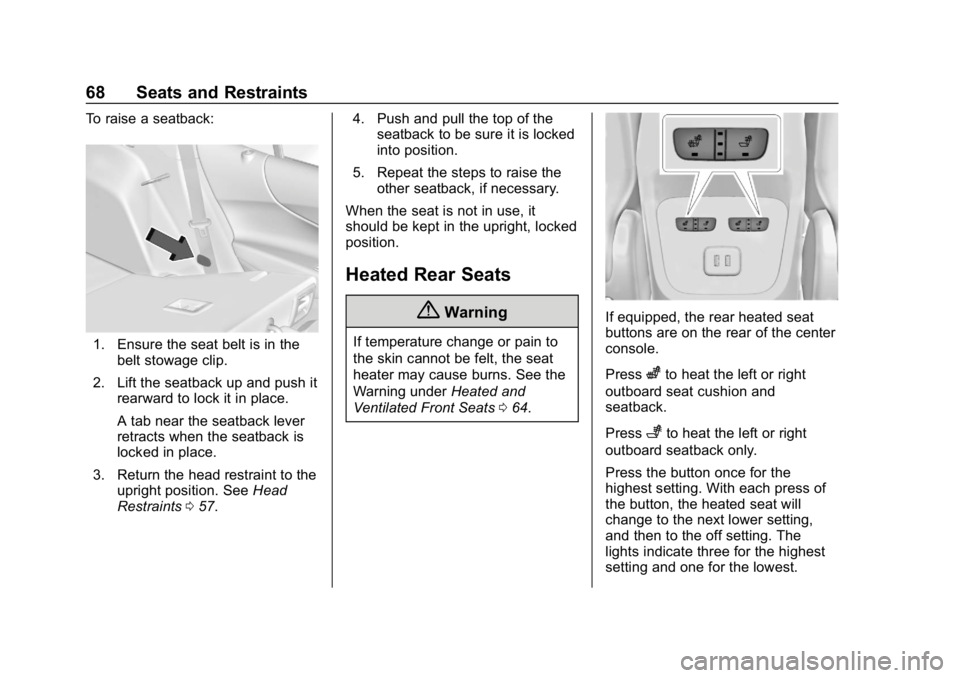
To raise a seatback:
1. Ensure the seat belt is in thebelt stowage clip.
2. Lift the seatback up and push it rearward to lock it in place.
A tab near the seatback lever
retracts when the seatback is
locked in place.
3. Return the head restraint to the upright position. See Head
Restraints 057. 4. Push and pull the top of the
seatback to be sure it is locked
into position.
5. Repeat the steps to raise the other seatback, if necessary.
When the seat is not in use, it
should be kept in the upright, locked
position.
Heated Rear Seats
{Warning
If temperature change or pain to
the skin cannot be felt, the seat
heater may cause burns. See the
Warning under Heated and
Ventilated Front Seats 064.
If equipped, the rear heated seat
buttons are on the rear of the center
console.
Press
zto heat the left or right
outboard seat cushion and
seatback.
Press
+to heat the left or right
outboard seatback only.
Press the button once for the
highest setting. With each press of
the button, the heated seat will
change to the next lower setting,
and then to the off setting. The
lights indicate three for the highest
setting and one for the lowest.