Page 267 of 426

Chevrolet Equinox Owner Manual (GMNA-Localizing-U.S./Canada/Mexico-
12145779) - 2019 - CRC - 7/30/18
266 Driving and Operating
{Warning
To prevent serious injury or death
from carbon monoxide (CO),
when towing a trailer:. Do not drive with the
liftgate, trunk/hatch,
or rear-most window open.
. Fully open the air outlets on
or under the instrument
panel.
. Adjust the climate control
system to a setting that
brings in only outside air.
See “Climate Control
Systems” in the Index.
For more information about
carbon monoxide, see Engine
Exhaust 0203.
Towing a trailer requires experience.
The combination of the vehicle and
trailer is longer and not as
responsive as the vehicle itself. Get
used to the handling and braking of the combination by driving on a
level road surface before driving on
public roads.
The trailer structure, the tires, and
the brakes must be all be rated to
carry the intended cargo.
Inadequate trailer equipment can
cause the combination to operate in
an unexpected or unsafe manner.
Before driving, inspect all trailer
hitch parts and attachments, safety
chains, electrical connectors, lamps,
tires, and mirrors. See
Towing
Equipment 0271. If the trailer has
electric brakes, start the
combination moving and then
manually apply the trailer brake
controller to check that the trailer
brakes work. During the trip,
occasionally check that the cargo
and trailer are secure and that the
lamps and any trailer brakes are
working.
Towing with a Stability Control
System
When towing, the stability control
system might be heard. The system
reacts to vehicle movement caused by the trailer, which mainly occurs
during cornering. This is normal
when towing heavier trailers.
Following Distance
Stay at least twice as far behind the
vehicle ahead as you would when
driving without a trailer. This can
help to avoid heavy braking and
sudden turns.
Passing
More passing distance is needed
when towing a trailer. The
combination of the vehicle and
trailer will not accelerate as quickly
and is much longer than the vehicle
alone. It is necessary to go much
farther beyond the passed vehicle
before returning to the lane. Pass
on level roadways. Avoid passing
on hills if possible.
Backing Up
Hold the bottom of the steering
wheel with one hand. To move the
trailer to the left, move that hand to
the left. To move the trailer to the
right, move that hand to the right.
Page 304 of 426

Chevrolet Equinox Owner Manual (GMNA-Localizing-U.S./Canada/Mexico-
12145779) - 2019 - CRC - 7/30/18
Vehicle Care 303
Rear Wiper Blade Replacement
The rear wiper blade and wiper arm
have a cover for protection.
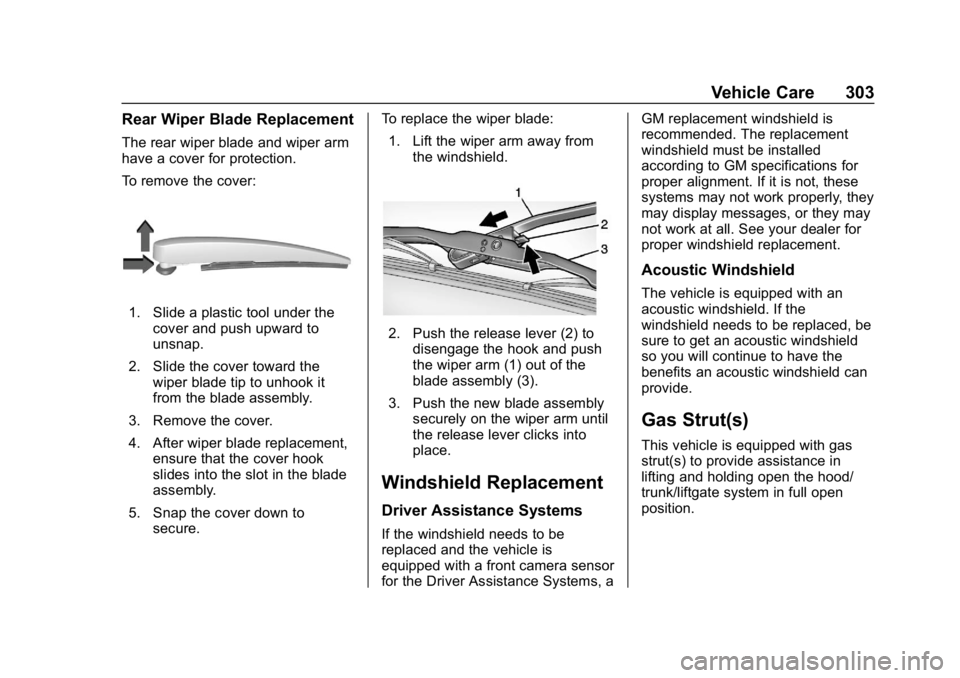
To remove the cover:
1. Slide a plastic tool under thecover and push upward to
unsnap.
2. Slide the cover toward the wiper blade tip to unhook it
from the blade assembly.
3. Remove the cover.
4. After wiper blade replacement, ensure that the cover hook
slides into the slot in the blade
assembly.
5. Snap the cover down to secure. To replace the wiper blade:
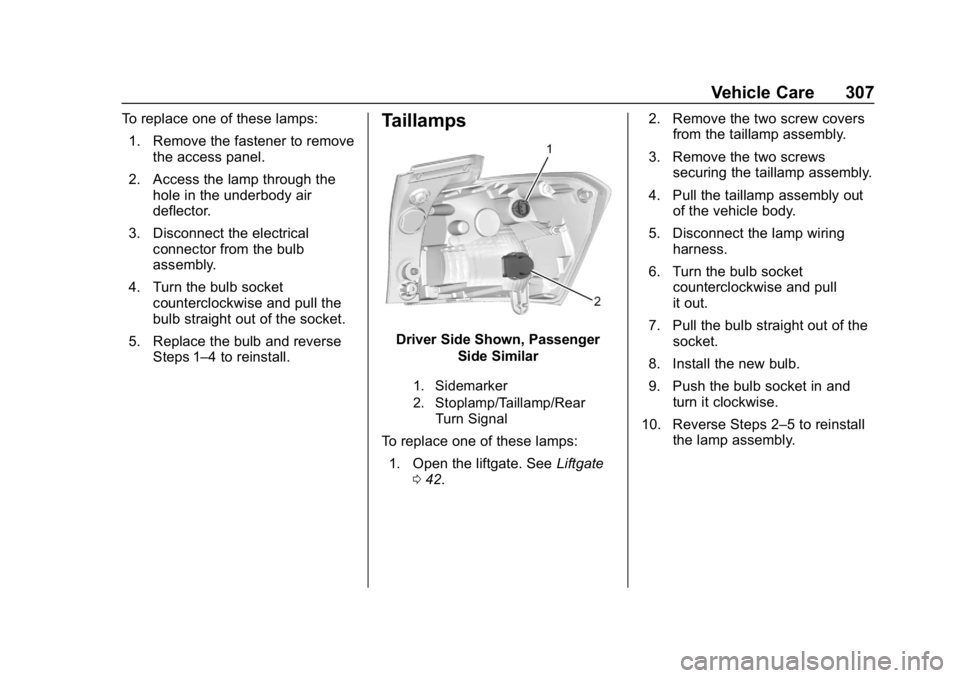
1. Lift the wiper arm away from the windshield.
2. Push the release lever (2) todisengage the hook and push
the wiper arm (1) out of the
blade assembly (3).
3. Push the new blade assembly securely on the wiper arm until
the release lever clicks into
place.
Windshield Replacement
Driver Assistance Systems
If the windshield needs to be
replaced and the vehicle is
equipped with a front camera sensor
for the Driver Assistance Systems, a GM replacement windshield is
recommended. The replacement
windshield must be installed
according to GM specifications for
proper alignment. If it is not, these
systems may not work properly, they
may display messages, or they may
not work at all. See your dealer for
proper windshield replacement.
Acoustic Windshield
The vehicle is equipped with an
acoustic windshield. If the
windshield needs to be replaced, be
sure to get an acoustic windshield
so you will continue to have the
benefits an acoustic windshield can
provide.
Gas Strut(s)
This vehicle is equipped with gas
strut(s) to provide assistance in
lifting and holding open the hood/
trunk/liftgate system in full open
position.
Page 305 of 426
Chevrolet Equinox Owner Manual (GMNA-Localizing-U.S./Canada/Mexico-
12145779) - 2019 - CRC - 7/30/18
304 Vehicle Care
{Warning
If the gas struts that hold open
the hood, trunk, and/or liftgate fail,
you or others could be seriously
injured. Take the vehicle to your
dealer for service immediately.
Visually inspect the gas struts for
signs of wear, cracks, or other
damage periodically. Check to
make sure the hood/trunk/liftgate
is held open with enough force.
If struts are failing to hold the
hood/trunk/liftgate, do not
operate. Have the vehicle
serviced.
Caution
Do not apply tape or hang any
objects from gas struts. Also do
not push down or pull on gas
struts. This may cause damage to
the vehicle.
See Maintenance Schedule 0370.
Hood
Trunk
Liftgate
Page 308 of 426

Chevrolet Equinox Owner Manual (GMNA-Localizing-U.S./Canada/Mexico-
12145779) - 2019 - CRC - 7/30/18
Vehicle Care 307
To replace one of these lamps:1. Remove the fastener to remove the access panel.
2. Access the lamp through the hole in the underbody air
deflector.
3. Disconnect the electrical connector from the bulb
assembly.
4. Turn the bulb socket counterclockwise and pull the
bulb straight out of the socket.
5. Replace the bulb and reverse Steps 1–4 to reinstall.Taillamps
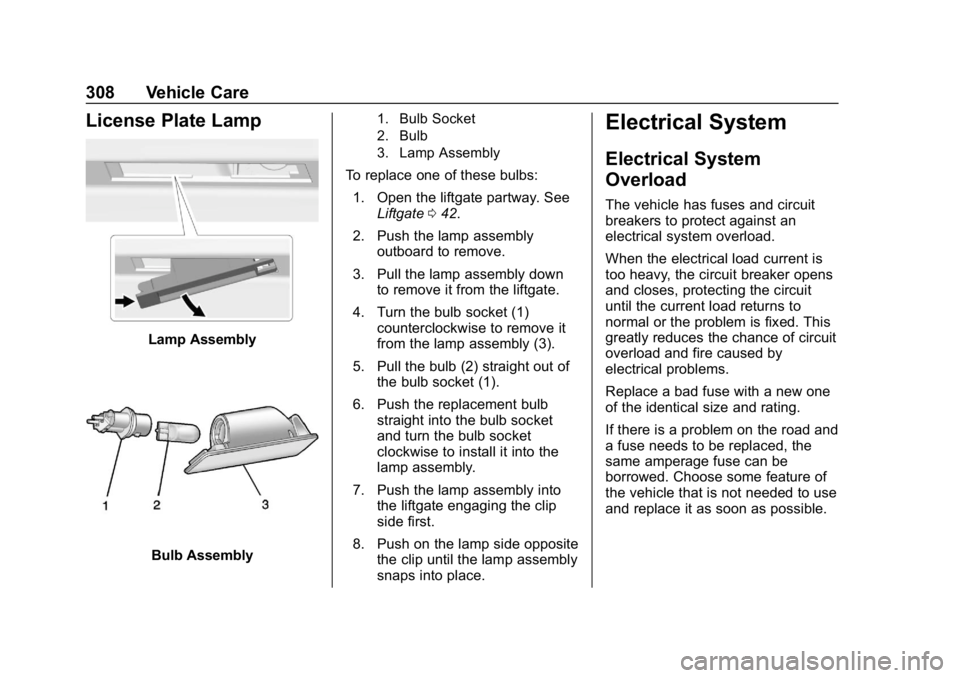
Driver Side Shown, Passenger
Side Similar
1. Sidemarker
2. Stoplamp/Taillamp/RearTurn Signal
To replace one of these lamps:
1. Open the liftgate. See Liftgate
0 42. 2. Remove the two screw covers
from the taillamp assembly.
3. Remove the two screws securing the taillamp assembly.
4. Pull the taillamp assembly out of the vehicle body.
5. Disconnect the lamp wiring harness.
6. Turn the bulb socket counterclockwise and pull
it out.
7. Pull the bulb straight out of the socket.
8. Install the new bulb.
9. Push the bulb socket in and turn it clockwise.
10. Reverse Steps 2–5 to reinstall the lamp assembly.
Page 309 of 426

Chevrolet Equinox Owner Manual (GMNA-Localizing-U.S./Canada/Mexico-
12145779) - 2019 - CRC - 7/30/18
308 Vehicle Care
License Plate Lamp
Lamp Assembly
Bulb Assembly
1. Bulb Socket
2. Bulb
3. Lamp Assembly
To replace one of these bulbs:1. Open the liftgate partway. See Liftgate 042.
2. Push the lamp assembly outboard to remove.
3. Pull the lamp assembly down to remove it from the liftgate.
4. Turn the bulb socket (1) counterclockwise to remove it
from the lamp assembly (3).
5. Pull the bulb (2) straight out of the bulb socket (1).
6. Push the replacement bulb straight into the bulb socket
and turn the bulb socket
clockwise to install it into the
lamp assembly.
7. Push the lamp assembly into the liftgate engaging the clip
side first.
8. Push on the lamp side opposite the clip until the lamp assembly
snaps into place.
Electrical System
Electrical System
Overload
The vehicle has fuses and circuit
breakers to protect against an
electrical system overload.
When the electrical load current is
too heavy, the circuit breaker opens
and closes, protecting the circuit
until the current load returns to
normal or the problem is fixed. This
greatly reduces the chance of circuit
overload and fire caused by
electrical problems.
Replace a bad fuse with a new one
of the identical size and rating.
If there is a problem on the road and
a fuse needs to be replaced, the
same amperage fuse can be
borrowed. Choose some feature of
the vehicle that is not needed to use
and replace it as soon as possible.
Page 315 of 426
Chevrolet Equinox Owner Manual (GMNA-Localizing-U.S./Canada/Mexico-
12145779) - 2019 - CRC - 7/30/18
314 Vehicle Care
FusesUsage
F18 Body control module 7
F19 Exterior mirror
F20 Body control module 1
F21 Body control module 4
F22 Body control module 6
F23 Electric steering column lock
F24 Sensing and diagnostic module
F25 Occupancy sensor
F26 –
F27 Power seats
F28 Rear windows
F29 –
F30 Front heated seats switch
F31 Steering wheel controls Fuses
Usage
F32 Body control module 8
F33 Heating, ventilation, and air conditioning
F34 Passive entry, passive start
F35 Liftgate latch
F36 Wireless charger module/USB
accessory
F37 Cigarette lighter
F38 OnStar
F39 Instrument panel USB
F40 Camera module/ Liftgate module
F41 Park assist module
F42 Radio
Relays Usage
K01 Deadbolt
K02 Retained accessory power Relays
Usage
K03 Liftgate
K04 –
K05 Logistics
Circuit
Breakers Usage
CB1 –
CB2 Auxiliary power outlet console
Rear Compartment Fuse
Block
Page 316 of 426
Chevrolet Equinox Owner Manual (GMNA-Localizing-U.S./Canada/Mexico-
12145779) - 2019 - CRC - 7/30/18
Vehicle Care 315
The rear compartment fuse block is
behind a trim panel on the side of
the rear compartment.
Remove the trim plate to access the
fuse block.
The vehicle may not be equipped
with all of the fuses and relays
shown.
FusesUsage
F1 Exhaust fuel heater/Selective
catalytic reduction
power module
(diesel only)
F2 Liftgate
F3 Trailer auxiliary power
F4 Passenger power seat
F5 Memory seat module
F6 Sunroof
F7 Side blind zone alert
F8 Trailer reverse lamps
F9 Rear heated seat 1
F10 Park lamps F11 Rear heated seat 2
F12 –
F13 Trailer parking lamp
Page 346 of 426

Chevrolet Equinox Owner Manual (GMNA-Localizing-U.S./Canada/Mexico-
12145779) - 2019 - CRC - 7/30/18
Vehicle Care 345
12. Turn the air only hose (10)counterclockwise to remove it
from the tire valve stem.
13. Replace the tire valve stem cap.
14. Return the air only hose (10) and power plug (9) back to
their original storage location.
15. Return the equipment to its original storage location in the
vehicle.
The tire sealant and compressor kit
has accessory adapters located in a
compartment on the bottom of its
housing that can be used to inflate
air mattresses, balls, etc.
Storing the Tire Sealant
and Compressor Kit
The tire sealant and compressor kit
is in a bag in the rear compartment
storage area. 1. Open the liftgate. See Liftgate
0 42.
2. Fold the rear part of the load floor to the front.
3. Turn the retainer nutcounterclockwise to remove the
tire sealant and compressor
kit bag.
4. Remove the tire sealant and compressor kit from the bag.
To store the tire sealant and
compressor kit, reverse the steps.
Tire Changing
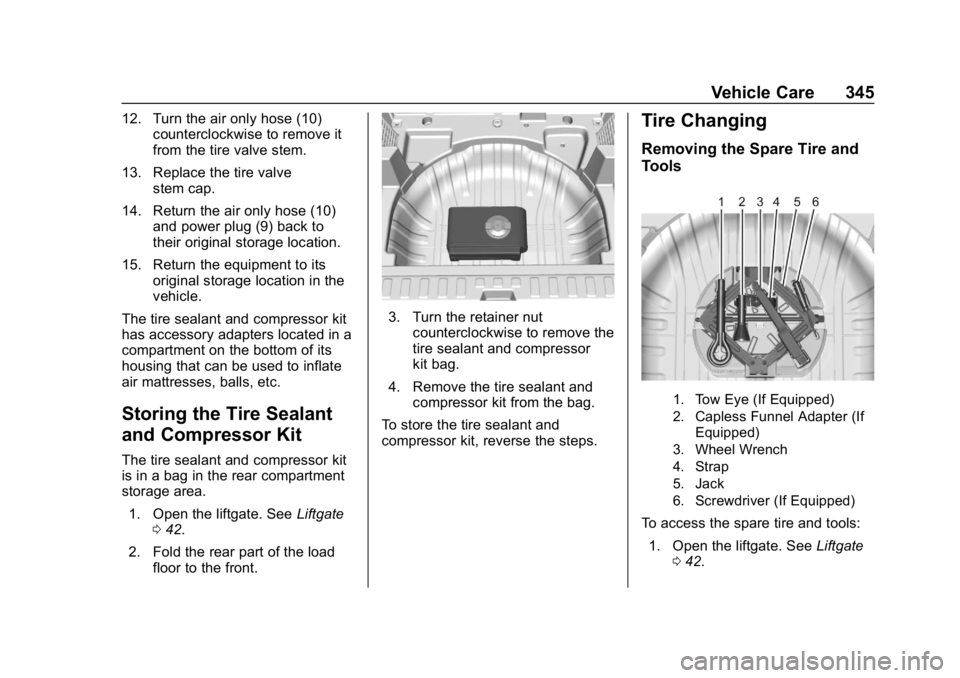
Removing the Spare Tire and
Tools
1. Tow Eye (If Equipped)
2. Capless Funnel Adapter (If Equipped)
3. Wheel Wrench
4. Strap
5. Jack
6. Screwdriver (If Equipped)
To access the spare tire and tools:
1. Open the liftgate. See Liftgate
0 42.