2019 CHEVROLET EQUINOX display
[x] Cancel search: displayPage 34 of 426

Chevrolet Equinox Owner Manual (GMNA-Localizing-U.S./Canada/Mexico-
12145779) - 2019 - CRC - 7/30/18
Keys, Doors, and Windows 33
transmitter inside the vehicle. Do
not leave the RKE transmitter in an
unattended vehicle.
To customize the doors to
automatically lock when exiting the
vehicle, see“Remote Lock, Unlock,
Start” under Vehicle Personalization
0 151.
Temporary Disable of Passive
Locking
Temporarily disable passive locking
by pressing and holding
Kon the
interior door switch with a door open
for at least four seconds, or until
three chimes are heard. Passive
locking will then remain disabled
until
Qon the interior door is
pressed, or until the vehicle is
turned on.
Remote Left in Vehicle Alert
When the vehicle is turned off and
an RKE transmitter is left in the
vehicle, the horn will chirp three
times after all doors are closed. To
turn on or off, see Vehicle
Personalization 0151. Remote No Longer in Vehicle Alert
If the vehicle is on with a door open,
and then all doors are closed, the
vehicle will check for RKE
transmitters inside. If an RKE
transmitter is not detected, the
Driver Information Center (DIC) will
display NO REMOTE DETECTED
and the horn will chirp three times.
This occurs only once each time the
vehicle is driven.
To turn on or off see
Vehicle
Personalization 0151
Keyless Liftgate Opening
When the doors are locked, press
the touch pad on the liftgate handle
to open the liftgate if the RKE
transmitter is within 1 m (3 ft).
Key Access
To access a vehicle with a dead
transmitter battery, see Door Locks
0 38.
Programming Transmitters to
the Vehicle
Only RKE transmitters programmed
to the vehicle will work. If a
transmitter is lost or stolen, a
replacement can be purchased and
programmed through your dealer.
The vehicle can be reprogrammed
so that lost or stolen transmitters no
longer work. Each vehicle can have
up to eight transmitters matched
to it.
Programming with Recognized
Transmitters
A new transmitter can be
programmed to the vehicle when
there are two recognized
transmitters.
To program, the vehicle must be off
and all of the transmitters, both
currently recognized and new, must
be with you.
1. Remove the key lock cylinder cap on the driver door handle.
See Door Locks 038. Place
the two recognized transmitters
in the cupholder.
Page 35 of 426

Chevrolet Equinox Owner Manual (GMNA-Localizing-U.S./Canada/Mexico-
12145779) - 2019 - CRC - 7/30/18
34 Keys, Doors, and Windows
2. Insert the vehicle key of thetransmitter into the key lock
cylinder on the driver door
handle and turn the key,
counterclockwise, to the unlock
position five times within
10 seconds.
The DIC displays READY FOR
REMOTE #2, 3, 4, ETC.
3. Place the new transmitter into
the cupholder.
4. Press ENGINE START/STOP. When the transmitter is learned
the DIC display will show that it
is ready to program the next
transmitter. 5. Remove the transmitter from
the cupholder and press
Kor
Qon the transmitter.
To program additional
transmitters, repeat Steps 3–5.
When all additional transmitters
are programmed, press and
hold ENGINE START/STOP for
12 seconds to exit
programming mode.
6. Put the key back into the transmitter.
7. Replace the key lock cylinder cap. See Door Locks 038.
Programming without Recognized
Transmitters
If two currently recognized
transmitters are not available, follow
this procedure to program up to
eight transmitters. This feature is
not available in Canada. This
procedure will take approximately
30 minutes to complete. The vehicle
must be off and all of the
transmitters you wish to program
must be with you. 1. Remove the key lock cylinder
cap on the driver door handle.
See Door Locks 038. Insert
the vehicle key of the
transmitter into the key lock
cylinder on the driver door
handle and turn the key,
counterclockwise, to the unlock
position five times within
10 seconds.
The DIC displays REMOTE
LEARN PENDING,
PLEASE WAIT.
2. Wait for 10 minutes until the DIC displays PRESS ENGINE
START BUTTON TO LEARN
and then press ENGINE
START/STOP.
The DIC display will again
show REMOTE LEARN
PENDING, PLEASE WAIT.
3. Repeat Step 2 two additional times. After the third time all
previously known transmitters
will no longer work with the
vehicle. Remaining transmitters
can be relearned during the
next steps.
Page 36 of 426

Chevrolet Equinox Owner Manual (GMNA-Localizing-U.S./Canada/Mexico-
12145779) - 2019 - CRC - 7/30/18
Keys, Doors, and Windows 35
The DIC display should now
show READY FOR REMOTE
# 1.
4. Place the new transmitter intothe cupholder.
5. Press ENGINE START/STOP. When the transmitter is learned
the DIC display will show that it
is ready to program the next
transmitter. 6. Remove the transmitter from
the cupholder and press
Kor
Qon the transmitter.
To program additional
transmitters, repeat Steps 4–6.
When all additional transmitters
are programmed, press and
hold ENGINE START/STOP for
12 seconds to exit
programming mode.
7. Put the key back into the transmitter.
8. Replace the key lock cylinder cap. See Door Locks 038.
Starting the Vehicle with a Low
Transmitter Battery
When the vehicle is started, if the
transmitter battery is weak, the DIC
may display NO REMOTE
DETECTED or NO REMOTE KEY
WAS DETECTED PLACE KEY IN
TRANSMITTER POCKET THEN
START YOUR VEHICLE. The DIC
may also display REPLACE
BATTERY IN REMOTE KEY. To start the vehicle:
1. Place the transmitter in the
cupholder.
2. With the vehicle in P (Park) or N (Neutral), press the brake
pedal and ENGINE
START/STOP.
Replace the transmitter battery
as soon as possible.
Battery Replacement
Replace the battery if the DIC
displays REPLACE BATTERY IN
REMOTE KEY.
Page 63 of 426
Chevrolet Equinox Owner Manual (GMNA-Localizing-U.S./Canada/Mexico-
12145779) - 2019 - CRC - 7/30/18
62 Seats and Restraints
Then immediately press and hold 1,
2, or
B(Exit) until two beeps
sound. To manually recall these
positions, press and hold 1, 2, or
B
until the saved position is reached.
Follow the instructions under
“Saving Memory Positions.”
The vehicle identifies the current
driver ’s RKE transmitter number
(1–8). See Remote Keyless Entry
(RKE) System Operation 030. Only
RKE transmitters 1 and 2 can be
used for automatic memory recalls.
A Driver Information Center (DIC)
welcome message indicating the
transmitter number may display for
the first few ignition cycles following
a transmitter change. For Seat Entry
Memory to work properly, save the
positions to the memory button (1 or
2) matching the RKE transmitter
number displayed in the DIC
welcome message. Carry the linked
RKE transmitter when entering the
vehicle. Memory adjustments may not be
available upon delivery or after
service until steps in
“Saving
Memory Positions” section are
performed.
Vehicle Personalization Settings
. To have the Seat Entry Memory
movement begin when the
vehicle is started, select the
Settings menu, then Vehicle,
then Seating Position, and then
Seat Entry Memory. Select On or
Off. See “Seat Entry Memory”
later in this section.
. Seat Exit Memory movement
begins when the ignition is
turned off and the driver door is
opened, or when the ignition is
turned off with the driver door
already opened, select the
Settings menu, then Vehicle,
then Seating Position, and then
Seat Exit Memory. Select On or
Off. See “Seat Exit Memory”
later in this section.
. See Vehicle Personalization
0 151 for additional setting
information. Identifying Driver Number
To identify the driver number:
1. Start the vehicle with a different key or RKE transmitter. The
DIC should display the driver
number; 1 or 2. Turn the
ignition off and remove the key
or RKE transmitter from the
vehicle.
2. Start the vehicle with the initial key or RKE transmitter. The
DIC should display the other
driver number not shown in
Step 1.
Saving Memory Positions
Read these instructions completely
before saving memory positions.
To save preferred driving positions
1 and 2: 1. Turn the ignition on or to ACC/ ACCESSORY.
A DIC welcome message may
indicate driver number 1 or 2.
2. Adjust all available memory features to the desired driving
position.
Page 66 of 426
Chevrolet Equinox Owner Manual (GMNA-Localizing-U.S./Canada/Mexico-
12145779) - 2019 - CRC - 7/30/18
Seats and Restraints 65
Press the button once for the
highest setting. With each press of
the button, the heated seat will
change to the next lower setting,
and then to the off setting. The
lights indicate three for the highest
setting and one for the lowest.
The passenger seat may take
longer to heat up.
Press
{orCto ventilate the driver
or passenger seat. A ventilated seat
has a fan that pulls air through the
seat cushion and seatback. The air
is not cooled.
Press the button once for the
highest setting. With each press of
the button, the ventilated seat will
change to the next lower setting,
and then to the off setting. The
lights indicate three for the highest
setting and one for the lowest. Remote Start Heated and
Ventilated Seats
During a remote start, the heated or
ventilated seats, if equipped, can be
turned on automatically. When it is
cold outside, the heated seats turn
on, and when it is hot outside the
ventilated seats turn on. The heated
or ventilated seats are canceled
when the ignition is turned on. Press
the heated or ventilated seat button
to use the heated or ventilated seats
after the vehicle is started.
The heated or ventilated seat
indicator lights do not turn on during
a remote start.
The temperature performance of an
unoccupied seat may be reduced.
This is normal.
The remote start heated or
ventilated seats may be enabled or
disabled in the vehicle
personalization menu. See
Remote
Vehicle Start 036 and Vehicle
Personalization 0151.
Rear Seats
Rear Seat Reminder
If equipped, the message REAR
SEAT REMINDER LOOK IN REAR
SEAT displays under certain
conditions indicating there may be
an item or passenger in the rear
seat. Check before exiting the
vehicle.
This feature will activate when a
second row door is opened while
the vehicle is on or up to 10 minutes
before the vehicle is turned on.
There will be an alert when the
vehicle is turned off. The alert does
not directly detect objects in the rear
seat; instead, under certain
conditions, it detects when a rear
door is opened and closed,
indicating that there may be
something in the rear seat.
The feature is active only once each
time the vehicle is turned on and off,
and will require reactivation by
opening and closing the second row
doors. There may be an alert even
when there is nothing in the rear
seat; for example, if a child entered
Page 112 of 426
Chevrolet Equinox Owner Manual (GMNA-Localizing-U.S./Canada/Mexico-
12145779) - 2019 - CRC - 7/30/18
Instruments and Controls 111
Instruments and
Controls
Controls
Steering Wheel Adjustment . . . 112
Steering Wheel Controls . . . . . . 112
Heated Steering Wheel . . . . . . . 112
Horn . . . . . . . . . . . . . . . . . . . . . . . . . . 112
Windshield Wiper/Washer . . . . 112
Rear Window Wiper/Washer . . . . . . . . . . . . . . . . . . . . . . 113
Compass . . . . . . . . . . . . . . . . . . . . . 114
Clock . . . . . . . . . . . . . . . . . . . . . . . . . 114
Power Outlets . . . . . . . . . . . . . . . . 115
Wireless Charging . . . . . . . . . . . . 116
Warning Lights, Gauges, and
Indicators
Warning Lights, Gauges, and Indicators . . . . . . . . . . . . . . . . . . . 119
Instrument Cluster (Base and
Midlevel) . . . . . . . . . . . . . . . . . . . . 120
Instrument Cluster (Uplevel) . . . . . . . . . . . . . . . . . . . . 124
Speedometer . . . . . . . . . . . . . . . . . 127
Odometer . . . . . . . . . . . . . . . . . . . . . 127
Trip Odometer . . . . . . . . . . . . . . . . 127
Tachometer . . . . . . . . . . . . . . . . . . . 127 Fuel Gauge . . . . . . . . . . . . . . . . . . . 128
Engine Coolant Temperature
Gauge . . . . . . . . . . . . . . . . . . . . . . 129
Seat Belt Reminders . . . . . . . . . 129
Airbag Readiness Light . . . . . . . 130
Passenger Airbag Status Indicator . . . . . . . . . . . . . . . . . . . . 130
Charging System Light . . . . . . . 131
Malfunction Indicator Lamp (Check Engine Light) . . . . . . . . 132
Brake System Warning Light . . . . . . . . . . . . . . . . . . . . . . . . 134
Electric Parking Brake Light . . . . . . . . . . . . . . . . . . . . . . . . 134
Service Electric Parking Brake Light . . . . . . . . . . . . . . . . . . . . . . . . 135
Antilock Brake System (ABS) Warning Light . . . . . . . . . . . . . . . 135
Tow/Haul Mode Light . . . . . . . . . 135
Lane Keep Assist (LKA) Light . . . . . . . . . . . . . . . . . . . . . . . . 136
Vehicle Ahead Indicator . . . . . . 136
Pedestrian Ahead Indicator . . . 136
Traction Off Light . . . . . . . . . . . . . 136
StabiliTrak OFF Light . . . . . . . . . 137
Traction Control System (TCS)/ StabiliTrak Light . . . . . . . . . . . . . 137
Wait-to-Start Light . . . . . . . . . . . . 137
Tire Pressure Light . . . . . . . . . . . 138
Engine Oil Pressure Light . . . . 138 Low Fuel Warning Light . . . . . . 139
Diesel Exhaust Fluid (DEF)
Warning Light . . . . . . . . . . . . . . . 139
Security Light . . . . . . . . . . . . . . . . . 139
High-Beam On Light . . . . . . . . . . 140
Front Fog Lamp Light . . . . . . . . . 140
Lamps On Reminder . . . . . . . . . 140
Cruise Control Light . . . . . . . . . . 140
Information Displays
Driver Information Center (DIC) (Base Level and Midlevel) . . . 141
Driver Information Center (DIC) (Uplevel) . . . . . . . . . . . . . . . . . . . . 146
Vehicle Messages
Vehicle Messages . . . . . . . . . . . . 150
Engine Power Messages . . . . . 151
Vehicle Speed Messages . . . . . 151
Vehicle Personalization
Vehicle Personalization . . . . . . . 151
Universal Remote System
Universal Remote System . . . . 156
Universal Remote SystemProgramming . . . . . . . . . . . . . . . 156
Universal Remote System Operation . . . . . . . . . . . . . . . . . . . 159
Page 113 of 426
Chevrolet Equinox Owner Manual (GMNA-Localizing-U.S./Canada/Mexico-
12145779) - 2019 - CRC - 7/30/18
112 Instruments and Controls
Controls
Steering Wheel
Adjustment
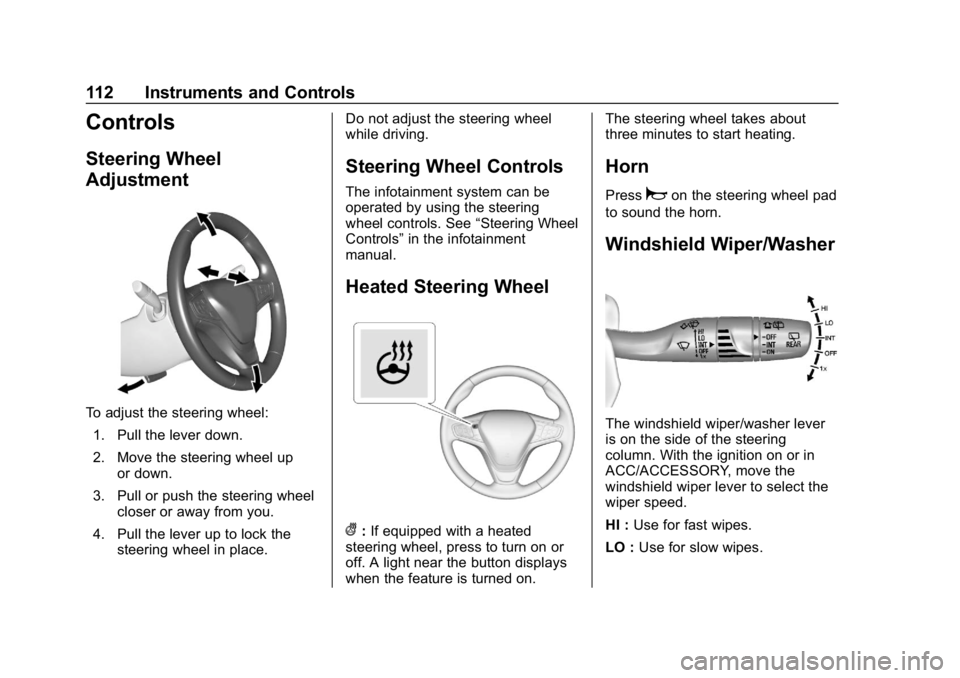
To adjust the steering wheel:1. Pull the lever down.
2. Move the steering wheel up or down.
3. Pull or push the steering wheel closer or away from you.
4. Pull the lever up to lock the steering wheel in place. Do not adjust the steering wheel
while driving.
Steering Wheel Controls
The infotainment system can be
operated by using the steering
wheel controls. See
“Steering Wheel
Controls” in the infotainment
manual.
Heated Steering Wheel
(: If equipped with a heated
steering wheel, press to turn on or
off. A light near the button displays
when the feature is turned on. The steering wheel takes about
three minutes to start heating.
Horn
Pressaon the steering wheel pad
to sound the horn.
Windshield Wiper/Washer
The windshield wiper/washer lever
is on the side of the steering
column. With the ignition on or in
ACC/ACCESSORY, move the
windshield wiper lever to select the
wiper speed.
HI : Use for fast wipes.
LO : Use for slow wipes.
Page 115 of 426
Chevrolet Equinox Owner Manual (GMNA-Localizing-U.S./Canada/Mexico-
12145779) - 2019 - CRC - 7/30/18
114 Instruments and Controls
Turn the end of the windshield wiper
lever to operate the rear window
wiper/washer.
OFF :Turns the system off.
INT : Intermittent wipes.
ON : Slow wipes.
1:Push the windshield wiper
lever forward to spray washer fluid
on the rear window. The lever
automatically returns to its original
position when released.
{Warning
In freezing weather, do not use
the washer until the windshield is
warmed. Otherwise the washer
fluid can form ice on the
windshield, blocking your vision.
Rear Wiper Arm Assembly
Protection
When using an automatic car wash,
move the rear wiper control to OFF
to disable the rear wiper. In some
vehicles, if the transmission is in N (Neutral) and the vehicle speed is
very slow, the rear wiper will
automatically park.
The wiper operations return to
normal when the transmission is no
longer in N (Neutral) or the vehicle
speed has increased.
Reverse Gear Wipes
If the rear wiper control is off, the
rear wiper will automatically operate
continuously when the transmission
is in R (Reverse), and the front
windshield wiper is performing low
or high speed wipes. If the rear
wiper control is off, the transmission
is in R (Reverse), and the front
windshield wiper is performing
interval wipes, then the rear wiper
automatically performs interval
wipes.
This feature can be turned on or off.
See
Vehicle Personalization 0151.
The windshield washer reservoir is
used for the windshield and rear
window. Check the fluid level if
either washer is not working. See
Washer Fluid 0297.
Compass
The vehicle may have a compass
display on the Driver Information
Center (DIC). The compass receives
its heading and other information
from the Global Positioning
System (GPS) antenna, StabiliTrak/
Electronic Stability Control (ESC),
and vehicle speed information.
The compass system is designed to
operate for a certain number of
miles or degrees of turn before
needing a signal from the GPS
satellites. When the compass
display shows CAL, drive the
vehicle for a short distance in an
open area where it can receive a
GPS signal. The compass system
will automatically determine when a
GPS signal is restored and provide
a heading again.
Clock
Set the time and date using the
infotainment system. See "Time /
Date" under “Settings”in the
infotainment manual.