2019 CHEVROLET EQUINOX Power liftgate
[x] Cancel search: Power liftgatePage 46 of 426

Chevrolet Equinox Owner Manual (GMNA-Localizing-U.S./Canada/Mexico-
12145779) - 2019 - CRC - 7/30/18
Keys, Doors, and Windows 45
Caution
Manually forcing the liftgate to
open or close during a power
cycle can damage the vehicle.
Allow the power cycle to
complete.
The power liftgate may be
temporarily disabled under extreme
low temperatures, or after repeated
power cycling over a short period of
time. If this occurs, the liftgate can
still be operated manually.
If the vehicle is shifted out of
P (Park) while the power function is
in progress, the liftgate will continue
to completion. If the vehicle is
accelerated before the liftgate has
completed moving, the liftgate may
stop or reverse direction. Check for
Driver Information Center (DIC)
messages and make sure the
liftgate is closed and latched before
driving. Falling Liftgate Detection
If the power liftgate automatically
closes after a power opening cycle,
it indicates that the system is
reacting to excess weight on the
liftgate or a possible support strut
failure. A repetitive chime will sound
while the falling liftgate detection
feature is operating. Remove any
excess weight. If the liftgate
continues to automatically close
after opening, see your dealer for
service before using the power
liftgate.
Interfering with the power liftgate
motion or manually closing the
liftgate too quickly after power
opening may resemble a support
strut failure. This could also activate
the falling liftgate detection feature.
Allow the liftgate to complete its
operation and wait a few seconds
before manually closing the liftgate.
Obstacle Detection Features
If the liftgate encounters an obstacle
during a power open or close cycle,
the liftgate will automatically reverse
direction and move a short distanceaway from the obstacle. After
removing the obstruction, the power
liftgate operation can be used again.
If the liftgate encounters multiple
obstacles on the same power cycle,
the power function will deactivate.
After removing the obstructions,
manually close the liftgate, This will
allow normal power operation
functions to resume.
If the vehicle is locked while the
liftgate is closing, and an obstacle is
encountered that prevents the
liftgate from completely closing, the
horn will sound as an alert that the
liftgate did not close.
Pinch sensors are on the side
edges of the liftgate. If an object is
caught between the liftgate and the
vehicle and presses against a
sensor, the liftgate will reverse
direction and then stop. The liftgate
will remain open until it is activated
again or closed manually.
Page 47 of 426

Chevrolet Equinox Owner Manual (GMNA-Localizing-U.S./Canada/Mexico-
12145779) - 2019 - CRC - 7/30/18
46 Keys, Doors, and Windows
Setting the 3/4 Mode
To change the position the liftgate
stops at when opening:1. Select MAX or 3/4 mode and power open the liftgate.
2. Stop the liftgate movement at the desired height by pressing
any liftgate button. Manually
adjust the liftgate position if
needed.
3. Press and hold
lnext to the
pull cup on the outside of the
liftgate until the turn signals
flash and a beep sounds. This
indicates the setting has been
recorded.
The liftgate cannot be set below a
minimum programmable height.
If there is no light flash or sound,
then the height adjustment may be
too low.
Manual Operation
Select OFF to manually operate the
liftgate. See “Manual Liftgate” at the
beginning of this section.
Caution
Attempting to move the liftgate
too quickly and with excessive
force may result in damage to the
vehicle.
Operate the liftgate manually with a
smooth motion and moderate
speed. The system includes a
feature which limits the manual
closing speed to protect the
components.
Hands-Free Operation
The liftgate may be operated with a
kicking motion under the rear
bumper between the left exhaust
pipe and the license plate.
The RKE transmitter must be within
1 m (3 ft) of the rear bumper to
operate the power liftgate
hands-free. The hands-free feature will not work
while the liftgate is moving. To stop
the liftgate while in motion use one
of the liftgate buttons.
The hands-free feature will not work
while the liftgate is moving. To stop
the liftgate while in motion use one
of the liftgate switches.
The hands-free feature can be
customized. See
Vehicle
Personalization 0151. Choose from
the following:
On-Open and Close : The kicking
motion is activated to both open and
close the liftgate.
On-Open Only : The kicking motion
is activated to only open the liftgate.
Off : The feature is disabled.
Page 315 of 426

Chevrolet Equinox Owner Manual (GMNA-Localizing-U.S./Canada/Mexico-
12145779) - 2019 - CRC - 7/30/18
314 Vehicle Care
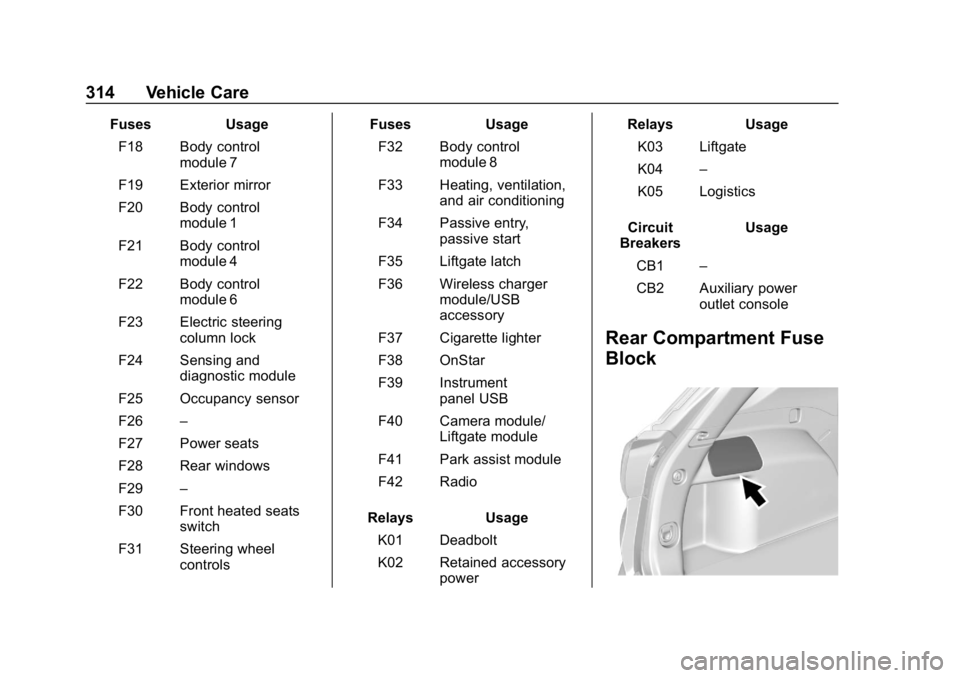
FusesUsage
F18 Body control module 7
F19 Exterior mirror
F20 Body control module 1
F21 Body control module 4
F22 Body control module 6
F23 Electric steering column lock
F24 Sensing and diagnostic module
F25 Occupancy sensor
F26 –
F27 Power seats
F28 Rear windows
F29 –
F30 Front heated seats switch
F31 Steering wheel controls Fuses
Usage
F32 Body control module 8
F33 Heating, ventilation, and air conditioning
F34 Passive entry, passive start
F35 Liftgate latch
F36 Wireless charger module/USB
accessory
F37 Cigarette lighter
F38 OnStar
F39 Instrument panel USB
F40 Camera module/ Liftgate module
F41 Park assist module
F42 Radio
Relays Usage
K01 Deadbolt
K02 Retained accessory power Relays
Usage
K03 Liftgate
K04 –
K05 Logistics
Circuit
Breakers Usage
CB1 –
CB2 Auxiliary power outlet console
Rear Compartment Fuse
Block
Page 316 of 426

Chevrolet Equinox Owner Manual (GMNA-Localizing-U.S./Canada/Mexico-
12145779) - 2019 - CRC - 7/30/18
Vehicle Care 315
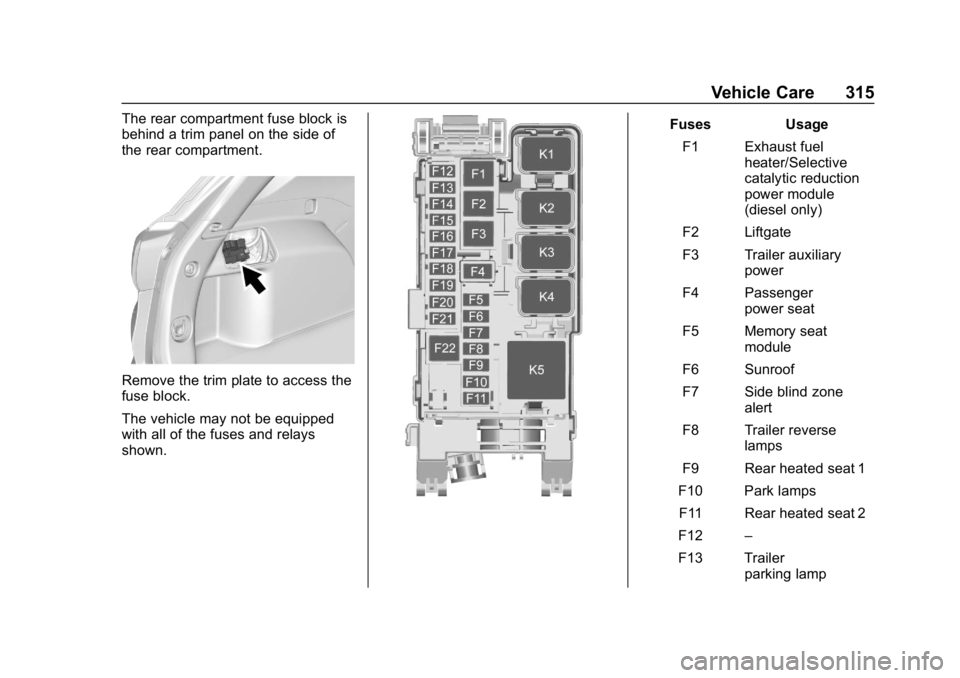
The rear compartment fuse block is
behind a trim panel on the side of
the rear compartment.
Remove the trim plate to access the
fuse block.
The vehicle may not be equipped
with all of the fuses and relays
shown.
FusesUsage
F1 Exhaust fuel heater/Selective
catalytic reduction
power module
(diesel only)
F2 Liftgate
F3 Trailer auxiliary power
F4 Passenger power seat
F5 Memory seat module
F6 Sunroof
F7 Side blind zone alert
F8 Trailer reverse lamps
F9 Rear heated seat 1
F10 Park lamps F11 Rear heated seat 2
F12 –
F13 Trailer parking lamp
Page 346 of 426

Chevrolet Equinox Owner Manual (GMNA-Localizing-U.S./Canada/Mexico-
12145779) - 2019 - CRC - 7/30/18
Vehicle Care 345
12. Turn the air only hose (10)counterclockwise to remove it
from the tire valve stem.
13. Replace the tire valve stem cap.
14. Return the air only hose (10) and power plug (9) back to
their original storage location.
15. Return the equipment to its original storage location in the
vehicle.
The tire sealant and compressor kit
has accessory adapters located in a
compartment on the bottom of its
housing that can be used to inflate
air mattresses, balls, etc.
Storing the Tire Sealant
and Compressor Kit
The tire sealant and compressor kit
is in a bag in the rear compartment
storage area. 1. Open the liftgate. See Liftgate
0 42.
2. Fold the rear part of the load floor to the front.
3. Turn the retainer nutcounterclockwise to remove the
tire sealant and compressor
kit bag.
4. Remove the tire sealant and compressor kit from the bag.
To store the tire sealant and
compressor kit, reverse the steps.
Tire Changing
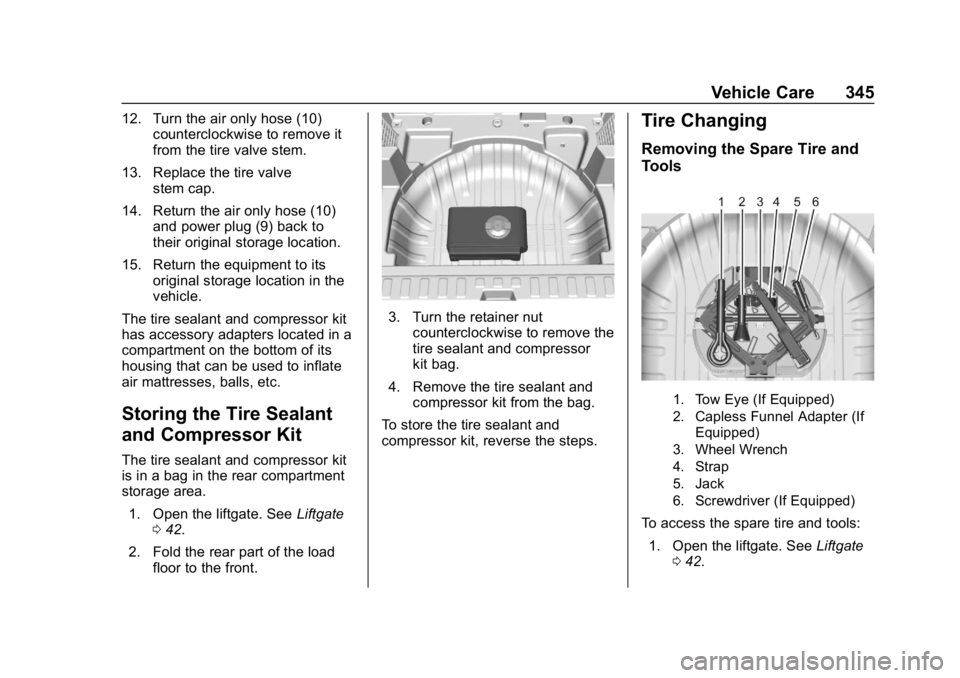
Removing the Spare Tire and
Tools
1. Tow Eye (If Equipped)
2. Capless Funnel Adapter (If Equipped)
3. Wheel Wrench
4. Strap
5. Jack
6. Screwdriver (If Equipped)
To access the spare tire and tools:
1. Open the liftgate. See Liftgate
0 42.
Page 364 of 426

Chevrolet Equinox Owner Manual (GMNA-Localizing-U.S./Canada/Mexico-
12145779) - 2019 - CRC - 7/30/18
Vehicle Care 363
pads for wear and rotors for surface
condition. Inspect drum brake
linings/shoes for wear or cracks.
Inspect all other brake parts.
Steering, Suspension, and
Chassis Components
Visually inspect steering,
suspension, and chassis
components for damaged, loose,
or missing parts or signs of wear at
least once a year.
Inspect power steering for proper
attachment, connections, binding,
leaks, cracks, chafing, etc.
Visually check constant velocity joint
boots and axle seals for leaks.
Body Component Lubrication
Lubricate all key lock cylinders,
hood hinges, liftgate hinges, steel
fuel door hinges, and power assist
step hinges, unless the components
are plastic. Applying silicone grease
on weatherstrips with a clean cloth
will make them last longer, seal
better, and not stick or squeak.
Underbody Maintenance
At least twice a year, spring and fall,
use plain water to flush any
corrosive materials from the
underbody. Take care to thoroughly
clean any areas where mud and
other debris can collect.
Do not directly power wash the
transfer case and/or front/rear axle
output seals. High pressure water
can overcome the seals and
contaminate the fluid. Contaminated
fluid will decrease the life of the
transfer case and/or axles and
should be replaced.
Sheet Metal Damage
If the vehicle is damaged and
requires sheet metal repair or
replacement, make sure the body
repair shop applies anti-corrosion
material to parts repaired or
replaced to restore corrosion
protection.
Original manufacturer replacement
parts will provide the corrosion
protection while maintaining the
vehicle warranty.
Finish Damage
Quickly repair minor chips and
scratches with touch-up materials
available from your dealer to avoid
corrosion. Larger areas of finish
damage can be corrected in your
dealer's body and paint shop.
Chemical Paint Spotting
Airborne pollutants can fall upon
and attack painted vehicle surfaces
causing blotchy, ring-shaped
discolorations, and small, irregular
dark spots etched into the paint
surface. See“Finish Care”
previously in this section.
Interior Care
To prevent dirt particle abrasions,
regularly clean the vehicle's interior.
Immediately remove any soils.
Newspapers or dark garments can
transfer color to the vehicle’s
interior.
Use a soft bristle brush to remove
dust from knobs and crevices on the
instrument cluster. Using a mild
soap solution, immediately remove
Page 415 of 426

Chevrolet Equinox Owner Manual (GMNA-Localizing-U.S./Canada/Mexico-
12145779) - 2019 - CRC - 7/30/18
414 Index
Assistance Systems forParking and Backing . . . . . . . . . . 236
Auto Stop Stop/Start System . . . . . . . . . . . . 198
Automatic Dimming Mirrors . . . . . . . . . . . . . . . . 51
Door Locks . . . . . . . . . . . . . . . . . . . . . 41
Forward Braking . . . . . . . . . . . . . . 242
Headlamp System . . . . . . . . . . . . 163
Transmission . . . . . . . . . . . . . . . . . 210
Transmission Fluid . . . . . . . . . . . 290
Automatic Transmission Manual Mode . . . . . . . . . . . . . . . . . 212
Shift Lock Control FunctionCheck . . . . . . . . . . . . . . . . . . . . . . . 301
B
BatteryExterior Lighting BatterySaver . . . . . . . . . . . . . . . . . . . . . . . 167
Load Management . . . . . . . . . . . . 167
Power Protection . . . . . . . . . . . . . 167
Battery - North America . . . . 300, 351
Biodiesel . . . . . . . . . . . . . . . . . . . . . . . 254
Blade Replacement, Wiper . . . . . 302
Brake Parking, Electric . . . . . . . . . . . . . . 216
System Warning Light . . . . . . . . 134 Brakes . . . . . . . . . . . . . . . . . . . . . . . . . . 298
Antilock . . . . . . . . . . . . . . . . . . . . . . . 215
Assist . . . . . . . . . . . . . . . . . . . . . . . . . 217
Fluid . . . . . . . . . . . . . . . . . . . . . . . . . . 299
Braking . . . . . . . . . . . . . . . . . . . . . . . . . 180 Automatic Forward . . . . . . . . . . . 242
Braking System
Front Pedestrian (FPB) . . . . . . . 244
Break-In, New Vehicle . . . . . . . . . . 194
Bulb Replacement Front Turn Signal and Fog
Lamps . . . . . . . . . . . . . . . . . . . . . . 306
Halogen Bulbs . . . . . . . . . . . . . . . . 305
Headlamp Aiming . . . . . . . . . . . . . 305
Headlamps . . . . . . . . . . . . . . 305, 306
High Intensity Discharge (HID) Lighting . . . . . . . . . . . . . . . 305
License Plate Lamps . . . . . . . . . 308
Taillamps . . . . . . . . . . . . . . . . . . . . . 307
Buying New Tires . . . . . . . . . . . . . . . 332
C
Calibration . . . . . . . . . . . . . . . . . . . . . . 114
California Perchlorate MaterialsRequirements . . . . . . . . . . . . . . . 277 California
Proposition
65 Warning . . . . . . . . . .276, 300, 351,
Back Cover
Canadian Vehicle Owners . . . . . . . . 2
Capacities and Specifications . . . . . . . . . . . . . . . . . 384
Carbon Monoxide Engine Exhaust . . . . . . . . . . . . . . . 203
Liftgate . . . . . . . . . . . . . . . . . . . . . . . . . 42
Winter Driving . . . . . . . . . . . . . . . . 188
Cargo Cover . . . . . . . . . . . . . . . . . . . . . . . . . 108
Tie-Downs . . . . . . . . . . . . . . . . . . . . 109
Caution, Danger, and Warning . . . . 3
Center Console Storage . . . . . . . . 107
Chains, Tire . . . . . . . . . . . . . . . . . . . . 337
Charging Wireless . . . . . . . . . . . . . . . . . . . . . . .116
Charging System Light . . . . . . . . . 131
Check Engine Light (MalfunctionIndicator) . . . . . . . . . . . . . . . . . . . . 132
Child Restraints Infants and Young Children . . . . . 91
Lower Anchors and Tethers
for Children . . . . . . . . . . . . . . . . . . . 96
Older Children . . . . . . . . . . . . . . . . . . 89