2019 CHEVROLET CORVETTE suspension
[x] Cancel search: suspensionPage 129 of 367

Chevrolet Corvette Owner Manual (GMNA-Localizing-U.S./Canada/Mexico-
12032182) - 2019 - crc - 5/8/18
128 Instruments and Controls
.Brakes
. Steering
. Ride Control Systems
. Driver Assistance Systems
. Cruise Control
. Lighting and Bulb Replacement
. Wiper/Washer Systems
. Doors and Windows
. Seat Belts
. Airbag Systems
. Engine and Transmission
. Tire Pressure
. Battery
Engine Power Messages
ENGINE POWER IS REDUCED
This message displays when the
vehicle's propulsion power is
reduced. Reduced propulsion power
can affect the vehicle's ability to
accelerate. If this message is on,
but there is no observed reduction
in performance, proceed to your
destination. The performance may be reduced the next time the vehicle
is driven. The vehicle may be driven
while this message is on, but
maximum acceleration and speed
may be reduced. Anytime this
message stays on, or displays
repeatedly, the vehicle should be
taken to your dealer for service as
soon as possible.
Vehicle Speed Messages
SPEED LIMITED TO
XXX KM/H (MPH)
This message shows that the
vehicle speed has been limited to
the speed displayed. The limited
speed is a protection for various
propulsion and vehicle systems,
such as lubrication, thermal,
suspension, or tires.
Vehicle
Personalization
Use the audio system controls to
access the personalization menus
for customizing vehicle features.
The following are all possible
personalization features. Depending
on the vehicle, some may not be
available.
Infotainment System Audio
System Controls
To access the
personalization menu:
1. Touch SETTINGS on the Home Page on the infotainment
display.
2. Touch the desired feature to display a list of available
options.
3. Touch to select the desired feature setting.
4. Press
oBACK on the center
stack or touch Back on the
infotainment display to return to
the previous menu.
Page 165 of 367

Chevrolet Corvette Owner Manual (GMNA-Localizing-U.S./Canada/Mexico-
12032182) - 2019 - crc - 5/8/18
164 Driving and Operating
ZR1 FEB suspension equipped
vehicles can be lowered 12 mm in
the front for optimal track
performance. Lowering the vehicle
should be completed prior to the
track suspension alignment. The
front spring outboard ends must be
unloaded from the front control arms
in order to adjust the spring cushion
adjuster screws upward by
approximately 6–9 mm to achieve
the lowered condition. Driving on
the public roads in this condition is
not recommended.
Caution
Failure to unload the front spring
outboard ends before adjusting
the spring cushion adjuster
screws could damage the spring.If the vehicle is a Z51, Grand Sport,
Z06, or ZR1, the racing and
competitive driving wheel alignment
settings should be set as
described here:
.
Z51 Performance
Package –remove one washer
from each upper control arm to
body bolt attachment (both front
and rear).
. Grand Sport, Z06, and
ZR1 models –do not remove
washers from front or rear upper
control arm bolts.
Proceed by adjusting the lower
control arm cam bolts until
alignment is within specifications.
Alignment values are targets. See
your dealer for tolerances.
After track use, reinstall washers
and reset to factory alignment
settings.
Front (per corner)
. Caster: +7.0 degrees
. Camber: -2.0 degrees
. Toe: 0.05 degrees toe in Rear (per corner)
.
Caster: 0 degrees
. Camber: -2.0 degrees
. Toe: 0.05 degrees toe in
Thrust Angle: 0 degrees
Rear Axle Fluid
Caution
During a first time track or racing
event, high rear axle
temperatures can occur. Damage
could be caused to the rear axle
and would not be covered by the
vehicle warranty. Do not drive as
long or as fast the first time the
vehicle is driven on the track or
raced.
Axles must have 2414 km (1,500 mi)
before being used in track driving.
The rear axle fluid temperatures
may be higher than when driving in
severe conditions. Drain and refill
with new fluid after the first racing or
competitive driving event, and then
Page 204 of 367

Chevrolet Corvette Owner Manual (GMNA-Localizing-U.S./Canada/Mexico-
12032182) - 2019 - crc - 5/8/18
Driving and Operating 203
Steering (Assist Effort)
Adjusts from a lighter steering feel
to reduced assist for more
steering feel.
Magnetic Ride Control (if
equipped)
Adjusts the shock dampening
firmness based on driving
conditions to improve comfort and
performance.
Launch Control
Available only in Track Mode for
maximum“off-the-line” acceleration
when in Competitive or PTM modes.
Stability Control
. Competitive Driving Mode allows
less computer control to permit
some slide and drift and is
selected with
g–only available
in Sport or Track Mode.
. StabiliTrak/ESC can be turned
off by pressing and holding
gfor
10 seconds. PTM (Performance Traction
Management) (if equipped)
.
Available in Track Mode.
. There are five selectable
settings if Competitive Driving
Mode is activated.
Competitive Driving Mode
If equipped, Competitive Driving
Mode, Performance Traction
Management, and Launch Control
are systems designed to allow
increased performance while
accelerating and/or cornering. This
is accomplished by regulating and
optimizing the engine, brakes, and
suspension performance. These
modes are for use at a closed
course race track and are not
intended for use on public roads.
They will not compensate for driver
inexperience or lack of familiarity
with the race track. Drivers who
prefer to allow the system to have
more control of the engine, brake,
and suspension are advised to turn
the normal Traction Control System
(TCS) and StabiliTrak/Electronic
Stability Control (ESC) system on.
Caution
Attempting to shift when the drive
wheels are spinning and do not
have traction may cause damage
to the transmission. Damage
caused by misuse of the vehicle
is not covered by the vehicle
warranty. Do not attempt to shift
when the drive wheels do not
have traction.
Competitive Driving Mode
Competitive Driving Mode allows full
engine power while StabiliTrak
helps maintain directional control of
the vehicle by selective brake
application. In this mode, TCS is off.
Launch Control is available if in
Track Mode. Adjust your driving
style to account for the available
engine power. See “Launch Control”
later in this section.
Page 221 of 367

Chevrolet Corvette Owner Manual (GMNA-Localizing-U.S./Canada/Mexico-
12032182) - 2019 - crc - 5/8/18
220 Vehicle Care
California Perchlorate
Materials Requirements
Certain types of automotive
applications, such as airbag
initiators, seat belt pretensioners,
and lithium batteries contained in
Remote Keyless Entry transmitters,
may contain perchlorate materials.
Special handling may be necessary.
For additional information, see
www.dtsc.ca.gov/hazardouswaste/
perchlorate.
Accessories and
Modifications
Adding non-dealer accessories or
making modifications to the vehicle
can affect vehicle performance and
safety, including such things as
airbags, braking, stability, ride and
handling, emissions systems,
aerodynamics, durability, and
electronic systems like antilock
brakes, traction control, and stability
control. These accessories or
modifications could even cause
malfunction or damage not covered
by the vehicle warranty.Damage to suspension components
caused by modifying vehicle height
outside of factory settings will not be
covered by the vehicle warranty.
Damage to vehicle components
resulting from modifications or the
installation or use of non-GM
certified parts, including control
module or software modifications, is
not covered under the terms of the
vehicle warranty and may affect
remaining warranty coverage for
affected parts.
GM Accessories are designed to
complement and function with other
systems on the vehicle. See your
dealer to accessorize the vehicle
using genuine GM Accessories
installed by a dealer technician.
Also, see
Adding Equipment to the
Airbag-Equipped Vehicle 083.
Lifting the Vehicle
{Warning
Lifting a vehicle can cause an
injury. The vehicle can slip off the
jack and roll over you or other
people. You and they could be
badly injured. Find a level place
to lift your vehicle. To help
prevent the vehicle from moving:
1. Set the parking brake firmly.
2. Put an automatictransmission in P (Park) or a
manual transmission in
1 (First) or R (Reverse).
3. Turn off the engine.
To be even more certain the
vehicle will not move, put blocks
in front of and behind the wheels.
Page 287 of 367

Chevrolet Corvette Owner Manual (GMNA-Localizing-U.S./Canada/Mexico-
12032182) - 2019 - crc - 5/8/18
286 Vehicle Care
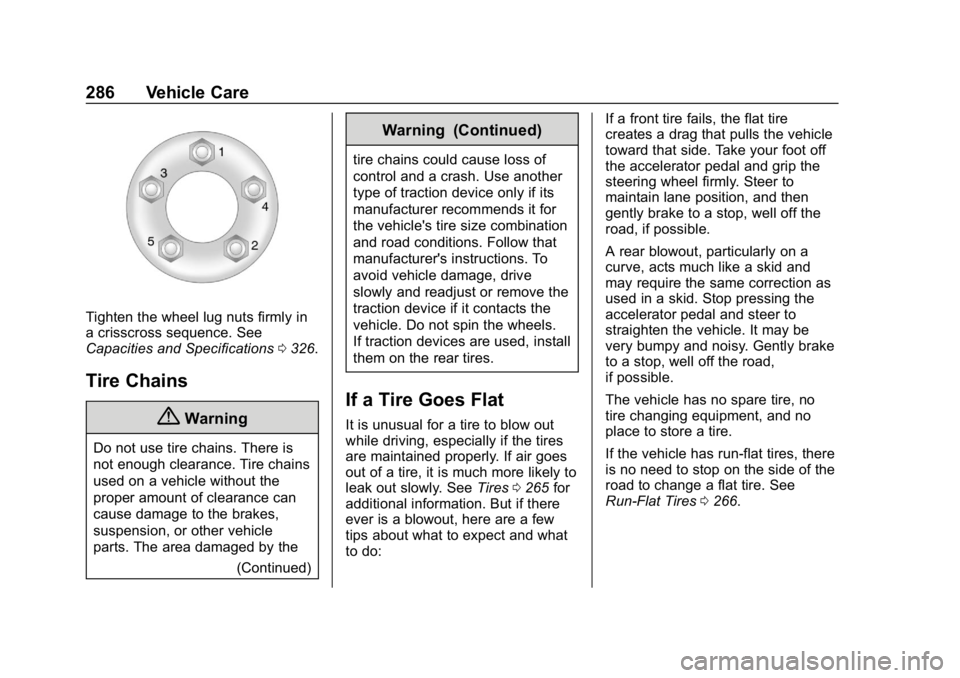
Tighten the wheel lug nuts firmly in
a crisscross sequence. See
Capacities and Specifications0326.
Tire Chains
{Warning
Do not use tire chains. There is
not enough clearance. Tire chains
used on a vehicle without the
proper amount of clearance can
cause damage to the brakes,
suspension, or other vehicle
parts. The area damaged by the
(Continued)
Warning (Continued)
tire chains could cause loss of
control and a crash. Use another
type of traction device only if its
manufacturer recommends it for
the vehicle's tire size combination
and road conditions. Follow that
manufacturer's instructions. To
avoid vehicle damage, drive
slowly and readjust or remove the
traction device if it contacts the
vehicle. Do not spin the wheels.
If traction devices are used, install
them on the rear tires.
If a Tire Goes Flat
It is unusual for a tire to blow out
while driving, especially if the tires
are maintained properly. If air goes
out of a tire, it is much more likely to
leak out slowly. SeeTires0265 for
additional information. But if there
ever is a blowout, here are a few
tips about what to expect and what
to do: If a front tire fails, the flat tire
creates a drag that pulls the vehicle
toward that side. Take your foot off
the accelerator pedal and grip the
steering wheel firmly. Steer to
maintain lane position, and then
gently brake to a stop, well off the
road, if possible.
A rear blowout, particularly on a
curve, acts much like a skid and
may require the same correction as
used in a skid. Stop pressing the
accelerator pedal and steer to
straighten the vehicle. It may be
very bumpy and noisy. Gently brake
to a stop, well off the road,
if possible.
The vehicle has no spare tire, no
tire changing equipment, and no
place to store a tire.
If the vehicle has run-flat tires, there
is no need to stop on the side of the
road to change a flat tire. See
Run-Flat Tires
0266.
Page 299 of 367

Chevrolet Corvette Owner Manual (GMNA-Localizing-U.S./Canada/Mexico-
12032182) - 2019 - crc - 5/8/18
298 Vehicle Care
10. Connect the other end of thenegative (−) cable to the
negative (−) terminal (2) on the
dead battery.
11. Now start the vehicle with the good battery and run the
engine for a while.
12. Try to start the vehicle that had the dead battery. If it will not
start after a few tries, it
probably needs service.Caution
If the jumper cables are
connected or removed in the
wrong order, electrical shorting
may occur and damage the
vehicle. The repairs would not be
covered by the vehicle warranty.
Always connect and remove the
jumper cables in the correct order,
making sure that the cables do
not touch each other or other
metal.
Jumper Cable Removal
Reverse the sequence exactly when
removing the jumper cables.
After starting the disabled vehicle
and removing the jumper cables,
allow it to idle for several minutes.
The power windows may need to be
initialized. See “Window Indexing”
under Power Windows 046.
Towing the Vehicle
Caution
Incorrectly towing a disabled
vehicle may cause damage. The
damage would not be covered by
the vehicle warranty. Do not lash
or hook to suspension
components. Use the proper
straps around the tires to secure
the vehicle. Do not drag a locked
wheel/tire while loading the
vehicle. Do not use a sling type
lift to tow the vehicle. This could
damage the vehicle.
GM recommends a flatbed tow truck
to transport a disabled vehicle. Use
ramps to help reduce approach
angles, if necessary. A towed
vehicle should have its drive wheels
off the ground. Contact Roadside
Assistance or a professional towing
service if the disabled vehicle must
be towed.
Page 306 of 367

Chevrolet Corvette Owner Manual (GMNA-Localizing-U.S./Canada/Mexico-
12032182) - 2019 - crc - 5/8/18
Vehicle Care 305
vacuum pipes, electric vacuum
pump including bracket and vent
hose, if equipped.
Steering, Suspension, and
Chassis Components
Visually inspect steering,
suspension, and chassis
components for damaged, loose,
or missing parts or signs of wear at
least once a year.
Inspect power steering for proper
hook-up, binding, leaks, cracks,
chafing, etc.
Visually check constant velocity joint
boots and axle seals for leaks.
Body Component Lubrication
Lubricate all key lock cylinders,
hood hinges, and liftgate hinges,
unless the components are plastic.
Applying silicone grease on
weatherstrips with a clean cloth will
make them last longer, seal better,
and not stick or squeak.
Underbody Maintenance
At least twice a year, spring and fall,
use plain water to flush any
corrosive materials from the
underbody. Take care to thoroughly
clean any areas where mud and
other debris can collect.
Do not directly power wash the
transfer case and/or front/rear axle
output seals. High pressure water
can overcome the seals and
contaminate the fluid. Contaminated
fluid will decrease the life of the
transfer case and/or axles and
should be replaced.
Composite SpringsCaution
Do not use acidic or corrosive
cleaning products, engine
degreasers, or aluminum cleaning
agents on fiberglass springs as it
may cause damage. The repairs
would not be covered by the
vehicle warranty. Use only
approved cleaners.
Body Damage
If the vehicle is damaged and
requires sheet metal repair or
replacement, make sure the body
repair shop applies anti-corrosion
material to parts repaired or
replaced to restore corrosion
protection.
Original manufacturer replacement
parts will provide the corrosion
protection while maintaining the
vehicle warranty.
Finish Damage
Quickly repair minor chips and
scratches with touch-up materials
available from your dealer. Larger
areas of finish damage can be
corrected in your dealer's body and
paint shop.
Chemical Paint Spotting
Airborne pollutants can fall upon
and attack painted vehicle surfaces
causing blotchy, ring-shaped
discolorations, and small, irregular
dark spots etched into the paint
surface. See “Finish Care”
previously in this section.
Page 314 of 367

Chevrolet Corvette Owner Manual (GMNA-Localizing-U.S./Canada/Mexico-
12032182) - 2019 - crc - 5/8/18
Service and Maintenance 313
.Visually inspect steering,
suspension, and chassis
components for damage,
including cracks or tears in the
rubber boots, loose or missing
parts, or signs of wear at least
once a year. See Exterior Care
0 300.
. Inspect power steering for
proper attachment, connections,
binding, leaks, cracks,
chafing, etc.
. Visually inspect halfshafts and
drive shafts for excessive wear,
lubricant leaks, and/or damage
including: tube dents or cracks,
constant velocity joint or
universal joint looseness,
cracked or missing boots, loose
or missing boot clamps, center
bearing excessive looseness,
loose or missing fasteners, and
axle seal leaks.
. Check restraint system
components. See Safety System
Check 072.
. Visually inspect fuel system for
damage or leaks. .
Visually inspect exhaust system
and nearby heat shields for
loose or damaged parts.
. Lubricate body components. See
Exterior Care 0300.
. Check starter switch. See Starter
Switch Check 0253.
. Check parking brake and
automatic transmission park
mechanism. See Park Brake and
P (Park) Mechanism Check
0 254.
. Check accelerator pedal for
damage, high effort, or binding.
Replace if needed.
. Visually inspect gas strut for
signs of wear, cracks, or other
damage. Check the hold open
ability of the strut. If the hold
open is low, service the gas
strut. See Gas Strut(s) 0255.