2019 CHEVROLET CORVETTE remote control
[x] Cancel search: remote controlPage 137 of 367
Chevrolet Corvette Owner Manual (GMNA-Localizing-U.S./Canada/Mexico-
12032182) - 2019 - crc - 5/8/18
136 Instruments and Controls
See“Erasing Universal Remote
System Buttons” later in this
section.
To program a garage door opener,
park outside directly in line with and
facing the garage door opener
receiver. Clear all people and
objects near the garage door.
Make sure the hand-held transmitter
has a new battery for quick and
accurate transmission of the
radio-frequency signal.
Programming the Universal
Remote System
For questions or programming help,
see www.homelink.com/gm or call
1-800-355-3515. For calls placed
outside the U.S., Canada, or Puerto
Rico, international rates will apply
and may differ based on landline or
mobile phone.
Programming involves
time-sensitive actions, and may time
out causing the procedure to be
repeated. To program up to three devices:
1. Hold the end of the hand-held transmitter about 3 to 8 cm (1
to 3 in) away from the
Universal Remote system
buttons with the indicator light
in view. The hand-held
transmitter was supplied by the
manufacturer of the garage
door opener receiver.
2. At the same time, press and hold both the hand-held
transmitter button and one of
the three Universal Remote
system buttons to be used to
operate the garage door. Do
not release either button until
the indicator light changes from
a slow to a rapid flash. Then
release both buttons.
Some garage door openers
may require substitution of
Step 2 with the procedure
under “Radio Signals for Some
Gate Operators” later in this
section. 3. Press and hold the newly
programmed Universal Remote
system button for five seconds
while watching the indicator
light and garage door
activation.
.If the indicator light stays on
continuously or the garage
door moves when the
button is pressed, then
programming is complete.
There is no need to
complete Steps 4–6.
. If the indicator light does
not come on or the garage
door does not move, a
second button press may
be required. For a second
time, press and hold the
newly programmed button
for five seconds. If the light
stays on or the garage door
moves, programming is
complete.
. If the indicator light blinks
rapidly for two seconds,
then changes to a solid light
Page 138 of 367
Chevrolet Corvette Owner Manual (GMNA-Localizing-U.S./Canada/Mexico-
12032182) - 2019 - crc - 5/8/18
Instruments and Controls 137
and the garage door does
not move, continue with
programming Steps 4–6.
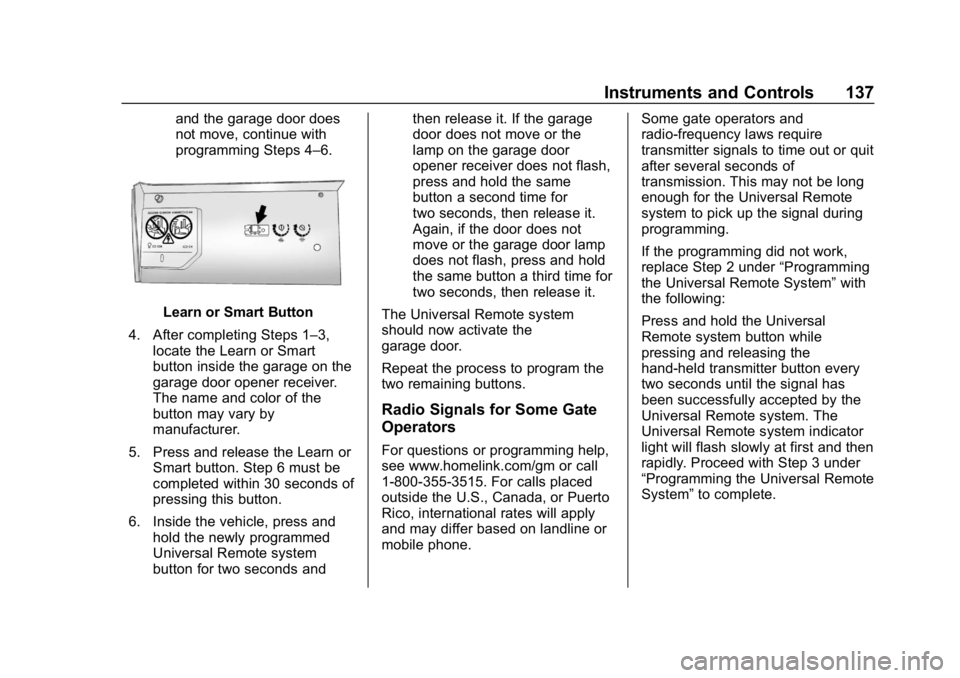
Learn or Smart Button
4. After completing Steps 1–3, locate the Learn or Smart
button inside the garage on the
garage door opener receiver.
The name and color of the
button may vary by
manufacturer.
5. Press and release the Learn or Smart button. Step 6 must be
completed within 30 seconds of
pressing this button.
6. Inside the vehicle, press and hold the newly programmed
Universal Remote system
button for two seconds and then release it. If the garage
door does not move or the
lamp on the garage door
opener receiver does not flash,
press and hold the same
button a second time for
two seconds, then release it.
Again, if the door does not
move or the garage door lamp
does not flash, press and hold
the same button a third time for
two seconds, then release it.
The Universal Remote system
should now activate the
garage door.
Repeat the process to program the
two remaining buttons.
Radio Signals for Some Gate
Operators
For questions or programming help,
see www.homelink.com/gm or call
1-800-355-3515. For calls placed
outside the U.S., Canada, or Puerto
Rico, international rates will apply
and may differ based on landline or
mobile phone. Some gate operators and
radio-frequency laws require
transmitter signals to time out or quit
after several seconds of
transmission. This may not be long
enough for the Universal Remote
system to pick up the signal during
programming.
If the programming did not work,
replace Step 2 under
“Programming
the Universal Remote System” with
the following:
Press and hold the Universal
Remote system button while
pressing and releasing the
hand-held transmitter button every
two seconds until the signal has
been successfully accepted by the
Universal Remote system. The
Universal Remote system indicator
light will flash slowly at first and then
rapidly. Proceed with Step 3 under
“Programming the Universal Remote
System” to complete.
Page 139 of 367
Chevrolet Corvette Owner Manual (GMNA-Localizing-U.S./Canada/Mexico-
12032182) - 2019 - crc - 5/8/18
138 Instruments and Controls
Universal Remote System
Operation
Using the Universal Remote
System
Press and hold the appropriate
Universal Remote system button for
at least one-half second. The
indicator light will come on while the
signal is being transmitted.
Erasing Universal Remote
System Buttons
Erase all programmed buttons when
vehicle ownership is terminated.
To erase:1. Press and hold the two outside buttons until the indicator light
begins to flash. This should
take about 10 seconds.
2. Release both buttons.
Reprogramming a Single
Universal Remote System
Button
To reprogram any of the system
buttons: 1. Press and hold any one of the buttons. Do not release the
button.
2. The indicator light will begin to flash after 20 seconds. Without
releasing the button, proceed
with Step 1 under
“Programming the Universal
Remote System.”
Page 144 of 367

Chevrolet Corvette Owner Manual (GMNA-Localizing-U.S./Canada/Mexico-
12032182) - 2019 - crc - 5/8/18
Lighting 143
Interior Lighting
Instrument Panel
Illumination Control
The knob for this feature is on the
left side of the instrument panel.
Turn the knob clockwise or
counterclockwise to brighten or dim
the instrument panel lights at night.
Turn the knob completely clockwise
to turn on the interior lights.
Courtesy Lamps
When any door or the hatch/trunk is
opened, the interior lamps will
come on.The hatch/trunk lamps only come on
when the rear compartment is
opened.
To turn the courtesy lamps on or off,
turn the instrument panel brightness
knob completely clockwise or
counterclockwise.
Reading Lamps
The reading lamps are in the
overhead console. The lamps go on
when a door is opened. When the
doors are closed, press the lamp
buttons to turn on each lamp.
Lighting Features
Entry Lighting
Some exterior lamps turn on briefly
at night, or in areas with limited
lighting, when
Kis pressed on the
Remote Keyless Entry (RKE)
transmitter. When the driver door is
opened, all control lights, Driver
Information Center (DIC) lights, and
door pocket lights turn on. After
about 30 seconds the exterior lamps
turn off, and then the dome and
remaining interior lamps dim to off.
Entry lighting can be disabled
manually by turning the ignition to
on or ACC/ACCESSORY, or by
pressing
Qon the RKE transmitter.
This feature can be changed. See
“Vehicle Locator Lights” under
Vehicle Personalization 0128.
Exit Lighting
Some exterior lamps come on at
night, or in areas with limited
lighting, when the driver door is
opened after the ignition is turned
Page 155 of 367

Chevrolet Corvette Owner Manual (GMNA-Localizing-U.S./Canada/Mexico-
12032182) - 2019 - crc - 5/8/18
154 Climate Controls
The heated outside mirrors turn on
with the rear window defogger and
help to clear fog or frost from the
surface of the mirror. SeeHeated
Mirrors 045.
If equipped with a convertible top,
the rear window defogger and
heated mirrors are automatically
disabled when the convertible top is
moving or down.
Caution
Using a razor blade or sharp
object on the inside rear window
can damage the antenna or
defogger. Repairs would not be
covered by the vehicle warranty.
Do not stick anything to the rear
window.
(/{: If equipped, press to heat
or ventilate the seat. See Heated
and Ventilated Front Seats 065. Remote Start Climate Control
Operation (If Equipped) :
If remote
start is used to start the vehicle, the
climate control system will come on,
depending on the outside
temperature. The rear window
defogger or heated outside mirrors
may come on based on cold
ambient conditions. The rear defog
indicator light may not come on
during a remote start. The heated or
ventilated seats may turn on if it is
cold or hot outside.
See Remote Vehicle Start 033 and
Heated and Ventilated Front Seats
0 65, if equipped.
Sensors
The interior cabin air temperature
and solar sensor on top of the
instrument panel near the
windshield monitors the solar heat
and measures the initial interior
cabin temperature.
The climate control system uses the
sensor information to adjust the
temperature, fan speed,
recirculation, and air delivery mode
for best comfort. The humidity and windshield
temperature sensor is on the
windshield glass inside surface near
the rearview mirror. The automatic
climate control system uses this
sensor to receive information to
determine the need for defogging.
If any of these sensors are blocked
or covered, the automatic climate
control system may not work
properly.
There is also a sensor behind the
front bumper. This sensor reads the
outside air temperature and helps to
maintain the temperature inside the
vehicle. Any cover on the front of
the vehicle could give a false
reading in the temperature.
Page 221 of 367
Chevrolet Corvette Owner Manual (GMNA-Localizing-U.S./Canada/Mexico-
12032182) - 2019 - crc - 5/8/18
220 Vehicle Care
California Perchlorate
Materials Requirements
Certain types of automotive
applications, such as airbag
initiators, seat belt pretensioners,
and lithium batteries contained in
Remote Keyless Entry transmitters,
may contain perchlorate materials.
Special handling may be necessary.
For additional information, see
www.dtsc.ca.gov/hazardouswaste/
perchlorate.
Accessories and
Modifications
Adding non-dealer accessories or
making modifications to the vehicle
can affect vehicle performance and
safety, including such things as
airbags, braking, stability, ride and
handling, emissions systems,
aerodynamics, durability, and
electronic systems like antilock
brakes, traction control, and stability
control. These accessories or
modifications could even cause
malfunction or damage not covered
by the vehicle warranty.Damage to suspension components
caused by modifying vehicle height
outside of factory settings will not be
covered by the vehicle warranty.
Damage to vehicle components
resulting from modifications or the
installation or use of non-GM
certified parts, including control
module or software modifications, is
not covered under the terms of the
vehicle warranty and may affect
remaining warranty coverage for
affected parts.
GM Accessories are designed to
complement and function with other
systems on the vehicle. See your
dealer to accessorize the vehicle
using genuine GM Accessories
installed by a dealer technician.
Also, see
Adding Equipment to the
Airbag-Equipped Vehicle 083.
Lifting the Vehicle
{Warning
Lifting a vehicle can cause an
injury. The vehicle can slip off the
jack and roll over you or other
people. You and they could be
badly injured. Find a level place
to lift your vehicle. To help
prevent the vehicle from moving:
1. Set the parking brake firmly.
2. Put an automatictransmission in P (Park) or a
manual transmission in
1 (First) or R (Reverse).
3. Turn off the engine.
To be even more certain the
vehicle will not move, put blocks
in front of and behind the wheels.
Page 348 of 367
Chevrolet Corvette Owner Manual (GMNA-Localizing-U.S./Canada/Mexico-
12032182) - 2019 - crc - 5/8/18
OnStar 347
Reactivation for Subsequent
Owners
Press|and follow the prompts to
speak to an Advisor as soon as
possible. The Advisor will update
vehicle records and explain OnStar
or connected service options.
How OnStar Service Works
Automatic Crash Response,
Emergency Services, Crisis Assist,
Stolen Vehicle Assistance, Remote
Services, Roadside Assistance, and
Hands-Free Calling are available on
most vehicles. Not all OnStar
services are available everywhere
or on all vehicles. For more
information, a full description of
OnStar services, system limitations,
and OnStar User Terms, Privacy
Statement, and Software Terms:
. Call 1-888-4ONSTAR
(1-888-466-7827).
. See www.onstar.com (U.S.).
. See www.onstar.ca (Canada).
. Call TTY 1-877-248-2080. .
Press
|to speak with an
Advisor.
OnStar or connected services
cannot work unless the vehicle is in
a place where OnStar has an
agreement with a wireless service
provider for service in that area. The
wireless service provider must also
have coverage, network capacity,
reception, and technology
compatible with OnStar or
connected services. Service
involving location information about
the vehicle cannot work unless GPS
signals are available, unobstructed,
and compatible with the OnStar
hardware. OnStar or connected
services may not work if the OnStar
equipment is not properly installed
or it has not been properly
maintained. If equipment or software
is added, connected, or modified,
OnStar or connected services may
not work. Other problems beyond
the control of OnStar —such as
hills, tall buildings, tunnels, weather,
electrical system design and
architecture of the vehicle, damage to the vehicle in a crash, or wireless
phone network congestion or
jamming
—may prevent service.
See Radio Frequency Statement
0 340.
Services for People with
Disabilities
Advisors provide services to help
with physical disabilities and
medical conditions.
Press
|to help:
. Locate a gas station with an
attendant to pump gas.
. Find a hotel, restaurant, etc.,
that meets accessibility needs.
. Provide directions to the closest
hospital or pharmacy in urgent
situations.
TTY Users
OnStar has the ability to
communicate to deaf,
hard-of-hearing, or speech-impaired
customers while in the vehicle. The
available dealer-installed TTY
system can provide in-vehicle
Page 364 of 367

Chevrolet Corvette Owner Manual (GMNA-Localizing-U.S./Canada/Mexico-
12032182) - 2019 - crc - 5/8/18
Index 363
Proposition65 Warning,
California . . . . . . . . . . . .219, 251, 295,
Back Cover
Publication Ordering Information . . . . . . . . . . . . . . . . . . . . 339
R
Radio Frequency Statement . . . . 340
Reading Lamps . . . . . . . . . . . . . . . . . 143
Rear Axle . . . . . . . . . . . . . . . . . . . . . . . 252
Rear Storage . . . . . . . . . . . . . . . . . . . . 95
Rear Vision Camera (RVC) . . . . . 210
Rearview Mirrors . . . . . . . . . . . . . . . . 45Automatic Dimming . . . . . . . . . . . . . 46
Reclining Seatbacks . . . . . . . . . . . . . 60
Recommended Fuel . . . . . . . . . . . . . . . . . . . . . 212, 213
Recommended Fluids and Lubricants . . . . . . . . . . . . . . . . . . . . . 321
Records
Maintenance . . . . . . . . . . . . . . . . . . 324
Recreational Vehicle Towing . . . . 300
Reimbursement Program, GM Mobility . . . . . . . . . . . . . . . . . . . 334
Remote Keyless Entry
(RKE) System . . . . . . . . . . . . . . 26, 27
Remote Vehicle Start . . . . . . . . . . . . 33 Replacement Parts
Airbags . . . . . . . . . . . . . . . . . . . . . . . . . 84
Maintenance . . . . . . . . . . . . . . . . . . 323
Replacing Airbag System . . . . . . . . 84
Replacing Seat Belt System Parts after a Crash . . . . . . . . . . . . . 73
Reporting Safety Defects
Canadian Government . . . . . . . . 341
General Motors . . . . . . . . . . . . . . . 341
U.S. Government . . . . . . . . . . . . . 340
Retained Accessory
Power (RAP) . . . . . . . . . . . . . . . . . . 183
Reverse Tilt Mirrors . . . . . . . . . . . . . . 45
Ride Control Systems Enhanced TractionSystem (ETS) . . . . . . . . . . . . . . . 207
Roads Driving, Wet . . . . . . . . . . . . . . . . . . 172
Roadside Assistance Program . . . . . . . . . . . . . . . . . . . . . . . 334
Roof Panel . . . . . . . . . . . . . . . . . . . . . . 48
Rotation, Tires . . . . . . . . . . . . . . . . . . 279
Routing, Engine Drive Belt . . . . . . 329
Run-Flat Tires . . . . . . . . . . . . . . . . . . 266
Running the Vehicle While
Parked . . . . . . . . . . . . . . . . . . . . . . . . 187
S
Safety Defects ReportingCanadian Government . . . . . . . . 341
General Motors . . . . . . . . . . . . . . . 341
U.S. Government . . . . . . . . . . . . . 340
Safety System Check . . . . . . . . . . . . 72
Scheduling Appointments . . . . . . . 336
Sealant Kit, Tire . . . . . . . . . . . . . . . . 287
Seat Belts . . . . . . . . . . . . . . . . . . . . . . . 66 Care . . . . . . . . . . . . . . . . . . . . . . . . . . . . 73
Extender . . . . . . . . . . . . . . . . . . . . . . . . 72
How to Wear Seat Belts
Properly . . . . . . . . . . . . . . . . . . . . . . . 67
Lap-Shoulder Belt . . . . . . . . . . . . . . 69
Reminders . . . . . . . . . . . . . . . . . . . . . 111
Replacing after a Crash . . . . . . . . 73
Use During Pregnancy . . . . . . . . . . 72
Seatback Latches . . . . . . . . . . . . . . . 64
Seats Head Restraints . . . . . . . . . . . . . . . . 58
Heated and Ventilated Front . . . . 65
Lumbar Adjustment, Front . . . . . . 60
Memory . . . . . . . . . . . . . . . . . . . . . . . . . 60
Power Adjustment, Front . . . . . . . 59
Reclining Seatbacks . . . . . . . . . . . . 60
Securing Child Restraints . . . . . . . . 91
Security Light . . . . . . . . . . . . . . . . . . . . . . . . . . 120