2019 CHEVROLET CORVETTE GRAND SPORT run flat
[x] Cancel search: run flatPage 287 of 367
Chevrolet Corvette Owner Manual (GMNA-Localizing-U.S./Canada/Mexico-
12032182) - 2019 - crc - 5/8/18
286 Vehicle Care
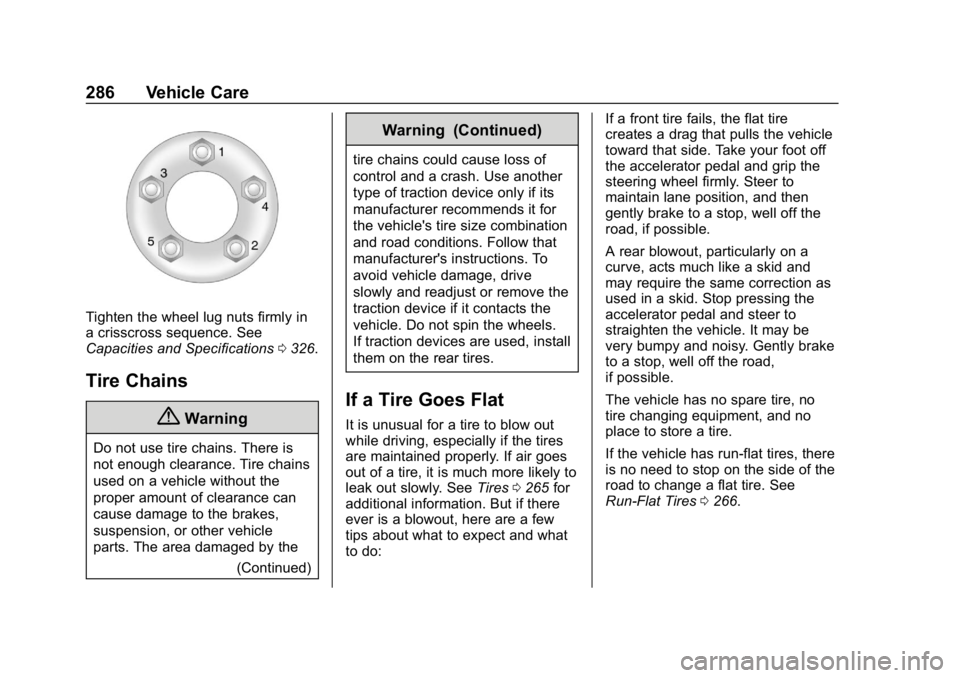
Tighten the wheel lug nuts firmly in
a crisscross sequence. See
Capacities and Specifications0326.
Tire Chains
{Warning
Do not use tire chains. There is
not enough clearance. Tire chains
used on a vehicle without the
proper amount of clearance can
cause damage to the brakes,
suspension, or other vehicle
parts. The area damaged by the
(Continued)
Warning (Continued)
tire chains could cause loss of
control and a crash. Use another
type of traction device only if its
manufacturer recommends it for
the vehicle's tire size combination
and road conditions. Follow that
manufacturer's instructions. To
avoid vehicle damage, drive
slowly and readjust or remove the
traction device if it contacts the
vehicle. Do not spin the wheels.
If traction devices are used, install
them on the rear tires.
If a Tire Goes Flat
It is unusual for a tire to blow out
while driving, especially if the tires
are maintained properly. If air goes
out of a tire, it is much more likely to
leak out slowly. SeeTires0265 for
additional information. But if there
ever is a blowout, here are a few
tips about what to expect and what
to do: If a front tire fails, the flat tire
creates a drag that pulls the vehicle
toward that side. Take your foot off
the accelerator pedal and grip the
steering wheel firmly. Steer to
maintain lane position, and then
gently brake to a stop, well off the
road, if possible.
A rear blowout, particularly on a
curve, acts much like a skid and
may require the same correction as
used in a skid. Stop pressing the
accelerator pedal and steer to
straighten the vehicle. It may be
very bumpy and noisy. Gently brake
to a stop, well off the road,
if possible.
The vehicle has no spare tire, no
tire changing equipment, and no
place to store a tire.
If the vehicle has run-flat tires, there
is no need to stop on the side of the
road to change a flat tire. See
Run-Flat Tires
0266.
Page 288 of 367
Chevrolet Corvette Owner Manual (GMNA-Localizing-U.S./Canada/Mexico-
12032182) - 2019 - crc - 5/8/18
Vehicle Care 287
{Warning
Special tools and procedures are
required to service a run-flat tire.
If these special tools and
procedures are not used, injury or
vehicle damage may occur.
Always be sure the proper tools
and procedures, as described in
the service manual, are used.
If this vehicle does not have run-flat
tires and a tire goes flat, avoid
further tire and wheel damage by
driving slowly to a level place, well
off the road, if possible. Turn on the
hazard warning flashers. See
Hazard Warning Flashers 0142.
1. Turn on the hazard warning flashers.
2. Set the parking brake firmly.
3. Put an automatic transmission in P (Park) or a manual
transmission in 1 (First) or
R (Reverse).
4. Turn off the ignition. 5. Inspect the flat tire.{Warning
Driving on a flat tire will cause
permanent damage to the tire.
Re-inflating a tire after it has been
driven on while severely
underinflated or flat may cause a
blowout and a serious crash.
Never attempt to re-inflate a tire
that has been driven on while
severely underinflated or flat.
Have your dealer or an authorized
tire service center repair or
replace the flat tire as soon as
possible.
If this vehicle has a tire sealant kit
and the tire has been separated
from the wheel, has damaged
sidewalls, or has a puncture larger
than 6 mm (0.25 in), the tire is too
severely damaged for the tire
sealant and compressor kit to be
effective. If the tire has a puncture
less than 6 mm (0.25 in) in the tread
area of the tire, see Tire Sealant
and Compressor Kit 0287.
Tire Sealant and
Compressor Kit
{Warning
Idling a vehicle in an enclosed
area with poor ventilation is
dangerous. Engine exhaust may
enter the vehicle. Engine exhaust
contains carbon monoxide (CO)
which cannot be seen or smelled.
It can cause unconsciousness
and even death. Never run the
engine in an enclosed area that
has no fresh air ventilation. For
more information, see Engine
Exhaust 0186.
{Warning
Overinflating a tire could cause
the tire to rupture and you or
others could be injured. Be sure
to read and follow the tire sealant
and compressor kit instructions
(Continued)
Page 291 of 367
Chevrolet Corvette Owner Manual (GMNA-Localizing-U.S./Canada/Mexico-
12032182) - 2019 - crc - 5/8/18
290 Vehicle Care
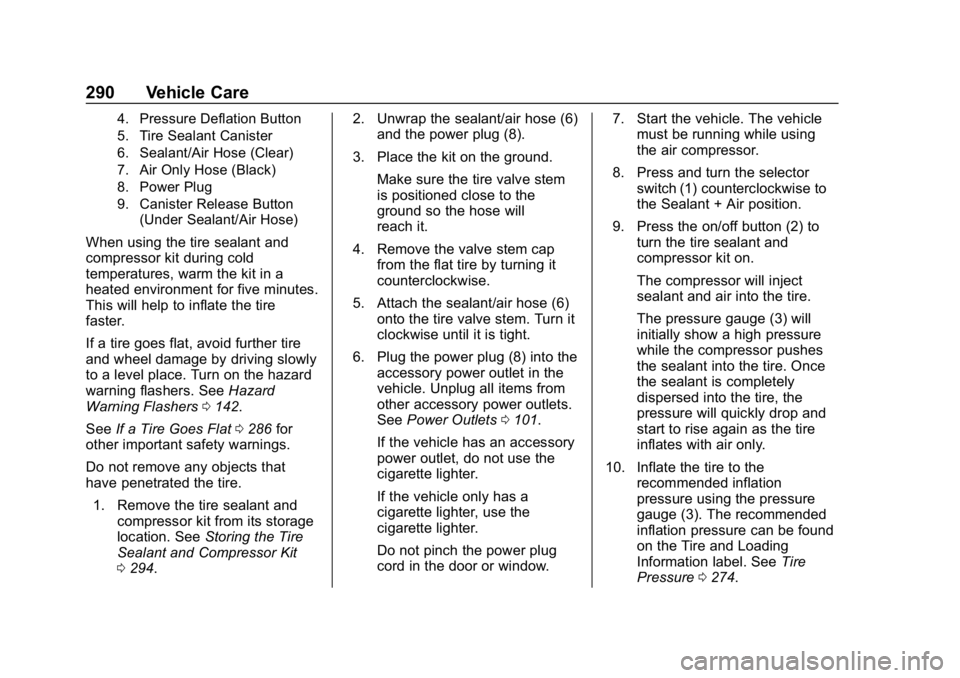
4. Pressure Deflation Button
5. Tire Sealant Canister
6. Sealant/Air Hose (Clear)
7. Air Only Hose (Black)
8. Power Plug
9. Canister Release Button(Under Sealant/Air Hose)
When using the tire sealant and
compressor kit during cold
temperatures, warm the kit in a
heated environment for five minutes.
This will help to inflate the tire
faster.
If a tire goes flat, avoid further tire
and wheel damage by driving slowly
to a level place. Turn on the hazard
warning flashers. See Hazard
Warning Flashers 0142.
See If a Tire Goes Flat 0286 for
other important safety warnings.
Do not remove any objects that
have penetrated the tire.
1. Remove the tire sealant and compressor kit from its storage
location. See Storing the Tire
Sealant and Compressor Kit
0 294. 2. Unwrap the sealant/air hose (6)
and the power plug (8).
3. Place the kit on the ground. Make sure the tire valve stem
is positioned close to the
ground so the hose will
reach it.
4. Remove the valve stem cap from the flat tire by turning it
counterclockwise.
5. Attach the sealant/air hose (6) onto the tire valve stem. Turn it
clockwise until it is tight.
6. Plug the power plug (8) into the accessory power outlet in the
vehicle. Unplug all items from
other accessory power outlets.
See Power Outlets 0101.
If the vehicle has an accessory
power outlet, do not use the
cigarette lighter.
If the vehicle only has a
cigarette lighter, use the
cigarette lighter.
Do not pinch the power plug
cord in the door or window. 7. Start the vehicle. The vehicle
must be running while using
the air compressor.
8. Press and turn the selector switch (1) counterclockwise to
the Sealant + Air position.
9. Press the on/off button (2) to turn the tire sealant and
compressor kit on.
The compressor will inject
sealant and air into the tire.
The pressure gauge (3) will
initially show a high pressure
while the compressor pushes
the sealant into the tire. Once
the sealant is completely
dispersed into the tire, the
pressure will quickly drop and
start to rise again as the tire
inflates with air only.
10. Inflate the tire to the recommended inflation
pressure using the pressure
gauge (3). The recommended
inflation pressure can be found
on the Tire and Loading
Information label. See Tire
Pressure 0274.
Page 294 of 367
Chevrolet Corvette Owner Manual (GMNA-Localizing-U.S./Canada/Mexico-
12032182) - 2019 - crc - 5/8/18
Vehicle Care 293
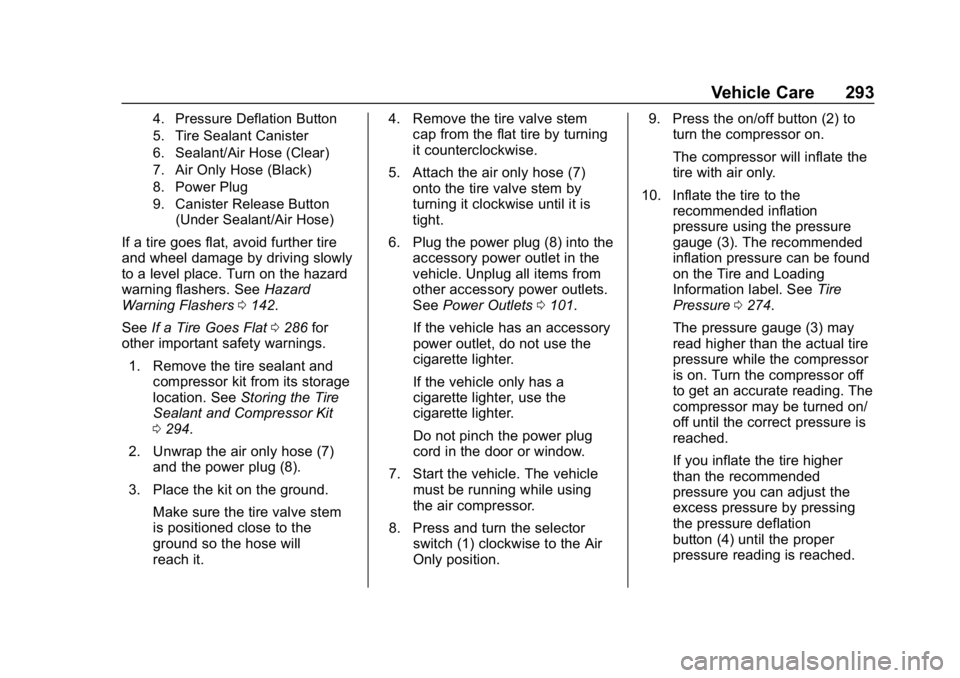
4. Pressure Deflation Button
5. Tire Sealant Canister
6. Sealant/Air Hose (Clear)
7. Air Only Hose (Black)
8. Power Plug
9. Canister Release Button(Under Sealant/Air Hose)
If a tire goes flat, avoid further tire
and wheel damage by driving slowly
to a level place. Turn on the hazard
warning flashers. See Hazard
Warning Flashers 0142.
See If a Tire Goes Flat 0286 for
other important safety warnings.
1. Remove the tire sealant and compressor kit from its storage
location. See Storing the Tire
Sealant and Compressor Kit
0 294.
2. Unwrap the air only hose (7) and the power plug (8).
3. Place the kit on the ground. Make sure the tire valve stem
is positioned close to the
ground so the hose will
reach it. 4. Remove the tire valve stem
cap from the flat tire by turning
it counterclockwise.
5. Attach the air only hose (7) onto the tire valve stem by
turning it clockwise until it is
tight.
6. Plug the power plug (8) into the accessory power outlet in the
vehicle. Unplug all items from
other accessory power outlets.
See Power Outlets 0101.
If the vehicle has an accessory
power outlet, do not use the
cigarette lighter.
If the vehicle only has a
cigarette lighter, use the
cigarette lighter.
Do not pinch the power plug
cord in the door or window.
7. Start the vehicle. The vehicle must be running while using
the air compressor.
8. Press and turn the selector switch (1) clockwise to the Air
Only position. 9. Press the on/off button (2) to
turn the compressor on.
The compressor will inflate the
tire with air only.
10. Inflate the tire to the recommended inflation
pressure using the pressure
gauge (3). The recommended
inflation pressure can be found
on the Tire and Loading
Information label. See Tire
Pressure 0274.
The pressure gauge (3) may
read higher than the actual tire
pressure while the compressor
is on. Turn the compressor off
to get an accurate reading. The
compressor may be turned on/
off until the correct pressure is
reached.
If you inflate the tire higher
than the recommended
pressure you can adjust the
excess pressure by pressing
the pressure deflation
button (4) until the proper
pressure reading is reached.
Page 295 of 367
Chevrolet Corvette Owner Manual (GMNA-Localizing-U.S./Canada/Mexico-
12032182) - 2019 - crc - 5/8/18
294 Vehicle Care
This option is only functional
when using the air only
hose (7).
11. Press the on/off button (2) to turn the tire sealant and
compressor kit off.
Be careful while handling the
tire sealant and compressor kit
as it could be warm after
usage.
12. Unplug the power plug (8) from the accessory power outlet in
the vehicle.
13. Disconnect the air only hose (7) from the tire valve stem, by
turning it counterclockwise, and
replace the tire valve stem cap.
14. Replace the air only hose (7) and the power plug (8) and
cord back in its original
location.
15. Place the equipment in the original storage location in the
vehicle.
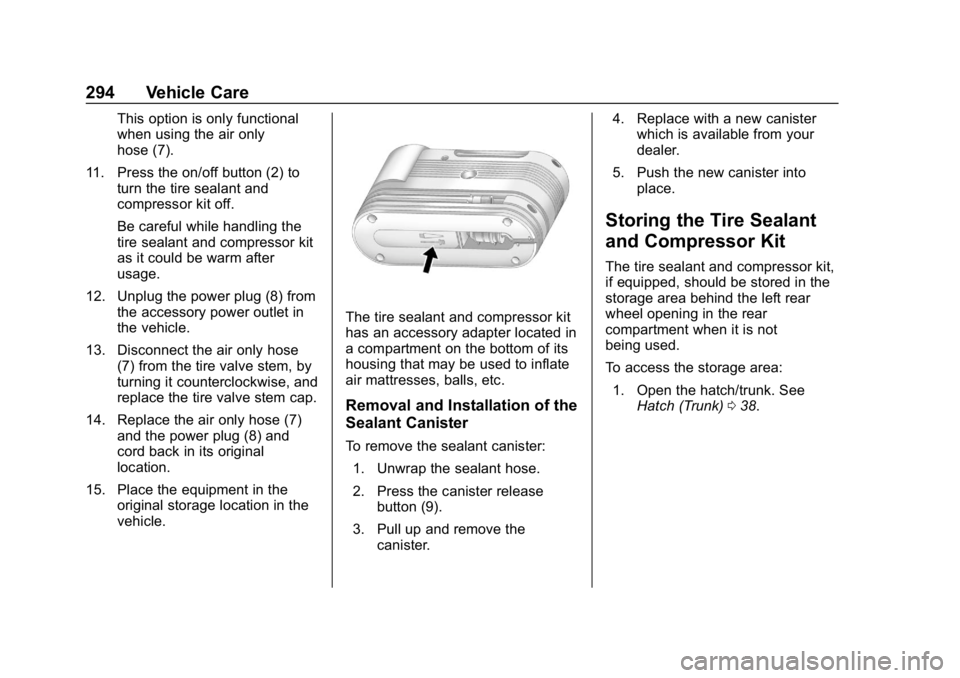
The tire sealant and compressor kit
has an accessory adapter located in
a compartment on the bottom of its
housing that may be used to inflate
air mattresses, balls, etc.
Removal and Installation of the
Sealant Canister
To remove the sealant canister:
1. Unwrap the sealant hose.
2. Press the canister release button (9).
3. Pull up and remove the canister. 4. Replace with a new canister
which is available from your
dealer.
5. Push the new canister into place.
Storing the Tire Sealant
and Compressor Kit
The tire sealant and compressor kit,
if equipped, should be stored in the
storage area behind the left rear
wheel opening in the rear
compartment when it is not
being used.
To access the storage area:
1. Open the hatch/trunk. See Hatch (Trunk) 038.
Page 299 of 367
Chevrolet Corvette Owner Manual (GMNA-Localizing-U.S./Canada/Mexico-
12032182) - 2019 - crc - 5/8/18
298 Vehicle Care
10. Connect the other end of thenegative (−) cable to the
negative (−) terminal (2) on the
dead battery.
11. Now start the vehicle with the good battery and run the
engine for a while.
12. Try to start the vehicle that had the dead battery. If it will not
start after a few tries, it
probably needs service.Caution
If the jumper cables are
connected or removed in the
wrong order, electrical shorting
may occur and damage the
vehicle. The repairs would not be
covered by the vehicle warranty.
Always connect and remove the
jumper cables in the correct order,
making sure that the cables do
not touch each other or other
metal.
Jumper Cable Removal
Reverse the sequence exactly when
removing the jumper cables.
After starting the disabled vehicle
and removing the jumper cables,
allow it to idle for several minutes.
The power windows may need to be
initialized. See “Window Indexing”
under Power Windows 046.
Towing the Vehicle
Caution
Incorrectly towing a disabled
vehicle may cause damage. The
damage would not be covered by
the vehicle warranty. Do not lash
or hook to suspension
components. Use the proper
straps around the tires to secure
the vehicle. Do not drag a locked
wheel/tire while loading the
vehicle. Do not use a sling type
lift to tow the vehicle. This could
damage the vehicle.
GM recommends a flatbed tow truck
to transport a disabled vehicle. Use
ramps to help reduce approach
angles, if necessary. A towed
vehicle should have its drive wheels
off the ground. Contact Roadside
Assistance or a professional towing
service if the disabled vehicle must
be towed.
Page 300 of 367
Chevrolet Corvette Owner Manual (GMNA-Localizing-U.S./Canada/Mexico-
12032182) - 2019 - crc - 5/8/18
Vehicle Care 299
Caution
Improper use of the tow eye can
cause vehicle damage. Use
caution and low speeds to
prevent damage to the vehicle.
If the vehicle is equipped with a tow
eye, only use the tow eye to pull the
vehicle onto a flatbed car carrier
from a flat road surface. Do not use
the tow eye to pull the vehicle from
snow, mud, or sand.
If necessary, the tow eye can be
obtained from your dealer.
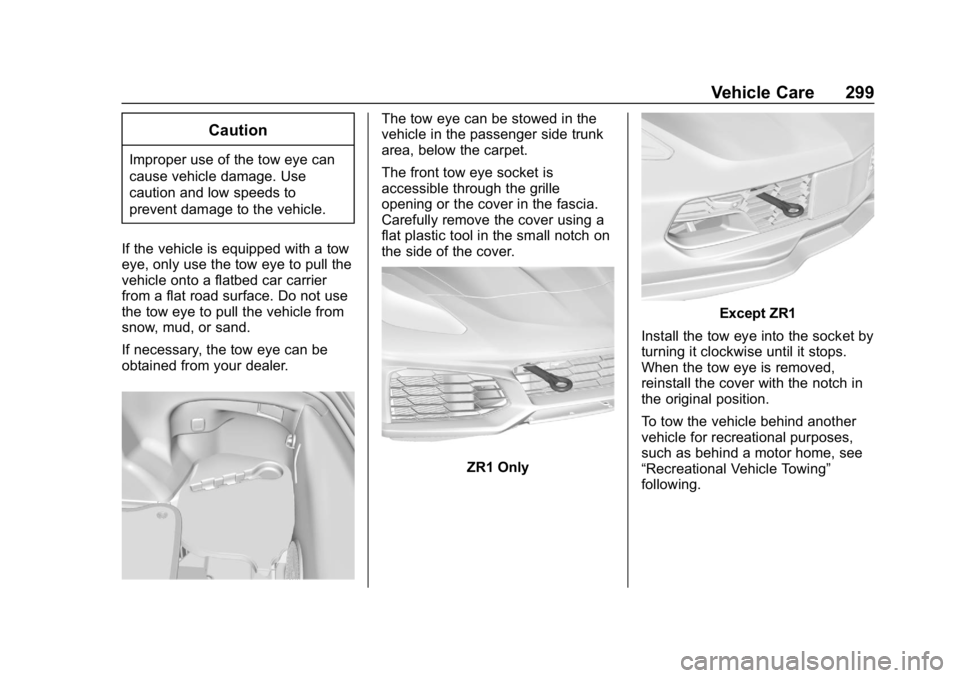
The tow eye can be stowed in the
vehicle in the passenger side trunk
area, below the carpet.
The front tow eye socket is
accessible through the grille
opening or the cover in the fascia.
Carefully remove the cover using a
flat plastic tool in the small notch on
the side of the cover.
ZR1 Only
Except ZR1
Install the tow eye into the socket by
turning it clockwise until it stops.
When the tow eye is removed,
reinstall the cover with the notch in
the original position.
To tow the vehicle behind another
vehicle for recreational purposes,
such as behind a motor home, see
“Recreational Vehicle Towing”
following.
Page 360 of 367

Chevrolet Corvette Owner Manual (GMNA-Localizing-U.S./Canada/Mexico-
12032182) - 2019 - crc - 5/8/18
Index 359
E
Electric Parking Brake . . . . . . . . . . 195
Electric Parking Brake Light . . . . 116
Electrical Equipment,Add-On . . . . . . . . . . . . . . . . . . . . . . . 216
Electrical System Engine Compartment FuseBlock . . . . . . . . . . . . . . . . . . . . . . . . 259
Fuses . . . . . . . . . . . . . . . . . . . . . . . . 258
Overload . . . . . . . . . . . . . . . . . . . . . 258
Rear Compartment Fuse Block . . . . . . . . . . . . . . . . . . . . . . . . 262
Electronic Stability Control (ESC) Off Light . . . . . . . . . . . . . . . . 118
Emergency OnStar . . . . . . . . . . . . . . . . . . . . . . . 346
Engine Air Cleaner/Filter . . . . . . . . . . . . . 239
Check Light (MalfunctionIndicator) . . . . . . . . . . . . . . . . . . . . .113
Compartment Overview . . . . . . . 225
Coolant Temperature Gauge . . . . . . . . . . . . . . . . . . . . . . .110
Coolant Temperature
Warning Light . . . . . . . . . . . . . . . .118
Cooling System . . . . . 242, 246, 247
Drive Belt Routing . . . . . . . . . . . . 329
Exhaust . . . . . . . . . . . . . . . . . . . . . . 186 Engine (cont'd)
Oil Life System . . . . . . . . . . . . . . . 237
Oil Pressure Light . . . . . . . . . . . . .119
Overheating . . . . . . . . . . . . . . . . . . 247
Power Messages . . . . . . . . . . . . . 128
Running While Parked . . . . . . . . 187
Starting . . . . . . . . . . . . . . . . . . . . . . . 182
Entry Lighting . . . . . . . . . . . . . . . . . . . 143
Event Data Recorders . . . . . . . . . . 342
Exit Lighting . . . . . . . . . . . . . . . . . . . . 143
Extended Parking . . . . . . . . . . . . . . . 186
Extender, Seat Belt . . . . . . . . . . . . . . 72
Exterior Lamp Controls . . . . . . . . . 139
Exterior Lamps Off Reminder . . . 139
Exterior Lighting Battery Saver . . . . . . . . . . . . . . . . . . . . . . . . . 144
F
FeaturesMemory . . . . . . . . . . . . . . . . . . . . . . . . . 12
Filter, Engine Air Cleaner . . . . . . . . . . . 239
Flash-to-Pass . . . . . . . . . . . . . . . . . . . 140
Flashers, Hazard Warning . . . . . . 142
Flat Tire . . . . . . . . . . . . . . . . . . . . . . . . 286
Floor Mats . . . . . . . . . . . . . . . . . . . . . . 309
Fluid Automatic Transmission . . . . . . 238 Fluid (cont'd)
Brakes . . . . . . . . . . . . . . . . . . . . . . . . 250
Washer . . . . . . . . . . . . . . . . . . . . . . . 248
Folding Mirrors . . . . . . . . . . . . . . . . . . 45
Frequency Statement
Radio . . . . . . . . . . . . . . . . . . . . . . . . . 340
Front Air Dam . . . . . . . . . . . . . . . . . . 179
Front Seats Heated and Ventilated . . . . . . . . . . 65
Fuel Additives . . . . . . . . . . . . . . . . . . . . . 213
Economy Driving . . . . . . . . . . . . . . . 24
Filling a Portable FuelContainer . . . . . . . . . . . . . . . . . . . 215
Filling the Tank . . . . . . . . . . . . . . . 214
Foreign Countries . . . . . . . . . . . . 213
Gauge . . . . . . . . . . . . . . . . . . . . . . . . 109
Low Fuel Warning Light . . . . . . . .119
Management, Active . . . . . . . . . . 185
Prohibited Fuels . . . . . . . . . . . . . . 213
Recommended . . . . . . . . . . 212, 213
Top Tier . . . . . . . . . . . . . . . . . . . . . . 212
Fuses . . . . . . . . . . . . . . . . . . . . . . . . . . 258
Engine Compartment FuseBlock . . . . . . . . . . . . . . . . . . . . . . . . 259
Rear Compartment Fuse Block . . . . . . . . . . . . . . . . . . . . . . . . 262