2019 CHEVROLET BOLT EV instrument panel
[x] Cancel search: instrument panelPage 190 of 371

Chevrolet BOLT EV Owner Manual (GMNA-Localizing-U.S./Canada/Mexico-
12163003) - 2019 - crc - 5/18/18
Climate Controls 189
The heated seats, if equipped,
climate on/off, recirculation, heat,
and air conditioning can be
controlled by touching Climate
Settings on the infotainment
Home Page.
A selection can then be made on
the climate settings page.
Automatic Operation
The system automatically controls
the fan speed, air delivery, air
conditioning, electric heating, and
recirculation to heat or cool the
vehicle to the selected temperature.
When AUTO is lit, all five functions
operate automatically. Each function
can also be manually set and the
selected setting is displayed or the
indicator is lit. Functions not
manually set will continue to be
automatically controlled, even if the
AUTO indicator is not lit.
For automatic operation:1. Press AUTO. 2. Set the temperature. An initial
setting of 22 °C (72 °F) is
recommended. Allow the
system time to stabilize. Adjust
the temperature as needed.
Manual Operation
ON : Touch to turn the climate
control system on and off.
The climate control system will turn
on when any climate control button
is pressed on the center stack or
touched on the climate control
display. To turn the system off,
touch ON again.
DorC: Press the buttons to
increase or decrease the fan speed.
The fan speed setting appears on
the climate control display. Manually
adjusting the fan speed cancels
automatic fan control. Press AUTO
to return to automatic operation.
Touch ON to turn off the fan and the
climate control system.
Temperature Control : Turn the
knob clockwise or counterclockwise
to increase or decrease the
temperature setting. Air Delivery Mode Control :
Press
c,d, or0on the center stack
to change the direction of airflow.
Any combination of the three
buttons can be selected. The
selected air delivery mode button
indicator is lit.
Pressing any button cancels
automatic air delivery control and
the direction of the airflow can be
controlled manually. Press AUTO to
return to automatic operation.
0: Air is directed to the
windshield.
d: Air is directed to the instrument
panel outlets.
c: Air is directed to the floor
outlets.
0MAX : Air is directed to the
windshield and the fan runs at a
higher speed. Fog or frost is cleared
from the windshield more quickly.
When the button is pressed again,
the system returns to the previous
mode setting.
Page 192 of 371

Chevrolet BOLT EV Owner Manual (GMNA-Localizing-U.S./Canada/Mexico-
12163003) - 2019 - crc - 5/18/18
Climate Controls 191
Caution
Do not try to clear frost or other
material from the inside of the
front windshield and rear window
with a razor blade or anything
else that is sharp. This may
damage the rear window
defogger grid and affect the
radio's ability to pick up stations
clearly. The repairs would not be
covered by the vehicle warranty.
Remote Start : The climate control
system may be started by using the
Remote Keyless Entry (RKE)
transmitter. The climate control
system will default to an appropriate
heating or cooling mode. See
Remote Start 040.
The rear window defogger turns on
if it is cold outside.
Mobile Application Feature
If equipped, this feature allows a
smartphone to set the start-up
climate control settings. The
following features can be set: .
Temperature
. Fan Speed
. Air Delivery Mode
. Climate Mode
. Recirculation
Once the settings are saved through
the application, the vehicle will use
these settings when turned on. After
the vehicle is turned on, use the
climate controls if additional
adjustments are desired.
Sensors
Indicator Light and Solar
Sensor (ILSS)
The ILSS is on top of the instrument
panel, near the windshield, where it
monitors solar intensity.
The climate control system uses the
sensor information to adjust the
temperature, fan speed,
recirculation, and air delivery mode
for best comfort.
Do not cover the sensor; otherwise
the automatic climate control system
may not work properly. Humidity Sensor
The humidity sensor is near the
base of the inside rearview mirror.
The climate control system uses the
sensor information to adjust the
temperature and recirculation for
best comfort.
Outside Air Temperature Sensor
The outside air temperature sensor
is behind the front grille of the
vehicle. The vehicle uses the sensor
information to display outside air
temperature. The climate control
system uses the information to
adjust the climate system operation.
Page 193 of 371

Chevrolet BOLT EV Owner Manual (GMNA-Localizing-U.S./Canada/Mexico-
12163003) - 2019 - crc - 5/18/18
192 Climate Controls
Air Vents
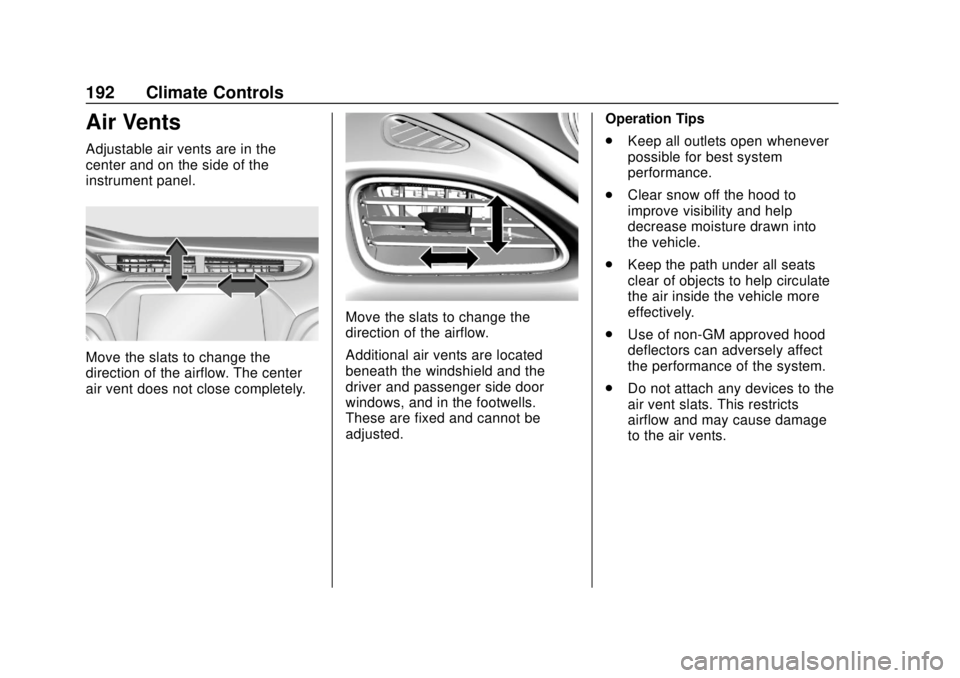
Adjustable air vents are in the
center and on the side of the
instrument panel.
Move the slats to change the
direction of the airflow. The center
air vent does not close completely.
Move the slats to change the
direction of the airflow.
Additional air vents are located
beneath the windshield and the
driver and passenger side door
windows, and in the footwells.
These are fixed and cannot be
adjusted.Operation Tips
.
Keep all outlets open whenever
possible for best system
performance.
. Clear snow off the hood to
improve visibility and help
decrease moisture drawn into
the vehicle.
. Keep the path under all seats
clear of objects to help circulate
the air inside the vehicle more
effectively.
. Use of non-GM approved hood
deflectors can adversely affect
the performance of the system.
. Do not attach any devices to the
air vent slats. This restricts
airflow and may cause damage
to the air vents.
Page 240 of 371

Chevrolet BOLT EV Owner Manual (GMNA-Localizing-U.S./Canada/Mexico-
12163003) - 2019 - crc - 5/18/18
Driving and Operating 239
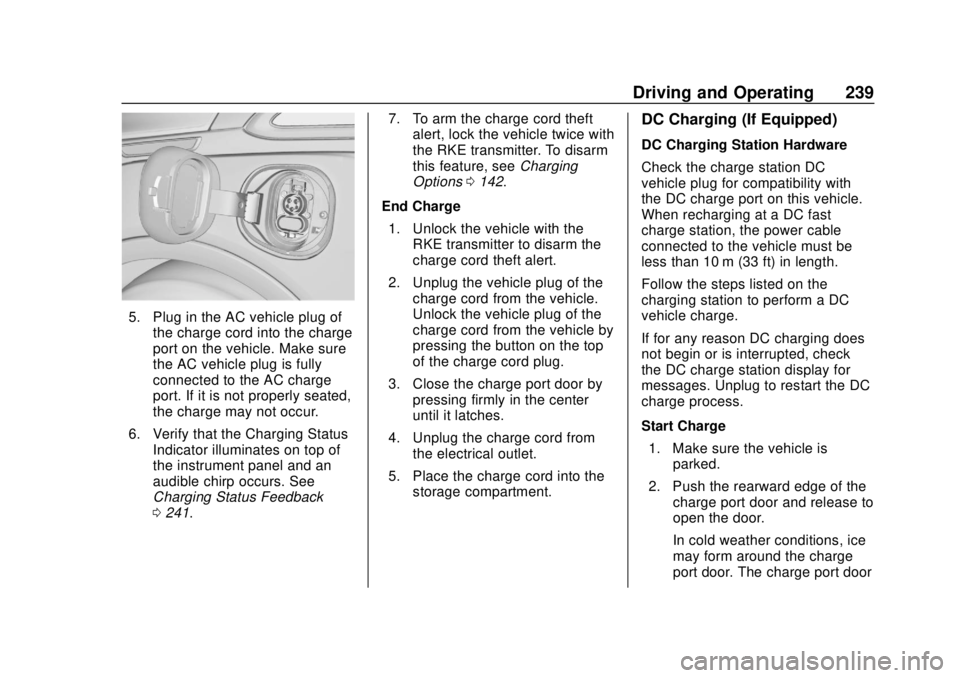
5. Plug in the AC vehicle plug ofthe charge cord into the charge
port on the vehicle. Make sure
the AC vehicle plug is fully
connected to the AC charge
port. If it is not properly seated,
the charge may not occur.
6. Verify that the Charging Status Indicator illuminates on top of
the instrument panel and an
audible chirp occurs. See
Charging Status Feedback
0241. 7. To arm the charge cord theft
alert, lock the vehicle twice with
the RKE transmitter. To disarm
this feature, see Charging
Options 0142.
End Charge 1. Unlock the vehicle with the RKE transmitter to disarm the
charge cord theft alert.
2. Unplug the vehicle plug of the charge cord from the vehicle.
Unlock the vehicle plug of the
charge cord from the vehicle by
pressing the button on the top
of the charge cord plug.
3. Close the charge port door by pressing firmly in the center
until it latches.
4. Unplug the charge cord from the electrical outlet.
5. Place the charge cord into the storage compartment.
DC Charging (If Equipped)
DC Charging Station Hardware
Check the charge station DC
vehicle plug for compatibility with
the DC charge port on this vehicle.
When recharging at a DC fast
charge station, the power cable
connected to the vehicle must be
less than 10 m (33 ft) in length.
Follow the steps listed on the
charging station to perform a DC
vehicle charge.
If for any reason DC charging does
not begin or is interrupted, check
the DC charge station display for
messages. Unplug to restart the DC
charge process.
Start Charge
1. Make sure the vehicle is parked.
2. Push the rearward edge of the charge port door and release to
open the door.
In cold weather conditions, ice
may form around the charge
port door. The charge port door
Page 241 of 371

Chevrolet BOLT EV Owner Manual (GMNA-Localizing-U.S./Canada/Mexico-
12163003) - 2019 - crc - 5/18/18
240 Driving and Operating
may not open on the first
attempt. Remove ice from the
area and repeat attempting to
open the charge port door.
3. Unlatch the DC charging dustcover and lower it fully.
4. Plug in the DC vehicle plug into the DC charge port on the
vehicle. Make sure that the DC
vehicle plug is fully connected
to the DC charge port. If it is
not properly seated then the
charge may not occur. Proper
plug connection can be
checked by information on
the DIC. 5. Follow the steps listed on the
charging station to start
charging. The Electric Parking
Brake will automatically apply
once the charge process has
been started.
6. Once charging, the DC vehicle plug will be locked to the DC
charge port and cannot be
disconnected while charging is
active.
7. Verify that the Charging Status Indicator illuminates on top of
the instrument panel and an
audible chirp occurs. See
Charging Status Feedback
0241.
Caution
Do not attempt to disconnect the
DC vehicle plug while charging is
active. This action may damage
vehicle or charging station
hardware. Stop Charge
Controls on the charging station can
be used to stop the charge process
at any time.
To stop the charge when inside the
vehicle, you may use the stop
charging button on the Charging
screen. See
Programmable
Charging 0132.
There is also an available mobile
app with several charging functions.
See KeyPass 045.
Stop Charge —Automatic
When the vehicle no longer needs
to use power from the charging
station, it will stop charging and the
DC vehicle plug will be unlocked
from the DC charge port.
Energy can still be consumed from
the charging station when the
vehicle’s displays and indicators
show that the battery is fully
charged. This is to ensure the
battery is in optimal temperature
operating range to maximize vehicle
range. See Programmable Charging
0 132.
Page 242 of 371

Chevrolet BOLT EV Owner Manual (GMNA-Localizing-U.S./Canada/Mexico-
12163003) - 2019 - crc - 5/18/18
Driving and Operating 241
End Charge1. Wait until the charging process has been fully stopped, the
vehicle plug is unlocked, and
the Charging Status Indicator is
solid green or off.
If the vehicle plug does not
unlock from the vehicle charge
port after a charge, contact
Roadside Assistance for
assistance. See Roadside
Assistance Program 0337.
2. Unplug the DC vehicle plug from the DC charge port on the
vehicle and close the dust
cover.
3. Close the charge port door by pressing firmly in the center
until it latches.
4. The Electric Parking Brake should be manually
disengaged before driving the
vehicle.
5. To start another DC charge, remove the DC vehicle plug
and reconnect.Delayed Charging
Override
To temporarily override a delayed
charge event, unplug the charge
cord from the charge port and then
plug it back in within five seconds.
A single audible chirp will sound
and charging will begin immediately.
To cancel a temporary override,
unplug the charge cord, wait for
10 seconds, and then plug the
charge cord back in. A double
audible chirp will sound and
charging will be delayed.
See Programmable Charging 0132
for advanced charge scheduling
options.
Charging Status
Feedback
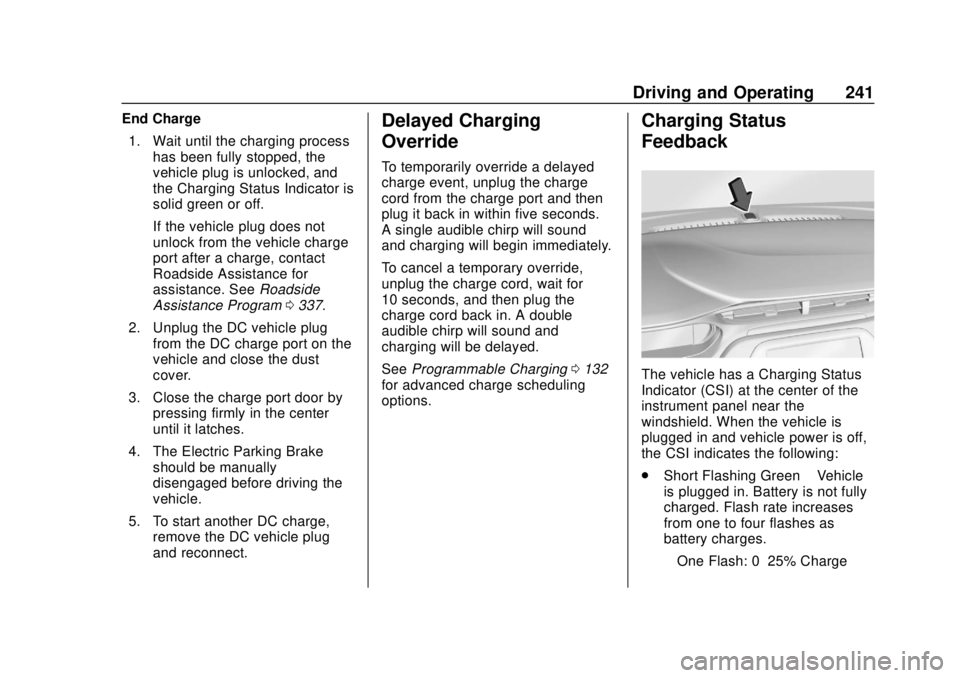
The vehicle has a Charging Status
Indicator (CSI) at the center of the
instrument panel near the
windshield. When the vehicle is
plugged in and vehicle power is off,
the CSI indicates the following:
. Short Flashing Green –Vehicle
is plugged in. Battery is not fully
charged. Flash rate increases
from one to four flashes as
battery charges.
‐ One Flash: 0–25% Charge
Page 256 of 371

Chevrolet BOLT EV Owner Manual (GMNA-Localizing-U.S./Canada/Mexico-
12163003) - 2019 - crc - 5/18/18
Vehicle Care 255
Vehicle Care
General Information
General Information . . . . . . . . . . 256
California Proposition65 Warning . . . . . . . . . . . . . . . . . 256
California Perchlorate Materials Requirements . . . . . 257
Accessories and Modifications . . . . . . . . . . . . . . . . 257
Vehicle Checks
Doing Your OwnService Work . . . . . . . . . . . . . . . 257
Hood . . . . . . . . . . . . . . . . . . . . . . . . . 258
Underhood Compartment Overview . . . . . . . . . . . . . . . . . . . . 260
Cooling System . . . . . . . . . . . . . . 261
Washer Fluid . . . . . . . . . . . . . . . . . 262
Brakes . . . . . . . . . . . . . . . . . . . . . . . 263
Brake Fluid . . . . . . . . . . . . . . . . . . . 264
Battery - North America . . . . . . 265
Wiper Blade Replacement . . . . 267
Windshield Replacement . . . . . 268
Gas Strut(s) . . . . . . . . . . . . . . . . . . 268
Headlamp Aiming
Headlamp Aiming . . . . . . . . . . . . 270
Bulb Replacement
Bulb Replacement . . . . . . . . . . . . 270
Halogen Bulbs . . . . . . . . . . . . . . . . 270
High Intensity Discharge (HID) Lighting . . . . . . . . . . . . . . . . . . . . . 270
LED Lighting . . . . . . . . . . . . . . . . . 270
Taillamps, Turn Signal,
Stoplamps, and Back-Up
Lamps . . . . . . . . . . . . . . . . . . . . . . 271
License Plate Lamp . . . . . . . . . . 271
Electrical System
High Voltage Devices and Wiring . . . . . . . . . . . . . . . . . . . . . . . 272
Electrical System Overload . . . 272
Fuses and Circuit Breakers . . . 273
Underhood Compartment Fuse Block . . . . . . . . . . . . . . . . . . . . . . . . 273
Instrument Panel Fuse Block . . . . . . . . . . . . . . . . . . . . . . . . 277
Wheels and Tires
Tires . . . . . . . . . . . . . . . . . . . . . . . . . . 279
All-Season Tires . . . . . . . . . . . . . . 279
Winter Tires . . . . . . . . . . . . . . . . . . 280
Self-Sealing Tires . . . . . . . . . . . . 280
Tire Sidewall Labeling . . . . . . . . 281
Tire Designations . . . . . . . . . . . . . 282
Tire Terminology andDefinitions . . . . . . . . . . . . . . . . . . 282
Tire Pressure . . . . . . . . . . . . . . . . . 285 Tire Pressure Monitor
System . . . . . . . . . . . . . . . . . . . . . . 286
Tire Pressure Monitor Operation . . . . . . . . . . . . . . . . . . . 287
Tire Inspection . . . . . . . . . . . . . . . . 291
Tire Rotation . . . . . . . . . . . . . . . . . 292
When It Is Time for New
Tires . . . . . . . . . . . . . . . . . . . . . . . . 293
Buying New Tires . . . . . . . . . . . . . 293
Different Size Tires and Wheels . . . . . . . . . . . . . . . . . . . . . . 295
Uniform Tire Quality Grading . . . . . . . . . . . . . . . . . . . . . 295
Wheel Alignment and Tire Balance . . . . . . . . . . . . . . . . . . . . . 297
Wheel Replacement . . . . . . . . . . 297
Tire Chains . . . . . . . . . . . . . . . . . . . 298
If a Tire Goes Flat . . . . . . . . . . . . 298
Tire Sealant and Compressor Kit . . . . . . . . . . . . . 299
Storing the Tire Sealant and Compressor Kit . . . . . . . . . . . . . 305
Jump Starting
Jump Starting - NorthAmerica . . . . . . . . . . . . . . . . . . . . . 306
Towing the Vehicle
Towing the Vehicle . . . . . . . . . . . 309
Recreational VehicleTowing . . . . . . . . . . . . . . . . . . . . . . 311
Page 259 of 371

Chevrolet BOLT EV Owner Manual (GMNA-Localizing-U.S./Canada/Mexico-
12163003) - 2019 - crc - 5/18/18
258 Vehicle Care
Warning (Continued)
High voltage components are
identified by labels. Do not
remove, open, take apart,
or modify these components.
High voltage cable or wiring has
orange covering. Do not probe,
tamper with, cut, or modify high
voltage cable or wiring.
{Warning
It can be dangerous to work on
your vehicle if you do not have
the proper knowledge, service
manual, tools, or parts. Always
follow owner’s manual procedures
and consult the service manual
for your vehicle before doing any
service work.
If doing some of your own service
work, use the proper service
manual. It tells you much more
about how to service the vehicle
than this manual can. To order the proper service manual, see
Publication Ordering Information
0
342.
This vehicle has an airbag system.
Before attempting to do your own
service work, see Servicing the
Airbag-Equipped Vehicle 082.
Keep a record with all parts receipts
and list the mileage and the date of
any service work performed. See
Maintenance Records 0330.
Hood
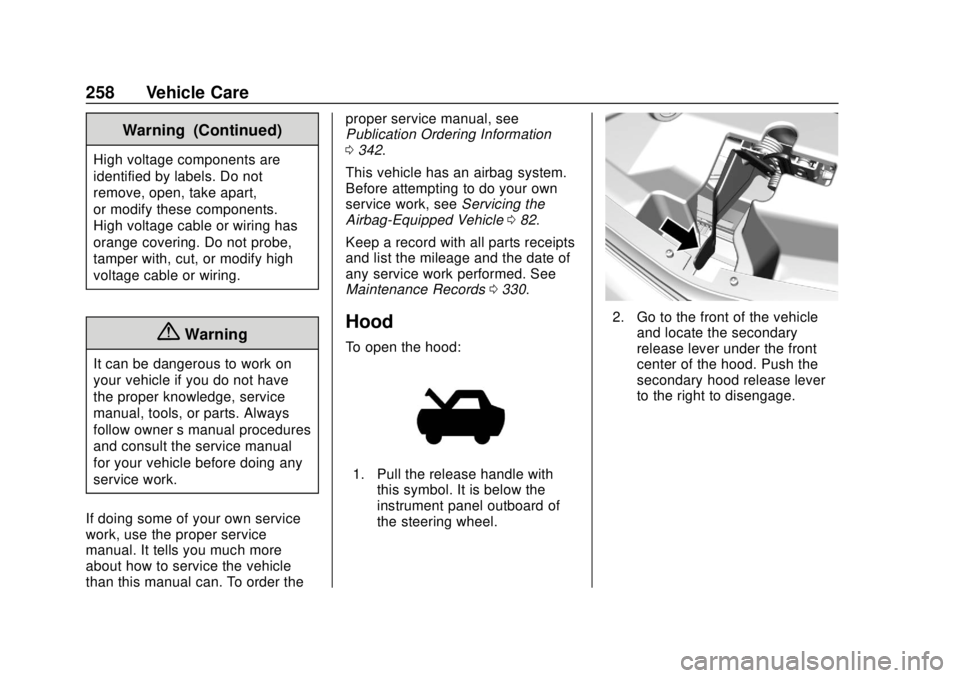
To open the hood:
1. Pull the release handle with
this symbol. It is below the
instrument panel outboard of
the steering wheel.
2. Go to the front of the vehicleand locate the secondary
release lever under the front
center of the hood. Push the
secondary hood release lever
to the right to disengage.