2019 CHEVROLET BLAZER rear lift gate
[x] Cancel search: rear lift gatePage 246 of 404

Chevrolet Blazer (GMNA-Localizing-U.S./Canada/Mexico-12461541) - 2019 -
CRC - 3/11/19
Driving and Operating 245
.Intelligent Brake Assist (IBA)
. Front Pedestrian Braking (FPB)
If equipped with Lane Change Alert
(LCA), the LCA detection zones that
extend back from the side of the
vehicle do not move further back
when a trailer is towed. Use caution
while changing lanes when towing a
trailer.
If equipped with Rear Cross Traffic
Alert (RCTA), use caution while
backing up when towing a trailer, as
the RCTA detection zones that
extend out from the back of the
vehicle do not move further back
when a trailer is towed.
{Warning
To prevent serious injury or death
from carbon monoxide (CO),
when towing a trailer: . Do not drive with the
liftgate, trunk/hatch,
or rear-most window open.
(Continued)
Warning (Continued)
.Fully open the air outlets on
or under the instrument
panel.
. Adjust the climate control
system to a setting that
brings in only outside air.
See “Climate Control
Systems” in the Index.
For more information about
carbon monoxide, see Engine
Exhaust 0200.
Towing a trailer requires experience.
The combination of the vehicle and
trailer is longer and not as
responsive as the vehicle itself. Get
used to the handling and braking of
the combination by driving on a
level road surface before driving on
public roads.
The trailer structure, the tires, and
the brakes must all be rated to carry
the intended cargo. Inadequate trailer equipment can cause the
combination to operate in an
unexpected or unsafe manner.
Before driving, inspect all trailer
hitch parts and attachments, safety
chains, electrical connectors, lamps,
tires, and mirrors. See
Towing
Equipment 0251. If the trailer has
electric brakes, start the
combination moving and then
manually apply the trailer brake
controller to check that the trailer
brakes work.
During the trip, occasionally check
that the cargo and trailer are secure
and that the lamps and any trailer
brakes are working.
Towing with a Stability Control
System
When towing, the stability control
system might be heard. The system
reacts to vehicle movement caused
by the trailer, which mainly occurs
during cornering. This is normal
when towing heavier trailers.
Page 283 of 404

Chevrolet Blazer (GMNA-Localizing-U.S./Canada/Mexico-12461541) - 2019 -
CRC - 3/11/19
282 Vehicle Care
Rear Wiper Blade Replacement
The rear wiper blade and wiper arm
have a cover for protection.
To remove the cover:
1. Slide a plastic tool under thecover and push upward to
unsnap.
2. Slide the cover toward the wiper blade tip to unhook it
from the blade assembly.
3. Remove the cover.
4. After wiper blade replacement, ensure that the cover hook
slides into the slot in the blade
assembly.
5. Snap the cover down to secure. To replace the wiper blade:
1. Lift the wiper arm away from the windshield.
2. Push the release lever (2) todisengage the hook and push
the wiper arm (1) out of the
blade assembly (3).
3. Push the new blade assembly securely on the wiper arm until
the release lever clicks into
place.
Windshield Replacement
Driver Assistance Systems
If the windshield needs to be
replaced and the vehicle is
equipped with a front camera sensor
for the Driver Assistance Systems, a GM replacement windshield is
recommended. The replacement
windshield must be installed
according to GM specifications for
proper alignment. If it is not, these
systems may not work properly, they
may display messages, or they may
not work at all. See your dealer for
proper windshield replacement.
Gas Strut(s)
This vehicle is equipped with gas
strut(s) to provide assistance in
lifting and holding open the hood/
trunk/liftgate system in full open
position.
{Warning
If the gas struts that hold open
the hood, trunk, and/or liftgate fail,
you or others could be seriously
injured. Take the vehicle to your
dealer for service immediately.
Visually inspect the gas struts for
signs of wear, cracks, or other
damage periodically. Check to
(Continued)
Page 295 of 404

Chevrolet Blazer (GMNA-Localizing-U.S./Canada/Mexico-12461541) - 2019 -
CRC - 3/11/19
294 Vehicle Care
FusesUsage
F1 –
F2 Trailer battery
F3 –
F4 Rear blower
F5 Rear drive control 1
F6 –
F7 Right window
F8 Rear window defogger
F9 Left window
F10 –
F11 Trailer reverse
F12 –
F13 –
F14 –
F15 –
F16 –
F17 –
F18 –
F19 – Fuses
Usage
F20 Glove box door/ Trailer stoplamp
F21 –
F22 –
F23 –
F24 –
F25 –
F26 Trailer brake
F27 Driver ventilated seat/Lumbar
F28 Passive entry/ Passive start
F29 –
F30 Canister vent
F31 –
F32 Heated mirrors
F33 –
F34 Liftgate module
F35 Fuel system control module/Fuel tank
zone module Fuses
Usage
F36 Passenger ventilated seat/
Lumbar
F37 –
F38 Window module
F39 Rear closure
F40 Memory seat module
F41 Automatic occupancy sensor
F42 –
F43 –
F44 –
F45 Liftgate motor
F46 Rear heated seats
F47 –
F48 –
F49 –
F50 –
F51 –
Page 321 of 404

Chevrolet Blazer (GMNA-Localizing-U.S./Canada/Mexico-12461541) - 2019 -
CRC - 3/11/19
320 Vehicle Care
sealant and compressor kit to be
effective. SeeRoadside Assistance
Program 0370.
Removing the Tire Sealant and
Compressor Kit
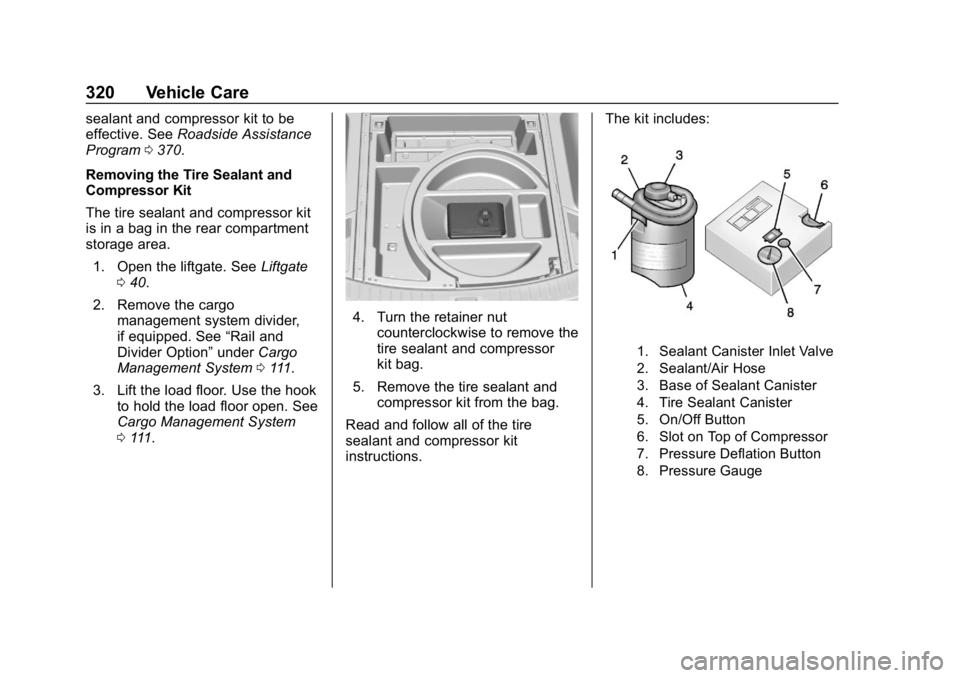
The tire sealant and compressor kit
is in a bag in the rear compartment
storage area. 1. Open the liftgate. See Liftgate
0 40.
2. Remove the cargo management system divider,
if equipped. See “Rail and
Divider Option” underCargo
Management System 0111.
3. Lift the load floor. Use the hook to hold the load floor open. See
Cargo Management System
0111.
4. Turn the retainer nut
counterclockwise to remove the
tire sealant and compressor
kit bag.
5. Remove the tire sealant and compressor kit from the bag.
Read and follow all of the tire
sealant and compressor kit
instructions. The kit includes:
1. Sealant Canister Inlet Valve
2. Sealant/Air Hose
3. Base of Sealant Canister
4. Tire Sealant Canister
5. On/Off Button
6. Slot on Top of Compressor
7. Pressure Deflation Button
8. Pressure Gauge
Page 331 of 404

Chevrolet Blazer (GMNA-Localizing-U.S./Canada/Mexico-12461541) - 2019 -
CRC - 3/11/19
330 Vehicle Care
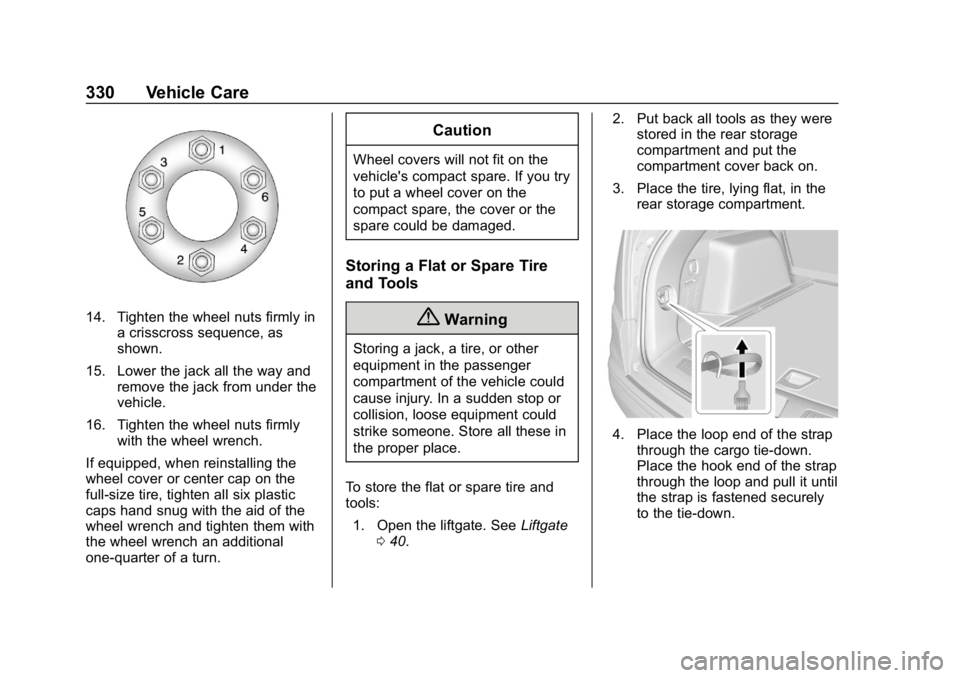
14. Tighten the wheel nuts firmly ina crisscross sequence, as
shown.
15. Lower the jack all the way and remove the jack from under the
vehicle.
16. Tighten the wheel nuts firmly with the wheel wrench.
If equipped, when reinstalling the
wheel cover or center cap on the
full-size tire, tighten all six plastic
caps hand snug with the aid of the
wheel wrench and tighten them with
the wheel wrench an additional
one-quarter of a turn.
Caution
Wheel covers will not fit on the
vehicle's compact spare. If you try
to put a wheel cover on the
compact spare, the cover or the
spare could be damaged.
Storing a Flat or Spare Tire
and Tools
{Warning
Storing a jack, a tire, or other
equipment in the passenger
compartment of the vehicle could
cause injury. In a sudden stop or
collision, loose equipment could
strike someone. Store all these in
the proper place.
To store the flat or spare tire and
tools: 1. Open the liftgate. See Liftgate
0 40. 2. Put back all tools as they were
stored in the rear storage
compartment and put the
compartment cover back on.
3. Place the tire, lying flat, in the rear storage compartment.
4. Place the loop end of the strapthrough the cargo tie-down.
Place the hook end of the strap
through the loop and pull it until
the strap is fastened securely
to the tie-down.
Page 343 of 404

Chevrolet Blazer (GMNA-Localizing-U.S./Canada/Mexico-12461541) - 2019 -
CRC - 3/11/19
342 Vehicle Care
Caution (Continued)
dust and ice. Always wash the
chrome with soap and water after
exposure.
Caution
To avoid surface damage on
wheels and wheel trim, do not
use strong soaps, chemicals,
abrasive polishes, cleaners,
or brushes. Use only GM
approved cleaners. Do not drive
the vehicle through an automatic
car wash that uses silicon carbide
tire/wheel cleaning brushes.
Damage could occur and the
repairs would not be covered by
the vehicle warranty.
Brake System
Visually inspect brake lines and
hoses for proper hook-up, binding,
leaks, cracks, chafing, etc. Inspect
disc brake pads for wear and rotorsfor surface condition. Inspect drum
brake linings/shoes for wear or
cracks. Inspect all other brake parts.
Steering, Suspension, and
Chassis Components
Visually inspect steering,
suspension, and chassis
components for damaged, loose,
or missing parts or signs of wear at
least once a year.
Inspect power steering for proper
electrical connections, binding,
cracks, chafing, etc.
Visually check constant velocity joint
boots and axle seals for leaks.
Body Component Lubrication
Lubricate all key lock cylinders,
hood hinges, liftgate hinges, and the
steel fuel door hinges, unless the
components are plastic. Applying
silicone grease on weatherstrips
with a clean cloth will make them
last longer, seal better, and not stick
or squeak.
Underbody Maintenance
At least twice a year, spring and fall,
use plain water to flush any
corrosive materials from the
underbody. Take care to thoroughly
clean any areas where mud and
other debris can collect.
Do not directly power wash the
transfer case and/or front/rear axle
output seals. High pressure water
can overcome the seals and
contaminate the fluid. Contaminated
fluid will decrease the life of the
transfer case and/or axles and
should be replaced.
Sheet Metal Damage
If the vehicle is damaged and
requires sheet metal repair or
replacement, make sure the body
repair shop applies anti-corrosion
material to parts repaired or
replaced to restore corrosion
protection.
Original manufacturer replacement
parts will provide the corrosion
protection while maintaining the
vehicle warranty.
Page 398 of 404

Chevrolet Blazer (GMNA-Localizing-U.S./Canada/Mexico-12461541) - 2019 -
CRC - 3/11/19
Index 397
Horn . . . . . . . . . . . . . . . . . . . . . . . . . . . . 117
How to Wear Seat BeltsProperly . . . . . . . . . . . . . . . . . . . . . . . . 72
HVAC . . . . . . . . . . . . . . . . . . . . . . . . . . . 170
I
Ignition Positions . . . . . . . . . . . . . . . 192
Immobilizer . . . . . . . . . . . . . . . . . . . . . . 48
Indicator Pedestrian Ahead . . . . . . . . . . . . 140
Vehicle Ahead . . . . . . . . . . . . . . . . 139
Infants and Young Children,
Restraints . . . . . . . . . . . . . . . . . . . . . . 93
Information Publication Ordering . . . . . . . . . . 375
Infotainment . . . . . . . . . . . . . . . . . . . . 169
Infotainment System . . . . . . . . . . . . 379
Instrument Cluster . . . . . . . . . 124, 128
Interior Rearview Mirrors . . . . . . . . . 50
Introduction . . . . . . . . . . . . . . . . . . . . . . . 2
J
Jump Starting - North America . . . . . . . . . . . . . . . . . . . . . . . 332
K
Keyless EntryRemote (RKE) System . . . . . . . . . 27
Keys . . . . . . . . . . . . . . . . . . . . . . . . . . . . . 26
L
Labeling, Tire Sidewall . . . . . . . . . . 298
Lamps Courtesy . . . . . . . . . . . . . . . . . . . . . . 165
Daytime Running (DRL) . . . . . . 163
Dome . . . . . . . . . . . . . . . . . . . . . . . . . 165
Exterior Controls . . . . . . . . . . . . . . 160
Exterior Lamps OffReminder . . . . . . . . . . . . . . . . . . . 162
Exterior Lighting Battery
Saver . . . . . . . . . . . . . . . . . . . . . . . 168
Malfunction Indicator (Check Engine) . . . . . . . . . . . . . 135
On Reminder . . . . . . . . . . . . . . . . . 143
Reading . . . . . . . . . . . . . . . . . . . . . . 165
Lane Change Alert (LCA) . . . . . . . 236
Lane Departure Warning (LDW) . . . . . . . . . . . . . . . . 238
Lane Keep Assist (LKA) . . . . . . . . 238
Lane Keep Assist Light . . . . . . . . . 139
Lap-Shoulder Belt . . . . . . . . . . . . . . . 74
LATCH System
Replacing Parts after aCrash . . . . . . . . . . . . . . . . . . . . . . . 103
LATCH, Lower Anchors and Tethers for Children . . . . . . . . . . . . 98
LED Lighting . . . . . . . . . . . . . . . . . . . . 284
Liftgate . . . . . . . . . . . . . . . . . . . . . . . . . . 40 Lighting
Entry . . . . . . . . . . . . . . . . . . . . . . . . . 166
Exit . . . . . . . . . . . . . . . . . . . . . . . . . . . 167
Illumination Control . . . . . . . . . . . 165
LED . . . . . . . . . . . . . . . . . . . . . . . . . . 284
Lights Airbag Readiness . . . . . . . . . . . . . 134
Antilock Brake System
(ABS) Warning . . . . . . . . . . . . . . 138
Brake System Warning . . . . . . . 137
Charging System . . . . . . . . . . . . . 135
Check Engine (Malfunction Indicator) . . . . . . . . . . . . . . . . . . . . 135
Cruise Control . . . . . . . . . . . . . . . . 143
Door Ajar . . . . . . . . . . . . . . . . . . . . . 143
Electric Parking Brake . . . . . . . . 138
Engine Oil Pressure . . . . . . . . . . 141
Flash-to-Pass . . . . . . . . . . . . . . . . . 162
High-Beam On . . . . . . . . . . . . . . . . 142
High/Low Beam Changer . . . . . 162
Lane Keep Assist . . . . . . . . . . . . . 139
Low Fuel Warning . . . . . . . . . . . . 142
Seat Belt Reminders . . . . . . . . . . 133
Security . . . . . . . . . . . . . . . . . . . . . . 142
Service Electric Parking Brake . . . . . . . . . . . . . . . . . . . . . . . 138
StabiliTrak OFF . . . . . . . . . . . . . . . 140
Tire Pressure . . . . . . . . . . . . . . . . . 141