2019 CHEVROLET BLAZER height
[x] Cancel search: heightPage 12 of 404

Chevrolet Blazer (GMNA-Localizing-U.S./Canada/Mexico-12461541) - 2019 -
CRC - 3/11/19
In Brief 11
Windows
Power windows work when the
ignition is on, in ACC/ACCESSORY,
or when Retained Accessory
Power (RAP) is active. See
Retained Accessory Power (RAP)
0197.
Using the window switch, press to
open or pull to close the window.
The windows may be temporarily
disabled if they are used repeatedly
within a short time.
See Power Windows 053.
Seat Adjustment
Manual Seats
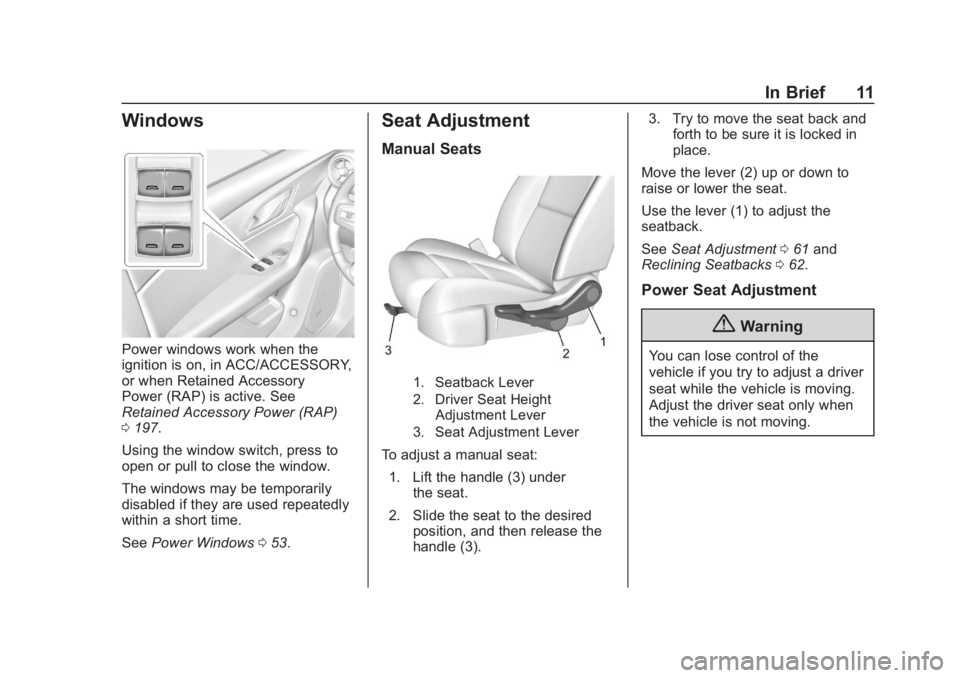
1. Seatback Lever
2. Driver Seat Height
Adjustment Lever
3. Seat Adjustment Lever
To adjust a manual seat:
1. Lift the handle (3) under the seat.
2. Slide the seat to the desired position, and then release the
handle (3). 3. Try to move the seat back and
forth to be sure it is locked in
place.
Move the lever (2) up or down to
raise or lower the seat.
Use the lever (1) to adjust the
seatback.
See Seat Adjustment 061 and
Reclining Seatbacks 062.
Power Seat Adjustment
{Warning
You can lose control of the
vehicle if you try to adjust a driver
seat while the vehicle is moving.
Adjust the driver seat only when
the vehicle is not moving.
Page 14 of 404

Chevrolet Blazer (GMNA-Localizing-U.S./Canada/Mexico-12461541) - 2019 -
CRC - 3/11/19
In Brief 13
Heated and Ventilated
Seats
Heated and Ventilated Seat
Buttons Shown, Heated Seat Buttons Similar
If available, the buttons are near the
climate controls on the center stack.
To operate, the engine must be
running.
Press
LorMto heat the driver or
passenger seat. Press
{orC, if available, to
ventilate the driver or passenger
seat. A ventilated seat has a fan
that pulls or pushes air through the
seat. The air is not cooled.
Press the button once for the
highest setting. With each press of
the button, the seat will change to
the next lower setting, and then to
the off setting. The indicator lights
below the buttons indicate three for
the highest setting and one for the
lowest. If the heated seats are on
high, the level may automatically be
lowered after approximately
30 minutes.
See Heated and Ventilated Front
Seats 067.
Head Restraint
Adjustment
Do not drive until the head restraints
for all occupants are installed and
adjusted properly.
To achieve a comfortable seating
position, change the seatback
recline angle as little as necessary while keeping the seat and the head
restraint height in the proper
position.
See
Head Restraints 059 and
Reclining Seatbacks 062.
Seat Belts
Refer to the following sections for
important information on how to use
seat belts properly:
.
Seat Belts 071
. How to Wear Seat Belts Properly
072
Page 42 of 404

Chevrolet Blazer (GMNA-Localizing-U.S./Canada/Mexico-12461541) - 2019 -
CRC - 3/11/19
Keys, Doors, and Windows 41
The liftgate has an electric latch.
If the battery is disconnected or has
low voltage, the liftgate will not
open. The liftgate will resume
operation when the battery is
reconnected and charged.
Power Liftgate Operation
{Warning
You or others could be injured if
caught in the path of the power
liftgate. Make sure there is no one
in the way of the liftgate as it is
opening and closing.
Caution
Driving with an open and
unsecured liftgate may result in
damage to the power liftgate
components.
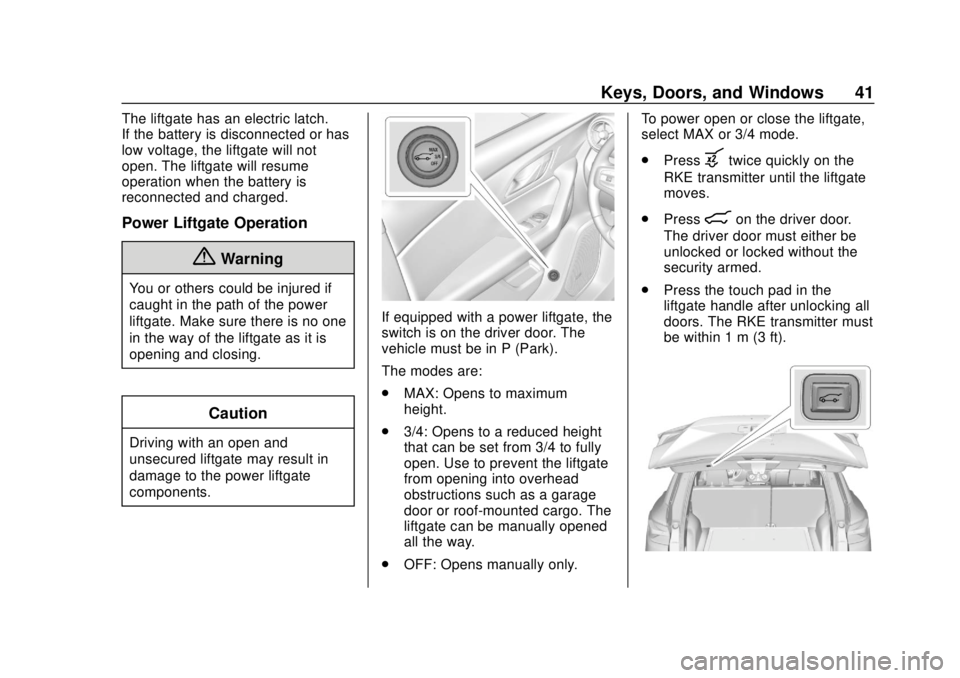
If equipped with a power liftgate, the
switch is on the driver door. The
vehicle must be in P (Park).
The modes are:
.MAX: Opens to maximum
height.
. 3/4: Opens to a reduced height
that can be set from 3/4 to fully
open. Use to prevent the liftgate
from opening into overhead
obstructions such as a garage
door or roof-mounted cargo. The
liftgate can be manually opened
all the way.
. OFF: Opens manually only. To power open or close the liftgate,
select MAX or 3/4 mode.
.
Press
btwice quickly on the
RKE transmitter until the liftgate
moves.
. Press
8on the driver door.
The driver door must either be
unlocked or locked without the
security armed.
. Press the touch pad in the
liftgate handle after unlocking all
doors. The RKE transmitter must
be within 1 m (3 ft).
Page 44 of 404

Chevrolet Blazer (GMNA-Localizing-U.S./Canada/Mexico-12461541) - 2019 -
CRC - 3/11/19
Keys, Doors, and Windows 43
sensor, the liftgate will reverse
direction and open fully. The liftgate
will remain open until it is activated
again or closed manually.
Setting the 3/4 Mode
To change the position the liftgate
stops at when opening:1. Select MAX or 3/4 mode and power open the liftgate.
2. Stop the liftgate movement at the desired height by pressing
any liftgate switch. Manually
adjust the liftgate position if
needed.
3. Press and hold
lat the
bottom of the liftgate until the
turn signals flash and a beep
sounds. This indicates the
setting has been recorded.
The liftgate cannot be set below a
minimum programmable height.
If there is no light flash or sound,
then the height adjustment may be
too low.
Manual Operation
Select OFF to manually operate the
liftgate. See “Manual Liftgate” at the
beginning of this section.
Caution
Attempting to move the liftgate
too quickly and with excessive
force may result in damage to the
vehicle.
Operate the liftgate manually with a
smooth motion and moderate
speed. The system includes a
feature that limits the manual
closing speed to protect the
components.
Hands-Free Operation
If equipped, the liftgate may be
operated with a kicking motion
under the left side of the rear
bumper at the location of the
projected logo. See "Projected
Logo" later in this section. The RKE
transmitter must be within 1 m (3 ft). The hands-free feature will not work
while the liftgate is moving. To stop
the liftgate while in motion use one
of the liftgate switches.
The hands-free feature can be
customized. See
Vehicle
Personalization 0151. Choose from
the following:
On-Open and Close : The kicking
motion is activated to both open and
close the liftgate.
On-Open Only : The kicking motion
is activated to only open the liftgate.
Off : The feature is disabled.
Page 60 of 404

Chevrolet Blazer (GMNA-Localizing-U.S./Canada/Mexico-12461541) - 2019 -
CRC - 3/11/19
Seats and Restraints 59
Head Restraints
The vehicle’s front seats have
adjustable head restraints in the
outboard seating positions.
{Warning
With head restraints that are not
installed and adjusted properly,
there is a greater chance that
occupants will suffer a neck/
spinal injury in a crash. Do not
drive until the head restraints for
all occupants are installed and
adjusted properly.
If your vehicle has rear head
restraints that fold down, always
return them to the full upright
position whenever an occupant is
seated in the seat.
Adjust the head restraint so that the
top of the restraint is at the same
height as the top of the occupant's
head. This position reduces the
chance of a neck injury in a crash.
Front Seats
The vehicle's front seats have
adjustable head restraints in the
outboard seating positions.
The height of the head restraint can
be adjusted.
To raise or lower the head restraint,
press the button located on the side
of the head restraint and pull up or
push the head restraint down, and
release the button. Pull and push on
the head restraint after the button is
released to make sure that it is
locked in place.
The front seat outboard head
restraints are not removable.
Page 61 of 404

Chevrolet Blazer (GMNA-Localizing-U.S./Canada/Mexico-12461541) - 2019 -
CRC - 3/11/19
60 Seats and Restraints
Rear Seats
Rear Head Restraint Adjustment
The vehicle's rear seats have
adjustable head restraints in the
outboard seating positions.
The height of the head restraint can
be adjusted. Pull the head restraint
up to raise it. Try to move the head
restraint to make sure that it is
locked in place.
To lower the head restraint, press
the button, located on the top of the
seatback, and push the head
restraint down. Try to move thehead restraint after the button is
released to make sure that it is
locked in place.
Folding the Rear Head Restraint
If equipped, the head restraint can
be folded rearward to allow for
better visibility when the rear seat is
unoccupied.
To fold the head restraint, press the
button on the side of the head
restraint.
The head restraint will fold rearward
automatically.
When an occupant or child restraint
is in the seat, always return the
head restraint to the full upright
position. Pull the head restraint up
and forward until it locks into place.
Push and pull on the head restraint
to make sure that it is locked.
Always adjust the head restraint so
that the top of the restraint is at the
same height as the top of the
occupant's head.
Rear outboard head restraints are
not removable.
Page 62 of 404

Chevrolet Blazer (GMNA-Localizing-U.S./Canada/Mexico-12461541) - 2019 -
CRC - 3/11/19
Seats and Restraints 61
Front Seats
Seat Adjustment
{Warning
You can lose control of the
vehicle if you try to adjust a driver
seat while the vehicle is moving.
Adjust the driver seat only when
the vehicle is not moving.
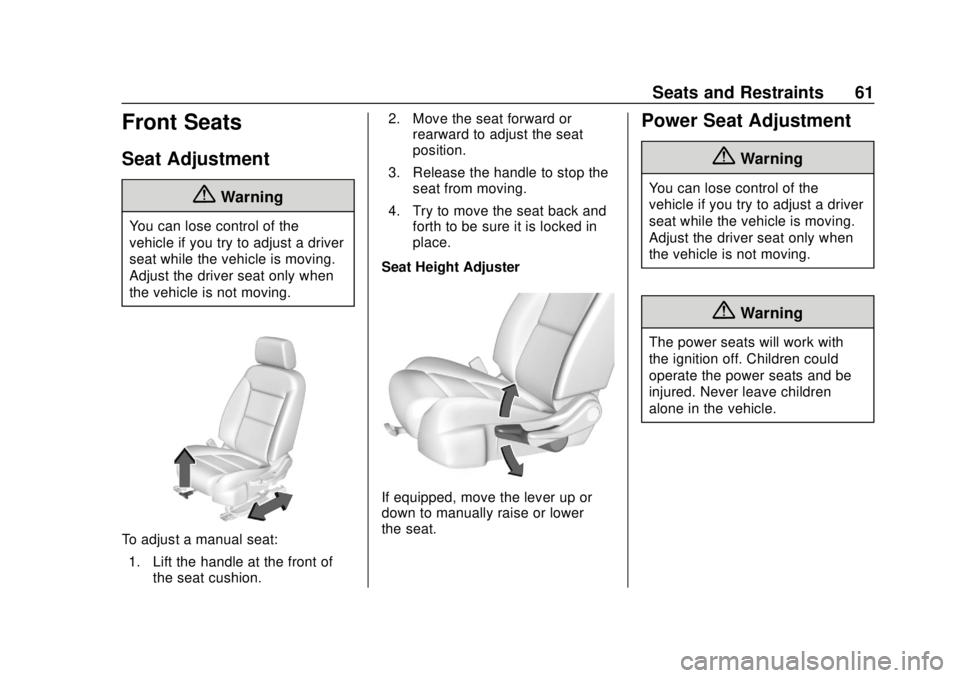
To adjust a manual seat:1. Lift the handle at the front of the seat cushion. 2. Move the seat forward or
rearward to adjust the seat
position.
3. Release the handle to stop the seat from moving.
4. Try to move the seat back and forth to be sure it is locked in
place.
Seat Height Adjuster
If equipped, move the lever up or
down to manually raise or lower
the seat.
Power Seat Adjustment
{Warning
You can lose control of the
vehicle if you try to adjust a driver
seat while the vehicle is moving.
Adjust the driver seat only when
the vehicle is not moving.
{Warning
The power seats will work with
the ignition off. Children could
operate the power seats and be
injured. Never leave children
alone in the vehicle.
Page 76 of 404

Chevrolet Blazer (GMNA-Localizing-U.S./Canada/Mexico-12461541) - 2019 -
CRC - 3/11/19
Seats and Restraints 75
The lap-shoulder belt may lock
if you pull the belt across you
very quickly. If this happens, let
the belt go back slightly to
unlock it. Then pull the belt
across you more slowly.
If the shoulder portion of a
passenger belt is pulled out all
the way, the child restraint
locking feature may be
engaged. If this happens, let
the belt go back all the way
and start again.
Engaging the child restraint
locking feature in the front
outboard seating position may
affect the passenger sensing
system. SeePassenger
Sensing System 085.
3. Push the latch plate into the
buckle until it clicks.
Pull up on the latch plate to
make sure it is secure. If the
belt is not long enough, see
Seat Belt Extender 077.
Position the release button on
the buckle so that the seat belt
could be quickly unbuckled if
necessary.
4. If equipped with a shoulder belt height adjuster, move it to the
height that is right for you. See
“Shoulder Belt Height Adjuster” later in this section for
instructions on use and
important safety information.
5. To make the lap part tight, pull
up on the shoulder belt.