2019 CADILLAC XTS settings
[x] Cancel search: settingsPage 165 of 376

Cadillac XTS Owner Manual (GMNA-Localizing-U.S./Canada-12032610) -
2019 - crc - 8/22/18
164 CLIMATE CONTROLS
Climate Control Display
1. Climate Control Selection(Application Tray Button)
2. Driver and Passenger Temperature Controls
3. Fan Control
4. REAR (Rear Climate Control Display)
5. Sync (Synchronized Temperature)
6. Outside Temperature Display
7. Air Delivery Mode Control
8. A/C (Air Conditioning) The fan, air delivery mode, air
conditioning, driver and passenger
temperatures, and Sync settings can
be controlled by touching CLIMATE
on the infotainment Home Page or the
climate button in the climate control
display application tray. A selection
can then be made on the front climate
control page displayed. See the
infotainment manual.
Climate Control Status Display
The climate control status display
appears briefly when the climate
control buttons on the center stack
are adjusted. Pressing the status
display will open the climate control
display.
Automatic Operation
The system automatically controls the
fan speed, air delivery, air
conditioning, and recirculation in
order to heat or cool the vehicle to the
desired temperature.
When AUTO is lit, all four functions
operate automatically. Each function
can also be manually set and the
setting is displayed. Functions not
manually set will continue to be
automatically controlled, even if the
AUTO indicator is not lit.
For automatic operation:
1. Press AUTO.
2. Set the temperature. Allow the system time to stabilize. Then
adjust the temperature as needed
for best comfort.
To cool the vehicle faster,
recirculation may be automatically
selected in warm weather. The
Page 166 of 376

Cadillac XTS Owner Manual (GMNA-Localizing-U.S./Canada-12032610) -
2019 - crc - 8/22/18
CLIMATE CONTROLS 165
recirculation light will not come on.
Press
@to select recirculation; press
it again to select outside air.
English units can be changed to
metric units through the instrument
cluster. See “Cluster Options Menu ”
under Instrument Cluster 0121.
OFF : Press to turn the fan on or off.
When off, no air will flow into the
vehicle. Turning the fan on,
or pressing any other button, will turn
the system back on using the current
setting. The temperature control and
air delivery mode can still be adjusted.
w/x: The temperature can be
adjusted separately for the driver and
the passenger. Press to increase or
decrease the temperature. Press and
hold to rapidly increase or decrease
the temperature.
The driver and passenger
temperatures can also be adjusted by
touching the controls on the display.
Sync : Touch Sync on the display to
link all climate zone settings to the
driver settings. Adjust the driver side
temperature control to change the linked temperature. When the
passenger settings are adjusted, the
Sync button is no longer highlighted.
REAR :
If equipped, touch REAR on
the front climate control display to
open the rear climate control display.
The rear climate control settings can
now be adjusted from the front
passenger area.
Manual Operation
z 9 y: Press the fan control
buttons or the climate display fan
control to increase or decrease the fan
speed. Press and hold the buttons or
the climate display control to adjust
the speed more quickly. The fan speed
setting displays. Pressing either button
cancels automatic fan control and the
fan can be controlled manually. Press
AUTO to return to automatic
operation. To turn off the fan and
climate control system, press and hold
the fan down button or climate
display fan control until it is off.
Air Delivery Mode Control : When
the climate information is displayed,
touch the desired air delivery mode on
the display to change the direction of the airf low. The selected air delivery
mode button is lit. Touching any of
the air delivery modes cancels
automatic air delivery control and the
direction of the airflow can be
controlled manually. Press AUTO to
return to automatic operation.
To change the current mode, select
one of the following:
Y:
Air is directed to the instrument
panel outlets.
\: Air is divided between the
instrument panel outlets and the floor
outlets.
[: Air is directed to the floor
outlets.
-: Clears the windows of fog or
moisture. Air is directed to the
windshield and floor outlets.
0: Clears the windshield of fog or
frost more quickly. Air is directed to
the windshield. Press
0to turn on or
off. Changing the air delivery mode
also turns the defrost off.
A/C : Touch A/C on the display to
turn the automatic air conditioning on
or off. If the fan is turned off or the
Page 168 of 376

Cadillac XTS Owner Manual (GMNA-Localizing-U.S./Canada-12032610) -
2019 - crc - 8/22/18
CLIMATE CONTROLS 167
Caution (Continued)
stations clearly. The repairs would
not be covered by the vehicle
warranty.
Driver and Passenger Heated and
Ventilated Seats : If equipped, press
Jorzto heat the driver or
passenger seat cushion and seatback.
Press
Cor{to ventilate the driver
or passenger seat. See Heated and
Ventilated Front Seats 063.
The vehicle also has auto heated or
ventilated seats that turn on when the
vehicle is on. The seats will activate at
the level required by the vehicle’s
interior temperature. To turn off the
heated seats, press
Jorz. To turn
off the ventilated seats, press
Cor{.
The auto heated or ventilated seats
feature can be turned on or off.
See Vehicle Personalization 0147 and
Heated and Ventilated Front Seats 063. Remote Start Climate Control
Operation :
If equipped with the
remote start feature, the climate
control system may run when the
vehicle is started remotely. The system
uses the driver’s previous settings to
heat or cool the inside of the vehicle.
The rear defog may come on during
remote start based on cold ambient
conditions. The rear defog indicator
light does not come on during a
remote start.
If equipped, the heated seats will turn
on if it is cold outside or the
ventilated seats will turn on if it is hot
outside. The heated and ventilated
seat indicator lights may not come on
during a remote start. If equipped, the
heated steering wheel will come on in
a remote start if it is cold outside. The
heated steering wheel indicator light
may not come on.
See Remote Vehicle Start 034 and
Heated and Ventilated Front Seats 063.
Sensor
The solar sensor, on top of the
instrument panel near the windshield,
monitors the solar heat.
The climate control system uses the
sensor information to adjust the
temperature, fan speed, recirculation,
and air delivery mode for best
comfort.
If the sensor is covered, the automatic
climate control system may not work
properly.
Page 169 of 376

Cadillac XTS Owner Manual (GMNA-Localizing-U.S./Canada-12032610) -
2019 - crc - 8/22/18
168 CLIMATE CONTROLS
Rear Climate Control
System
If equipped, the rear climate control
system is on the rear of the center
console. The settings can be adjusted
with the rear climate control buttons
and the rear climate display controls.
Rear Climate Control Buttons
1. Heated Rear Seats (If Equipped)
2. AUTO (Automatic Operation)
3. Temperature Control
4.
O(On/Off)
5. MODE (Air Delivery Mode Control)
Rear Climate Display Controls
1. Rear Climate Temperature Control
2. Front (Front Climate Control Display)
3. Fan Control
4. Outside Temperature Display
5. Sync (Synchronized Temperatures)
6. Rear Control Lockout
7. Air Delivery Mode Control
8. Auto (Rear Automatic Operation)
9. On/Off REAR :
Press this button on the front
climate control display to open the
rear climate control display. The rear
climate control settings can now be
adjusted from the front
passenger area.
P: PressPor touch On/Off on the
display to turn the rear climate
control on or off. If the rear climate
control is turned off using On/Off on
the display, the rear climate control
buttons must be pressed twice to turn
the system back on. Press
Pon the
rear climate controls and within
five seconds press the MODE or
temperature buttons on the controls.
Sync : Touch Sync on the display to
match the rear climate control
temperature to the front climate
control driver temperature. The Sync
button is highlighted. Press the
temperature, MODE, or AUTO button
twice to unlink the set driver and rear
temperatures. The Sync button is no
longer highlighted.
Page 174 of 376

Cadillac XTS Owner Manual (GMNA-Localizing-U.S./Canada-12032610) -
2019 - crc - 8/22/18
DRIVING AND OPERATING 173
Driving Characteristics andTowing Tips . . . . . . . . . . . . . . . . . . . . . 230
Trailer Towing . . . . . . . . . . . . . . . . . . . . 232
Towing Equipment . . . . . . . . . . . . . . . 234
Conversions and Add-Ons
Add-On Electrical Equipment . . . 235
Driving Information
Distracted Driving
Distraction comes in many forms and
can take your focus from the task of
driving. Exercise good judgment and
do not let other activities divert your
attention away from the road. Many
local governments have enacted laws
regarding driver distraction. Become
familiar with the local laws in
your area.
To avoid distracted driving, keep your
eyes on the road, keep your hands on
the steering wheel, and focus your
attention on driving.
. Do not use a phone in demanding
driving situations. Use a
hands-free method to place or
receive necessary phone calls.
. Watch the road. Do not read, take
notes, or look up information on
phones or other electronic devices.
. Designate a front seat passenger
to handle potential distractions. .
Become familiar with vehicle
features before driving, such as
programming favorite radio
stations and adjusting climate
control and seat settings. Program
all trip information into any
navigation device prior to driving.
. Wait until the vehicle is parked to
retrieve items that have fallen to
the floor.
. Stop or park the vehicle to tend to
children.
. Keep pets in an appropriate carrier
or restraint.
. Avoid stressful conversations
while driving, whether with a
passenger or on a cell phone.
{Warning
Taking your eyes off the road too
long or too often could cause a
crash resulting in injury or death.
Focus your attention on driving.
Refer to the CUE manual for more
information on using the CUE system,
if equipped.
Page 206 of 376
Cadillac XTS Owner Manual (GMNA-Localizing-U.S./Canada-12032610) -
2019 - crc - 8/22/18
DRIVING AND OPERATING 205
.Press and hold SET– down until
the desired lower speed is reached,
then release it.
. To decrease the vehicle speed in
smaller increments, press SET–
down to the first detent. For each
press, the vehicle goes about
1 km/h (1 mph) slower.
. To decrease the vehicle speed in
larger increments, press SET–
down to the second detent. For
each press, the vehicle speed
decreases to the next 5 km/h
(5 mph) mark on the speedometer.
Selecting the Follow Distance Gap
When a slower moving vehicle is
detected ahead within the selected
following gap, ACC will adjust the
vehicle's speed and attempt to
maintain the follow distance gap
selected.
Press
[on the steering wheel to
adjust the following gap. Each press
cycles the gap button through three
settings: Far, Medium, or Near. When pressed, the current gap setting
displays briefly on the instrument
cluster and HUD. The gap setting will
be maintained until it is changed.
Since each gap setting corresponds to
a following time (Far, Medium,
or Near), the following distance will
vary based on vehicle speed. The
faster the vehicle speed, the further
back your vehicle will follow a vehicle
detected ahead. Consider traffic and
weather conditions when selecting the
following gap. The range of selectable
gaps may not be appropriate for all
drivers and driving conditions.
Changing the gap setting
automatically changes the alert timing
sensitivity (Far, Medium, or Near) for
the Forward Collision Alert (FCA)
feature. See
Forward Collision Alert
(FCA) System 0217. Alerting the Driver
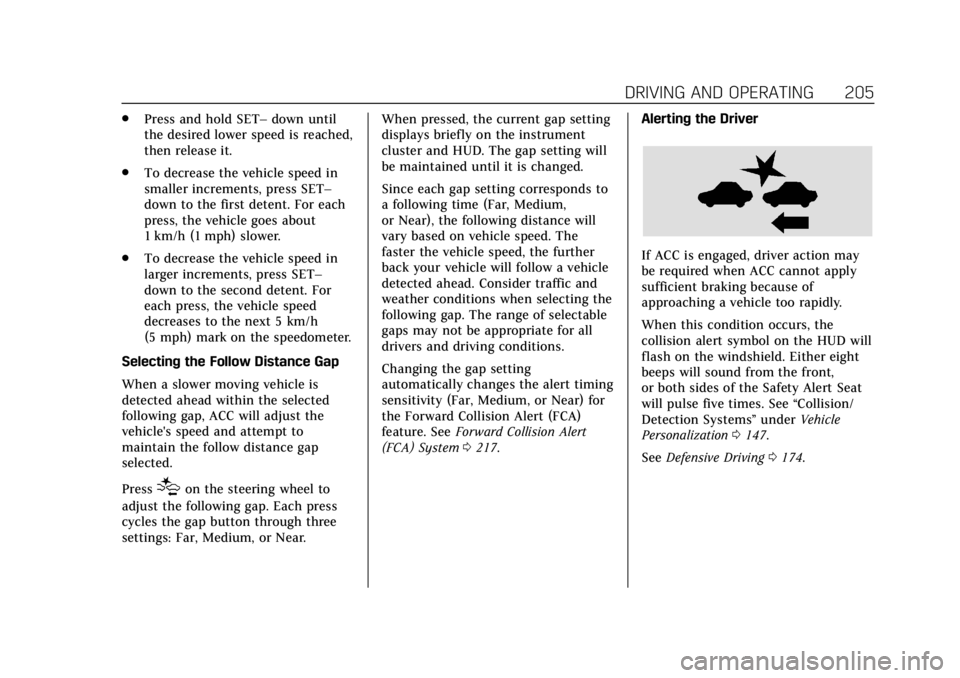
If ACC is engaged, driver action may
be required when ACC cannot apply
sufficient braking because of
approaching a vehicle too rapidly.
When this condition occurs, the
collision alert symbol on the HUD will
flash on the windshield. Either eight
beeps will sound from the front,
or both sides of the Safety Alert Seat
will pulse five times. See
“Collision/
Detection Systems” underVehicle
Personalization 0147.
See Defensive Driving 0174.
Page 239 of 376

Cadillac XTS Owner Manual (GMNA-Localizing-U.S./Canada-12032610) -
2019 - crc - 8/22/18
238 VEHICLE CARE
California Perchlorate
Materials Requirements
Certain types of automotive
applications, such as airbag initiators,
seat belt pretensioners, and lithium
batteries contained in Remote Keyless
Entry transmitters, may contain
perchlorate materials. Special
handling may be necessary. For
additional information, see
www.dtsc.ca.gov/hazardouswaste/
perchlorate.
Accessories and
Modifications
Adding non-dealer accessories or
making modifications to the vehicle
can affect vehicle performance and
safety, including such things as
airbags, braking, stability, ride and
handling, emissions systems,
aerodynamics, durability, and
electronic systems like antilock
brakes, traction control, and stability
control. These accessories or
modifications could even cause
malfunction or damage not covered by
the vehicle warranty.Damage to suspension components
caused by modifying vehicle height
outside of factory settings will not be
covered by the vehicle warranty.
Damage to vehicle components
resulting from modifications or the
installation or use of non-GM certified
parts, including control module or
software modifications, is not covered
under the terms of the vehicle
warranty and may affect remaining
warranty coverage for affected parts.
GM Accessories are designed to
complement and function with other
systems on the vehicle. See your
dealer to accessorize the vehicle using
genuine GM Accessories installed by a
dealer technician.
Also, see
Adding Equipment to the
Airbag-Equipped Vehicle 087.
Vehicle Checks
Doing Your Own
Service Work
{Warning
It can be dangerous to work on
your vehicle if you do not have the
proper knowledge, service manual,
tools, or parts. Always follow
owner’s manual procedures and
consult the service manual for your
vehicle before doing any
service work.
If doing some of your own service
work, use the proper service manual.
It tells you much more about how to
service the vehicle than this manual
can. To order the proper service
manual, see Publication Ordering
Information 0348.
This vehicle has an airbag system.
Before attempting to do your own
service work, see Servicing the
Airbag-Equipped Vehicle 087.
Page 351 of 376

Cadillac XTS Owner Manual (GMNA-Localizing-U.S./Canada-12032610) -
2019 - crc - 8/22/18
350 CUSTOMER INFORMATION
Transport Canada
Motor Vehicle Safety Directorate
Defect Investigations and Recalls
Division
80 Noel Street
Gatineau
,QC J8Z 0A1
Reporting Safety Defects
to General Motors
In addition to notifying NHTSA (or
Transport Canada) in a situation like
this, notify General Motors.
Call 1-800-458-8006, or write:
Cadillac Customer Assistance Center
Cadillac Motor Car Division
P.O. Box 33169
Detroit, MI 48232-5169
In Canada, call 1-888-446-2000,
or write:
Canadian Cadillac Customer Care
Centre, Mail Code: CA1-163-005
General Motors of Canada Company
1908 Colonel Sam Drive
Oshawa, Ontario L1H 8P7
Vehicle Data Recording
and Privacy
The vehicle has a number of
computers that record information
about the vehicle’s performance and
how it is driven. For example, the
vehicle uses computer modules to
monitor and control engine and
transmission performance, to monitor
the conditions for airbag deployment
and deploy them in a crash, and,
if equipped, to provide antilock
braking to help the driver control the
vehicle. These modules may store data
to help the dealer technician service
the vehicle. Some modules may also
store data about how the vehicle is
operated, such as rate of fuel
consumption or average speed. These
modules may retain personal
preferences, such as radio presets, seat
positions, and temperature settings.
Event Data Recorders
This vehicle is equipped with an event
data recorder (EDR). The main
purpose of an EDR is to record, in
certain crash or near crash-likesituations, such as an air bag
deployment or hitting a road obstacle,
data that will assist in understanding
how a vehicle’s systems performed.
The EDR is designed to record data
related to vehicle dynamics and safety
systems for a short period of time,
typically 30 seconds or less. The EDR
in this vehicle is designed to record
such data as:
.
How various systems in your
vehicle were operating;
. Whether or not the driver and
passenger safety belts were
buckled/fastened;
. How far (if at all) the driver was
depressing the accelerator and/or
brake pedal; and,
. How fast the vehicle was traveling.
These data can help provide a better
understanding of the circumstances in
which crashes and injuries occur.
Note
EDR data are recorded by your vehicle
only if a non-trivial crash situation
occurs; no data are recorded by the
EDR under normal driving conditions