2019 BUICK ENVISION window
[x] Cancel search: windowPage 2 of 20

2
Power Liftgate Control
Power Mirror/ Window Controls
INSTRUMENT PANEL
Driver Information Center Controls/ Audio Steering Wheel Controls
Engine Start/Stop Button
Cruise Control/Forward Collision AlertF/Heated Steering WheelF/Voice Recognition Buttons
Tilt/Telescoping Steering Wheel Lever
Head-Up Display ControlsF
Symbols
Check Engine
Engine Oil Pressure
Lane Keep Assist
Airbag Readiness
Cruise Control Set
Service Electric Parking Brake
Traction Control Off
Traction Control/StabiliTrak Active
Charging System
Security
Engine Coolant Temperature
Brake System Warning
P ARK Electric Parking Brake
Low Fuel Warning
Power Door Lock ButtonsTurn Signal Lever
Driver Information Center
Hazard Warning Flashers ButtonWindshield Wipers Lever
Memory Seat ButtonsF
Exterior/ Interior Lamp Controls
Page 4 of 20

4
REMOTE KEYLESS ENTRY (RKE) TRANSMITTER
KEYLESS ACCESS SYSTEM
Lock
Press to lock all doors.
Unlock
Press to unlock the driv-er’s door. Press again to unlock all doors.
Power Liftgate
Press twice to open or close the liftgate. Press once to stop power liftgate operation.
Vehicle Locator/Panic Alarm
Press and release to locate your vehicle. The exterior lamps will flash and the horn will sound.
Press and hold to activate the alarm. Press it again to cancel the alarm.
Note: To change the remote lock, unlock, and remote start settings, go to Settings > Vehicle > Remote Lock, Unlock, Start.
Remote Vehicle Start
Press and release the Lock button and then immediately press and hold the button until the turn signal lamps flash to start the engine from outside the vehicle. After entering the vehicle, turn on the ignition.
• During a remote start, the engine will run for 10 minutes. Repeat these steps to run the engine for an additional 10 minutes. A remote start can be extended once.
• Press and hold the button until the parking lamps turn off to cancel a remote start.
Remote Start and Heated Seats: Select the remote start heated seat option in the Vehicle Settings to have the heated seats turn on during a remote start. The heated seat button indicators do not illuminate and the temperature of the unoccupied seat may be reduced during a remote start.
The Keyless Access System enables operation of the doors,
ignition and liftgate without removing the Remote Keyless Entry transmitter from your pocket or purse. The transmitter must be within 3 feet of the door or the liftgate for the system to operate.
Keyless Unlocking
With the transmitter within range:
Press the lock button on the driver’s door handle to unlock the driver’s door; press it again within 5 seconds to unlock all doors.
Press the lock button on a passenger door handle to unlock all doors.
Press the touchpad on the liftgate handle to open the liftgate.
Keyless Locking
With the ignition off, the transmitter removed from the vehicle, and all doors closed:
Press the lock button on any door handle to lock all doors immediately.
If Passive Locking is turned on, all doors will lock automatically after a short delay.
Note: To change the keyless locking and unlocking settings, go to Settings > Vehicle > Remote Lock, Unlock, Start.
See Keys, Doors and Windows in your Owner’s Manual.
See Keys, Doors and Windows in your Owner’s Manual.
Page 5 of 20

5
KEYLESS (PUSHBUTTON) START
AUTO ENGINE STOP/START OPERATION
The Remote Keyless Entry transmitter must be in the vehicle to turn on the ignition.
Start
With the vehicle in Park or Neutral, press the brake pedal and then press the ENGINE START/STOP
button to start the engine. The green indicator on the button will illuminate.
Note: If the transmitter battery is weak, place the transmitter in the front cupholder to enable the engine to start. Replace the transmitter battery as soon as possible.
Stop/Off
Shift to Park and press the ENGINE START/STOP button to turn off the engine.
Power will be available for 10 minutes to operate the audio system until the driver’s door is opened and to operate the windows and moonroofF until any door is opened.
Accessory Mode
With the engine off and the brake pedal NOT depressed, press the ENGINE START/STOP button to place the ignition system in the accessory mode. The amber indicator on the button will illuminate.
See Driving and Operating in your Owner’s Manual.
A fuel-saving stop/start system has been integrated with the engine. While driving, when the brake pedal is applied and the vehicle is at a complete stop, the automatic engine stop/start system may turn off the engine, depending on operating conditions. When the engine is off, the tachometer gauge will read AUTO STOP. Upon releasing the brake pedal or applying the accelerator pedal, the engine will restart. After parking the vehicle and turn-ing off the engine, the tachometer gauge will read OFF.
The engine may remain running or restart when the vehicle is stopped if:
• A minimum vehicle speed is not reached.
• The engine or transmission is not at the required operating temperature.
• The outside temperature is not in the required operating range.
• The shift lever is in any gear other than Drive (D).
• The battery charge is low.
• The current settings for the climate control or defog system have not been reached.
• The Auto Stop time is greater than 2 minutes.
Disabling Auto Engine Stop/Start
Press the �$ button, located below the analog clock on the center of the instrument panel, when the engine is running to disable the automatic engine stop/start system.
When the system is disabled, the button indicator will not be illuminated. The system is enabled each time the vehicle is started.
See Driving and Operating in your Owner’s Manual.F Optional equipment
Page 8 of 20

8
DRIVER INFORMATION CENTER
The Driver Information Center (DIC) on the instrument cluster displays a variety of vehicle system information and warning messages.
DIC Controls
Use the controls on the right side of the steer-ing wheel to view and move through the Info (trip and fuel information), Audio, Phone, NavigationF, and Options menus.
Press the or button to move between the display zones.
Press the or button to scroll through the menus.
Press the button to open a menu or to select or reset a setting.
Select Info Pages
1. Use the controls to display Options and then press the button.
2. Scroll to Info Pages. Press the button to enter the menu.
3. Scroll through the list of items.
4. Press the button to select or deselect an item to display in the Info menu.
F Optional equipment
Base DIC display shown
See Instruments and Controls in your Owner’s Manual.
POWER LIFTGATE
Open/Close the Power Liftgate
Press the Power Liftgate button on the Remote Keyless Entry
transmitter twice.
Press the Power Liftgate knob on the inside of the driver’s door.
Press the touchpad on the liftgate handle to open the liftgate.
Press the button next to the liftgate pull to close the liftgate.
To open or close the liftgate hands-free, kick your foot under the rear bumper in the area directly below the left edge of the license plate. To function, the Remote Keyless Entry transmitter must be within 3 feet of the liftgate.
Programming the Liftgate Height
1. Turn the Power Liftgate knob to the 3/4 position.
2. Open the liftgate.
3. Adjust the liftgate manually to the desired height.
4. To save the setting, press and hold the button next to the liftgate pull for 3 seconds. The turn signals flash and a beep sounds when the setting is saved.
See Keys, Doors and Windows in your Owner’s Manual.
Page 14 of 20

14F Optional equipment
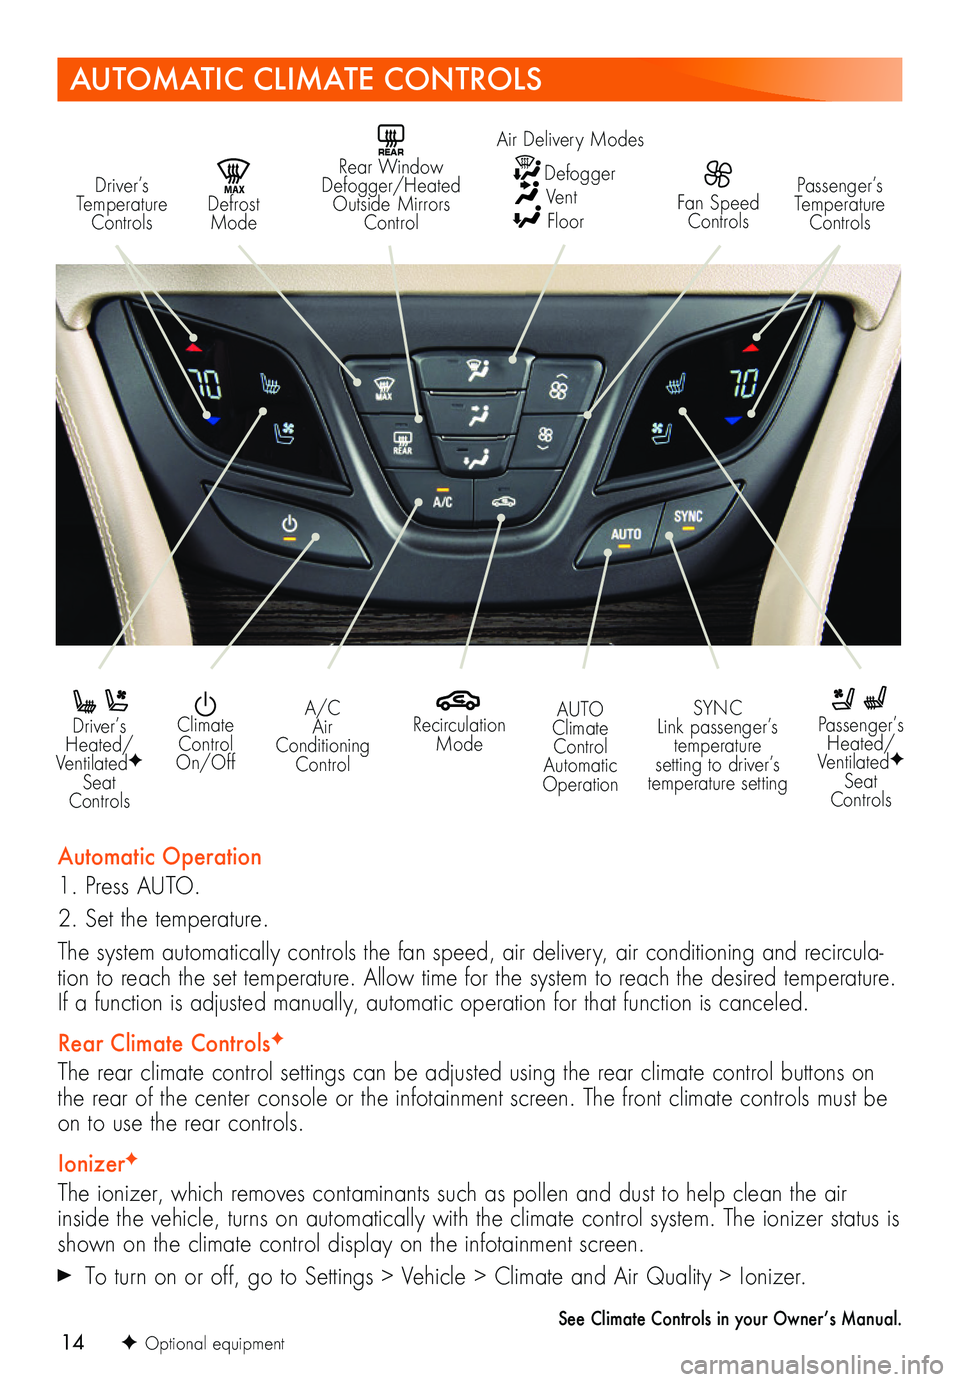
AUTOMATIC CLIMATE CONTROLS
Driver’s Temperature Controls
REAR Rear Window Defogger/Heated Outside Mirrors Control
MAX Defrost Mode
Passenger’s Temperature Controls
Driver’s Heated/VentilatedF Seat Controls
Passenger’s Heated/VentilatedF Seat Controls
Recirculation Mode
Climate Control On/Off
A/C Air Conditioning Control
SYNC Link passenger’s temperature setting to driver’s temperature setting
AUTO Climate Control Automatic Operation
Automatic Operation
1. Press AUTO.
2. Set the temperature.
The system automatically controls the fan speed, air delivery, air conditioning and recircula-tion to reach the set temperature. Allow time for the system to reach the desired temperature. If a function is adjusted manually, automatic operation for that function is canceled.
Rear Climate ControlsF
The rear climate control settings can be adjusted using the rear climate control buttons on the rear of the center console or the infotainment screen. The front climate controls must be on to use the rear controls.
IonizerF
The ionizer, which removes contaminants such as pollen and dust to help clean the air inside the vehicle, turns on automatically with the climate control system. The ionizer status is shown on the climate control display on the infotainment screen.
To turn on or off, go to Settings > Vehicle > Climate and Air Quality > Ionizer.
See Climate Controls in your Owner’s Manual.
Fan Speed Controls
Air Delivery Modes
Defogger Vent Floor
Page 17 of 20

17
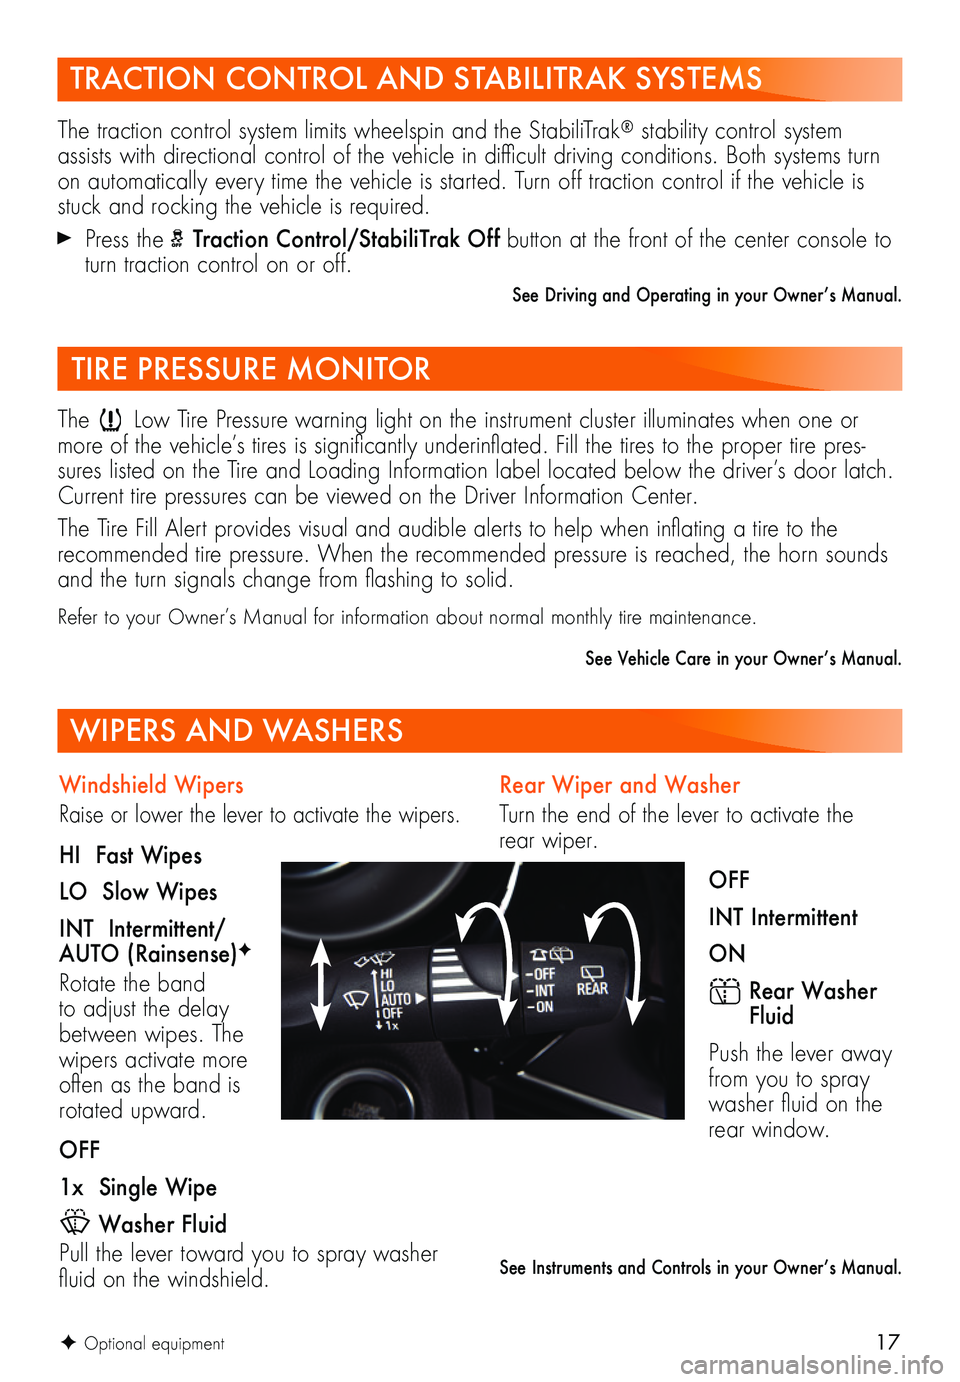
Rear Wiper and Washer
Turn the end of the lever to activate the rear wiper.
OFF
INT Intermittent
ON
Rear Washer Fluid
Push the lever away from you to spray washer fluid on the rear window.
See Instruments and Controls in your Owner’s Manual.
TRACTION CONTROL AND STABILITRAK SYSTEMS
The traction control system limits wheelspin and the StabiliTrak® stability control system assists with directional control of the vehicle in difficult driving conditions. Both systems turn on automatically every time the vehicle is started. Turn off traction control if the vehicle is stuck and rocking the vehicle is required.
Press the Traction Control/StabiliTrak Off button at the front of the center console to turn traction control on or off.
See Driving and Operating in your Owner’s Manual.
TIRE PRESSURE MONITOR
The Low Tire Pressure warning light on the instrument cluster illuminates when one or more of the vehicle’s tires is significantly underinflated. Fill the tires to the proper tire pres-sures listed on the Tire and Loading Information label located below the driver’s door latch. Current tire pressures can be viewed on the Driver Information Center.
The Tire Fill Alert provides visual and audible alerts to help when inflating a tire to the
recommended tire pressure. When the recommended pressure is reached, the horn sounds and the turn signals change from flashing to solid.
Refer to your Owner’s Manual for information about normal monthly tire maintenance.
See Vehicle Care in your Owner’s Manual.
WIPERS AND WASHERS
Windshield Wipers
Raise or lower the lever to activate the wipers.
HI Fast Wipes
LO Slow Wipes
INT Intermittent/AUTO (Rainsense)F
Rotate the band to adjust the delay between wipes. The wipers activate more often as the band is rotated upward.
OFF
1x Single Wipe
Washer Fluid
Pull the lever toward you to spray washer fluid on the windshield.
F Optional equipment