Page 102 of 399
100
uuCustomized Features u
System Setup
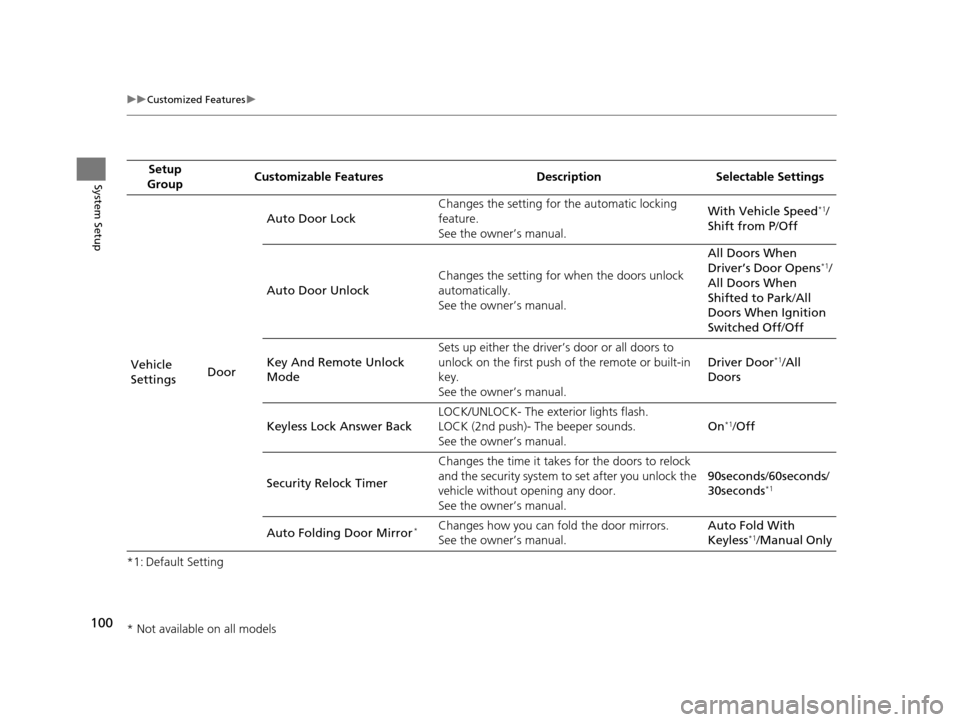
*1: Default SettingSetup
Group Customizable Features Desc
ription Selectable Settings
Vehicle
Settings DoorAuto Door Lock
Changes the setting for
the automatic locking
feature.
See the owner’s manual. With Vehicle Speed
*1/
Shift from P /Off
Auto Door Unlock Changes the setting for
when the doors unlock
automatically.
See the owner’s manual. All Doors When
Driver’s Door Opens
*1/
All Doors When
Shifted to Park /All
Doors When Ignition
Switched Off /Off
Key And Remote Unlock
Mode Sets up either the driver’s door or all doors to
unlock on the first push of the remote or built-in
key.
See the owner’s manual.
Driver Door
*1/
All
Doors
Keyless Lock Answer Back LOCK/UNLOCK- The ex
terior lights flash.
LOCK (2nd push)- The beeper sounds.
See the owner’s manual. On
*1/
Off
Security Relock Timer Changes the time it takes for the doors to relock
and the security system to set after you unlock the
vehicle without opening any door.
See the owner’s manual. 90seconds
/60seconds /
30seconds
*1
Auto Folding Door Mirror*Changes how you can fold the door mirrors.
See the owner’s manual. Auto Fold With
Keyless*1/
Manual Only
* Not available on all models
19 ACURA TLX NAVI-31TZ38400.book 100 ページ 2018年3月7日 水曜日 午後4時23分
Page 104 of 399
102
uuCustomized Features u
System Setup
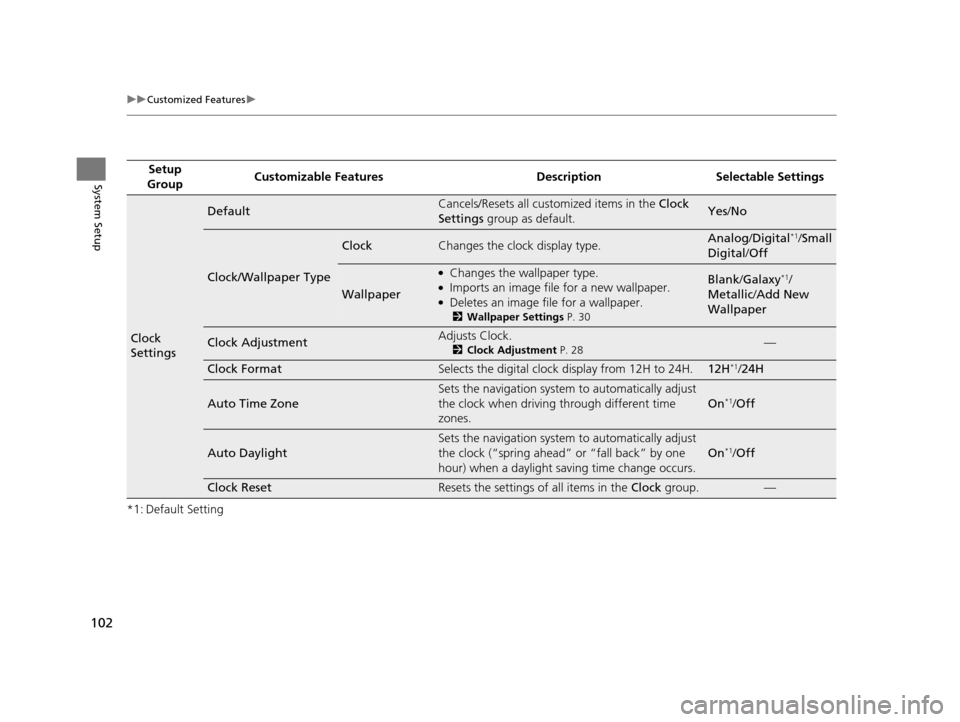
*1: Default SettingSetup
Group Customizable Features Desc
ription Selectable Settings
Clock
Settings
DefaultCancels/Resets all customized items in the Clock
Settings group as default.Yes/No
Clock/Wallpaper Type
ClockChanges the clock display type.Analog /Digital*1/Small
Digital /Off
Wallpaper
●Changes the wallpaper type.●Imports an image file for a new wallpaper.●Deletes an image file for a wallpaper.
2 Wallpaper Settings P. 30
Blank/Galaxy*1/
Metallic /Add New
Wallpaper
Clock AdjustmentAdjusts Clock.
2 Clock Adjustment P. 28—
Clock FormatSelects the digital clock display from 12H to 24H.12H*1/24H
Auto Time Zone
Sets the navigation system to automatically adjust
the clock when driving through different time
zones.
On*1/ Off
Auto Daylight
Sets the navigation system to automatically adjust
the clock (“spring ahead” or “fall back” by one
hour) when a daylight saving time change occurs.
On*1/ Off
Clock ResetResets the settings of all items in the Clock group.—
19 ACURA TLX NAVI-31TZ38400.book 102 ページ 2018年3月7日 水曜日 午後4時23分
Page 121 of 399
Continued119
uuEntering a Destination uAddress
Navigation
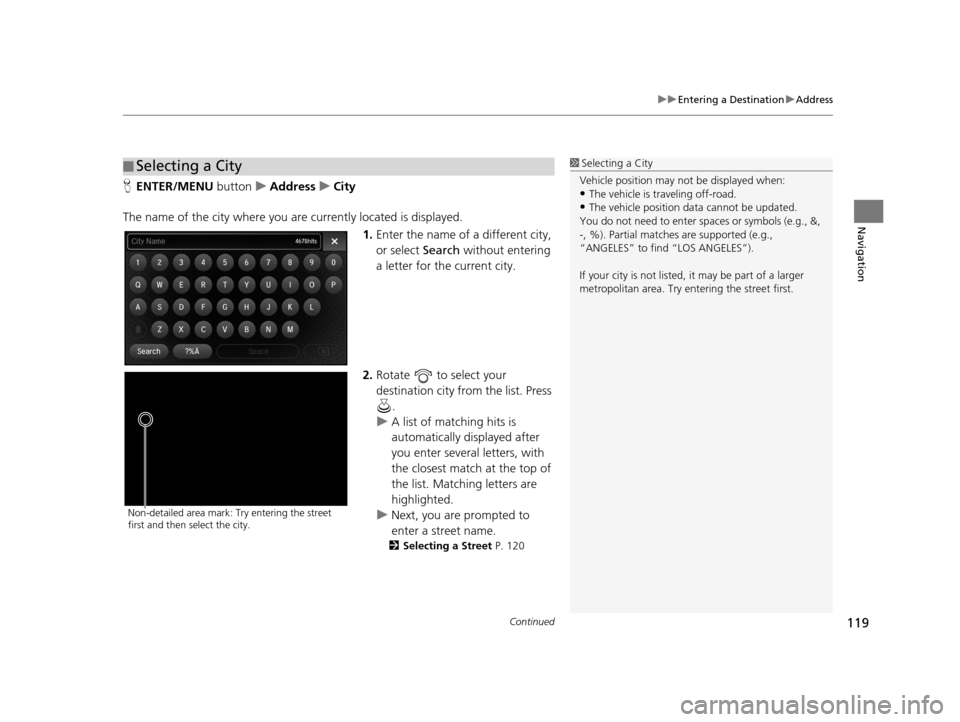
H ENTER/MENU buttonuAddress uCity
The name of the city where you are currently located is displayed. 1.Enter the name of a different city,
or select Search without entering
a letter for the current city.
2. Rotate to select your
destination city from the list. Press
.
u A list of matching hits is
automatically displayed after
you enter several letters, with
the closest match at the top of
the list. Matching letters are
highlighted.
u Next, you are prompted to
enter a street name.
2 Selecting a Street P. 120
■Selecting a City1
Selecting a City
Vehicle position may not be displayed when:
•The vehicle is traveling off-road.
•The vehicle position da ta cannot be updated.
You do not need to enter spaces or symbols (e.g., &,
-, %). Partial matche s are supported (e.g.,
“ANGELES” to find “LOS ANGELES”).
If your city is not listed, it may be part of a larger
metropolitan area. Try entering the street first.
Non-detailed area mark: Try entering the street
first and then select the city.
19 ACURA TLX NAVI-31TZ38400.book 119 ページ 2018年3月7日 水曜日 午後4時23分
Page 122 of 399
uuEntering a Destination uAddress
120
Navigation
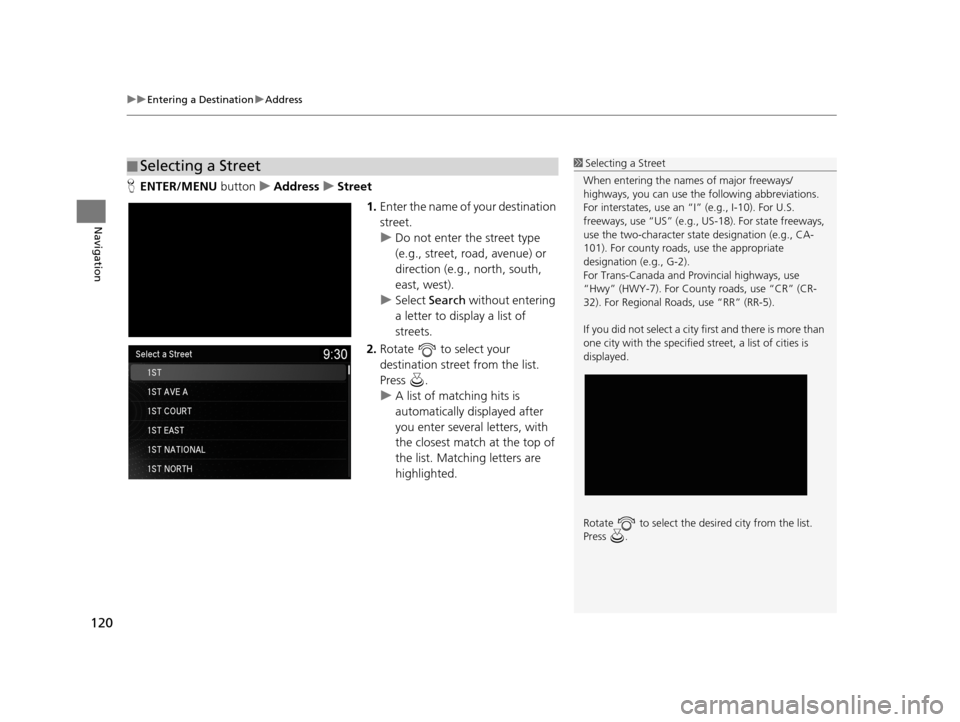
H ENTER/MENU buttonuAddress uStreet
1.Enter the name of your destination
street.
u Do not enter the street type
(e.g., street, road, avenue) or
direction (e.g., north, south,
east, west).
u Select Search without entering
a letter to display a list of
streets.
2. Rotate to select your
destination street from the list.
Press .
u A list of matching hits is
automatically displayed after
you enter several letters, with
the closest match at the top of
the list. Matching letters are
highlighted.
■Selecting a Street1
Selecting a Street
When entering the names of major freeways/
highways, you can use the following abbreviations.
For interstates, use an “I” (e.g., I-10). For U.S.
freeways, use “US” (e.g., US -18). For state freeways,
use the two-character st ate designation (e.g., CA-
101). For county roads, use the appropriate
designation (e.g., G-2).
For Trans-Canada and Pr ovincial highways, use
“Hwy” (HWY-7). For County roads, use “CR” (CR-
32). For Regional Roads, use “RR” (RR-5).
If you did not select a city first and there is more than
one city with the specified street, a list of cities is
displayed.
Rotate to select the desi red city from the list.
Press .
19 ACURA TLX NAVI-31TZ38400.book 120 ページ 2018年3月7日 水曜日 午後4時23分
Page 128 of 399
uuEntering a Destination uPlace Category
126
Navigation
3. Rotate to select an item. Press
.
The following items are available:
• Search by Name : Searches for a place in the subc ategory by name. Enter a place
name when prompted.
• Sort by Distance to Travel : Displays all the places in the subcategory sorted by
distance from your current location. The closest place is displayed at the top.
• City Vicinity: Searches for a place in the subc ategory within a 20 mile (32 km)
radius of a specific city. Enter a city na me when prompted and then select a city.
4.Rotate to select a destination
from the list. Press .
5. Set the route to your destination.
2 Calculating the Route P. 139
1Place Category
The straight line distance (as the crow flies, not
driving distance) and direct ion to the destination are
displayed for the highlighted place.
19 ACURA TLX NAVI-31TZ38400.book 126 ページ 2018年3月7日 水曜日 午後4時23分
Page 132 of 399
uuEntering a Destination uPlace Name
130
Navigation
If the place name is in multiple categories in the map database, the following screen
is displayed.
1.Rotate to select a place name.
Move .
2. Rotate to select a
subcategory. Press .
■Place Name in Multiple Categories1
Place Name in Multiple Categories
Matching letters are highlighted.
19 ACURA TLX NAVI-31TZ38400.book 130 ページ 2018年3月7日 水曜日 午後4時23分
Page 146 of 399
uuDriving to Your Destination uViewing the Route
144
Navigation
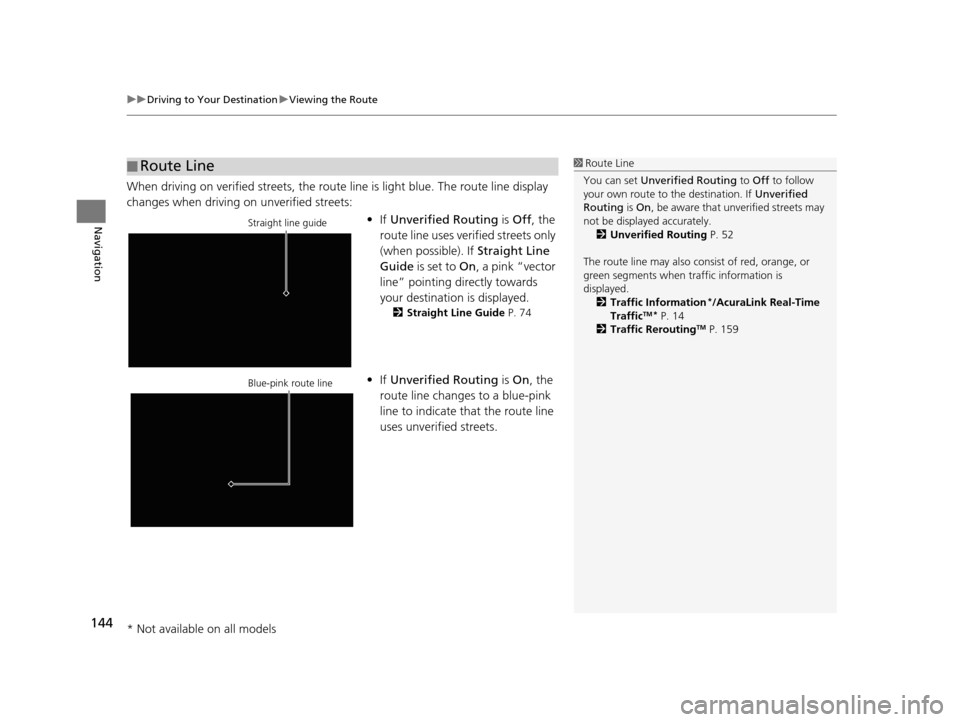
When driving on verified streets, the route line is light blue. The route line display
changes when driving on unverified streets:
•If Unverified Routing is Off, the
route line uses verified streets only
(when possible). If Straight Line
Guide is set to On, a pink “vector
line” pointing directly towards
your destination is displayed.
2 Straight Line Guide P. 74
•If Unverified Routing is On , the
route line changes to a blue-pink
line to indicate that the route line
uses unverified streets.
■ Route Line1
Route Line
You can set Unverified Routing to Off to follow
your own route to the destination. If Unverified
Routing is On, be aware that unverified streets may
not be displayed accurately. 2 Unverified Routing P. 52
The route line may also c onsist of red, orange, or
green segments when traffic information is
displayed.
2 Traffic Information
*/AcuraLink Real-Time
TrafficTM* P. 14
2 Traffic ReroutingTM P. 159
Straight line guide
Blue-pink route line
* Not available on all models
19 ACURA TLX NAVI-31TZ38400.book 144 ページ 2018年3月7日 水曜日 午後4時23分
Page 185 of 399
183
uuAudio System uUSB Port
Audio
USB Port
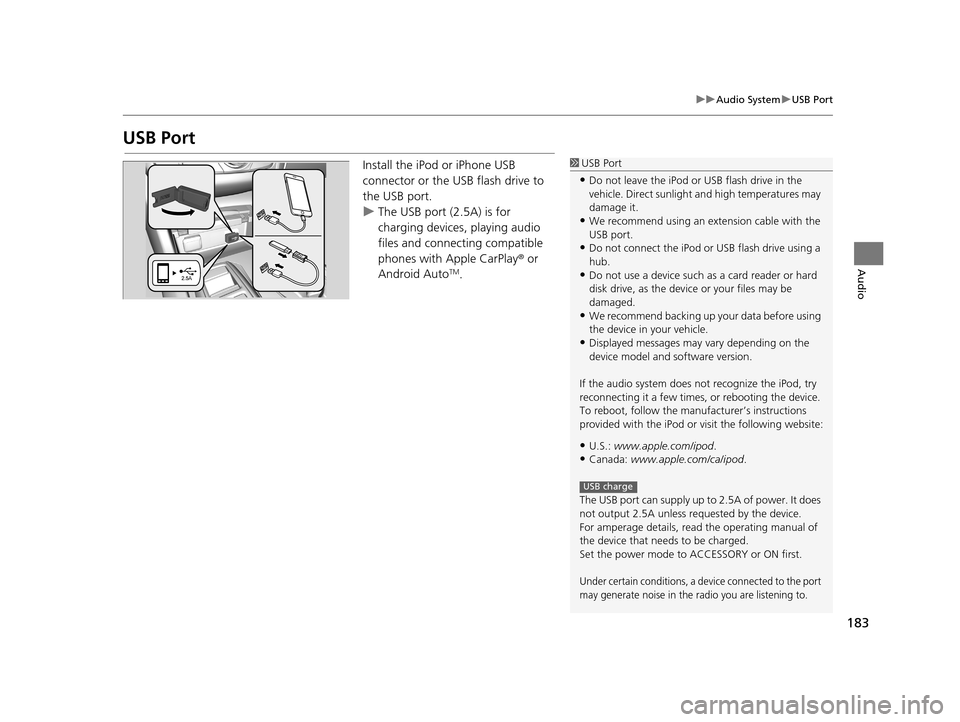
Install the iPod or iPhone USB
connector or the USB flash drive to
the USB port.
u The USB port (2.5A) is for
charging devices, playing audio
files and connecting compatible
phones with Apple CarPlay ® or
Android Auto
TM.
1 USB Port
•Do not leave the iPod or USB flash drive in the
vehicle. Direct sunlight and high temperatures may
damage it.
•We recommend using an ex tension cable with the
USB port.
•Do not connect the iPod or USB flash drive using a
hub.
•Do not use a device such as a card reader or hard
disk drive, as the device or your files may be
damaged.
•We recommend backing up yo ur data before using
the device in your vehicle.
•Displayed messages may vary depending on the
device model and software version.
If the audio system does not recognize the iPod, try
reconnecting it a few times, or rebooting the device.
To reboot, follow the manuf acturer’s instructions
provided with the iPod or visit the following website:
•U.S.: www.apple.com/ipod .
•Canada: www.apple.com/ca/ipod.
The USB port can supply up to 2.5A of power. It does
not output 2.5A unless requested by the device.
For amperage details, read the operating manual of
the device that ne eds to be charged.
Set the power mode to ACCESSORY or ON first.
Under certain conditions, a device connected to the port
may generate noise in the radio you are listening to.
USB charge
19 ACURA TLX NAVI-31TZ38400.book 183 ページ 2018年3月7日 水曜日 午後4時23分