2019 Acura NSX wheel
[x] Cancel search: wheelPage 420 of 485

419
uuCleaning uInterior Care
Maintenance
The floor mats hook over the floor anchors,
which keep the mats from sliding forward. To
remove the mats for cleaning, turn the anchor
knobs to the unlock position. When
reinstalling the mats after cleaning, turn the
knobs to the lock position.
Do not put additional floor mats on top of
the anchored mat.
To properly clean leather:
1. Use a vacuum or soft dry cloth first to remove any dirt or dust.
2. Clean the leather with a soft cloth dampen ed with a solution comprised of 90%
water and 10% neutral soap.
3. Wipe away any soap residu e with a clean damp cloth.
4. Wipe away residual water and allo w leather to air dry in the shade.
Do not use abrasive cleaners.
■Floor Mats1 Floor Mats
If you use any floor mats that were not originally
provided with your vehicle, make sure they are
designed for your specific ve hicle, fit correctly, and
are securely anchored by the floor anchors.
Unlock
Lock
■Maintaining Genuine Leather
■Carbon Fiber Meter Visor and Steering Wheel
1 Maintaining Genuine Leather
It is important to clean or wipe away dirt or dust as
soon as possible. Spills can soak into leather resulting
in stains. Dirt or dust ca n cause abrasions in the
leather. In addition, pl ease note that some dark
colored clothing can rub onto the leather seats
resulting in discol oration or stains.
19 NSX-31T6N6200.book 419 ページ 2018年8月9日 木曜日 午前11時12分
Page 422 of 485

Continued421
uuCleaning uExterior Care
Maintenance
A good coat of automotive body wax helps protect your vehicle’s paint from the
elements. Wax will wear off over time and expose your vehicle’s paint to the
elements, so reapply as necessary.
If you get gasoline, oil, engine coolant, or battery fluid on resi n coated parts, they
may be stained or the coating may peel. Prom ptly wipe it away using a soft cloth and
clean water.
Wipe using a glass cleaner.
Aluminum is susceptible to deterioration caused by salt and other road
contaminants. When necessary, as early as possible use a sponge and mild detergent
to wipe away these contaminants. Do no t use a stiff brush or harsh chemicals
(including some commercial wheel cleaners). These can damage the protective finish
on aluminum alloy wheels, resulting in corrosion. Depending on the type of finish,
the wheels also may lo se their luster or appear burn ished. To avoid water stains,
wipe the wheels dry with a cloth while they are still wet.
■Applying Wax
■Maintaining the Bumpers and Other Resin Coated Parts
■Cleaning the Window
■Maintaining Aluminum Wheels
1 Applying Wax
NOTICE
Chemical solvents and st rong cleaners can damage
the paint, metal, carbon fiber*, and plastic on your
vehicle. Wipe away spills immediately.
1 Maintaining the Bumpers an d Other Resin Coated Parts
Ask an authorized Acur a NSX dealer about the
correct coating material when you want to repair the
painted surface of the parts made of resin.
* Not available on all models
19 NSX-31T6N6200.book 421 ページ 2018年8月9日 木曜日 午前11時12分
Page 431 of 485

430
Handling the Unexpected
Tools
Types of Tools
1Types of Tools
The tools are stored in the trunk.
Towing Hook Funnel
Tool Box
Wheel Bolt Cap Removal Tool
19 NSX-31T6N6200.book 430 ページ 2018年8月9日 木曜日 午前11時12分
Page 432 of 485

431Continued
Handling the Unexpected
If a Tire Goes Flat
Temporarily Repairing a Flat Tire
If the tire has a large cut or is otherwise severely damaged, you will need to have the
vehicle towed. If the tire only has a sma ll puncture, from a small nail for instance,
you can use the temporary tire repair kit so that you can drive to the nearest service
station for a more permanent repair.
If a tire goes flat while driving, grasp the steering wheel firmly, and brake gradually
to reduce speed. Then stop in a safe place.
1. Park the vehicle on a firm, level, and non-slippery surface. Apply the parking
brake.
2. Put the transmission into
(P.
3. Turn on the hazard warning lights an d set the power mode to VEHICLE OFF.
1Temporarily Repairing a Flat Tire
The kit should not be used in the following situations.
Instead, contact an authorized Acura NSX dealer or a
roadside assistant to have the vehicle towed.
•The tire sealant has expired.•More than one tire is punctured.•The puncture or cut is larger than 3/16 inch (4 mm).•The tire side wall is da maged or the puncture is
outside the contact area.
•Damage has been caused by driving with the tire
extremely under inflated.
•The tire bead is no longer seated.•The rim is damaged.
Do not remove a nail or screw that punctured the
tire. If you remove it from the tire, you may not be
able to repair the puncture using the kit.
NOTICE
Do not use a puncture-repairing agent other than the
one provided in the kit that came with your vehicle. If
a different agent is used, you may permanently
damage the tire pressure sensor.
When the puncture is:Kit Use
Smaller than 3/16 inch
(4 mm)Yes
Larger than 3/16 inch (4 mm)No
Contact
Area
19 NSX-31T6N6200.book 431 ページ 2018年8月9日 木曜日 午前11時12分
Page 436 of 485

435
uuIf a Tire Goes Flat uTemporarily Repairing a Flat Tire
Continued
Handling the Unexpected
10. Unplug the kit from the accessory power
socket.
11. Unscrew the sealant/ai r hose from the tire
valve stem. Reinstall the valve cap.
12. Push the deflation button until the gauge
returns 0 psi (0 kPa).
13. Apply the repair notification label to the
flat surface of the wheel.
u The wheel surface must be clean to
ensure the label adheres properly.
Deflation Button Air Pressure Gauge
Repair Notification Label
U.S.
Canada
19 NSX-31T6N6200.book 435 ページ 2018年8月9日 木曜日 午前11時12分
Page 446 of 485

445
uuPower System Won’t Start uEmergency Power System Off
Handling the Unexpected
Emergency Power System Off
The ENGINE START/STOP button may be used to turn the power system off due to
an emergency situation even while driving. If you must turn the power system off,
do either of the following operations:
• Press and hold the ENGINE START/STOP button for about two seconds.
• Firmly press the ENGINE START/STOP button three times.
The steering wheel will not lock. However, because turning off the engine disables
the power assist the engine provides to the steering and braking systems, it will
require significantly more physical effort an d time to steer and slow the vehicle. Use
both feet on the brake pedal to slow down the vehicle and stop immediately in a
safe place.
The gear position auto matically changes to
(P after the vehicle comes to a complete
stop. Then, the power mode changes to VEHICLE OFF.
1 Emergency Power System Off
Do not press the button while driving unless it is
absolutely necessary for the power system to be
turned off.
19 NSX-31T6N6200.book 445 ページ 2018年8月9日 木曜日 午前11時12分
Page 468 of 485

467
uuSpecifications u
Information
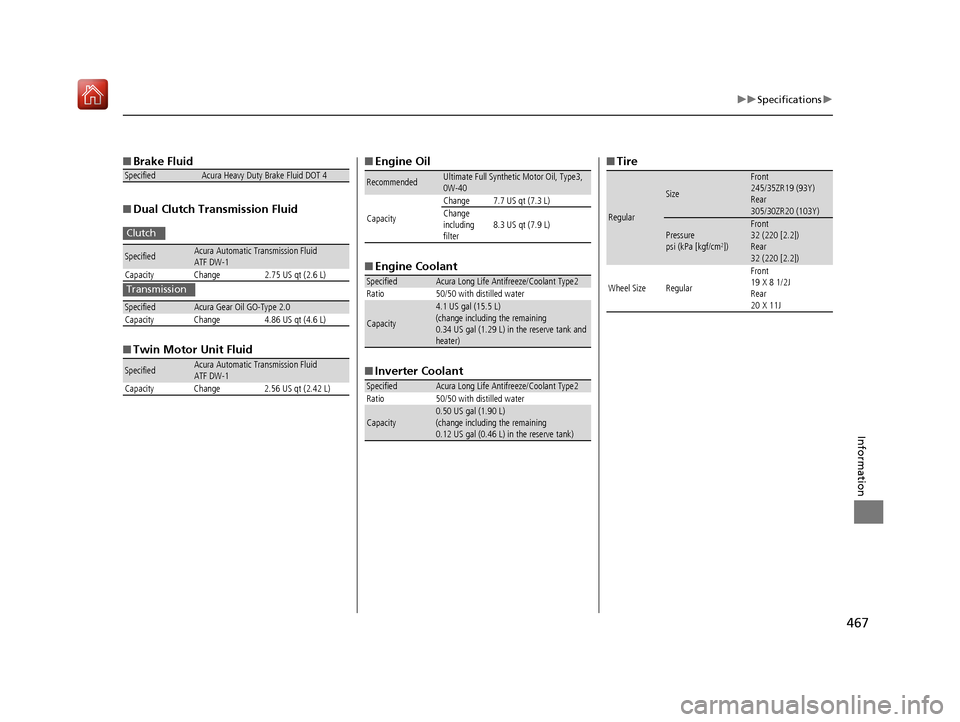
■Brake Fluid
■ Dual Clutch Transmission Fluid
■ Twin Motor Unit FluidSpecifiedAcura Heavy Duty Brake Fluid DOT 4
SpecifiedAcura Automatic Transmission Fluid
ATF DW-1
Capacity Change 2.75 US qt (2.6 L)
SpecifiedAcura Gear Oil GO-Type 2.0
Capacity Change 4.86 US qt (4.6 L)
SpecifiedAcura Automatic Transmission Fluid
ATF DW-1
Capacity Change 2.56 US qt (2.42 L)
Clutch
Transmission
■ Engine Oil
■ Engine Coolant
■ Inverter Coolant
RecommendedUltimate Full Synthetic Motor Oil, Type3,
0W-40
Capacity Change 7.7 US qt (7.3 L)
Change
including
filter
8.3 US qt (7.9 L)
SpecifiedAcura Long Life Antifreeze/Coolant Type2
Ratio 50/50 with distilled water
Capacity
4.1 US gal (15.5 L)
(change including the remaining
0.34 US gal (1.29 L) in the reserve tank and
heater)
SpecifiedAcura Long Life Antifreeze/Coolant Type2
Ratio 50/50 with distilled water
Capacity0.50 US gal (1.90 L)
(change including the remaining
0.12 US gal (0.46 L) in the reserve tank)
■ Tire
Regular
Size
Front
245/35ZR19 (93Y)
Rear
305/30ZR20 (103Y)
Pressure
psi (kPa [kgf/cm2])
Front
32 (220 [2.2])
Rear
32 (220 [2.2])
Wheel Size Regular Front
19 X 8 1/2J
Rear
20 X 11J
19 NSX-31T6N6200.book 467 ページ 2018年8月9日 木曜日 午前11時12分
Page 478 of 485

Index
477
Index
Index
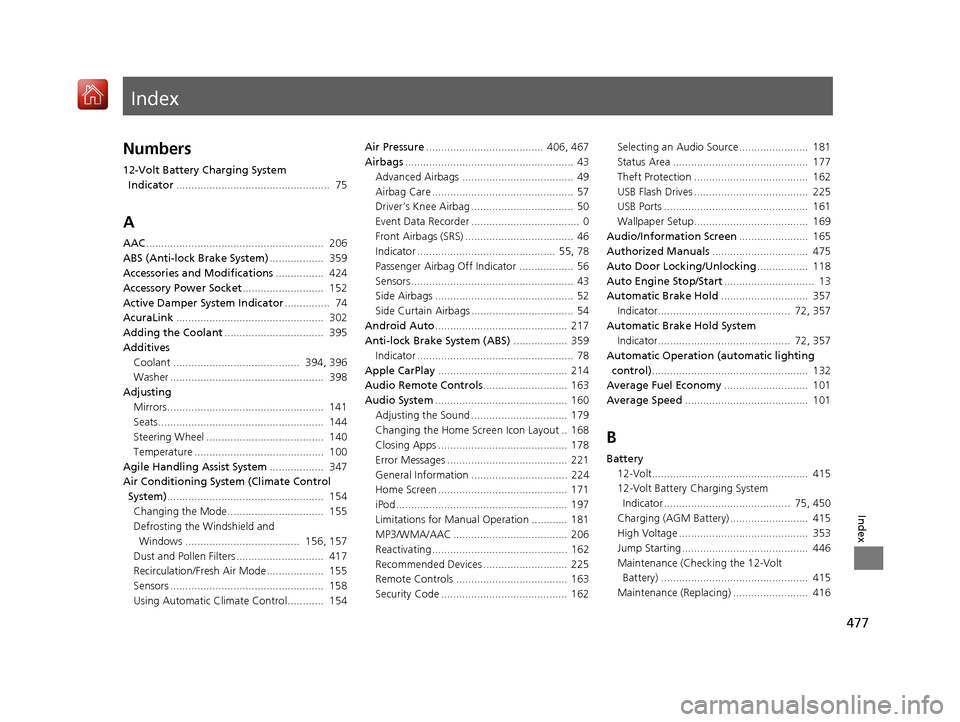
Numbers
12-Volt Battery Charging System Indicator ................................................... 75
A
AAC........................................................... 206
ABS (Anti-lock Brake System) .................. 359
Accessories and Modifications ................ 424
Accessory Power Socket ........................... 152
Active Damper System Indicator ............... 74
AcuraLink ................................................. 302
Adding the Coolant ................................. 395
Additives Coolant .......................................... 394, 396
Washer ................................................... 398
Adjusting Mirrors.................................................... 141
Seats....................................................... 144
Steering Wheel ....................................... 140
Temperature ........................................... 100
Agile Handling Assist System .................. 347
Air Conditioning System (Climate Control System) .................................................... 154
Changing the Mode................................ 155
Defrosting the Windshield and Windows ...................................... 156, 157
Dust and Pollen Filters ............................. 417
Recirculation/Fresh Air Mode................... 155
Sensors ................................................... 158
Using Automatic Climate Control............ 154 Air Pressure
....................................... 406, 467
Airbags ........................................................ 43
Advanced Airbags ..................................... 49
Airbag Care ............................................... 57
Driver’s Knee Airbag .................................. 50
Event Data Recorder .................................... 0
Front Airbags (SRS) .................................... 46
Indicator .............................................. 55, 78
Passenger Airbag Off Indicator .................. 56
Sensors ...................................................... 43
Side Airbags .............................................. 52
Side Curtain Airbags .................................. 54
Android Auto ............................................ 217
Anti-lock Brake System (ABS) .................. 359
Indicator .................................................... 78
Apple CarPlay ........................................... 214
Audio Remote Controls ............................ 163
Audio System ............................................ 160
Adjusting the Sound ................................ 179
Changing the Home Screen Icon Layout .. 168
Closing Apps ........................................... 178
Error Messages ........................................ 221
General Information ................................ 224
Home Screen ........................................... 171
iPod ......................................................... 197
Limitations for Manua l Operation ............ 181
MP3/WMA/AAC ...................................... 206
Reactivating ............................................. 162
Recommended Devices ............................ 225
Remote Controls ..................................... 163
Security Code .......................................... 162 Selecting an Audio Source ....................... 181
Status Area ............................................. 177
Theft Protection ...................................... 162
USB Flash Drives ...................................... 225
USB Ports ................................................ 161
Wallpaper Setup...................................... 169
Audio/Information Screen ....................... 165
Authorized Manuals ................................ 475
Auto Door Locking/Unlocking ................. 118
Auto Engine Stop/Start .............................. 13
Automatic Brake Hold ............................. 357
Indicator............................................ 72, 357
Automatic Brake Hold System Indicator............................................ 72, 357
Automatic Operation (automatic lighting control) .................................................... 132
Average Fuel Economy ............................ 101
Average Speed ......................................... 101
B
Battery
12-Volt.................................................... 415
12-Volt Battery Charging System
Indicator .......................................... 75, 450
Charging (AGM Battery) .......................... 415
High Voltage ........................................... 353
Jump Starting .......................................... 446
Maintenance (Checking the 12-Volt Battery) ................................................. 415
Maintenance (Replacing) ......................... 416
19 NSX-31T6N6200.book 477 ページ 2018年8月9日 木曜日 午前11時12分