2019 Acura MDX HYBRID valve
[x] Cancel search: valvePage 568 of 685

567
uuMaintenance MinderTMuTo Use Maintenance MinderTM
Continued
Maintenance
■Maintenance Service Items1Maintenance Service Items
•Independent of the Maintenance Minder
information, replace the brake fluid every 3 years.
•Adjust the valves during services A, B, 1, 2, or 3 if
they are noisy.Maintenance Minder MessageSystem Message
Indicator
Sub Items
Main
Item
*1: If the message
Maintenance Due Now does not appear more than 12 months after the display
is reset, change the engine oil every year.
# : See information on maintenance and emissions warranty.
*2: If you drive in dusty conditions, replace the air cleaner element every 15,000 miles (24,000 km).
*3: If you drive primarily in urban areas that have high concentrations of soot in the air from industry and from diesel-powered vehicles, replace the dust and pollen filter every 15,000 miles (24,000 km).
CODEMaintenance Main Items
A
●Replace engine oil*1
B●Replace engine oil*1 and oil filter●Inspect front and rear brakes●Check expiration date for Temporary Tire Repair Kit
bottle*
●Inspect tie rod ends, steering gearbox, boots●Inspect suspension components●Inspect driveshaft boots●Inspect brake hoses and li nes (Including ABS/VSA®)●Inspect all fluid levels and condition of fluids●Inspect exhaust system#
●Inspect fuel lines and connections#
*4: Driving in mountainous areas at very low vehicle speeds results in higher transmission temperature.
This requires transmission fluid changes more frequently than recommended by the Maintenance
Minder. If you regularly drive your vehicle under these conditions, have the transmission fluid changed
at 30,000 miles (48,000 km), then every 25,000 miles (40,000 km).
*5: If you drive regularly in very high temperatures (over 110°F, 43°C), in very low temperatures (under -20°F, -29°C), replace every 60,000 miles/100,000 km.
*6: Driving in mountainous areas at very low vehicle speeds results in higher level of mechanical (Shear)
stress to fluid. This requires twin motor unit fluid changes more frequently than recommended by the
Maintenance Minder. If you regularly drive your vehicle under these conditions, have the twin motor
unit fluid changed at 7,500 miles (12,000 km), then every 15,000 miles (24,000 km).
CODEMaintenance Sub Items
1
●Rotate tires
2●Replace air cleaner element*2
●Replace dust and pollen filter*3
3●Replace transmission fluid*4
4●Replace spark plugs●Replace timing belt and inspect water pump*5
●Inspect valve clearance
5
●Replace engine coolant
6●Replace twin motor unit fluid*6
* Not available on all models
19 ACURA MDX E-AWD-31TRX6200.book 567 ページ 2018年6月22日 金曜日 午後7時42分
Page 592 of 685

591
Maintenance
Checking and Maintaining Tires
Checking Tires
To safely operate your vehicle, your tires must be of the proper type and size, in
good condition with adequate tread, and properly inflated.
■Inflation guidelines
Properly inflated tires provid e the best combination of hand ling, tread life, and comfort.
Refer to the driver’s doorjamb label or spec ifications page for the specified pressure.
Underinflated tires wear unev enly, adversely affect handling and fuel economy, and
are more likely to fail from overheating.
Overinflated tires make your vehicle ride ha rshly, are more prone to road hazards,
and wear unevenly.
Every day before you drive, look at each of the tires. If one looks lower than the
others, check the pressure with a tire gauge.
At least once a month or before long trips , use a gauge to measure the pressure in
all tires, including the spare
*. Even tires in good condition can lose 1–2 psi (10–20
kPa, 0.1–0.2 kgf/cm2) per month.
■Inspection guidelines
Every time you check inflation, also examine the tires and valve stems.
Look for:
• Bumps or bulges on the side or in the tread. Replace the tire if you find any cuts,
splits, or cracks in the side of the tire . Replace it if you see fabric or cord.
• Remove any foreign objects and inspect for air leaks.
• Uneven tread wear. Have a deal er check the wheel alignment.
• Excessive tread wear.
2 Wear Indicators P. 596
•Cracks or other damage around valve stem.
1Checking Tires
Measure the air pressure when tires are cold. This
means the vehicle has been parked for at least three
hours, or driven less than 1 mile (1.6 km). If
necessary, add or releas e air until the specified
pressure is reached.
If checked when hot, tire pressure can be as much as
4–6 psi (30–40 kPa, 0.3–0.4 kgf/cm
2) higher than if
checked when cold.
Have a dealer check the tires if you feel a consistent
vibration while driving. Ne w tires and any that have
been removed and reinst alled should be properly
balanced.
3WARNING
Using tires that are excessively worn or
improperly inflated can cause a crash in
which you can be seriously hurt or killed.
Follow all instruction s in this owner’s
manual regarding ti re inflation and
maintenance.
* Not available on all models
19 ACURA MDX E-AWD-31TRX6200.book 591 ページ 2018年6月22日 金曜日 午後7時42分
Page 622 of 685

621
uuIf a Tire Goes Flat uChanging a Flat Tire*
Handling the Unexpected
1. Remove the center cap.
2. Place the flat tire face up under the hoist.
3. Insert the hoist bracket into the center hole
of the flat tire.
4. Slowly turn the wheel nut wrench clockwise
to take up the hoist cable slack. Make sure
the bracket is seated in the center hole of
the flat tire.
5. Turn the wheel nut wrench with the jack
handle bar (clockwise) until the flat tire rests
against the underbody of the vehicle, and
you hear the hoist click.
6. Securely store the jack, wheel nut wrench,
and jack handle bar back in the tool case.
Store the case in the cargo area.
If you replace a flat tire wi th the spare tire, the low tire pressure/TPMS indicator comes
on while you are driving. After driving for a few miles (kilometers), the indicator will
start blinking for a short time and then stay on. Tire Pressure Monitor Problem
appears on the multi-information display (MID), but this is normal.
If you replace the tire with a specified regular tire, the warning message on the MID
and the low tire pressure/TPMS indicator will go off after a few miles (kilometers).
■Storing the Flat Tire1Storing the Flat Tire
3WARNING
Loose items can fly around the interior in a
crash and can seriously injure the
occupants.
Store the jack and tools securely before
driving.
Center Cap
Wheel Nut Wrench Jack Handle Bar
■TPMS and the Spare Tire1
TPMS and the Spare Tire
The system cannot monitor th e pressure of the spare
tire. Manually check the spare tire pressure to be sure
that it is correct.
Use TPMS specific wheels. Each is equipped with a
tire pressure sensor mounted inside the tire behind
the valve stem.
19 ACURA MDX E-AWD-31TRX6200.book 621 ページ 2018年6月22日 金曜日 午後7時42分
Page 626 of 685
Continued625
uuIf a Tire Goes Flat uTemporarily Repairing a Flat Tire*
Handling the Unexpected
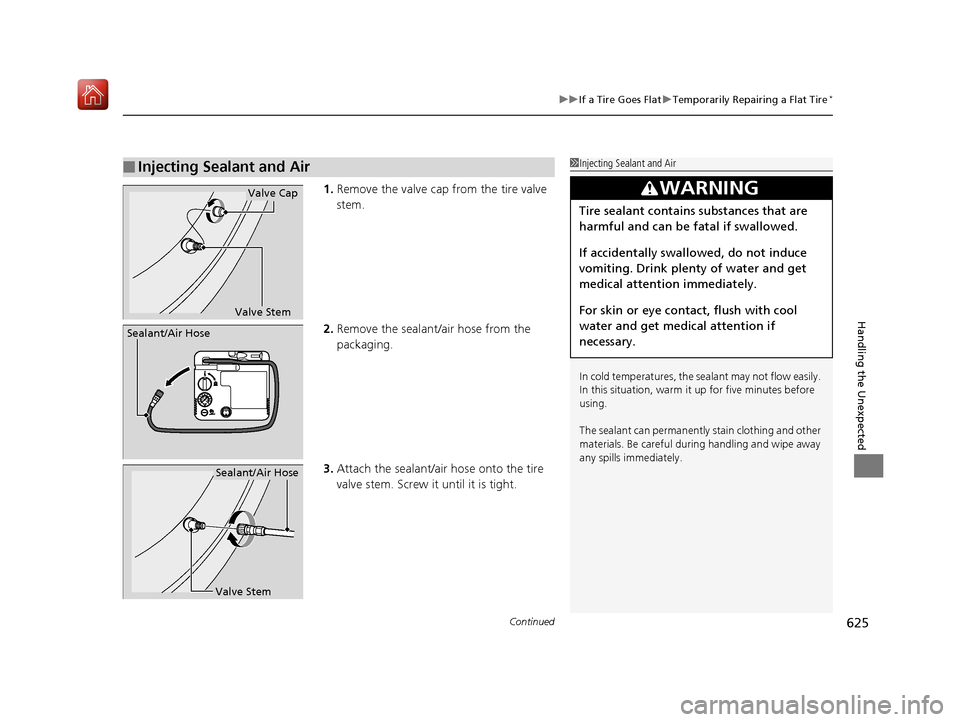
1. Remove the valve cap from the tire valve
stem.
2. Remove the sealant/air hose from the
packaging.
3. Attach the sealant/air hose onto the tire
valve stem. Screw it until it is tight.
■Injecting Sealant and Air1Injecting Sealant and Air
In cold temperatures, the sealant may not flow easily.
In this situation, warm it up for five minutes before
using.
The sealant can permanentl y stain clothing and other
materials. Be careful duri ng handling and wipe away
any spills immediately.
3WARNING
Tire sealant contains substances that are
harmful and can be fatal if swallowed.
If accidentally swallowed, do not induce
vomiting. Drink plenty of water and get
medical attention immediately.
For skin or eye contact, flush with cool
water and get medical attention if
necessary.
Valve Stem
Valve Cap
Sealant/Air Hose
Valve Stem
Sealant/Air Hose
19 ACURA MDX E-AWD-31TRX6200.book 625 ページ 2018年6月22日 金曜日 午後7時42分
Page 628 of 685
Continued627
uuIf a Tire Goes Flat uTemporarily Repairing a Flat Tire*
Handling the Unexpected
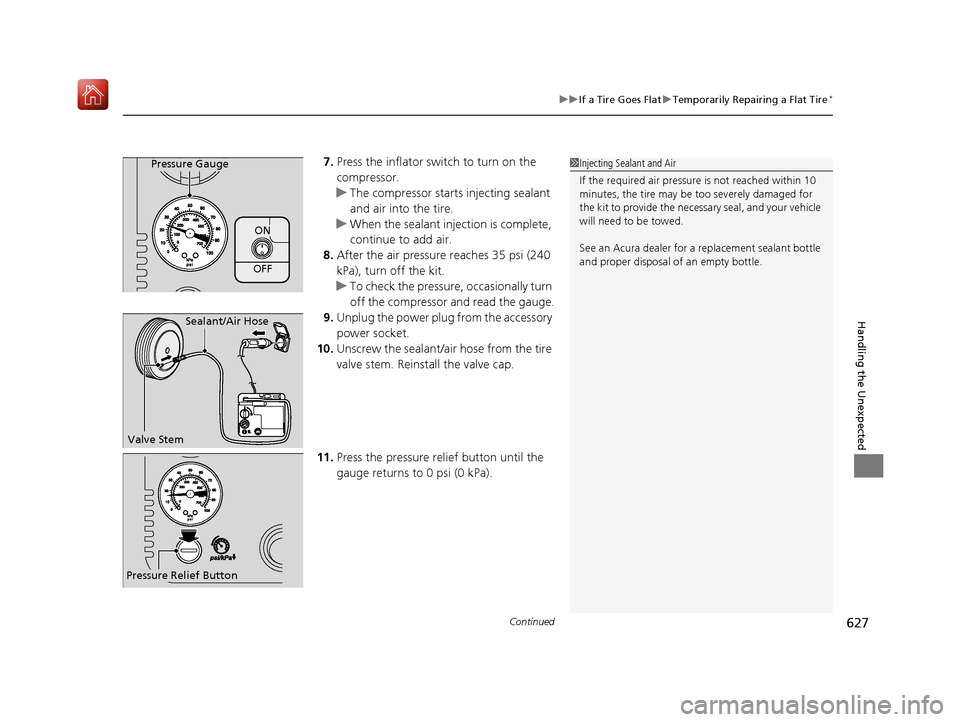
7. Press the inflator switch to turn on the
compressor.
u The compressor starts injecting sealant
and air into the tire.
u When the sealant injection is complete,
continue to add air.
8. After the air pressure reaches 35 psi (240
kPa), turn off the kit.
u To check the pressure, occasionally turn
off the compressor and read the gauge.
9. Unplug the power plug from the accessory
power socket.
10. Unscrew the sealant/ai r hose from the tire
valve stem. Reinstall the valve cap.
11. Press the pressure relief button until the
gauge returns to 0 psi (0 kPa).Pressure Gauge
ON
OFF
1Injecting Sealant and Air
If the required air pressure is not reached within 10
minutes, the tire may be too severely damaged for
the kit to provide the necessa ry seal, and your vehicle
will need to be towed.
See an Acura dealer for a replacement sealant bottle
and proper disposal of an empty bottle.
Sealant/Air Hose
Valve Stem
Pressure Relief Button
19 ACURA MDX E-AWD-31TRX6200.book 627 ページ 2018年6月22日 金曜日 午後7時42分
Page 631 of 685

uuIf a Tire Goes Flat uTemporarily Repairing a Flat Tire*
630
Handling the Unexpected
• Greater than 25 psi (175 kPa), but less
than 35 psi (240 kPa):
Turn the air compressor on to inflate the
tire until the tire pressure reaches 35 psi
(240 kPa).
2 Inflating an Under-inflated Tire P. 631
Then drive carefully for 10 more minutes or
until you reach the nearest service station,
whichever is sooner. Do not exceed 50 mph
(80 km/h). If you have not reached a service
station, stop and check the tire pressure.
u You should repeat this procedure as long
as the air pressure is within this range.
7. Unscrew the sealant/ai r hose from the tire
valve stem.
Reinstall the valve cap.
8. Press the pressure relief button until the
gauge returns to 0 psi (0 kPa).
9. Repackage and properly stow the kit.
Pressure Relief Button
1Distributing the Sealant in the Tire
3WARNING
Running the engine with the vehicle in an
enclosed or even partly enclosed area can
cause a rapid build-up of toxic carbon
monoxide.
Breathing this colorless, odorless gas can
cause unconsciousness and even death.
Only run the engine to power the air
compressor with th e vehicle outdoors.
19 ACURA MDX E-AWD-31TRX6200.book 630 ページ 2018年6月22日 金曜日 午後7時42分
Page 632 of 685

Continued631
uuIf a Tire Goes Flat uTemporarily Repairing a Flat Tire*
Handling the Unexpected
You can use the kit to inflate a non-punctured, under-inflated tire.
1.Open the cargo area floor lid.
2 Getting Ready to Temporarily Repair
the Flat Tire P. 623
2.Remove the kit from the case.
3. Place the kit, face up, on flat ground near
the flat tire, away from traffic. Do not
place the kit on its side.
4. Remove the sealant/air hose from the kit.
5. Remove the valve cap.
6. Attach the sealant/air hose onto the tire
valve stem. Screw it until it is tight.
■Inflating an Under-inflated Tire1Inflating an Under-inflated Tire
NOTICE
Do not operate the temporary tire repair kit
compressor for more than 15 minutes. The
compressor can overheat and become permanently
damaged.
Air Only Hose
Valve Cap
Valve Stem
Air Only Hose
19 ACURA MDX E-AWD-31TRX6200.book 631 ページ 2018年6月22日 金曜日 午後7時42分
Page 634 of 685

633
uuIf a Tire Goes Flat uTemporarily Repairing a Flat Tire*
Handling the Unexpected
12. Turn off the kit.
u Check the pressure gauge on the air
compressor.
u If overinflated, press the pressure relief
button.
13. Unplug the kit from the accessory power
socket.
14. Unscrew the sealant/ai r hose from the tire
valve stem. Reinstall the valve cap.
15. Press the pressure relief button until the
gauge returns to 0 psi (0 kPa).
16. Repackage and properly stow the kit.
Pressure Relief Button
19 ACURA MDX E-AWD-31TRX6200.book 633 ページ 2018年6月22日 金曜日 午後7時42分