2019 Abarth 124 Spider 100
[x] Cancel search: 100Page 174 of 224

ENGINE OIL
196)
40)
4)
Inspecting engine oil level
Proceed as follows:
be sure the vehicle is on a level
surface;
warm up the engine to normal
operating temperature;
turn it off and wait at least 5 minutes
for the oil to return to the sump;
pull out the dipstick 1 fig. 152, wipe it
clean, and reinsert it fully;
pull it out again and examine the
level. The level is normal if it is between
Low and Full. If it is near or below Low,
open the engine oil cap/filler 2 and add
enough oil to bring the level to Full.
IMPORTANT Do not overfill the engine
oil. This may cause engine damage.
make sure the O-ring on the dipstick
is positioned properly before reinserting
the dipstick;
reinsert the dipstick fully.
Engine oil consumption
During the initial period of use the
engine oil consumption conditions
should be considered as having
stabilised after the first 5000 –
6000 km.
NOTE It is normal for all engines to
consume engine oil under normal
driving conditions. Engine oil
consumption may be as high as
400 g/1000 km. This may be as a result
of evaporation, internal ventilation or
burning of the lubricating oil in the
working engine. Oil consumption may
be higher when the engine is new due
to the running-in process. Oil
consumption is also dependant on
engine speed and engine load. Under
extreme driving conditions, oil
consumption may be higher.
Engine oil changing
NOTE Changing the engine oil should
be done by an expert repairer, we
recommend an Abarth Dealership.
ENGINE COOLANT
197) 198) 199)
The coolant should be at full in the
radiator and between the F (Full) and L
(Low) marks on the coolant reservoir
fig. 153 when the engine is cool.
If it is at or near L (Low), add enough
coolant to the coolant reservoir to
provide freezing and corrosion
protection and to bring the level to F
(Full).
Securely tighten the coolant reservoir
tank cap after adding coolant.
If the coolant reservoir is empty or new
coolant is required frequently, contact
an Abarth Dealership.
IMPORTANT Radiator coolant will
damage paint. Rinse it off quickly if
spilled.
15207030403-121-001AB
15307030501-121-001AB
172
MAINTENANCE AND CARE
Page 185 of 224

IDENTIFICATION
DATA
MODEL PLATE
Model plate is located on the left side of
door pillar (see figure).
CHASSIS NUMBER / VEHICLE
IDENTIFICATION NUMBER
(Ireland / U.K.)
Chassis number: open the cover shown
in figure to check the chassis number.Vehicle Identification Number(see
figure).
TIRE PRESSURE LABEL
Tire pressure label is located on the left
side of door pillar for left-hand drive
versions fig. 161 or on the right side of
door pillar for right-hand drive versions.
ENGINE NUMBER
Engine number label is located on the
engine.
15810010103-121-001AB
15910010109-333-333AB
16010010104-122-001AB
16110010109-321-321AB
183
Page 190 of 224

DIMENSIONS
Dimensions are expressed in mm and refer to the vehicle equipped with its standard-supplied tyres. Height is measured with
vehicle unladen.
BOOT VOLUME: 140 litres
ABCDE F
4,054 (*) / 4,075 (**) 2,310 1,233 1,496 1,740 1,503
(*) Without license plate holder / (**) With license plate holder.
16210000555-122-333AB
188
TECHNICAL SPECIFICATIONS
Page 209 of 224

Device selection
If several devices have been paired, the
Bluetooth®
unit links the device last
paired. If you would like to link a
different paired device, it is necessary to
change the link. The order of device
priority after the link has been changed
is maintained even when the ignition is
switched off.
Connecting other devices
Proceed as follows:
select theicon on the home
screen to display the “Settings” screen;
select theDevicestab then select
Bluetooth®
. Turn theBluetooth®
setting on and select the name of the
device you would like to connect;
Phone And Audio selection
connects both devices as hands-free
and
Bluetooth®
audio.Phone Only
selectionconnects as a hands-free
device.Audio Only selection
connects as
Bluetooth®
audio.
Making a call
Making calls is possible using any of the
following six methods:
Phonebook downloaded from
Bluetooth®
device (mobile phone)
(voice recognition function can be
used);
Favourites;
Call record;
Dialing a telephone number (voice
recognition function can be used);
“Redial” - voice recognition
command for making a call to the latest
outgoing call record;
“Call back” - voice recognition
command for making a call to the latest
incoming call record.
Telephone calls can be made by saying
the contact name in the downloaded
phonebook or the name of a person
whose phone number has been
registered in the
Bluetooth®
hands-free.
Proceed as follows:
press the talk button;
wait for the beep sound;
say: “Call XXXXX... (Ex. “John”)
Mobile” (you can also say, “Home”,
“Work”, or “Other” instead of “Mobile”,
depending on how you set up your
contact information);
follow the voice guidance to make
the call, or simple press the pick-up
button on the steering switch during or
after the guidance to make the call.
Import contact (download
Phonebook)
Phonebook data from your device
(Mobile phone) can be sent and
registered to your
Bluetooth®
hands-free phonebook using
Bluetooth®
.
Automatic downloading: the “Auto
Download Contacts” setting must beon. When hands-free is connected to
the device, the phonebook is
downloaded automatically.
Manually downloading: if the “Auto
Download Contacts” setting is off,
download the phonebook using the
following procedure:
select theicon on the home
screen to display the “Communication”
screen;
selectContactsto display the
contact list;
selectEdit Contacts;
selectImport All Contactsor
Import Selected Contactto switch to
the device operation. IfImport All
Contactsis selected, select
Download. Download will be started
from the mobile phone.
NOTE A maximum of 1000 contacts
can be registered to the phonebook.
Receiving an incoming call
When an incoming call is received, the
incoming call notification screen is
displayed. The “Incoming Call
Notifications” setting must be on.
To accept the callpress steering
wheel button on the audio control
switch or selectAnsweron the screen.
To reject the callpress the hang-up
button on the audio control switch or
selectIgnoreon the screen.
207
Page 210 of 224

NAVIGATION
SD CARD
To use the navigation system, the SD
card containing the map information
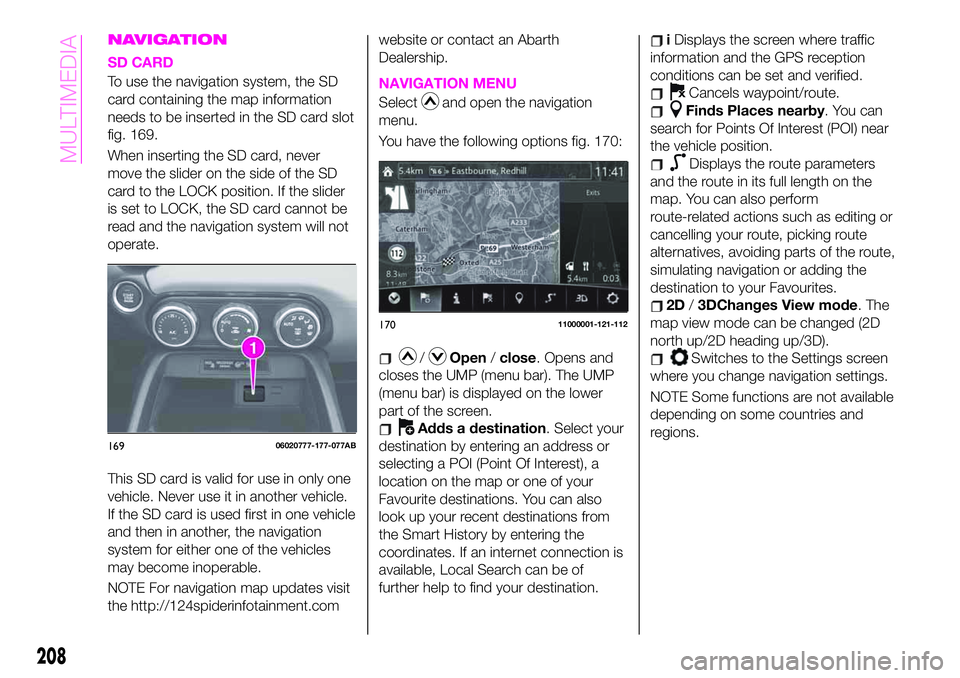
needs to be inserted in the SD card slot
fig. 169.
When inserting the SD card, never
move the slider on the side of the SD
card to the LOCK position. If the slider
is set to LOCK, the SD card cannot be
read and the navigation system will not
operate.
This SD card is valid for use in only one
vehicle. Never use it in another vehicle.
If the SD card is used first in one vehicle
and then in another, the navigation
system for either one of the vehicles
may become inoperable.
NOTE For navigation map updates visit
the http://124spiderinfotainment.comwebsite or contact an Abarth
Dealership.NAVIGATION MENU
Selectand open the navigation
menu.
You have the following options fig. 170:
/Open/close. Opens and
closes the UMP (menu bar). The UMP
(menu bar) is displayed on the lower
part of the screen.
Adds a destination. Select your
destination by entering an address or
selecting a POI (Point Of Interest), a
location on the map or one of your
Favourite destinations. You can also
look up your recent destinations from
the Smart History by entering the
coordinates. If an internet connection is
available, Local Search can be of
further help to find your destination.
iDisplays the screen where traffic
information and the GPS reception
conditions can be set and verified.
Cancels waypoint/route.
Finds Places nearby. You can
search for Points Of Interest (POI) near
the vehicle position.
Displays the route parameters
and the route in its full length on the
map. You can also perform
route-related actions such as editing or
cancelling your route, picking route
alternatives, avoiding parts of the route,
simulating navigation or adding the
destination to your Favourites.
2D/3DChanges View mode. The
map view mode can be changed (2D
north up/2D heading up/3D).
Switches to the Settings screen
where you change navigation settings.
NOTE Some functions are not available
depending on some countries and
regions.
16906020777-177-077AB
17011000001-121-112
208
MULTIMEDIA
Page 211 of 224

NAVIGATING ON THE MAP
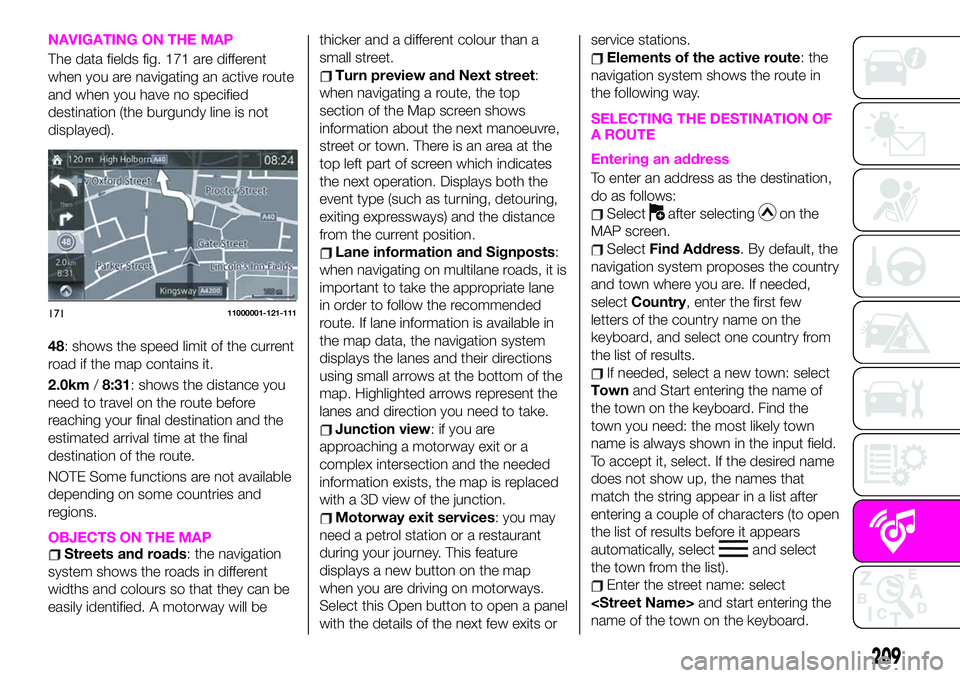
The data fields fig. 171 are different
when you are navigating an active route
and when you have no specified
destination (the burgundy line is not
displayed).
48: shows the speed limit of the current
road if the map contains it.
2.0km/8:31: shows the distance you
need to travel on the route before
reaching your final destination and the
estimated arrival time at the final
destination of the route.
NOTE Some functions are not available
depending on some countries and
regions.
OBJECTS ON THE MAPStreets and roads: the navigation
system shows the roads in different
widths and colours so that they can be
easily identified. A motorway will bethicker and a different colour than a
small street.
Turn preview and Next street:
when navigating a route, the top
section of the Map screen shows
information about the next manoeuvre,
street or town. There is an area at the
top left part of screen which indicates
the next operation. Displays both the
event type (such as turning, detouring,
exiting expressways) and the distance
from the current position.
Lane information and Signposts:
when navigating on multilane roads, it is
important to take the appropriate lane
in order to follow the recommended
route. If lane information is available in
the map data, the navigation system
displays the lanes and their directions
using small arrows at the bottom of the
map. Highlighted arrows represent the
lanes and direction you need to take.
Junction view: if you are
approaching a motorway exit or a
complex intersection and the needed
information exists, the map is replaced
with a 3D view of the junction.
Motorway exit services: you may
need a petrol station or a restaurant
during your journey. This feature
displays a new button on the map
when you are driving on motorways.
Select this Open button to open a panel
with the details of the next few exits orservice stations.
Elements of the active route: the
navigation system shows the route in
the following way.
SELECTING THE DESTINATION OF
A ROUTE
Entering an address
To enter an address as the destination,
do as follows:
Selectafter selectingon the
MAP screen.
SelectFind Address. By default, the
navigation system proposes the country
and town where you are. If needed,
selectCountry, enter the first few
letters of the country name on the
keyboard, and select one country from
the list of results.
If needed, select a new town: select
Townand Start entering the name of
the town on the keyboard. Find the
town you need: the most likely town
name is always shown in the input field.
To accept it, select. If the desired name
does not show up, the names that
match the string appear in a list after
entering a couple of characters (to open
the list of results before it appears
automatically, select
and select
the town from the list).
Enter the street name: select
name of the town on the keyboard.
17111000001-121-111
209
Page 220 of 224

Internal equipment............38
Jump starting..............159
Jump starting (procedure).......160
Key battery replacement........10
Keyless Entry System...........9
Keys......................9
Lane change signals...........27
Leaving Home Light system.......27
Load limiter (pretensioner)........85
Maintaining the finish.........179
Maintenance monitor...........53
Manual climate control system.....32
Manual transmission..........118
Mechanical Limited Slip
Differential................79
Message indicated on display.....71
Mirrors....................22
Multimedia.................195
Navigation................208
Occupant protection systems.....81
Odometer/Trip meter...........50
Outside mirrors...............22
Owner maintenance precautions . . .165
Paintwork (preserving).........178
Parking...................116
Parking brake...............117
Parking Sensor System.........129
Passenger Air Bag............102Passenger occupant classification
system.................107
Passive Entry................17
Performance...............192
Periodic checks (scheduled
servicing)................166
Power mirrors...............23
Power window lock switch.......37
Power windows..............36
Prescriptions for handling the
vehicle at the end of its life.....194
Pretensioners................85
Push button start positions.......11
Radio 3”.................197
Radio 7”..................202
Read this carefully..............2
Rear camera (ParkView rear
backup camera)...........133
Rear fog lights...............26
Refuelling procedure..........131
Refuelling the vehicle..........131
Replacing a bulb.............139
Replacing a tire..............177
Replacing exterior light bulbs.....142
Replacing fuses.............147
Rims and tires..............185
Rims and tires provided........186
SBA system (Seat Belt Alert)......84
Scheduled servicing plan.......167Seat belt precautions...........82
Seat belt pretensioner and load
limiting systems.............85
Seat Belt pretensioners.........102
Seat belts..................82
Seat belts (fastening/unfastening)}.......................82
Seats.....................19
Seats (manual adjustment).......19
Seats and fabric parts (cleaning) . . .181
Shift-lock override (automatic
gearbox)................120
Shift-lock system (automatic
gearbox)................120
Side Air Bags...............103
Snow chains...............177
Speed limiter...............126
SPORT mode...............123
Starting the engine.........11,116
Steering wheel...............21
Supplementary restraint system
(SRS) - Air bag............100
Symbols....................3
TCS (Traction Control System).....73
Theft deterrent system..........15
Tips, controls and general
information...............196
Tire service kit..............154
Tires rotation (recommendations) . .177
Tool storage................154
Towing the vehicle............161
INDEX
Page 222 of 224

FCA Italy S.p.A. - MOPAR - Technical Services - Service Engineering
Largo Senatore G. Agnelli, 3 - 10040 Volvera - Turin (Italy)
Print no. 603.91.772 - 06/2018 - 1 Edition