2019.75 VAUXHALL GRANDLAND X ECU
[x] Cancel search: ECUPage 145 of 271

Driving and operating143Engine brakingTo utilise the engine braking effect,
select a lower gear in good time when
driving downhill, see manual mode.
Rocking the vehicle Rocking the vehicle is only
permissible if the vehicle is stuck in
sand, mud or snow. Move the selector
lever between D and R in a repeat
pattern. Do not race the engine and
avoid sudden acceleration.
Parking Apply the parking brake and engageP .Manual mode
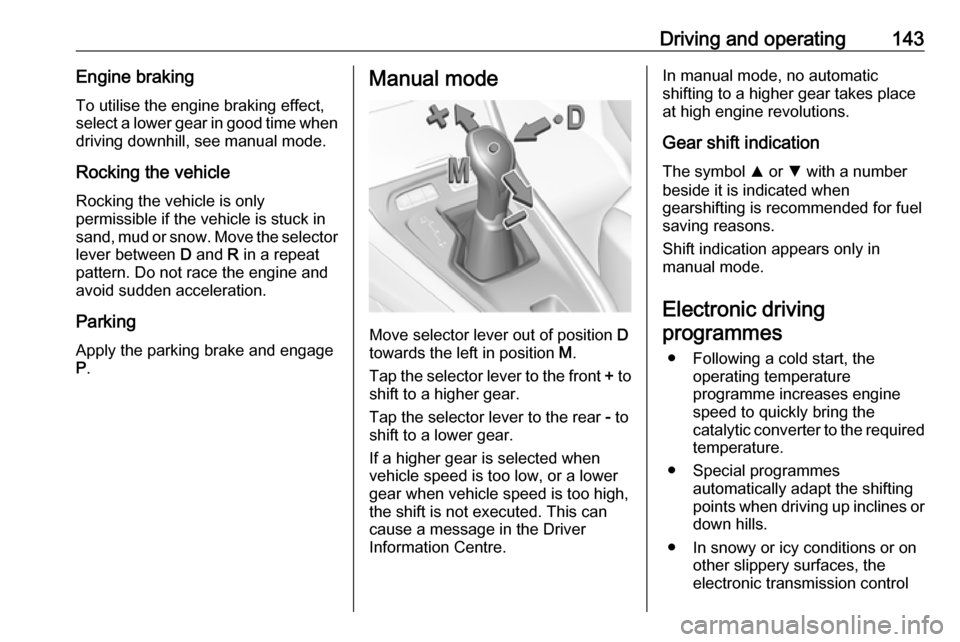
Move selector lever out of position D
towards the left in position M.
Tap the selector lever to the front + to
shift to a higher gear.
Tap the selector lever to the rear - to
shift to a lower gear.
If a higher gear is selected when
vehicle speed is too low, or a lower
gear when vehicle speed is too high,
the shift is not executed. This can
cause a message in the Driver
Information Centre.
In manual mode, no automatic
shifting to a higher gear takes place
at high engine revolutions.
Gear shift indication
The symbol R or S with a number
beside it is indicated when
gearshifting is recommended for fuel
saving reasons.
Shift indication appears only in
manual mode.
Electronic driving programmes
● Following a cold start, the operating temperature
programme increases engine
speed to quickly bring the
catalytic converter to the required
temperature.
● Special programmes automatically adapt the shifting
points when driving up inclines or
down hills.
● In snowy or icy conditions or on other slippery surfaces, the
electronic transmission control
Page 199 of 271

Vehicle care197Caution
When transporting the vehicle on
a train or on a recovery vehicle, the
mud flaps might be damaged.
Cold protection covers
It is recommended to have the
protection covers installed by a
workshop.
Caution
The protection covers must be removed when one of the
following conditions occurs:
● The ambient temperature is above 10 °C.
● When the vehicle is towed.
● The vehicle is driven at speeds
above 75 mph.
Installation
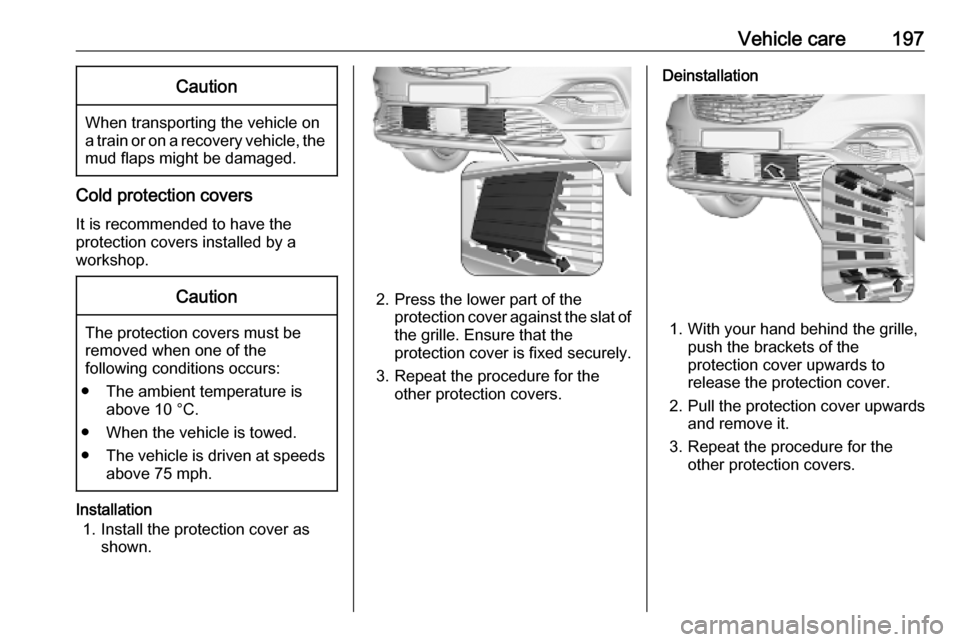
1. Install the protection cover as shown.
2. Press the lower part of theprotection cover against the slat ofthe grille. Ensure that the
protection cover is fixed securely.
3. Repeat the procedure for the other protection covers.
Deinstallation
1. With your hand behind the grille,push the brackets of the
protection cover upwards to
release the protection cover.
2. Pull the protection cover upwards and remove it.
3. Repeat the procedure for the other protection covers.
Page 201 of 271

Vehicle care199Vehicle checks
Performing work9 Warning
Only perform engine compartment
checks when the ignition is off.
The cooling fan may start
operating even if the ignition is off.
9 Danger
The ignition system uses
extremely high voltage. Do not
touch.
Bonnet
Opening
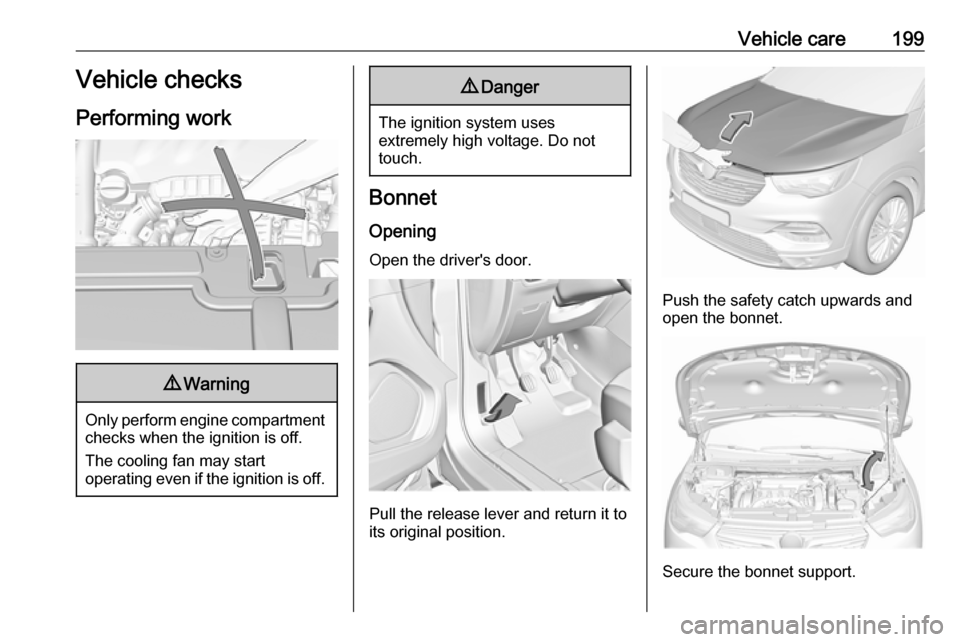
Open the driver's door.
Pull the release lever and return it to
its original position.
Push the safety catch upwards and
open the bonnet.
Secure the bonnet support.
Page 227 of 271

Vehicle care225Front arm position of the lifting
platform centrically under the relevant
vehicle jacking point.
Spare wheel
The spare wheel can be classified as
a temporary spare wheel depending
on the size compared to the other
mounted wheels and country
regulations. In this case a permissible maximum speed applies, even
though no label at the spare wheel
indicates this.
Only mount one temporary spare
wheel. Do not drive faster than
50 mph. Take curves slowly. Do not
use for a long period of time.Caution
The use of a spare wheel that is smaller than the other wheels or in combination with winter tyres
could affect driveability. Have the defective tyre replaced as soon as
possible.
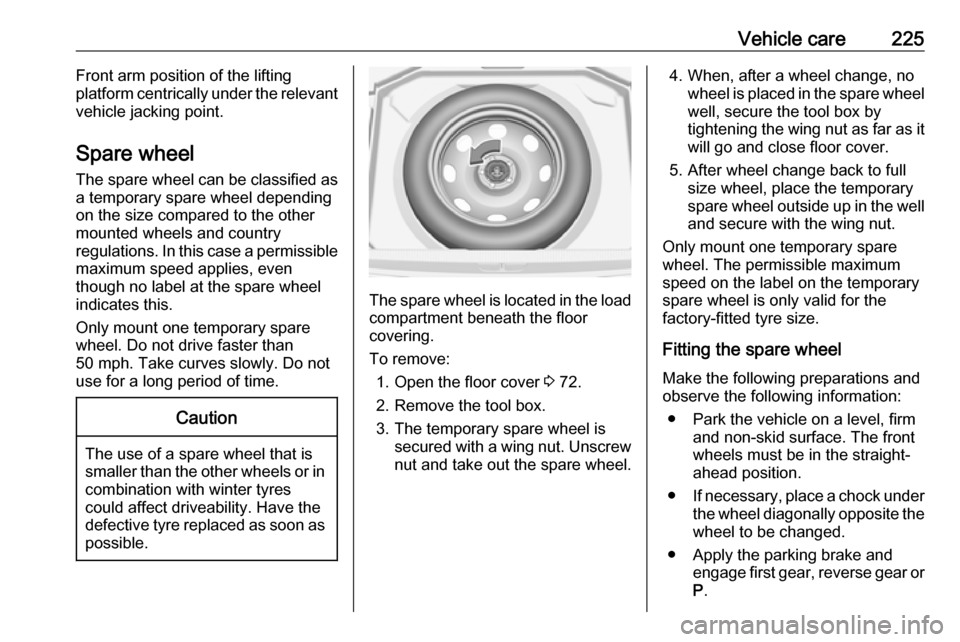
The spare wheel is located in the load
compartment beneath the floor
covering.
To remove: 1. Open the floor cover 3 72.
2. Remove the tool box.
3. The temporary spare wheel is secured with a wing nut. Unscrew
nut and take out the spare wheel.
4. When, after a wheel change, no wheel is placed in the spare wheelwell, secure the tool box by
tightening the wing nut as far as it
will go and close floor cover.
5. After wheel change back to full size wheel, place the temporary
spare wheel outside up in the well and secure with the wing nut.
Only mount one temporary spare
wheel. The permissible maximum
speed on the label on the temporary
spare wheel is only valid for the
factory-fitted tyre size.
Fitting the spare wheel
Make the following preparations and
observe the following information:
● Park the vehicle on a level, firm and non-skid surface. The front
wheels must be in the straight- ahead position.
● If necessary, place a chock under
the wheel diagonally opposite the
wheel to be changed.
● Apply the parking brake and engage first gear, reverse gear or
P .
Page 228 of 271

226Vehicle care● Remove the spare wheel.
● Never change more than one wheel at once.
● Use the jack only to change wheels in case of puncture, not
for seasonal winter or summer
tyre change.
● The jack is maintenance-free.
● If the ground on which the vehicle
is standing is soft, a solid board
(max. 1 cm thick) should be
placed under the jack.
● Take heavy objects out of the vehicle before jacking up.
● No people or animals may be in the vehicle when it is jacked-up.
● Never crawl under a jacked-up vehicle.
● Do not start the vehicle when it is
raised on the jack.
● Before screwing in the wheel bolts, clean them.9Warning
Do not grease wheel bolts.
9Warning
Ensure to use always the correct
wheel bolts if changing the
wheels. When installing the spare
wheel, the bolts for alloy wheels can also be used.
● Note that the spare wheel is secured by the conical contact ofeach bolt if the wheel bolts for the
alloy wheels are used. In this
case, the washers do not come
into contact with the spare wheel.
1. Disengage wheel bolt caps with the wheel bolt cover remover.
Vehicle tools 3 215.
Steel wheels with cover: Pull off
the wheel cover.
Alloy wheels: Disengage wheel
bolt caps with the wheel bolt cover remover.
2. Fold out the wheel wrench and install ensuring that it locates
securely and loosen each wheel
nut by half a turn.
The wheels might be protected by
locking wheel nuts. To loosen
these specific nuts first attach the
adapter onto the head of the nut
before installing the wheel
Page 229 of 271

Vehicle care227wrench. The adapter is located in
the tool box 3 215.
3. Ensure the jack is correctly
positioned under the relevant
vehicle jacking point.
4. Set the jack to the necessary height. Position it directly below
the jacking point in a manner that
prevents it from slipping.
Ensure that the edge of the body
fits into the notch of the jack.
Attach wheel wrench and with the
jack correctly aligned rotate wheel wrench until wheel is clear of the
ground.
5. Unscrew the wheel nuts. 6. Change the wheel.
7. Screw on the wheel nuts.
8. Lower the vehicle and remove jack.
9. Install the wheel wrench ensuring that it is located securely and
tighten each bolt in a crosswise
sequence. Tightening torque is
115 Nm.
If the vehicle is equipped with
alloy wheels, note that the wheel
Page 230 of 271

228Vehicle carebolts can also be used for the steelspare wheel. In this case, the
spare wheel is secured by the
conical contact of each bolt.
10. Align the valve hole in the wheel cover with the tyre valve before
installing.
Install wheel nut caps.
11. Stow the replaced wheel, the vehicle tools 3 215 and the
adapter for the locking wheel nuts.
12. Check the tyre pressure of the installed tyre and the wheel nut
torque as soon as possible.
Stowing a damaged full size
wheel in the load compartment
All permitted wheel sizes can be
stowed in the spare wheel well. To
secure the wheel:
1. Remove centre cap with the brand
emblem by pushing from the
inside.
2. Position the wheel outside down in the wheel well.
3. Secure the defective wheel with the wing nut.
4. Depending on the tyre size, the floor cover can be placed on theprojecting wheel.
Jump starting
Do not start with quick charger.
A vehicle with a discharged vehicle
battery can be started using jump
leads and the vehicle battery of
another vehicle.9 Warning
Be extremely careful when starting
with jump leads. Any deviation
from the following instructions can
lead to injuries or damage caused
by battery explosion or damage to the electrical systems of both
vehicles.
9 Warning
Avoid contact of the battery with
eyes, skin, fabrics and painted
surfaces. The fluid contains
sulphuric acid which can cause
injuries and damage in the event
of direct contact.
● Never expose the vehicle battery
to naked flames or sparks.
Page 261 of 271

Customer information2591. Redistributions of source codemust retain the above copyright
notice, definition, disclaimer, and
this list of conditions.
2. Redistributions in binary form (compiled executables) must
reproduce the above copyright
notice, definition, disclaimer, and
this list of conditions in
documentation and/or other
materials provided with the
distribution. The sole exception to this condition is redistribution of a
standard UnZipSFX binary
(including SFXWiz) as part of a
self-extracting archive; that is
permitted without inclusion of this
license, as long as the normal
SFX banner has not been
removed from the binary or
disabled.
3. Altered versions--including, but not limited to, ports to new
operating systems, existing ports
with new graphical interfaces, and dynamic, shared, or static library
versions--must be plainly marked
as such and must not be
misrepresented as being the
original source. Such alteredversions also must not be
misrepresented as being Info-ZIP
releases--including, but not
limited to, labeling of the altered
versions with the names “Info-
ZIP” (or any variation thereof,
including, but not limited to,
different capitalizations), “Pocket UnZip,” “WiZ” or “MacZip” without
the explicit permission of Info-ZIP.
Such altered versions are further
prohibited from misrepresentative use of the Zip-Bugs or Info-ZIP e-mail addresses or of the Info-ZIP
URL(s).
4. Info-ZIP retains the right to use the names “Info-ZIP,” “Zip,”
“UnZip,” “UnZipSFX,” “WiZ,” “Pocket UnZip,” “Pocket Zip,” and
“MacZip” for its own source and
binary releases.
Software update The Infotainment system can
download and install selected
software updates over a wireless
connection.Notice
The availability of these over-the-air
vehicle software updates varies by
vehicle and country. Find more
information on our home page.
Internet connection
Downloading over-the-air vehicle
software updates requires internet
connectivity, which can be accessed
through the vehicle's built-in OnStar
connection or another password-
protected Wi-Fi hotspot, e.g. provided
by a mobile phone.
To connect the Infotainment system
to a hotspot, select Settings on the
home screen, Wi-Fi and then Manage
Wi-Fi Networks . Select the desired
Wi-Fi network, and follow the on-
screen prompts.
Updates The system will prompt for certain
updates to be downloaded and
installed. There is also an option to
check for updates manually.