2019.75 VAUXHALL CROSSLAND X ESP
[x] Cancel search: ESPPage 98 of 247

96Instruments and controlsview camera guidelines on the
Info Display.
● Comfort and Convenience
Auto Wipe in Reverse Gear :
Activates or deactivates
automatic switching on of the
rear window wiper when reverse gear is engaged.
● Lighting
Ambient Lighting : Activates or
deactivates the ambient lighting
and adjusts its brightness.
Welcome Lighting : Activates or
deactivates and changes the duration of welcome lighting.
Exit Lighting : Activates or
deactivates and changes the
duration of exit lighting.
● Remote Lock, Unlock, Start
Remote Door Unlock : Changes
the configuration to unlock the
driver's door only or all doors
when pressing O on the remote
control.
Unlock boot only : Activates or
deactivates unlocking the tailgateonly when pressing T on the
remote control.
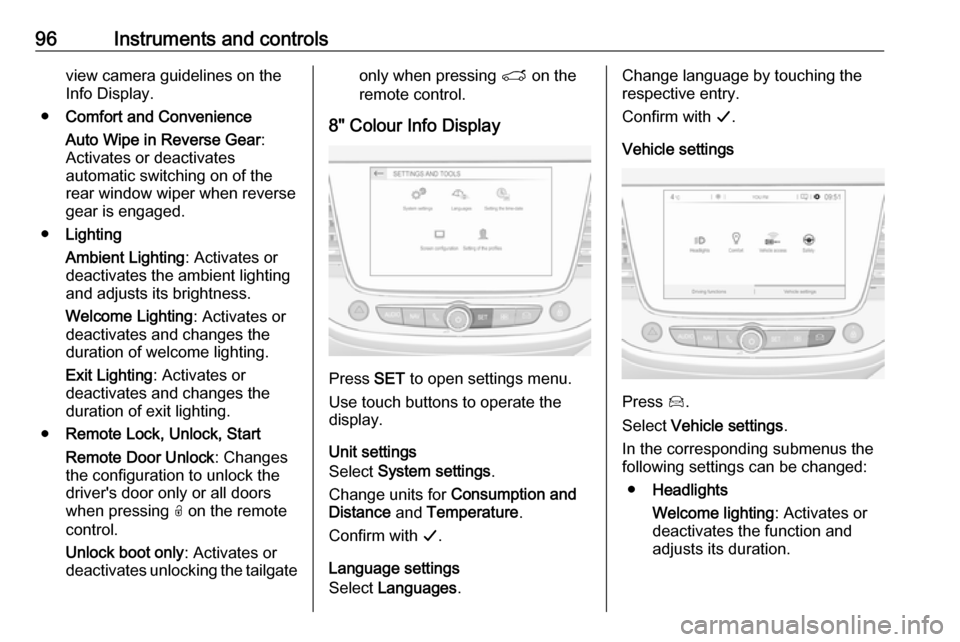
8" Colour Info Display
Press SET to open settings menu.
Use touch buttons to operate the
display.
Unit settings
Select System settings .
Change units for Consumption and
Distance and Temperature .
Confirm with G.
Language settings
Select Languages .
Change language by touching the
respective entry.
Confirm with G.
Vehicle settings
Press Í.
Select Vehicle settings .
In the corresponding submenus the
following settings can be changed:
● Headlights
Welcome lighting : Activates or
deactivates the function and
adjusts its duration.
Page 99 of 247

Instruments and controls97Guide-me-home lighting:
Activates or deactivates the
function and adjusts its duration.
● Comfort
Mood lighting : Adjusts the
brightness of the ambient
lighting.
Rear wiper in reverse : Activates
or deactivates automatic
switching on of the rear window
wiper when reverse gear is
engaged.
● Vehicle access
Door unlock: boot only : Activates
or deactivates unlocking only the tailgate when pressing T on the
remote control.
Door unlock: driver only :
Changes the configuration to
unlock only the driver's door and
fuel filler flap or all doors, load
compartment and fuel filler flap
when pressing O on the remote
control.
● Safety
Driver attention warning :
Activates or deactivates the
driver drowsiness system.Driving functions
Press Í.
Select Driving functions .
In the corresponding submenus the
following settings can be changed:
● Park Assist : Activates advanced
park assist, a parking maneuver can be selected.
● Blind Spot Sensors : Activates or
deactivates side blind spot alert.
● Panoramic view system :
Activation / deactivation of the
function.
Telematics services
Vauxhall Connect
Vauxhall Connect is a new way to
stay connected and secure on the
road.
Features available with
Vauxhall Connect are:
● emergency call function
● breakdown call function
When the vehicle is equipped with
Vauxhall Connect , these features are
automatically activated. Terms and
Conditions apply.
Vauxhall Connect is operated by the
buttons in the overhead console.
Emergency call function Vehicles featuring the emergency call
function are equipped with a red
SOS button in the overhead console.
The emergency call function will
establish a connection to the nearest
public safety answering point (PSAP).
A minimum set of data including
vehicle and location information will
be sent to the PSAP.
Page 106 of 247

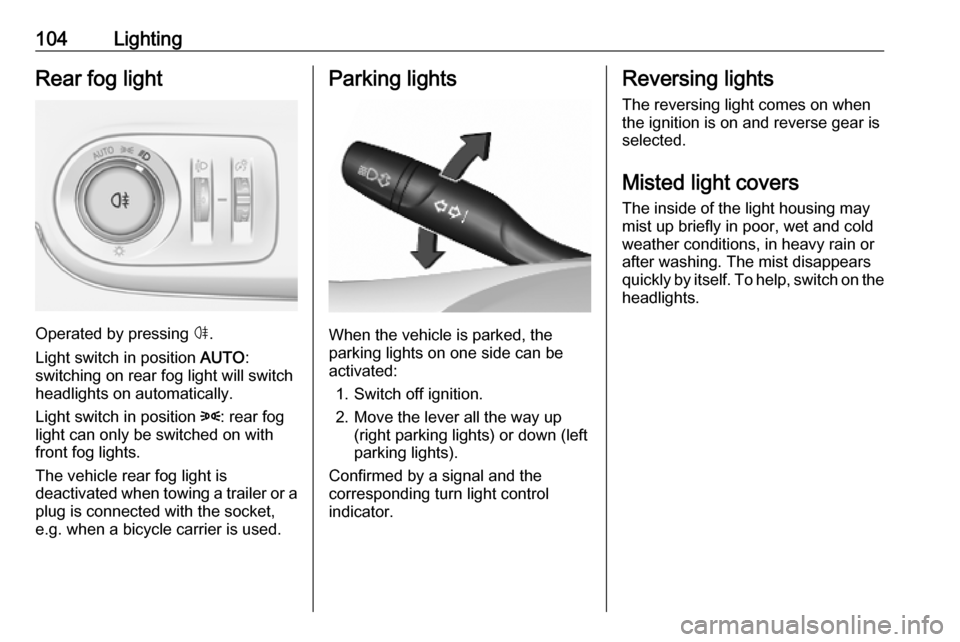
104LightingRear fog light
Operated by pressing ø.
Light switch in position AUTO:
switching on rear fog light will switch
headlights on automatically.
Light switch in position 8: rear fog
light can only be switched on with
front fog lights.
The vehicle rear fog light is
deactivated when towing a trailer or a
plug is connected with the socket,
e.g. when a bicycle carrier is used.
Parking lights
When the vehicle is parked, the
parking lights on one side can be
activated:
1. Switch off ignition.
2. Move the lever all the way up (right parking lights) or down (left
parking lights).
Confirmed by a signal and the
corresponding turn light control
indicator.
Reversing lights
The reversing light comes on when
the ignition is on and reverse gear is
selected.
Misted light covers
The inside of the light housing may
mist up briefly in poor, wet and cold weather conditions, in heavy rain or
after washing. The mist disappears
quickly by itself. To help, switch on the headlights.
Page 111 of 247

Climate control109Demisting and defrosting the
windows á
● Press á: the air distribution is
directed towards the windscreen.
● Set temperature controller £ to
warmest level.
● Set fan speed Z to highest level.
● Switch on heated rear window b.
● Open side air vents as required and direct them towards the doorwindows.
Heated rear window b 3 37.
Heated exterior mirrors b 3 34.
Heated windscreen , 3 38.
Heated seats ß 3 44.
Air conditioning system
Controls for: ● temperature £
● air distribution l, M and K
● fan speed Z
● demisting and defrosting à
● air conditioning A/C
● air recirculation 4
● heated rear window and heated exterior mirrors b
● heated windscreen ,
● heated seats ß
Some changes of settings are
indicated briefly in the Info Display.
Activated functions are indicated by the LED in the respective button.
Temperature £
Adjust the temperature by turning £ to the desired temperature.
red area:warmerblue area:colder
Heating will not be fully effective until
the engine has reached normal
operating temperature.
Page 114 of 247

112Climate controlHeated seats ß 3 44.
Electronic climate control system
The dual zone climate control allows
different temperatures for driver side
and front passenger side.
In automatic mode, temperature, fan
speed and air distribution are
regulated automatically.
Controls for:
● temperature on driver side £
● MENU enters the Climate setting
menu in the Info Display
● fan speed Z
● automatic mode AUTO
● temperature on front passenger side £
● cooling A/C
● manual air recirculation 4
● demisting and defrosting à
● heated rear window and heated exterior mirrors b
● heated windscreen ,
● heated seats ß
Activated functions are indicated by the LED in the respective control.
The electronic climate control system
is only fully operational when the
engine is running.
Make sure the sun sensor used by the
electronic climate control system is
not covered 3 10.Climate settings menu
Press MENU to enter the climate
setting menu.
Settings for: ● air distribution l, M , K
● fan speed Z
● temperature for driver and passenger side
● dual zone temperature synchronisation MONO
● cooling A/C
● automatic mode AUTO
Page 120 of 247

118Climate controlAir vent in the glovebox
The air vent can be opened or closedby turning.
Fixed air vents Additional air vents are located
beneath the windscreen and door
windows and in the foot wells.
Maintenance
Air intake
The air intake in front of the
windscreen in the engine
compartment must be kept clear to
allow air intake. Remove any leaves,
dirt or snow.
Cabin air filter
Change filter regulary for maximum
effect.
More frequent passenger
compartment air filter replacement
may be needed, if you drive in areas
with heavy traffic, poor air quality,
areas with high dust levels or which
are sensitive to environmental
allergens.
Passenger compartment air filter
replacement may also be needed if
there is reduced air flow, windows
fogging up, or odors.
Your dealer can help to determine
when it is the right time to replace the
filter.
Air conditioning regularoperation
In order to ensure continuously
efficient performance, cooling must
be operated for a few minutes once a month, irrespective of the weather
and time of year. Operation with
cooling is not possible when the
outside temperature is too low.
Service For optimal cooling performance, it is
recommended to annually check the
climate control system, starting 3
years after initial vehicle registration, including:
Page 126 of 247

124Driving and operating●Do not operate accelerator pedal.
● Diesel engines: wait until control indicator ! extinguishes.
● Turn key to position 2 and
release after the engine has been started.
Manual transmission: during an
Autostop, the engine can be started
by depressing the clutch pedal
3 125.
Automatic transmission: during an
Autostop, the engine can be started
by releasing the brake pedal 3 125.
Vehicles with power button● Manual transmission: operate clutch and brake pedal.
● Automatic transmission: operate brake pedal and move selector
lever to P or N.
● Do not operate accelerator pedal.
● Press Start/Stop button. Release
button after starting procedure
begins.
● Diesel engine starts after control indicator ! for preheating
extinguishes.
● Before restarting or to switch off the engine when vehicle is
stationary, press Start/Stop once
more briefly.
To start the engine during an
Autostop:
● Manual transmission: during an Autostop, the engine can be
started by depressing the clutch
pedal 3 125.
● Automatic transmission: during an Autostop, the engine can be
started by releasing the brake
pedal 3 125.Starting the vehicle at low
temperatures
Starting the engine without additional
heaters is possible down to -25 °С for diesel engines and -30 °C for petrol
engines.
Required is an engine oil with the
correct viscosity, the correct fuel,
performed services and a sufficiently
charged vehicle battery.
With temperatures below -30 °C the
automatic transmission requires a
warming phase of approx. 5 minutes.
The selector lever must be in position
P .
Turbo engine warm-up
Upon start-up, engine available
torque may be limited for a short time, especially when the engine
temperature is cold. The limitation is
to allow the lubrication system to fully
protect the engine.
Page 138 of 247

136Driving and operatingBrakes
The brake system comprises two
independent brake circuits.
If a brake circuit fails, the vehicle can
still be braked using the other brake
circuit. However, braking effect is
achieved only when the brake pedal
is depressed firmly. Considerably
more force is needed for this. The
braking distance is extended. Seek the assistance of a workshop before
continuing the journey.
When the engine is not running, the
support of the brake servo unit
disappears once the brake pedal has been depressed once or twice.
Braking effect is not reduced, but
braking requires significantly greater
force. It is especially important to bear this in mind when being towed.
Control indicator R 3 83.
Antilock brake system
Antilock brake system (ABS)
prevents the wheels from locking.ABS starts to regulate brake pressure as soon as a wheel shows a tendency to lock. The vehicle remains
steerable, even during hard braking.
ABS control is made apparent
through a pulse in the brake pedal
and the noise of the regulation
process.
For optimum braking, keep the brake
pedal fully depressed throughout the
braking process, despite the fact that the pedal is pulsating. Do not reduce
the pressure on the pedal.
When braking in an emergency, the
hazard warning flashers are switched
on automatically depending on the
force of deceleration. They are
switched off automatically the first
time you accelerate.
After starting off, the system performs
a self-test which may be audible.
Control indicator u 3 83.
Fault9 Warning
If there is a fault in the ABS, the
wheels may be liable to lock due
to braking that is heavier than
normal. The advantages of ABS are no longer available. During
hard braking, the vehicle can no longer be steered and may
swerve.
Have the cause of the fault remedied
by a workshop.
Parking brake
9 Warning
Before leaving the vehicle, check
parking brake status. Control
indicator R must illuminate
constantly.