Page 163 of 247

Driving and operating161parking assist sensors, e.g. below
the bumper or underneath the
vehicle, are not displayed.
Do not reverse or park the vehicle using only the rear view camera.
Always check the surrounding of
the vehicle before driving.
Switching on
Rear view camera is automatically
activated when reverse gear is
engaged.
Functionality
The area displayed by the camera is
limited. The distance of the image that
appears on the display differs from
the actual distance.
Guide lines
The vertical lines represent the width
of the vehicle without mirrors and the
general direction of the vehicle. The
horizontal lines represent a distance of about 30 cm, 1m and 2 m beyond
the rear bumper. The crossing curves
represent the maximum turning circle.
Deactivation of guide lines
Guide lines can be deactivated in the Info Display. Select Settings I Vehicle
I Collision detection I Rear view
camera guide lines I § .
Info Display 3 90.
Vehicle personalisation 3 94.
Switching off
The camera is switched off when a
certain forward speed is exceeded or
if reverse gear is disengaged for
approx. 10 seconds.
System limitations
The rear view camera may not
operate properly when:
● The surrounding is dark.
● The beam of headlights is shining
directly into the camera lenses.
● During nighttime driving.
● Weather limits visibility, such as fog, rain, or snow.
● The camera lenses are blocked by snow, ice, slush, mud, dirt.
Clean the lense, rinse with water,
and wipe with a soft cloth.
Page 181 of 247
Vehicle care179● See the Owner's Manual forfurther information.
● Explosive gas may be present in the vicinity of the vehicle battery.
Power saving mode
This mode deactivates electrical
consumers to avoid excessive
discharging of the vehicle battery.
These consumers, such as the
infotainment system, windscreen
wipers, low beam headlights,
courtesy light, etc. can be used for a
total maximum time of about
40 minutes after ignition is switched
off.
Deactivating power saving mode
Power saving mode is deactivated
automatically when the engine is
restarted. Run the engine for a
sufficient charge:
● for less than 10 minutes to use the consumers for approx.
5 minutes
● for more than 10 minutes to use the consumers for up to approx.
30 minutesDiesel fuel system bleeding
If the tank has been run dry, the diesel fuel system must be bled. Switch on
the ignition three times for
15 seconds at a time. Then crank the
engine for a maximum of
40 seconds. Repeat this process after
no less than 5 seconds. If the engine fails to start, seek the assistance of a
workshop.
Wiper blade replacement
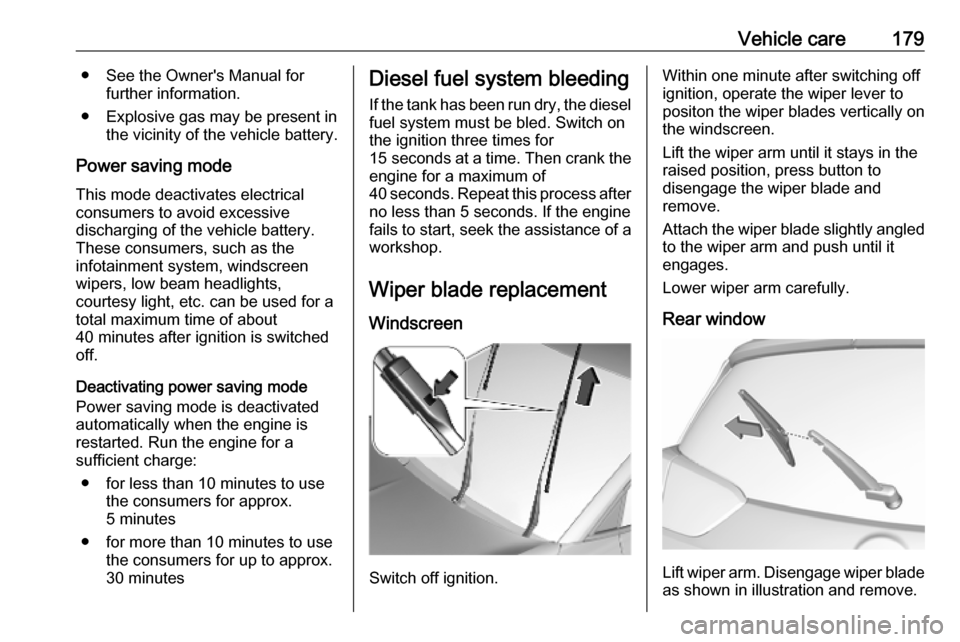
Windscreen
Switch off ignition.
Within one minute after switching off
ignition, operate the wiper lever to
positon the wiper blades vertically on
the windscreen.
Lift the wiper arm until it stays in the
raised position, press button to
disengage the wiper blade and
remove.
Attach the wiper blade slightly angled
to the wiper arm and push until it
engages.
Lower wiper arm carefully.
Rear window
Lift wiper arm. Disengage wiper blade as shown in illustration and remove.
Page 182 of 247
180Vehicle careAttach the wiper blade slightly angledto the wiper arm and push until it
engages.
Lower wiper arm carefully.Bulb replacement
Switch off the ignition and switch off
the relevant switch or close the doors.
Only hold a new bulb at the base. Do
not touch the bulb glass with bare
hands.
Use only the same bulb type for
replacement.
Replace headlight bulbs from within the engine compartment.
Bulb check After a bulb replacement switch on
the ignition, operate and check the
lights.Halogen headlights1:high beam, turn light2:low beam
Page 184 of 247
182Vehicle care2. Rotate the lower bulb holderanticlockwise to disengage.
Withdraw the bulb holder from the
reflector housing.
3. Press latch and remove the bulb from the bulb holder.
4. Replace the bulb and attach it to the bulb holder.
5. Insert the bulb holder into the reflector housing and rotate
clockwise.
6. Fit the cap and rotate clockwise.
Low beam
1. Rotate the cap anticlockwise and remove it.
2.Lift the retainer, then pull the plug
connector backwards.
3. Fold down the retainer and remove the bulb from the reflectorhousing.
4. Replace the bulb and push it into the reflector housing by setting
the lug into position.
5. Fold up the retainer and hold in position.
6. Attach the plug connector to the bulb and fix it with the retainer.
7. Fit the cap and rotate clockwise.
Page 185 of 247
Vehicle care183Sidelight / daytime running light
In case of defective LEDs, have them replaced by a workshop.
LED headlights Headlights for low and high beam,
sidelights, daytime running lights and turn lights are designed as LEDs and
cannot be changed.
Have lights repaired by a workshop in
case of failure.
Front fog lights
The bulbs are accessible from the
underside of the vehicle.1. Turn the bulb holder anti- clockwise and remove it from the
reflector housing.
2. Disengage the bulb socket from the plug connector by pressing
the retaining lug.
3. Remove and replace the bulb socket with bulb and attach the
plug connector.
4. Insert the bulb socket into the reflector housing by turning
clockwise and engage.
Tail lights
Depending on version, tail lights and
brake lights are designed as LEDs. In case of defective LEDs, have them
replaced by a workshop.
Light assembly in the body
Detaching the light assembly
1. Unscrew the two screws that secure the light assembly.
Page 244 of 247

242Headlight flash ........................... 101
Headlight range adjustment ......101
Headlights..................................... 99 Headlights when driving abroad 102
Head restraint adjustment .............8
Head restraints ............................ 40
Head-up display............................ 92 Heated mirrors ............................. 34
Heated rear window ..................... 37
Heated steering wheel .................70
Heated windscreen .......................38
Heating ........................................ 44
Heating and ventilation system . 108
High beam ........................... 86, 100
High beam assist ..................86, 100
Hill start assist ........................... 137
Horn ....................................... 13, 71
I
Identification plate .....................219
Ignition switch positions .............122
Immobiliser .................................. 33
Indicators ...................................... 77
Inductive charging ........................75
Info Display ................................... 90
Instrument cluster ........................76
Instrument panel fuse box .........190
Instrument panel illumination control .................................... 105
Instrument panel overview ........... 10Interior care ............................... 210
Interior lighting ............................ 105
Interior lights ...................... 105, 188
Interior mirrors .............................. 35
Interruption of power supply ......134
Introduction .................................... 3
J Jump starting ............................. 205
K Keys ............................................. 20
Keys, locks ................................... 20
L
Lane departure warning .......84, 162
Lashing eyes ............................... 65
LED headlights ...................102, 183
Lighting features .........................106
Light switch .................................. 99
Load compartment ................29, 62
Load compartment cover .............64
Loading information .....................67
Low beam ..................................... 86
Low fuel ....................................... 86
M Malfunction indicator light ............82
Manual anti-dazzle ......................35
Manual mode ............................. 133
Manual transmission .................. 135Manual windows ..........................36
Mirror adjustment ........................... 9
Misted light covers .....................104
N New vehicle running-in ..............121
Number plate light .....................188
O Object detection systems ...........149
Odometer ..................................... 78 Oil, engine .......................... 217, 221
Outside temperature ....................73
Overrun cut-off ........................... 125
P Panoramic view system ..............158
Parking ................................ 18, 127
Parking assist ............................ 149
Parking brake ....................... 83, 136
Parking lights ............................. 104
Particulate filter ........................... 128
Performance .............................. 224
Performing work ........................174
Power button .............................. 122
Power outlets ............................... 74
Power windows ............................ 36
Preheating ................................... 85
Puncture ..................................... 201


