Page 32 of 132

2-8
2
WARNING
EWB00073Avoid Carbon Monoxide Poisoning
All engine exhaust contains carbon monoxide,
a deadly gas. Breathing carbon monoxide can
cause headaches, dizziness, drowsiness, nau-
sea, confusion, and eventually death.
Carbon Monoxide is a colorless, odorless,
tasteless gas which may be present even if you
do not see or smell any engine exhaust. Deadly
levels of carbon monoxide can collect rapidly
and you can quickly be overcome and unable
to save yourself. Also, deadly levels of carbon
monoxide can linger for hours or days in en-
closed or poorly ventilated areas. If you experi-
ence any symptoms of carbon monoxide
poisoning, leave the area immediately, get
fresh air, and SEEK MEDICAL TREATMENT.
Do not run engine indoors. Even if you try to
ventilate engine exhaust with fans or open
windows and doors, carbon monoxide can
rapidly reach dangerous levels.
Do not run engine in poorly ventilated or par-
tially enclosed areas such as barns, garages,
or carports.
Do not run engine outdoors where engine
exhaust can be drawn into a building through
openings such as windows and doors.
WARNING
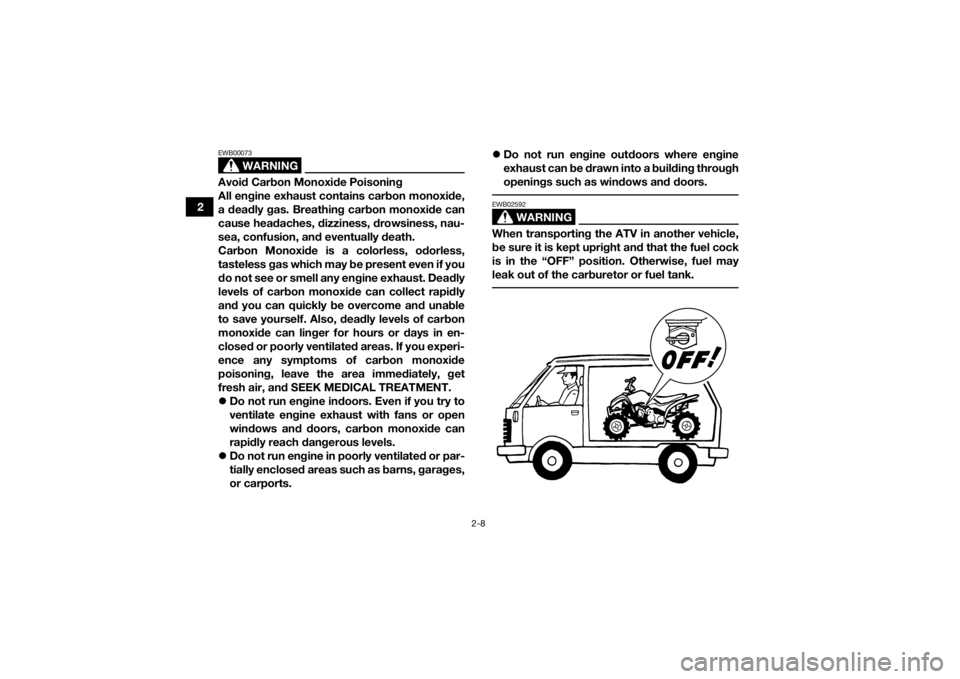
EWB02592When transporting the ATV in another vehicle,
be sure it is kept upright and that the fuel cock
is in the “OFF” position. Otherwise, fuel may
leak out of the carburetor or fuel tank.
UBW461E0.book Page 8 Tuesda y, January 31, 2017 5:13 PM
Page 38 of 132

4-4
4The vehicle speed limiter keeps the throttle from
fully opening, even when the throttle lever is
pushed to the maximum. The adjusting screw may
be gradually turned out as the beginner becomes
more familiar with operating the ATV. Parents
should decide when to adjust the ATV for more
power as their youngster’s riding skills improve.
Once the ATV rider can operate with skill at the top
speed permitted by adjusting the vehicle speed
limiter alone, the engine speed limiter plate can be
removed. Since removal of this plate will result in
a significant increase in power, turn the vehicle
speed limiter adjusting screw completely back in
again and adjust it out in stages as done previous-
ly.
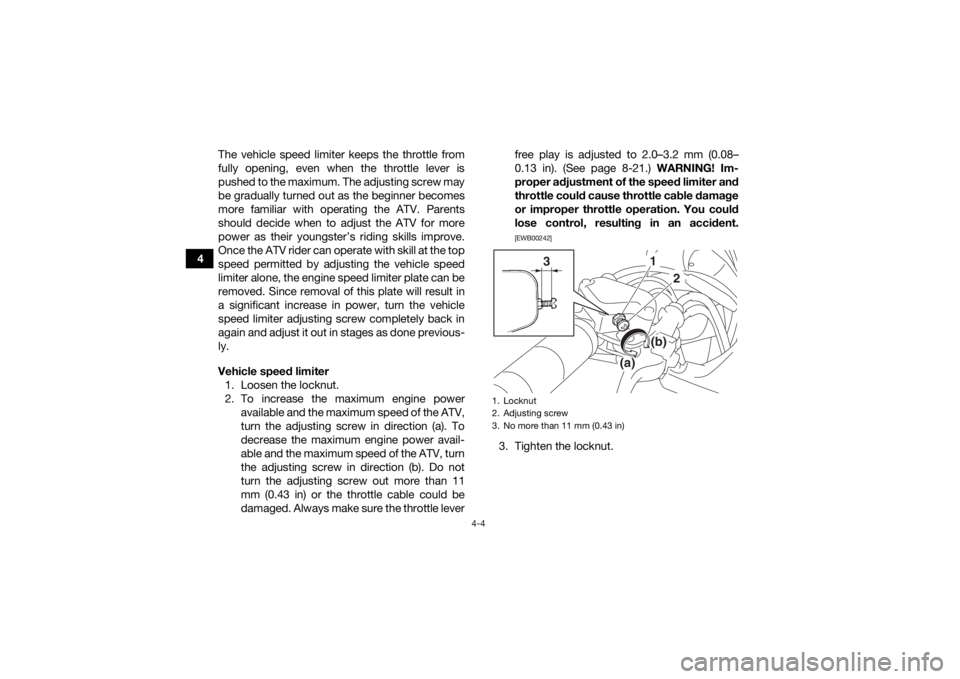
Vehicle speed limiter
1. Loosen the locknut.
2. To increase the maximum engine power available and the maximum speed of the ATV,
turn the adjusting screw in direction (a). To
decrease the maximum engine power avail-
able and the maximum speed of the ATV, turn
the adjusting screw in direction (b). Do not
turn the adjusting screw out more than 11
mm (0.43 in) or the throttle cable could be
damaged. Always make sure the throttle lever free play is adjusted to 2.0–3.2 mm (0.08–
0.13 in). (See page 8-21.) WARNING! Im-
proper adjustment of the speed limiter and
throttle could cause throttle cable damage
or improper throttle operation. You could
lose control, resulting in an accident.
[EWB00242]
3. Tighten the locknut.1. Locknut
2. Adjusting screw
3. No more than 11 mm (0.43 in)
1
3
2
(b)
(a)
UBW461E0.book Page 4 Tuesda y, January 31, 2017 5:13 PM
Page 40 of 132
4-6
4
EBU18402Rear brake leverThe rear brake lever is located on the left handle-
bar. To apply the rear brake, pull the brake lever
toward the handlebar grip.EBU18462Parking brakeUse the parking brake before starting the engine
or after parking the ATV, especially on a slope. Ap-
ply the rear brake lever and push down the lock
plate to apply the parking brake. Squeeze the rear
brake lever to release the parking brake.
WARNING
EWB00221Always set the parking brake before starting
the engine. The ATV could start moving un-
expectedly if the parking brake is not ap-
plied. This could cause loss of control or a
collision.
Always be sure you have released the park-
ing brake before you begin to ride. The brake
could overheat if you ride the ATV without re-
leasing the parking brake. You could lose
1. Rear brake lever
1
1. Parking brake lock plate
1
UBW461E0.book Page 6 Tuesda y, January 31, 2017 5:13 PM
Page 42 of 132
4-8
45. When the engine has started, remove thekickstarter lever and store it under the seat.
6. Install the kickstarter lever cap and the seat.
NOTICEECB02300Do not use the kickstarter if the battery is not
installed or if the battery leads are not connect-
ed. EBU18721Fuel tank capRemove the fuel tank cap by turning it counter-
clockwise.
EBU18758FuelMake sure there is sufficient gasoline in the tank.
WARNING
EWB02522Gasoline and gasoline vapors are extremely
flammable. To avoid fires and explosions and
to reduce the risk of injury when refueling, fol-
low these instructions. 1. Before refueling, turn off the engine and be sure that no one is sitting on the vehicle. Nev-
er refuel while smoking, or while in the vicinity
1. Fold out.
2. Push down.
1
2
1. Fuel tank cap
1
UBW461E0.book Page 8 Tuesda y, January 31, 2017 5:13 PM
Page 44 of 132
![YAMAHA YFZ50 2018 Owners Manual 4-10
43. Wipe up any spilled fuel immediately.
NOTICE: Immediately wipe off spilled fuel
with a clean, dry, soft cloth, since fuel may
deteriorate painted surfaces or plastic
parts.
[ECB00982]
4. Tu YAMAHA YFZ50 2018 Owners Manual 4-10
43. Wipe up any spilled fuel immediately.
NOTICE: Immediately wipe off spilled fuel
with a clean, dry, soft cloth, since fuel may
deteriorate painted surfaces or plastic
parts.
[ECB00982]
4. Tu](/manual-img/51/53867/w960_53867-43.png)
4-10
43. Wipe up any spilled fuel immediately.
NOTICE: Immediately wipe off spilled fuel
with a clean, dry, soft cloth, since fuel may
deteriorate painted surfaces or plastic
parts.
[ECB00982]
4. Turn the fuel tank cap fully clockwise to make sure it is securely closed.
WARNING
EWB02532Gasoline is poisonous and can cause injury or
death. Handle gasoline with care. Never siphon
gasoline by mouth. If you should swallow some
gasoline or inhale a lot of gasoline vapor, or get
some gasoline in your eyes, see your doctor
immediately. If gasoline spills on your skin,
wash with soap and water. If gasoline spills on
your clothing, change your clothes. NOTICEECB00071Use only unleaded gasoline. The use of leaded
gasoline will cause severe damage to internal
engine parts, such as the valves and piston
rings, as well as to the exhaust system.
Your Yamaha engine has been designed to use
regular unleaded gasoline with a research octane
number of 91 or higher (95 or higher for Europe). If
knocking (or pinging) occurs, use a gasoline of a
different brand. Use of unleaded fuel will extend
spark plug life and reduce maintenance costs.EBU18821Fuel cockThe fuel cock supplies fuel from the tank to the
carburetor while also filtering it.
The fuel cock lever positions are explained as fol-
lows and shown in the illustrations.
OFF1. Arrow mark positioned over “OFF”
1
UBW461E0.book Page 10 Tuesday, January 31, 2017 5:13 PM
Page 49 of 132

5-1
5
EBU19203
PRE-OPERATION CHECKS
EBU19226Inspect your vehicle each time you use it to make sure the vehicle is in safe operating condition. Always
follow the inspection and maintenance procedures and schedules described in the Owner’s Manual.
WARNING
EWB00482Failure to inspect or maintain the vehicle properly increases the possibility of an accident or equip-
ment damage. Do not operate the vehicle if you find any problem. If a problem cannot be corrected
by the procedures provided in this manual, have the vehicle inspected by a Yamaha dealer. Before using this vehicle, check the following points:
ITEMROUTINE PAGE
Fuel • Check fuel level in fuel tank,
and add recommended fuel if neces-
sary.
• Check fuel line for leakage. Correct if necessary. 4-8, 5-3
Engine oil • Check oil level in engine, and add recommended oil to specified
level if necessary.
• Check ATV for oil leakage. Correct if necessary. 5-3, 8-11
Transmission oil • Check ATV for oil leakage. Correct if necessary. 5-3, 8-14
Front brake • Check operation, and correct if necessary.
• Lubricate cable if necessary.
• Check lever free play, and adjust if necessary. 5-3, 8-22, 8-23
Rear brake • Check operation, and correct if necessary.
• Lubricate cable if necessary.
• Check lever free play, and adjust if necessary. 5-3, 8-22, 8-25
UBW461E0.book Page 1 Tuesda
y, January 31, 2017 5:13 PM
Page 52 of 132

5-4
5Tire pressure
Use a tire pressure gauge to check and adjust tire
air pressure when the tires are cold. The tire air
pressure must be equal on both sides.
WARNING! Operation of this vehicle with im- proper tire pressure may cause severe injury or
death from loss of control or rollover. Tire
pressure below the minimum specified could
also cause the tire to dislodge from the rim un-
der severe riding conditions.
[EWB02542]
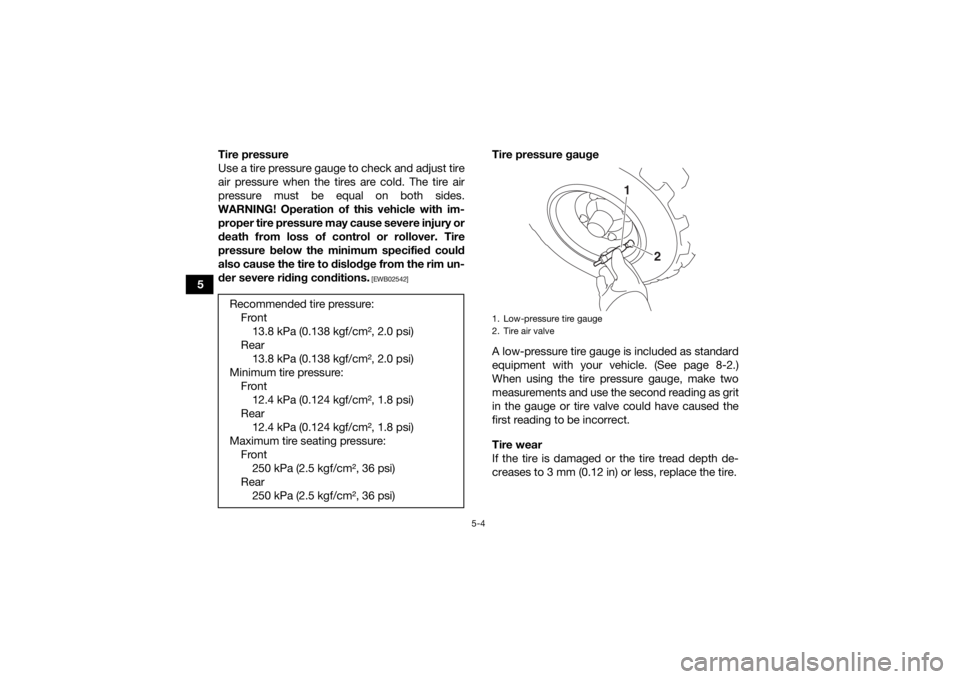
Tire pressure gauge
A low-pressure tire gauge is included as standard
equipment with your vehicle. (See page 8-2.)
When using the tire pressure gauge, make two
measurements and use the second reading as grit
in the gauge or tire valve could have caused the
first reading to be incorrect.
Tire wear
If the tire is damaged or the tire tread depth de-
creases to 3 mm (0.12 in) or less, replace the tire.
Recommended tire pressure:
Front13.8 kPa (0.138 kgf/cm², 2.0 psi)
Rear 13.8 kPa (0.138 kgf/cm², 2.0 psi)
Minimum tire pressure: Front12.4 kPa (0.124 kgf/cm², 1.8 psi)
Rear 12.4 kPa (0.124 kgf/cm², 1.8 psi)
Maximum tire seating pressure: Front250 kPa (2.5 kgf/cm², 36 psi)
Rear 250 kPa (2.5 kgf/cm², 36 psi)1. Low-pressure tire gauge
2. Tire air valve
1
2
UBW461E0.book Page 4 Tuesda y, January 31, 2017 5:13 PM
Page 54 of 132
5-6
5
WARNING
EWB02552Use of improper tires on this ATV may cause
loss of control, increasing your risk of an acci-
dent. EBU19841Chassis fastenersMake sure that all nuts, bolts and screws are
properly tightened.EBU33810Instruments and switchesCheck that all instruments and switches are work-
ing properly. Correct if necessary.UBW461E0.book Page 6 Tuesday, January 31, 2017 5:13 PM