2018 YAMAHA YFM90 torque
[x] Cancel search: torquePage 85 of 132
8-2
8
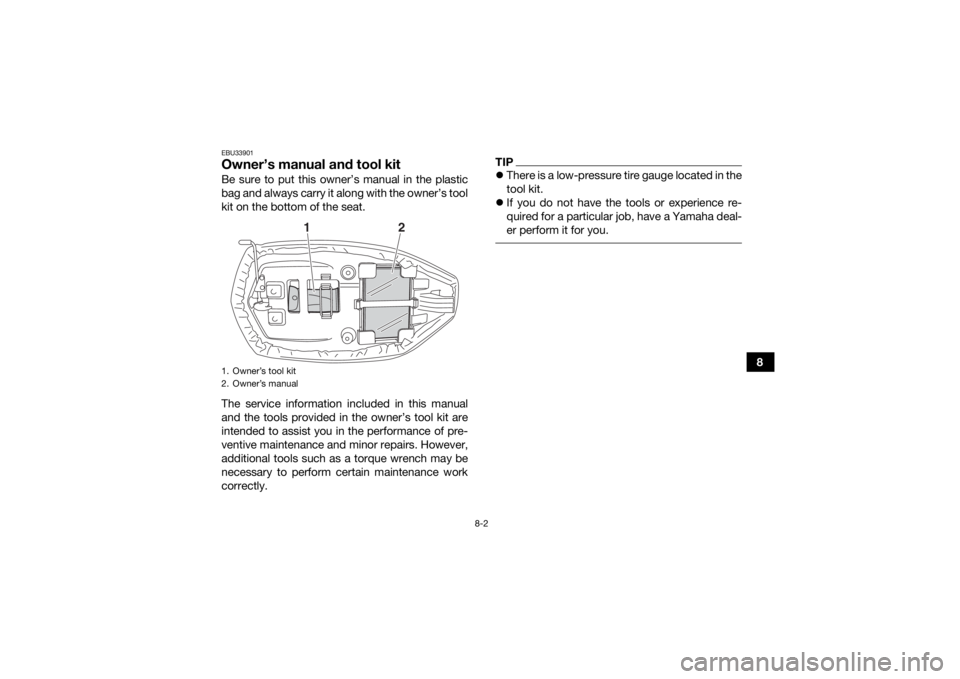
EBU33901Owner’s manual and tool kitBe sure to put this owner’s manual in the plastic
bag and always carry it along with the owner’s tool
kit on the bottom of the seat.
The service information included in this manual
and the tools provided in the owner’s tool kit are
intended to assist you in the performance of pre-
ventive maintenance and minor repairs. However,
additional tools such as a torque wrench may be
necessary to perform certain maintenance work
correctly.
TIPThere is a low-pressure tire gauge located in the
tool kit.
If you do not have the tools or experience re-
quired for a particular job, have a Yamaha deal-
er perform it for you.
1. Owner’s tool kit
2. Owner’s manual
1
2
UBD362E0.book Page 2 Tuesday, January 31, 2017 5:10 PM
Page 93 of 132

8-10
8
TIPIf the spark plug shows a distinctly different color,
the engine could be operating improperly. Do not
attempt to diagnose such problems yourself. In-
stead, have a Yamaha dealer check the ATV. 2. Check the spark plug for electrode erosionand excessive carbon or other deposits, and
replace it if necessary.
3. Measure the spark plug gap with a wire thick- ness gauge and, if necessary, adjust the gap
to specification.
To install the spark plug1. Clean the surface of the spark plug gasket and its mating surface, and then wipe off any
grime from the spark plug threads.
2. Install the spark plug with the spark plug wrench, and then tighten it to the specified
torque.
Specified spark plug:
NGK/CR6HSA
1. Spark plug gapSpark plug gap:0.6–0.7 mm (0.024–0.028 in)
UBD362E0.book Page 10 Tuesday, January 31, 2017 5:10 PM
Page 94 of 132

8-11
8
TIPIf a torque wrench is not available when installing
the spark plug, a good estimate of the correct
torque is 1/4–1/2 turn past finger tight. However,
the spark plug should be tightened to the speci-
fied torque as soon as possible. 3. Install the spark plug cap.EBU37000Engine oilThe engine oil level should be checked before
each ride. In addition, the oil must be changed at
the intervals specified in the periodic maintenance
and lubrication chart.
To check the engine oil level1. Place the ATV on a level surface.
2. Check the engine oil level on a cold engine.
TIPIf the engine was started before checking the oil
level, warm up the engine and then wait at least
ten minutes until the oil settles for an accurate
reading. 3. Remove the engine oil filler cap, and then wipe the engine oil dipstick off with a clean
rag.
4. Insert the dipstick into the filler hole, screw it in, and then remove it again to check the oil
level.
Tightening torque:
Spark plug:12 N·m (1.2 kgf·m, 8.9 lb·ft)1. Engine oil filler cap
1
UBD362E0.book Page 11 Tuesday, January 31, 2017 5:10 PM
Page 96 of 132
8-13
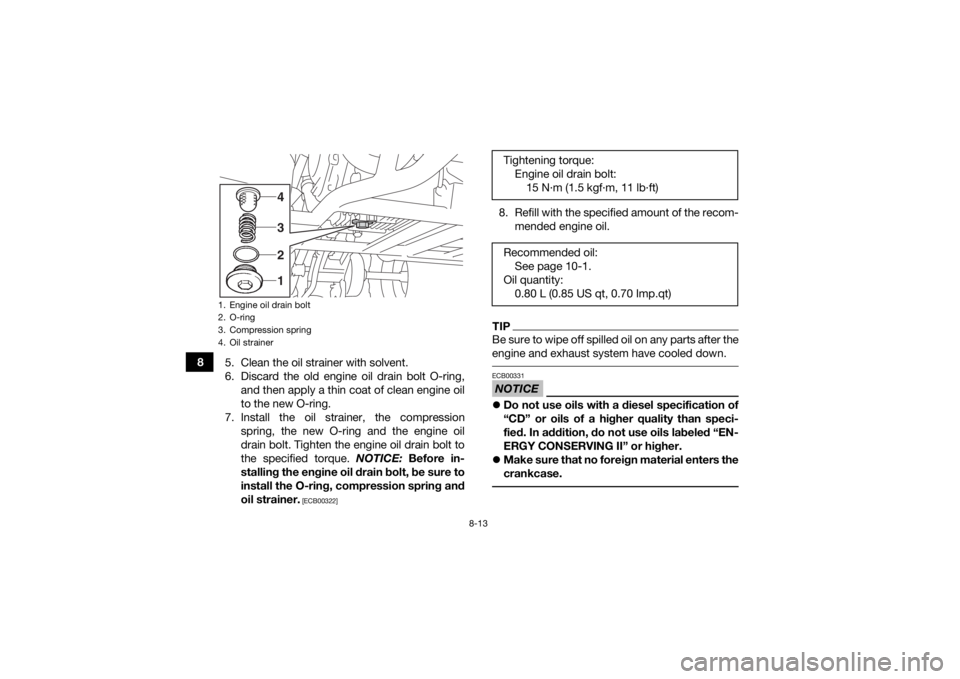
85. Clean the oil strainer with solvent.
6. Discard the old engine oil drain bolt O-ring,
and then apply a thin coat of clean engine oil
to the new O-ring.
7. Install the oil strainer, the compression spring, the new O-ring and the engine oil
drain bolt. Tighten the engine oil drain bolt to
the specified torque. NOTICE: Before in-
stalling the engine oil drain bolt, be sure to
install the O-ring, compression spring and
oil strainer.
[ECB00322]
8. Refill with the specified amount of the recom- mended engine oil.TIPBe sure to wipe off spilled oil on any parts after the
engine and exhaust system have cooled down. NOTICEECB00331Do not use oils with a diesel specification of
“CD” or oils of a higher quality than speci-
fied. In addition, do not use oils labeled “EN-
ERGY CONSERVING II” or higher.
Make sure that no foreign material enters the
crankcase.
1. Engine oil drain bolt
2. O-ring
3. Compression spring
4. Oil strainer
4321
Tightening torque:
Engine oil drain bolt:15 N·m (1.5 kgf·m, 11 lb·ft)
Recommended oil: See page 10-1.
Oil quantity: 0.80 L (0.85 US qt, 0.70 Imp.qt)
UBD362E0.book Page 13 Tuesday, January 31, 2017 5:10 PM
Page 98 of 132
8-15
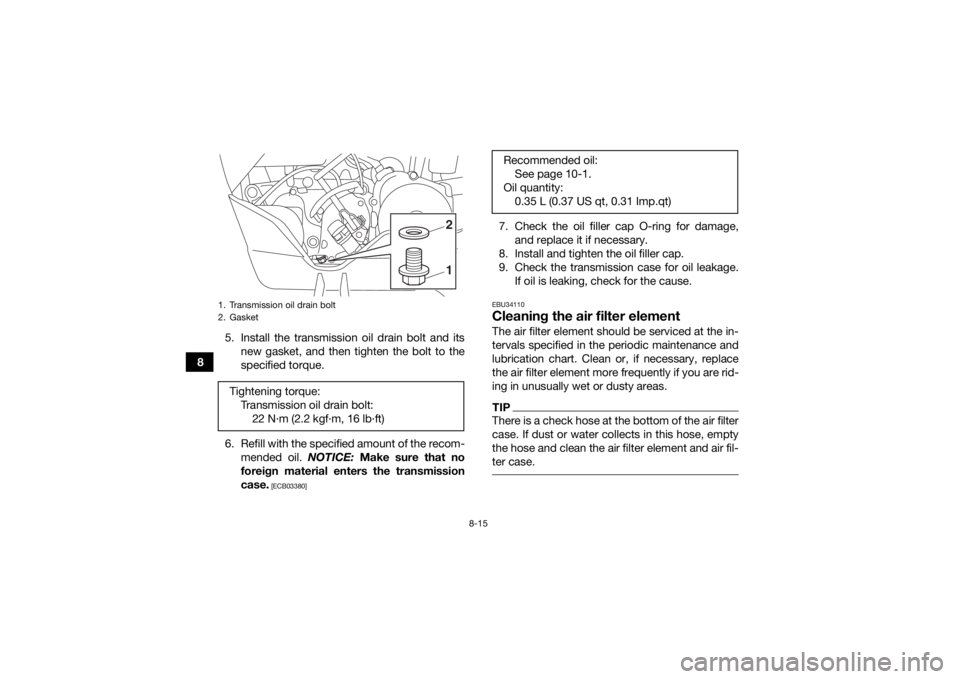
85. Install the transmission oil drain bolt and its
new gasket, and then tighten the bolt to the
specified torque.
6. Refill with the specified amount of the recom- mended oil. NOTICE: Make sure that no
foreign material enters the transmission
case.
[ECB03380]
7. Check the oil filler cap O-ring for damage, and replace it if necessary.
8. Install and tighten the oil filler cap.
9. Check the transmission case for oil leakage. If oil is leaking, check for the cause.EBU34110Cleaning the air filter elementThe air filter element should be serviced at the in-
tervals specified in the periodic maintenance and
lubrication chart. Clean or, if necessary, replace
the air filter element more frequently if you are rid-
ing in unusually wet or dusty areas.TIPThere is a check hose at the bottom of the air filter
case. If dust or water collects in this hose, empty
the hose and clean the air filter element and air fil-
ter case.
1. Transmission oil drain bolt
2. GasketTightening torque:Transmission oil drain bolt:22 N·m (2.2 kgf·m, 16 lb·ft)
12
Recommended oil:See page 10-1.
Oil quantity: 0.35 L (0.37 US qt, 0.31 Imp.qt)
UBD362E0.book Page 15 Tuesday, January 31, 2017 5:10 PM
Page 102 of 132

8-19
83. Tap the spark arrester lightly, and then use a
wire brush to remove any carbon deposits.
4. Insert the spark arrester into the muffler and align the bolt hole.
5. Install the tailpipe bolt and nut, and then tight- en the nut to the specified torque.
WARNING
EWB02341Do not start the engine when cleaning the
spark arrester, otherwise it could cause injury
to the eyes, burns, carbon monoxide poison-
ing, possibly leading to death, and start a fire.
Always let the exhaust system cool prior to
touching exhaust components. EBU23941Adjusting the carburetorThe carburetor should be checked and, if neces-
sary, adjusted at the intervals specified in the pe-
riodic maintenance and lubrication chart. The
carburetor is an important part of the engine and
requires very sophisticated adjustment. There- fore, most carburetor adjustments should be left
to a Yamaha dealer, who has the necessary pro-
fessional knowledge and experience. The adjust-
ment described in the following section, however,
may be performed by the owner as part of routine
maintenance.
NOTICEECB00481The carburetor has been set and extensively
tested at the Yamaha factory. Changing these
settings without sufficient technical knowl-
edge may result in poor performance of or
damage to the engine. EBU24001Adjusting the engine idling speedThe engine idling speed must be checked and, if
necessary, adjusted as follows at the intervals
specified in the periodic maintenance and lubrica-
tion chart.TIPA diagnostic tachometer is needed to make this
adjustment. 1. Start the engine and warm it up.
Tightening torque:
Tailpipe nut:10 N·m (1.0 kgf·m, 7.4 lb·ft)
UBD362E0.book Page 19 Tuesday, January 31, 2017 5:10 PM
Page 110 of 132
8-27
84. To tighten the drive chain, turn the drive chain
slack adjusting nut in direction (a). To loosen
the drive chain, turn the adjusting nut in direc-
tion (b) and push the rear wheels forward.
NOTICE: Improper drive chain slack will
overload the engine as well as other vital
parts of the ATV and can lead to drive
chain slippage or breakage. To prevent
this from occurring, keep the drive chain
slack within the specified limits.
[ECB00543]
5. Tighten the locknut, and then the bolts and nuts to their specified torques.
6. Adjust the rear brake lever free play. (See page 8-24.)
EBU24883Lubricating the drive chainThe drive chain must be cleaned and lubricated at
the intervals specified in the periodic maintenance
and lubrication chart, otherwise it will quickly wear
out, especially when riding in dusty or wet areas.
Service the drive chain as follows.NOTICEECB00562The drive chain must be lubricated after wash-
ing the ATV or riding in the rain or wet areas. 1. Clean the drive chain with kerosene and asmall soft brush. NOTICE: To prevent dam-
aging the O-rings, do not clean the drive
chain with steam cleaners, high-pressure
washers or inappropriate solvents.
[ECB00572]
Tightening torques: Locknut:22 N·m (2.2 kgf·m, 16 lb·ft)
Bolt: 45 N·m (4.5 kgf·m, 33 lb·ft)
Nut: 54 N·m (5.4 kgf·m, 40 lb·ft)
UBD362E0.book Page 27 Tuesday, January 31, 2017 5:10 PM
Page 118 of 132
8-35
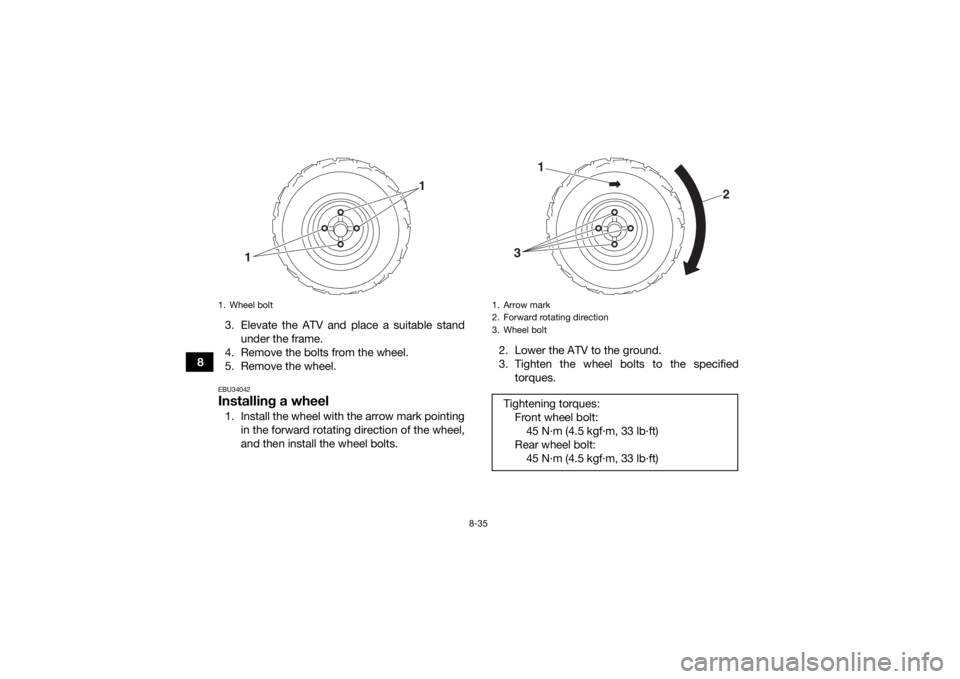
83. Elevate the ATV and place a suitable stand
under the frame.
4. Remove the bolts from the wheel.
5. Remove the wheel.
EBU34042Installing a wheel1. Install the wheel with the arrow mark pointing in the forward rotating direction of the wheel,
and then install the wheel bolts. 2. Lower the ATV to the ground.
3. Tighten the wheel bolts to the specified
torques.1. Wheel bolt
1
1
1. Arrow mark
2. Forward rotating direction
3. Wheel boltTightening torques:Front wheel bolt:45 N·m (4.5 kgf·m, 33 lb·ft)
Rear wheel bolt: 45 N·m (4.5 kgf·m, 33 lb·ft)3
1
2
UBD362E0.book Page 35 Tuesday, January 31, 2017 5:10 PM