Page 78 of 132

7-17
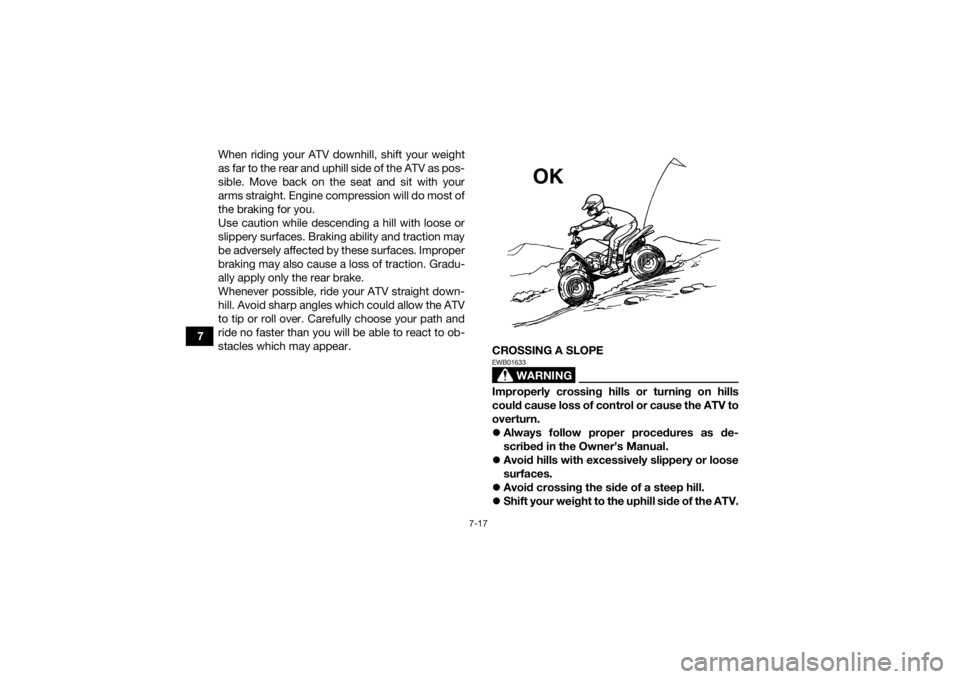
7When riding your ATV downhill, shift your weight
as far to the rear and uphill side of the ATV as pos-
sible. Move back on the seat and sit with your
arms straight. Engine compression will do most of
the braking for you.
Use caution while descending a hill with loose or
slippery surfaces. Braking ability and traction may
be adversely affected by these surfaces. Improper
braking may also cause a loss of traction. Gradu-
ally apply only the rear brake.
Whenever possible, ride your ATV straight down-
hill. Avoid sharp angles which could allow the ATV
to tip or roll over. Carefully choose your path and
ride no faster than you will be able to react to ob-
stacles which may appear.
CROSSING A SLOPE
WARNING
EWB01633Improperly crossing hills or turning on hills
could cause loss of control or cause the ATV to
overturn.
Always follow proper procedures as de-
scribed in the Owner’s Manual.
Avoid hills with excessively slippery or loose
surfaces.
Avoid crossing the side of a steep hill.
Shift your weight to the uphill side of the ATV.
OK
UBD362E0.book Page 17 Tuesday, January 31, 2017 5:10 PM
Page 84 of 132

8-1
8
EBU28788
PERIODIC MAINTENANCE AND ADJUSTMENT
EBU21675Periodic inspection, adjustment, and lubrication
will keep your vehicle in the safest and most effi-
cient condition possible. Safety is an obligation of
the vehicle owner/operator. The most important
points of vehicle inspection, adjustment, and lu-
brication are explained on the following pages.
WARNING
EWB01842Failure to properly maintain the vehicle or per-
forming maintenance activities incorrectly may
increase your risk of injury or death during ser-
vice or while using the vehicle. If you are not fa-
miliar with vehicle service, have a Yamaha
dealer perform the service.
WARNING
EWB02563Turn off the engine when performing mainte-
nance unless otherwise specified.
A running engine has moving parts that can
catch on body parts or clothing and electri-
cal parts that can cause shocks or fires.
Running the engine while servicing can lead
to eye injury, burns, fire, or carbon monoxide
poisoning - possibly leading to death. See
page 2-6 for more information about carbon
monoxide.
WARNING
EWB02691Brake discs, calipers, drums, and linings can
become very hot during use. To avoid possible
burns, let brake components cool before
touching them. The intervals given in the periodic maintenance
charts should be considered as a general guide
under normal riding conditions. However, DE-
PENDING ON THE WEATHER, TERRAIN, GEO-
GRAPHICAL LOCATION, AND INDIVIDUAL USE,
THE MAINTENANCE INTERVALS MAY NEED TO
BE SHORTENED.
UBD362E0.book Page 1 Tuesday, January 31, 2017 5:10 PM
Page 86 of 132

8-3
8
EBU21745Periodic maintenance chart for the emission control systemTIPFor ATVs not equipped with an odometer or an hour meter, follow the month maintenance intervals.
For ATVs equipped with an odometer or an hour meter, follow the km (mi) or hours maintenance inter-
vals. However, keep in mind that if the ATV isn’t used for a long period of time, the month maintenance
intervals should still be followed.
Items marked with an asterisk should be performed by a Yamaha dealer as they require special tools,
data and technical skills. NO. ITEM CHECK OR MAINTENANCE
JOB INITIAL
EVERY
Whichev-
er comes first month136612
km (mi) 320
(200) 1300
(800) 2500
(1600) 2500
(1600) 5000
(3200)
hours 20 80 160 160 320
1 *Fuel line • Check fuel hoses for cracks or other damage, and
replace if necessary. √√√
2 Spark plug • Check condition and clean, regap, or replace if
necessary. √√√√√
3 *Va l ve s • Check valve clearance and adjust if necessary. √ √√√
4 *Carburetor • Check starter (choke) operation and correct if
necessary.
• Check engine idling speed and adjust if neces- sary. √√√√
5 *Crankcase breath-
er system • Check breather hose for cracks or other damage,
and replace if necessary. √√√
UBD362E0.book Page 3 Tuesday, January 31, 2017 5:10 PM
Page 90 of 132
8-7
8
15*Steering system • Check operation and repair or replace if dam-
aged.
• Check toe-in and adjust if necessary. √√√√√
16 Engine oil • Change.
• Check ATV for oil leakage, and correct if neces-
sary. √ √√√
17 Engine oil strainer • Clean. √√√
18 Transmission oil • Change.
• Check ATV for oil leakage, and correct if neces-
sary. √√
19 *Moving parts and
cables
• Lubricate.
√√√√
20 *Throttle lever • Check operation.
• Check throttle lever free play, and adjust if neces-
sary.
• Lubricate cable and lever housing. √√√√√
21 *Brake switch • Check operation and correct if necessary. √√√√√
22 *Switches • Check operation and correct if necessary. √√√√√
NO. ITEM
CHECK OR MAINTENANCE
JOB INITIAL EVERY
Whichev-
er comes first month136612
km (mi) 320
(200) 1300
(800) 2500
(1600) 2500
(1600) 5000
(3200)
hours 20 80 160 160 320UBD362E0.book Page 7 Tuesday, January 31, 2017 5:10 PM
Page 92 of 132
8-9
8
EBU23214Checking the spark plugThe spark plug is an important engine component,
which is easy to check. Since heat and deposits
will cause any spark plug to slowly erode, the
spark plug should be removed and checked in ac-
cordance with the periodic maintenance and lubri-
cation chart. In addition, the condition of the spark
plug can reveal the condition of the engine.
To remove the spark plug1. Remove the spark plug cap. 2. Remove the spark plug as shown, with the
spark plug wrench included in the owner’s
tool kit.
To check the spark plug 1. Check that the porcelain insulator around the center electrode of the spark plug is a medi-
um-to-light tan (the ideal color when the ATV
is ridden normally).1. Spark plug cap
1
1. Spark plug wrench
1
UBD362E0.book Page 9 Tuesday, January 31, 2017 5:10 PM
Page 93 of 132
8-10
8
TIPIf the spark plug shows a distinctly different color,
the engine could be operating improperly. Do not
attempt to diagnose such problems yourself. In-
stead, have a Yamaha dealer check the ATV. 2. Check the spark plug for electrode erosionand excessive carbon or other deposits, and
replace it if necessary.
3. Measure the spark plug gap with a wire thick- ness gauge and, if necessary, adjust the gap
to specification.
To install the spark plug1. Clean the surface of the spark plug gasket and its mating surface, and then wipe off any
grime from the spark plug threads.
2. Install the spark plug with the spark plug wrench, and then tighten it to the specified
torque.
Specified spark plug:
NGK/CR6HSA
1. Spark plug gapSpark plug gap:0.6–0.7 mm (0.024–0.028 in)
UBD362E0.book Page 10 Tuesday, January 31, 2017 5:10 PM
Page 94 of 132

8-11
8
TIPIf a torque wrench is not available when installing
the spark plug, a good estimate of the correct
torque is 1/4–1/2 turn past finger tight. However,
the spark plug should be tightened to the speci-
fied torque as soon as possible. 3. Install the spark plug cap.EBU37000Engine oilThe engine oil level should be checked before
each ride. In addition, the oil must be changed at
the intervals specified in the periodic maintenance
and lubrication chart.
To check the engine oil level1. Place the ATV on a level surface.
2. Check the engine oil level on a cold engine.
TIPIf the engine was started before checking the oil
level, warm up the engine and then wait at least
ten minutes until the oil settles for an accurate
reading. 3. Remove the engine oil filler cap, and then wipe the engine oil dipstick off with a clean
rag.
4. Insert the dipstick into the filler hole, screw it in, and then remove it again to check the oil
level.
Tightening torque:
Spark plug:12 N·m (1.2 kgf·m, 8.9 lb·ft)1. Engine oil filler cap
1
UBD362E0.book Page 11 Tuesday, January 31, 2017 5:10 PM
Page 95 of 132

8-12
8
TIPThe engine oil should be between the minimum
and maximum level marks. 5. If the engine oil is at or below the minimumlevel mark, add sufficient oil of the recom-
mended type to raise it to the correct level.
NOTICE: Be sure the engine oil is at the
correct level, otherwise engine damage
may result.
[ECB00852]
6. Check the O-ring for damage, and then insert the dipstick and tighten the engine oil filler
cap.
To change the engine oil 1. Place the ATV on a level surface.
2. Start the engine, warm it up for several minu- tes, and then turn it off.
3. Place an oil pan under the engine to collect the used oil.
4. Remove the engine oil filler cap, and then re- move the engine oil drain bolt to drain the oil
from the crankcase. NOTICE: When remov-
ing the engine oil drain bolt, the compres-
sion spring, oil strainer and O-ring will fall
out. Take care not to lose these parts.
[ECB00312]
1. Engine oil filler cap
2. O-ring
3. Engine oil dipstick
4. Maximum level mark
5. Minimum level mark
1
4
5 3 2
UBD362E0.book Page 12 Tuesday, January 31, 2017 5:10 PM