Page 72 of 104

Periodic maintenance and adjustment
6-20
1
2
3
4
56
7
8
9
10
11
12
EAU22393
Checking the front and rear
brake padsThe front and rear brake pads must be
checked for wear at the intervals spec-
ified in the periodic maintenance and
lubrication chart.
EAU36891
Front brake pads
Each front brake pad is provided with
wear indicators, which allows you to
check the brake pad wear without hav-
ing to disassemble the brake. To check
the brake pad wear, check the position
of the wear indicators while applying
the brake. If a brake pad has worn to
the point that a wear indicator almost touches the brake disc, have a Yamaha
dealer replace the brake pads as a set.
EAU46292
Rear brake pads
Each rear brake pad is provided with
wear indicator grooves, which allow
you to check the brake pad wear with-
out having to disassemble the brake.
To check the brake pad wear, check
the wear indicator grooves. If a brake
pad has worn to the point that a wear
indicator groove almost appears, have
a Yamaha dealer replace the brake
pads as a set.
EAU40262
Checking the brake fluid levelBefore riding, check that the brake fluid
is above the minimum level mark.
Check the brake fluid level with the top
of the reservoir level. Replenish the
brake fluid if necessary.
Front brake
1. Brake pad wear indicator
1
1
1. Brake pad wear indicator groove
1
1
1. Minimum level mark
1
UB90E2.book 20 ページ 2018年6月5日 火曜日 午後5時40分
Page 73 of 104

Periodic maintenance and adjustment6-21
1
2
3
4
567
8
9
10
11
12
Rear brake
WARNING
EWA16011
Improper maintenance can result in
loss of braking ability. Observe
these precautions:
Insufficient brake fluid may al-
low air to enter the brake sys-
tem, reducing braking
performance.
Clean the filler cap before re-
moving. Use only DOT 4 brake
fluid from a sealed container.
Use only the specified brake flu-
id; otherwise, the rubber seals may deteriorate, causing leak-
age.
Refill with the same type of
brake fluid. Adding a brake fluid
other than DOT 4 may result in a
harmful chemical reaction.
Be careful that water or dust
does not enter the brake fluid
reservoir when refilling. Water
will significantly lower the boil-
ing point of the fluid and may re-
sult in vapor lock, and dirt may
clog the ABS hydraulic unitvalves.
NOTICE
ECA17641
Brake fluid may damage painted sur-
faces or plastic parts. Always cleanup spilled fluid immediately.
As the brake pads wear, it is normal for
the brake fluid level to gradually go
down. A low brake fluid level may indi-
cate worn brake pads and/or brake sys-
tem leakage; therefore, be sure to
check the brake pads for wear and the
brake system for leakage. If the brake
fluid level goes down suddenly, have a
Yamaha dealer check the cause before
further riding.
1. Minimum level markSpecified brake fluid:
DOT 4
1
UB90E2.book 21 ページ 2018年6月5日 火曜日 午後5時40分
Page 74 of 104

Periodic maintenance and adjustment
6-22
1
2
3
4
56
7
8
9
10
11
12
EAU22734
Changing the brake fluidHave a Yamaha dealer change the
brake fluid every 2 years. In addition,
have the seals of the master cylinders
and brake calipers, as well as the brake
hoses replaced at the intervals listed
below or sooner if they are damaged or
leaking.
Brake seals: every 2 years
Brake hoses: every 4 years
EAU22762
Drive chain slackThe drive chain slack should be
checked before each ride and adjusted
if necessary.
EAU2277G
To check the drive chain slack 1. Place the motorcycle on the sides- tand.TIPWhen checking and adjusting the drive
chain slack, there should be no weighton the motorcycle.
2. Shift the transmission into the neu- tral position.
3. Measure the drive chain slack as shown. 4. If the drive chain slack is incorrect,
adjust it as follows. NOTICE: Im-
proper drive chain slack will
overload the engine as well as
other vital parts of the motorcy-
cle and can lead to chain slip-
page or breakage. If the drive
chain slack is more than 25.0
mm (0.98 in), the chain can dam-
age the frame, swingarm, and
other parts. To prevent this from
occurring, keep the drive chain
slack within the specified lim-
its.
[ECA17791]
1. Drive chain slackDrive chain slack: 5.0–15.0 mm (0.20–0.59 in)
1
UB90E2.book 22 ページ 2018年6月5日 火曜日 午後5時40分
Page 77 of 104

Periodic maintenance and adjustment6-25
1
2
3
4
567
8
9
10
11
12
EAU23115
Checking and lubricating the
throttle grip and cableThe operation of the throttle grip should
be checked before each ride. In addi-
tion, the cable should be lubricated by a
Yamaha dealer at the intervals speci-
fied in the periodic maintenance chart.
The throttle cable is equipped with a
rubber cover. Make sure that the cover
is securely installed. Even though the
cover is installed correctly, it does not
completely protect the cable from water
entry. Therefore, use care not to pour
water directly onto the cover or cable
when washing the vehicle. If the cable
or cover becomes dirty, wipe clean with
a moist cloth.
EAU44276
Checking and lubr icating the
brake and shift pedalsThe operation of the brake and shift
pedals should be checked before each
ride, and the pedal pivots should be lu-
bricated if necessary.
Brake pedal Shift pedal
Recommended lubricant:
Lithium-soap-based grease
UB90E2.book 25 ページ 2018年6月5日 火曜日 午後5時40分
Page 78 of 104
Periodic maintenance and adjustment
6-26
1
2
3
4
56
7
8
9
10
11
12
EAU23144
Checking and lubricating the
brake and clutch leversThe operation of the brake and clutch
levers should be checked before each
ride, and the lever pivots should be lu-
bricated if necessary.
Brake lever Clutch lever
EAU23203
Checking and lubricating the
sidestandThe operation of the sidestand should
be checked before each ride, and the
sidestand pivot and metal-to-metal
contact surfaces should be lubricated if
necessary.
WARNING
EWA10732
If the sidestand does not move up
and down smoothly, have a Yamaha
dealer check or repair it. Otherwise,
the sidestand could contact the
ground and distract the operator, re-sulting in a possible loss of control.
Recommended lubricants:
Brake lever:Silicone grease
Clutch lever: Lithium-soap-based grease
Recommended lubricant: Lithium-soap-based grease
UB90E2.book 26 ページ 2018年6月5日 火曜日 午後5時40分
Page 79 of 104
Periodic maintenance and adjustment6-27
1
2
3
4
567
8
9
10
11
12
EAUM1653
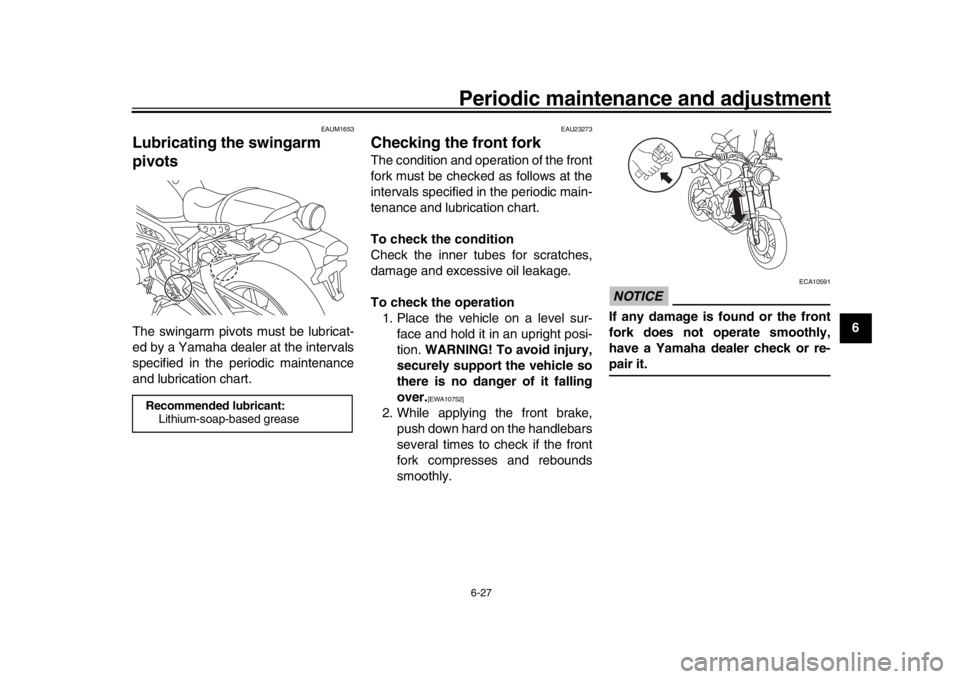
Lubricating the swingarm
pivotsThe swingarm pivots must be lubricat-
ed by a Yamaha dealer at the intervals
specified in the periodic maintenance
and lubrication chart.
EAU23273
Checking the front forkThe condition and operation of the front
fork must be checked as follows at the
intervals specified in the periodic main-
tenance and lubrication chart.
To check the condition
Check the inner tubes for scratches,
damage and excessive oil leakage.
To check the operation 1. Place the vehicle on a level sur- face and hold it in an upright posi-
tion. WARNING! To avoid injury,
securely support the vehicle so
there is no danger of it falling
over.
[EWA10752]
2. While applying the front brake, push down hard on the handlebars
several times to check if the front
fork compresses and rebounds
smoothly.
NOTICE
ECA10591
If any damage is found or the front
fork does not operate smoothly,
have a Yamaha dealer check or re-pair it.
Recommended lubricant:Lithium-soap-based grease
UB90E2.book 27 ページ 2018年6月5日 火曜日 午後5時40分
Page 86 of 104
Periodic maintenance and adjustment
6-34
1
2
3
4
56
7
8
9
10
11
12
EAU45226
Replacing the auxi liary light
bulbIf the auxiliary light bulb burns out, re-
place it as follows.
1. Remove the headlight unit. (See page 6-32.)
2. Remove the auxiliary light bulb socket (together with the bulb) by
pulling it out.
3. Remove the burnt-out bulb by pull- ing it out. 4. Insert a new bulb into the socket.
5. Install the socket (together with the
bulb) by pushing it in.
6. Install the headlight unit.
EAU70540
Brake/tail lightThis model is equipped with an
LED-type brake/tail light.
If the brake/tail light does not come on,
have a Yamaha dealer check it.
1. Auxiliary light bulb socket
1
1. Auxiliary light bulb
1
UB90E2.book 34 ページ 2018年6月5日 火曜日 午後5時40分
Page 92 of 104

Motorcycle care and storage
7-2
1
2
3
4
5
67
8
9
10
11
12 off any detergent residue using
plenty of water, as it is harmful
to plastic parts.
Do not use any harsh chemical
products on plastic parts. Be
sure to avoid using cloths or
sponges which have been in
contact with strong or abrasive
cleaning products, solvent or
thinner, fuel (gasoline), rust re-
movers or inhibitors, brake flu-
id, antifreeze or electrolyte.
Do not use high-pressure wash-
ers or steam-jet cleaners since
they cause water seepage and
deterioration in the following ar-
eas: seals (of wheel and swing-
arm bearings, fork and brakes),
electric components (couplers,
connectors, instruments,
switches and lights), breather
hoses and vents.
For motorcycles equipped with
a windshield: Do not use strong
cleaners or hard sponges as
they will cause dulling or
scratching. Some cleaning com-
pounds for plastic may leave
scratches on the windshield. Test the product on a small hid-
den part of the windshield to
make sure that it does not leave
any marks. If the windshield is
scratched, use a quality plastic
polishing compound after
washing.
After normal use
Remove dirt with warm water, a mild
detergent, and a soft, clean sponge,
and then rinse thoroughly with clean
water. Use a toothbrush or bottlebrush
for hard-to-reach areas. Stubborn dirt
and insects will come off more easily if
the area is covered with a wet cloth for
a few minutes before cleaning.
After riding in the rain, near the sea oron salt-sprayed roadsSince sea salt or salt sprayed on roads
during winter are extremely corrosive in
combination with water, carry out the
following steps after each ride in the
rain, near the sea or on salt-sprayed
roads.TIPSalt sprayed on roads in the winter may
remain well into spring. 1. Clean the motorcycle with cold wa- ter and a mild detergent, after the
engine has cooled down.
NOTICE: Do not use warm water
since it increases the corrosive
action of the salt.
[ECA10792]
2. Apply a corrosion protection spray on all metal, including chrome- and
nickel-plated, surfaces to prevent
corrosion.
After cleaning 1. Dry the motorcycle with a chamois or an absorbing cloth.
2. Immediately dry the drive chain and lubricate it to prevent it from
rusting.
3. Use a chrome polish to shine chrome, aluminum and stain-
less-steel parts, including the ex-
haust system. (Even the thermally
induced discoloring of stain-
less-steel exhaust systems can be
removed through polishing.)
4. To prevent corrosion, it is recom- mended to apply a corrosion pro-
tection spray on all metal,
UB90E2.book 2 ページ 2018年6月5日 火曜日 午後5時40分

