2018 YAMAHA XMAX 300 stop start
[x] Cancel search: stop startPage 63 of 116

Operation and important riding points
6-6
6
EAUN1421
Parking
When parking, turn the vehicle power
off, and then turn the smart key off.
TIP
Even when the vehicle is parked in a lo-
cation partitioned by a fence or the
glass window of a shop, if the smart
key is within operating range, other
people will be able to start the engine
and operate the vehicle. Please turn
the smart key off when leaving the ve-
hicle. (See page 3-5.)
If the sidestand is lowered when the
engine is running, the engine will stop
and the beeper will sound for approxi-
mately 1 minute. To stop the beeper,
turn the vehicle power off or raise the
sidestand.
TIP
Before leaving the vehicle, be sure
to turn the main switch to “OFF”
or “ ”. Otherwise, the battery may
discharge.
The sidestand alarm beeper can
be set to not activate. Please con-
tact your Yamaha dealer.
WARNING
EWA10312
Since the engine and exhaust
system can become very hot,
park in a place where pedestri-
ans or children are not likely to
touch them and be burned.
Do not park on a slope or on soft
ground, otherwise the vehicle
may overturn, increasing the
risk of a fuel leak and fire.Do not park near grass or other
flammable materials which
might catch fire.
UBY3E0E0.book Page 6 Friday, September 15, 2017 3:59 PM
Page 75 of 116

Periodic maintenance and adjustment
7-12
7
EAU20067
Final transmission oil
The final transmission case must be
checked for oil leakage before each
ride. If any leakage is found, have a
Yamaha dealer check and repair the
scooter. In addition, the final transmis-
sion oil must be changed as follows at
the intervals specified in the periodic
maintenance and lubrication chart.
1. Start the engine, warm up the final
transmission oil by riding the
scooter for several minutes, and
then stop the engine.
2. Place the scooter on the center-
stand.
3. Place an oil pan under the final
transmission case to collect the
used oil.
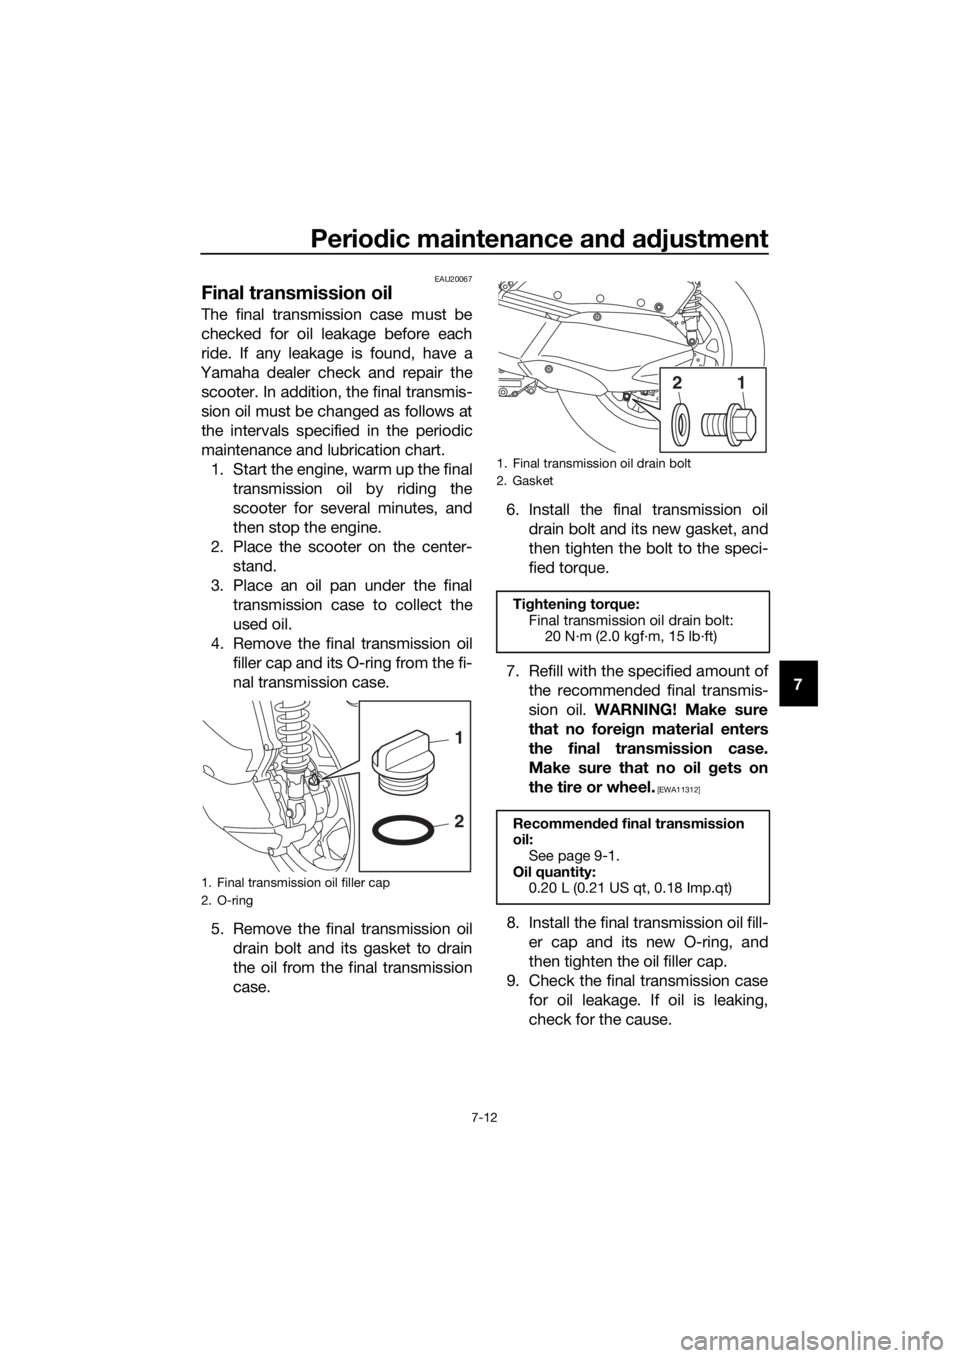
4. Remove the final transmission oil
filler cap and its O-ring from the fi-
nal transmission case.
5. Remove the final transmission oil
drain bolt and its gasket to drain
the oil from the final transmission
case.6. Install the final transmission oil
drain bolt and its new gasket, and
then tighten the bolt to the speci-
fied torque.
7. Refill with the specified amount of
the recommended final transmis-
sion oil. WARNING! Make sure
that no foreign material enters
the final transmission case.
Make sure that no oil gets on
the tire or wheel.
[EWA11312]
8. Install the final transmission oil fill-
er cap and its new O-ring, and
then tighten the oil filler cap.
9. Check the final transmission case
for oil leakage. If oil is leaking,
check for the cause.
1. Final transmission oil filler cap
2. O-ring
1
2
1. Final transmission oil drain bolt
2. Gasket
Tightening torque:
Final transmission oil drain bolt:
20 N·m (2.0 kgf·m, 15 lb·ft)
Recommended final transmission
oil:
See page 9-1.
Oil quantity:
0.20 L (0.21 US qt, 0.18 Imp.qt)
12
UBY3E0E0.book Page 12 Friday, September 15, 2017 3:59 PM
Page 100 of 116

Periodic maintenance and adjustment
7-37
7Engine overheating
WARNING
EWAT1041
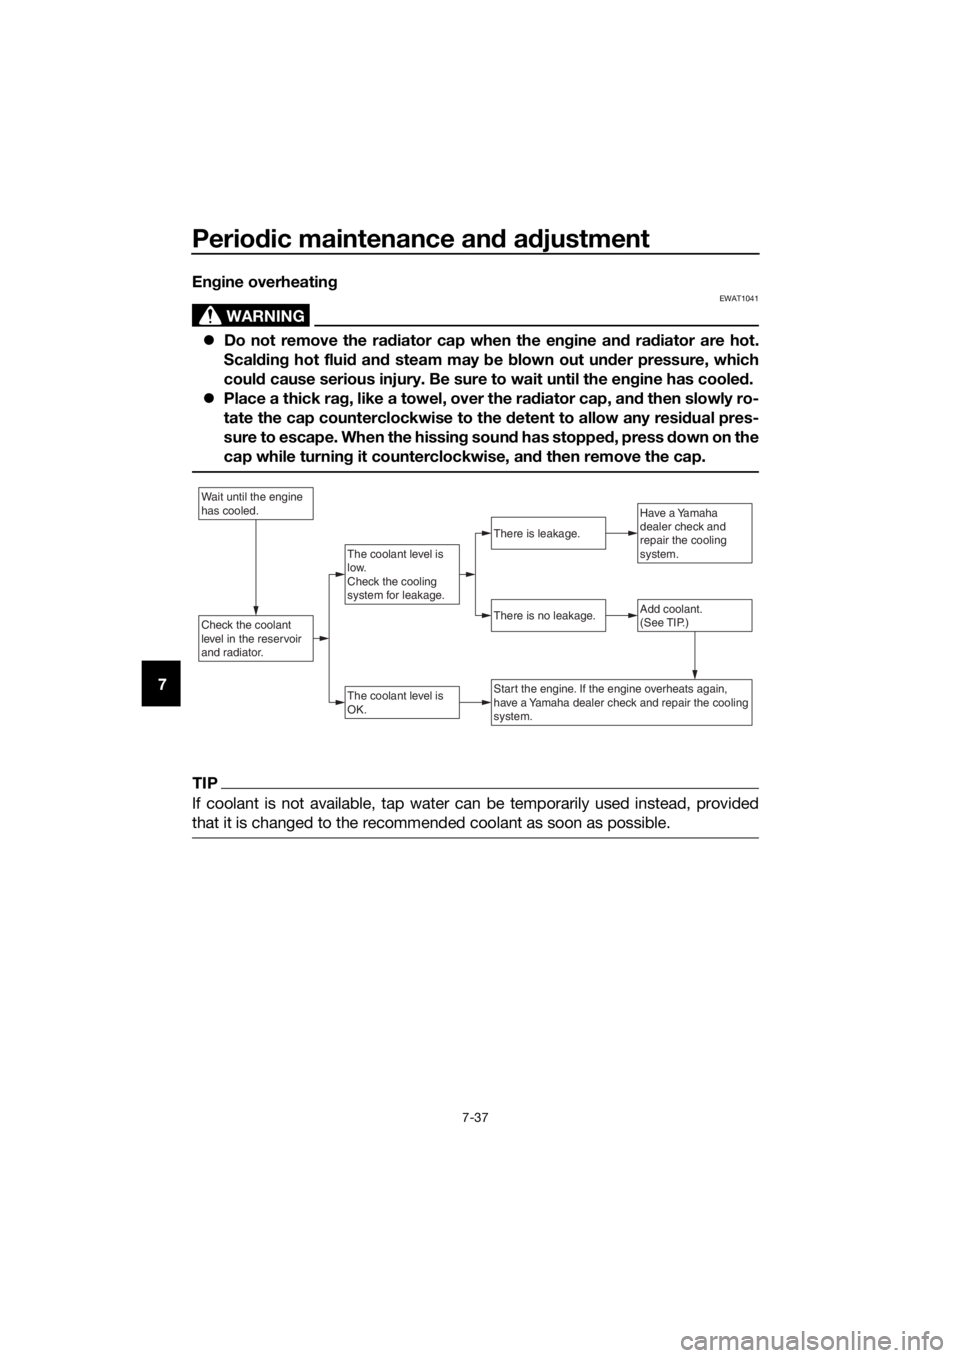
Do not remove the radiator cap when the engine and radiator are hot.
Scalding hot fluid and steam may be blown out under pressure, which
could cause serious injury. Be sure to wait until the engine has cooled.
Place a thick rag, like a towel, over the radiator cap, and then slowly ro-
tate the cap counterclockwise to the detent to allow any residual pres-
sure to escape. When the hissing sound has stopped, press down on the
cap while turning it counterclockwise, and then remove the cap.
TIP
If coolant is not available, tap water can be temporarily used instead, provided
that it is changed to the recommended coolant as soon as possible.
Wait until the engine
has cooled.
Check the coolant
level in the reservoir
and radiator.Add coolant.
(See TIP.)
The coolant level is
OK.
There is no leakage.
There is leakage.
The coolant level is
low.
Check the cooling
system for leakage.
Have a Yamaha
dealer check and
repair the cooling
system.
Start the engine. If the engine overheats again,
have a Yamaha dealer check and repair the cooling
system.
UBY3E0E0.book Page 37 Friday, September 15, 2017 3:59 PM
Page 101 of 116

Periodic maintenance and adjustment
7-38
7
EAU76561
Emergency mode
When the smart key is lost or dam-
aged, or its battery has discharged, the
vehicle can still be turned on and the
engine started. You will need the smart
key system identification number.
To operate the vehicle in emergency
mode
1. Stop the vehicle in a safe place
and turn the main switch to “OFF”.
2. Push the main switch knob for 5
seconds until the smart key sys-
tem indicator light flashes once,
then release it. Repeat two more
times. The smart key system indi-
cator light will come on for three
seconds to indicate the transition
to emergency mode.
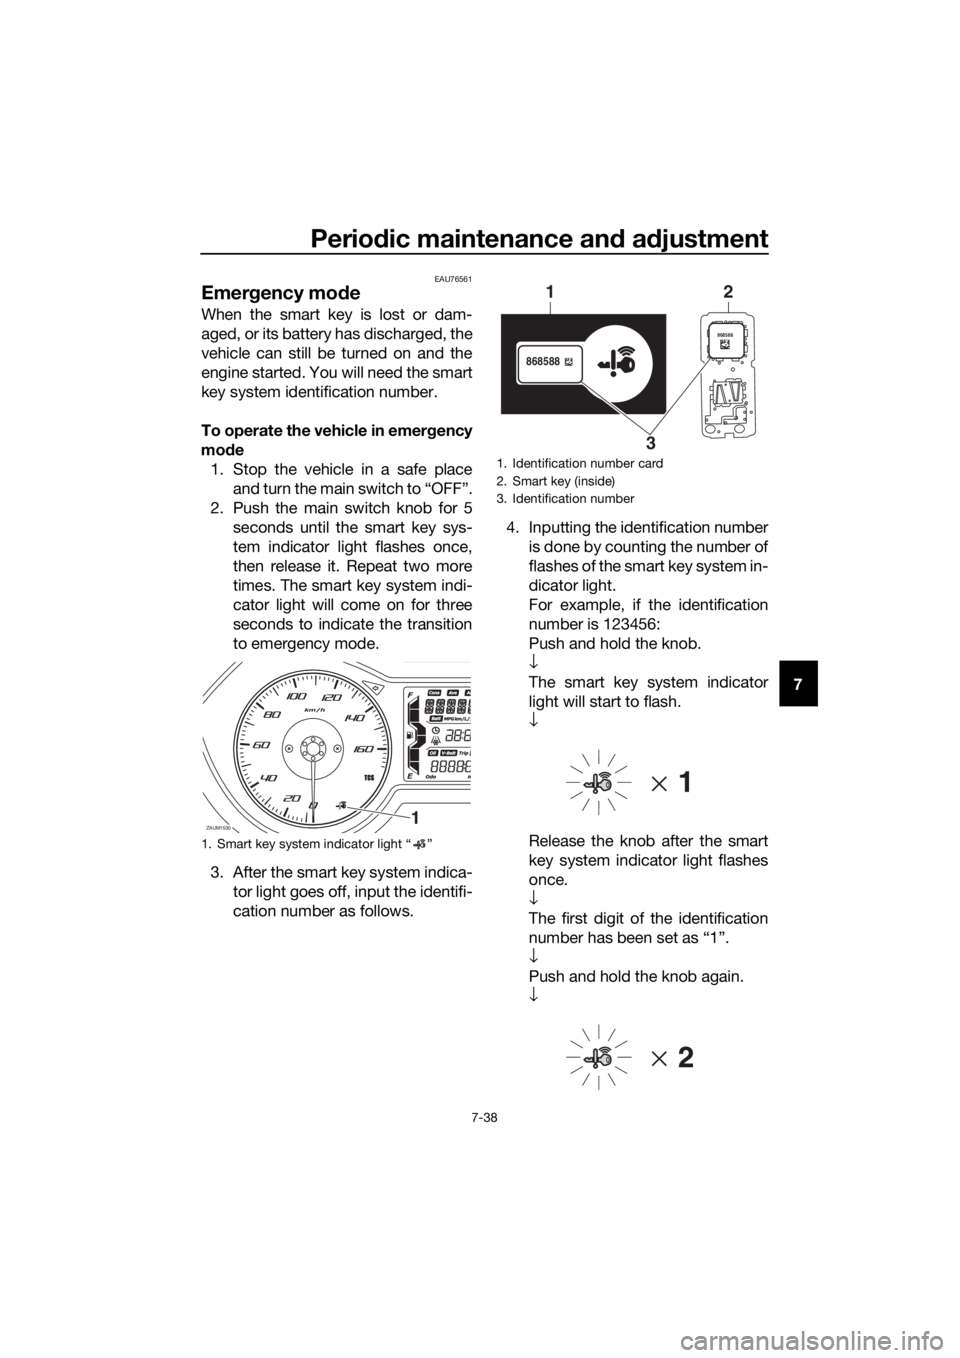
3. After the smart key system indica-
tor light goes off, input the identifi-
cation number as follows.4. Inputting the identification number
is done by counting the number of
flashes of the smart key system in-
dicator light.
For example, if the identification
number is 123456:
Push and hold the knob.
↓
The smart key system indicator
light will start to flash.
↓
Release the knob after the smart
key system indicator light flashes
once.
↓
The first digit of the identification
number has been set as “1”.
↓
Push and hold the knob again.
↓
1. Smart key system indicator light “ ”
ZAUM15301
1. Identification number card
2. Smart key (inside)
3. Identification number
868588
868588
1
32
UBY3E0E0.book Page 38 Friday, September 15, 2017 3:59 PM
Page 113 of 116

11-1
11
Index
A
ABS ...................................................... 4-14
ABS warning light ................................... 4-1
Acceleration and deceleration................ 6-3
Air filter and V-belt case air filter
elements ............................................ 7-14
Auxiliary DC jack .................................. 4-29
Auxiliary lights ...................................... 7-32
B
Battery .................................................. 7-29
Brake fluid, changing ........................... 7-24
Brake fluid level, checking ................... 7-23
Brake lever, front .................................. 4-13
Brake lever, rear ................................... 4-14
Brake levers, lubricating ....................... 7-26
Brake/tail light ...................................... 7-33
Braking ................................................... 6-4
C
Cables, checking and lubricating ......... 7-25
Canister .................................................. 7-9
Care ........................................................ 8-1
Catalytic converters ............................. 4-20
Centerstand and sidestand, checking
and lubricating ................................... 7-27
Coolant ................................................. 7-13
D
Data recording, vehicle ........................ 10-2
Diagnostic connectors ......................... 10-2
Dimmer/Pass switch ............................ 4-12
E
Emergency mode ................................. 7-38
Engine break-in ...................................... 6-5
Engine oil and oil filter element .............. 7-9
Engine serial number............................ 10-1
Engine trouble warning light................... 4-1
F
Final transmission oil ............................ 7-12
Front and rear brake lever free play,
checking............................................. 7-22
Front and rear brake pads, checking ... 7-23
Front fork, checking ............................. 7-27
Front turn signal light ........................... 7-33
Fuel....................................................... 4-18
Fuel consumption, tips for reducing ...... 6-5
Fuel tank cap........................................ 4-17
Fuel tank overflow hose ....................... 4-19
Fuses, replacing ................................... 7-30
H
Handlebar position, adjusting .............. 4-25
Handlebar switches.............................. 4-12Hazard switch ....................................... 4-12
Headlights ............................................. 7-32
High beam indicator light........................ 4-1
Horn switch........................................... 4-12
I
Identification numbers .......................... 10-1
Ignition circuit cut-off system ............... 4-27
Indicator lights and warning lights .......... 4-1
K
Key, handling of smart and mechanical
keys ...................................................... 3-3
L
License plate light bulb, replacing ........ 7-34
M
Main switch............................................. 3-8
Maintenance and lubrication, periodic ... 7-4
Maintenance, emission control
system .................................................. 7-3
Matte color, caution ................................ 8-1
Model label ........................................... 10-1
Multi-function display ............................. 4-3
O
Operating range of the smart key
system .................................................. 3-2
P
Panel, removing and installing ................ 7-7
Parking .................................................... 6-6
Part locations .......................................... 2-1
S
Safe-riding points ................................... 1-5
Safety information................................... 1-1
Shock absorber assemblies,
adjusting ............................................. 4-25
Sidestand .............................................. 4-26
Smart key ................................................ 3-5
Smart key battery, replacing................... 3-6
Smart key system ................................... 3-1
Smart key system indicator light ............ 4-2
Smart key system, troubleshooting ...... 7-35
Spark plug, checking .............................. 7-8
Specifications ......................................... 9-1
Speedometer .......................................... 4-2
Starting off .............................................. 6-3
Starting the engine.................................. 6-2
Steering, checking ................................ 7-28
Stop/Run/Start switch .......................... 4-12
Storage ................................................... 8-4
Storage compartments ......................... 4-20
T
Tachometer............................................. 4-3
UBY3E0E0.book Page 1 Friday, September 15, 2017 3:59 PM