2018 YAMAHA MT-10 engine
[x] Cancel search: enginePage 29 of 108

Instrument and control functions
4-8
1
2
345
6
7
8
9
10
11
12
try starting the engine with the
standard keys.
4. If one or both of the standard keys do not start the engine, take the
vehicle and all 3 keys to a Yamaha
dealer to have the standard keys
re-registered.
EAU79183
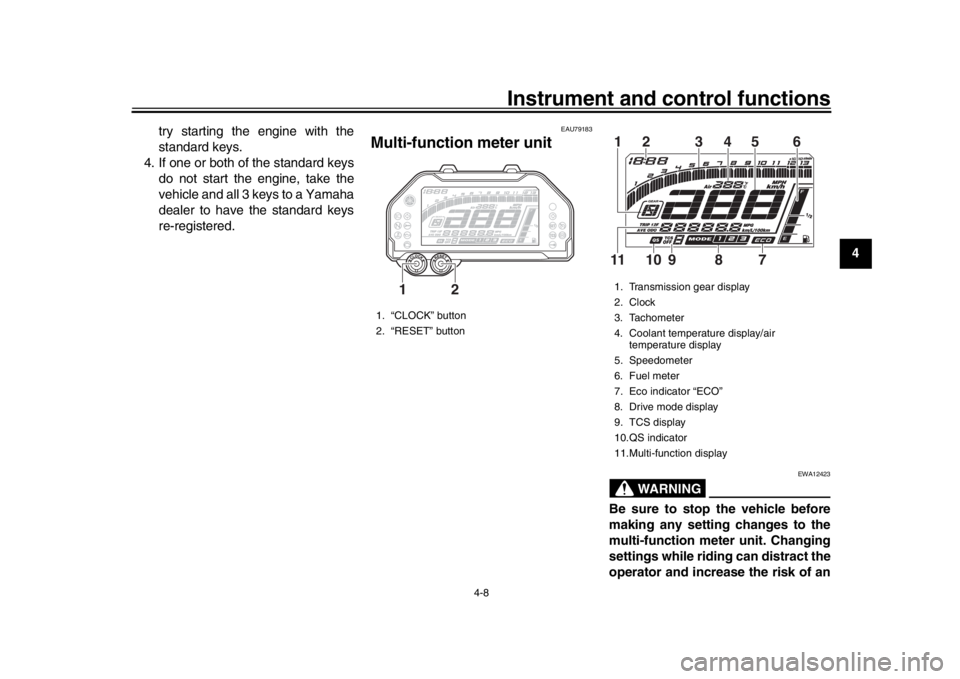
Multi-function meter unit
WARNING
EWA12423
Be sure to stop the vehicle before
making any setting changes to the
multi-function meter unit. Changing
settings while riding can distract the
operator and increase the risk of an
1. “CLOCK” button
2. “RESET” button
12
1. Transmission gear display
2. Clock
3. Tachometer
4. Coolant temperature display/air temperature display
5. Speedometer
6. Fuel meter
7. Eco indicator “ECO”
8. Drive mode display
9. TCS display
10.QS indicator
11.Multi-function display12 3 5 46
9
10 7 8
11
B67-9-E2.book 8 ページ 2018年6月5日 火曜日 午前9時7分
Page 30 of 108

Instrument and control functions
4-9
1
2
34
5
6
7
8
9
10
11
12
accident.
The multi-function meter unit is
equipped with the following:
a speedometer
a tachometer
a clock
a fuel meter
a coolant/air temperature display
an eco indicator
a transmission gear display
a drive mode display
a TCS display
a QS indicator
a multi-function display
TIPTo switch the multi-function meter unit
between kilometers and miles, push
the “CLOCK” button and “RESET” but-ton at the same time. Speedometer
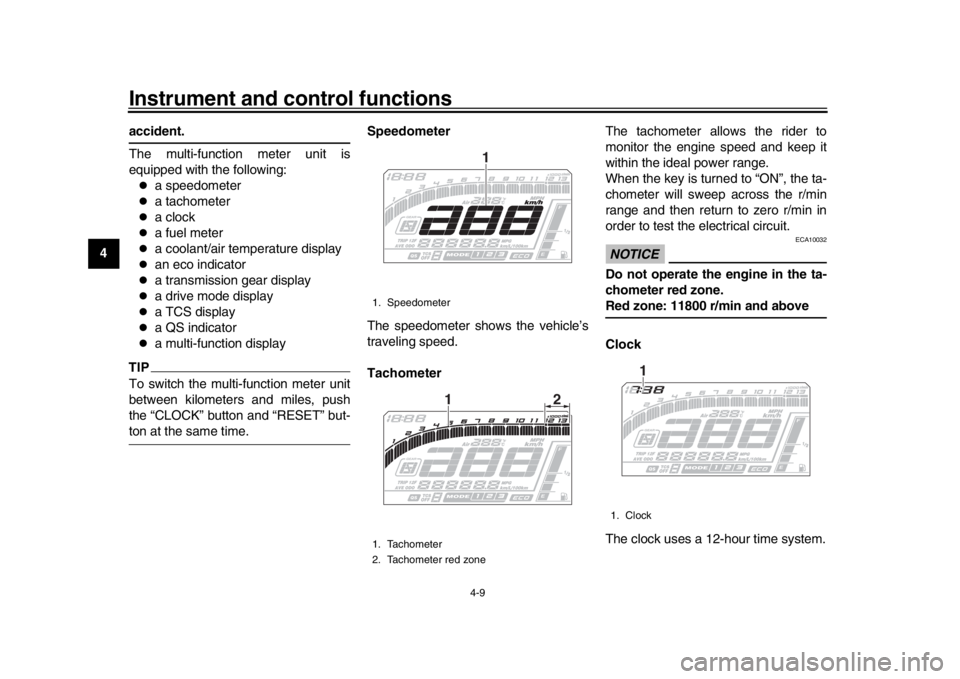
The speedometer shows the vehicle’s
traveling speed.
Tachometer
The tachometer allows the rider to
monitor the engine speed and keep it
within the ideal power range.
When the key is turned to “ON”, the ta-
chometer will sweep across the r/min
range and then return to zero r/min in
order to test the electrical circuit.
NOTICE
ECA10032
Do not operate the engine in the ta-
chometer red zone.Red zone: 11800 r/min and above
Clock
The clock uses a 12-hour time system.
1. Speedometer
1. Tachometer
2. Tachometer red zone
1
12
1. Clock
1
B67-9-E2.book 9 ページ 2018年6月5日 火曜日 午前9時7分
Page 31 of 108

Instrument and control functions
4-10
1
2
345
6
7
8
9
10
11
12
To set the clock
1. Turn the key to “ON”.
2. Push the “CLOCK” button for two
seconds.
3. When the hour digits start flashing, push the “RESET” button to set the
hours.
4. Push the “CLOCK” button, and the minute digits will start flashing.
5. Push the “RESET” button to set the minutes.
6. Push the “CLOCK” button and then release it to start the clock.
Fuel meter
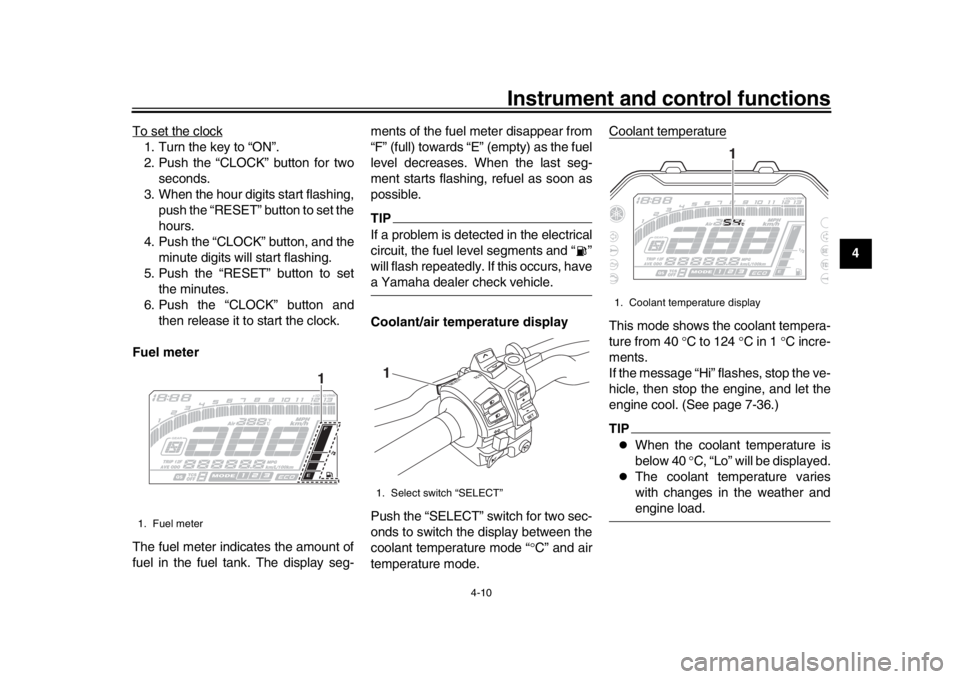
The fuel meter indicates the amount of
fuel in the fuel tank. The display seg- ments of the fuel meter disappear from
“F” (full) towards “E” (empty) as the fuel
level decreases. When the last seg-
ment starts flashing, refuel as soon as
possible.
TIPIf a problem is detected in the electrical
circuit, the fuel level segments and “ ”
will flash repeatedly. If this occurs, havea Yamaha dealer check vehicle.
Coolant/air temperature display
Push the “SELECT” switch for two sec-
onds to switch the display between the
coolant temperature mode “
C” and air
temperature mode. Coolant temperature
This mode shows the coolant tempera-
ture from 40
C to 124 C in 1 C incre-
ments.
If the message “Hi” flashes, stop the ve-
hicle, then stop the engine, and let the
engine cool. (See page 7-36.)TIP
When the coolant temperature is
below 40 C, “Lo” will be displayed.
The coolant temperature varies
with changes in the weather andengine load.
1. Fuel meter
1
1. Select switch “SELECT”
R ESSE T
PAS
S
TCS
SELECT
1
1. Coolant temperature display
1
B67-9-E2.book 10 ページ 2018年6月5日 火曜日 午前9時7分
Page 32 of 108

Instrument and control functions
4-11
1
2
34
5
6
7
8
9
10
11
12 Air temperature
This mode shows the air temperature
from –9
C to 50 C in 1 C increments.TIP
–9 C will be displayed even if the
air temperature falls below –9 C.
The temperature displayed may
vary from the actual ambient tem-perature. Eco indicator
This indicator comes on when the vehi-
cle is being operated in an environmen-
tally friendly, fuel-efficient manner. The
indicator goes off when the vehicle is
stopped.
TIPConsider the following tips to reduce
fuel consumption:
Avoid high engine speeds during
acceleration.
Travel at a constant speed.
Select the transmission gear that
is appropriate for the vehiclespeed. Transmission gear display
This display shows the selected gear.
The neutral position is indicated by “N”
and by the neutral indicator light.
Drive mode display
1. Air temperature display
1
1. Eco indicator “ECO”
1
1. Neutral indicator light “ ”
2. Transmission gear display
1. Drive mode display12
1
B67-9-E2.book 11 ページ 2018年6月5日 火曜日 午前9時7分
Page 35 of 108

Instrument and control functions
4-14
1
2
345
6
7
8
9
10
11
12
shown.
To switch between the “km/L” and
“L/100 km”, push the “CLOCK” and
“RESET” buttons at the same time.
TIPIf traveling at speeds under 20 km/h (12mi/h), “– –.–” is displayed.
Average fuel consumption mode
This display shows the average fuel
consumption since it was last reset.
The average fuel consumption display
can be set to either “AVE – –.– km/L”,
“AVE – –.– L/100 km” or “AVE – –.–
MPG” (when the multi-function meter
unit has been set to miles).
“AVE – –.– km/L”: The average
distance that can be traveled on
1.0 L of fuel is shown.
“AVE – –.– L/100 km”: The aver-
age amount of fuel necessary to
travel 100 km is shown.
“AVE – –.– MPG”: The average
distance that can be traveled on
1.0 Imp.gal of fuel is shown.
To switch between the “km/L” and
“L/100 km”, push the “CLOCK” and
“RESET” buttons at the same time.
To reset the average fuel consumption,
push the “RESET” button for two sec-
onds.
TIPAfter resetting the average fuel con-
sumption, “– –.–” will be shown until the
vehicle has traveled a sufficient dis-tance. Brightness and shift indicator light
control mode
This mode cycles through five control
functions, allowing you to make the fol-
lowing settings in the order listed be-
low.
Screen brightness:
This function allows you to adjust
the brightness of the screen.
Shift indicator light style:
This function allows you to set the
indicator light to on, flash, or off.
Shift indicator light on r/min:
This function allows you to select
the engine speed at which the indi-
cator light will be activated.
Shift indicator light off r/min:
1. Average fuel consumption display
1
1. Brightness level display
1
B67-9-E2.book 14 ページ 2018年6月5日 火曜日 午前9時7分
Page 36 of 108

Instrument and control functions
4-15
1
2
34
5
6
7
8
9
10
11
12 This function allows you to select
the engine speed at which the indi-
cator light will be deactivated.
Shift indicator light brightness:
This function allows you to adjust
the brightness of the shift indicator
light.
TIPThe brightness level display shows thebrightness level setting.
To adjust the brightness of the screen1. Turn the key to “OFF”.
2. Push and hold the “CLOCK” but-
ton.
3. Turn the key to “ON”, and then re- lease the “CLOCK” button after
five seconds.
4. Push the “RESET” button to select the desired brightness level.
5. Push the “CLOCK” button to con- firm the selected brightness level.
The control mode changes to the
shift indicator light style function.
To set the shift indicator light style1. Push the “RESET” button to select one of the following style settings:
On - the indicator light will come
on when activated. (This setting
is selected when the indicator
light stays on.)
Flash - the indicator light will
flash when activated. (This set-
ting is selected when the indica-
tor light flashes four times per
second.)
Off - the indicator light is deacti-
vated; in other words, it will not
come on or flash. (This setting
is selected when the indicator
light flashes once every two
seconds.)
2. Push the “CLOCK” button to con- firm the selected indicator light ac-
tivity. The control mode changes to
the shift indicator light on r/min
function.
To set the shift indicator light on r/min
TIPThe shift indicator light can be set be-
tween 7000 r/min and 13000 r/min in in-crements of 200 r/min. 1. Push the “RESET” button to select the desired engine speed for acti- vating the indicator light.
2. Push the “CLOCK” button to con- firm the selected engine speed.
The control mode changes to the
shift indicator light off r/min func-
tion.
To set the shift indicator light off r/min
TIP
The shift indicator light can be
set between 7000 r/min and
13000 r/min in increments of 200
r/min.
Be sure to set the off r/min to a
higher engine speed than the on
r/min setting, otherwise the shift in-dicator light will not come on.
1. Push the “RESET” button to select the desired engine speed for deac-
tivating the indicator light.
2. Push the “CLOCK” button to con- firm the selected engine speed.
The control mode changes to the
shift indicator light brightness func-
tion.
B67-9-E2.book 15 ページ 2018年6月5日 火曜日 午前9時7分
Page 40 of 108

Instrument and control functions
4-19
1
2
34
5
6
7
8
9
10
11
12
EAU13075
Fuel tank capTo open the fuel tank cap
Open the fuel tank cap lock cover, in-
sert the key into the lock, and then turn
it 1/4 turn clockwise. The lock will be re-
leased and the fuel tank cap can be
opened.
To close the fuel tank cap 1. Push the fuel tank cap into position with the key inserted in the lock.
2. Turn the key counterclockwise to the original position, remove it, and
then close the lock cover.
TIPThe fuel tank cap cannot be closed un-
less the key is in the lock. In addition,
the key cannot be removed if the cap isnot properly closed and locked.
WARNING
EWA11092
Make sure that the fuel tank cap is
properly closed after filling fuel.Leaking fuel is a fire hazard.
EAU13222
FuelMake sure there is sufficient gasoline in
the tank.
WARNING
EWA10882
Gasoline and gasoline vapors are
extremely flammable. To avoid fires
and explosions and to reduce the
risk of injury when refueling, followthese instructions.
1. Before refueling, turn off the en- gine and be sure that no one is sit-
ting on the vehicle. Never refuel
while smoking, or while in the vi-
cinity of sparks, open flames, or
other sources of ignition such as
the pilot lights of water heaters and
clothes dryers.
2. Do not overfill the fuel tank. When refueling, be sure to insert the
pump nozzle into the fuel tank filler
hole. Stop filling when the fuel
reaches the bottom of the filler
tube. Because fuel expands when
it heats up, heat from the engine or
the sun can cause fuel to spill out
of the fuel tank.
1. Fuel tank cap lock cover
2. Unlock.
1
2
B67-9-E2.book 19 ページ 2018年6月5日 火曜日 午前9時7分
Page 41 of 108

Instrument and control functions
4-20
1
2
345
6
7
8
9
10
11
12
3. Wipe up any spilled fuel immedi-
ately. NOTICE: Immediately wipe
off spilled fuel with a clean, dry,
soft cloth, since fuel may deteri-
orate painted surfaces or plastic
parts.
[ECA10072]
4. Be sure to securely close the fuel tank cap.
WARNING
EWA15152
Gasoline is poisonous and can
cause injury or death. Handle gaso-
line with care. Never siphon gaso-
line by mouth. If you should swallow
some gasoline or inhale a lot of gas-
oline vapor, or get some gasoline in your eyes, see your doctor immedi-
ately. If gasoline spills on your skin,
wash with soap and water. If gaso-
line spills on your clothing, change
your clothes.
EAU75300
NOTICE
ECA11401
Use only unleaded gasoline. The use
of leaded gasoline will cause severe
damage to internal engine parts,
such as the valves and piston rings,as well as to the exhaust system.
TIP
This mark identifies the recom-
mended fuel for this vehicle as
specified by European regulation
(EN228).
Check that gasoline nozzle has thesame identifier when fueling.
Your Yamaha engine has been de-
signed to use premium unleaded gaso-
line with a research octane number of
95 or higher. If knocking (or pinging) oc-
curs, use a gasoline of a different
brand. Use of unleaded fuel will extend
spark plug life and reduce maintenance
costs.
Gasohol
There are two types of gasohol: gaso-
1. Fuel tank filler tube
2. Maximum fuel level
2
1
Recommended fuel: Premium unleaded gasoline (Gaso-
hol [E10] acceptable)
Fuel tank capacity: 17 L (4.5 US gal, 3.7 Imp.gal)
Fuel reserve amount:
4.0 L (1.06 US gal, 0.88 Imp.gal)
E5
E10
B67-9-E2.book 20 ページ 2018年6月5日 火曜日 午前9時7分