2018 YAMAHA AEROX50 check engine light
[x] Cancel search: check engine lightPage 6 of 78

Table of contentsSafety information............................ 1-1
Further safe-riding points ............... 1-5
Description....................................... 2-1
Left view ......................................... 2-1
Right view ....................................... 2-2
Controls and instruments ............... 2-3
Instrument and control functions... 3-1
Main switch/steering lock............... 3-1
Indicator lights and warning
lights............................................ 3-2
Multi-function display ..................... 3-3
Handlebar switches ........................ 3-6
Front brake lever ............................ 3-7
Rear brake lever ............................. 3-7
Fuel tank cap .................................. 3-7
Fuel ................................................. 3-8
Catalytic converter ....................... 3-10
Kickstarter .................................... 3-10
Seats ............................................ 3-11
Storage compartment .................. 3-12
For your safety – pre-operation
checks............................................... 4-1
Operation and important riding
points................................................ 5-1
Starting a cold engine .................... 5-1
Starting off ...................................... 5-2
Acceleration and deceleration ........ 5-2Braking ............................................ 5-3
Tips for reducing fuel
consumption ................................ 5-3
Engine break-in ............................... 5-4
Parking ............................................ 5-4
Periodic maintenance and
adjustment........................................ 6-1
Periodic maintenance chart for the
emission control system .............. 6-2
General maintenance and
lubrication chart ........................... 6-3
Removing and installing the
cowling and panel........................ 6-6
Checking the spark plug ................. 6-7
Engine oil and oil strainer ................ 6-9
Final transmission oil..................... 6-11
Coolant.......................................... 6-12
Replacing the air filter element
and cleaning the check hose..... 6-13
Checking the throttle grip free
play ............................................ 6-14
Valve clearance ............................. 6-14
Tires .............................................. 6-15
Cast wheels................................... 6-16
Checking the front and rear brake
lever free play ............................ 6-17
Checking the front and rear brake
pads ........................................... 6-17
Checking the brake fluid level ....... 6-18
Changing the brake fluid ............... 6-19Checking and lubricating the
cables ........................................ 6-19
Checking and lubricating the
throttle grip and cable ............... 6-20
Lubricating the front and rear
brake levers ............................... 6-20
Checking and lubricating the
centerstand ............................... 6-21
Checking the front fork ................. 6-21
Checking the steering................... 6-22
Checking the wheel bearings ....... 6-22
Battery .......................................... 6-23
Replacing the fuse ........................ 6-24
Replacing the headlight bulb ........ 6-25
Replacing the auxiliary light bulb
(for CHE) .................................... 6-26
Replacing the tail/brake light
bulb ........................................... 6-27
Replacing a turn signal light
bulb ........................................... 6-27
License plate light......................... 6-28
Troubleshooting............................ 6-28
Troubleshooting charts................. 6-29
Scooter care and storage................ 7-1
Matte color caution......................... 7-1
Care ................................................ 7-1
Storage ........................................... 7-4U1GBE1E0.book Page 1 Tuesday, October 17, 2017 11:45 AM
Page 18 of 78
Instrument and control functions
3-2
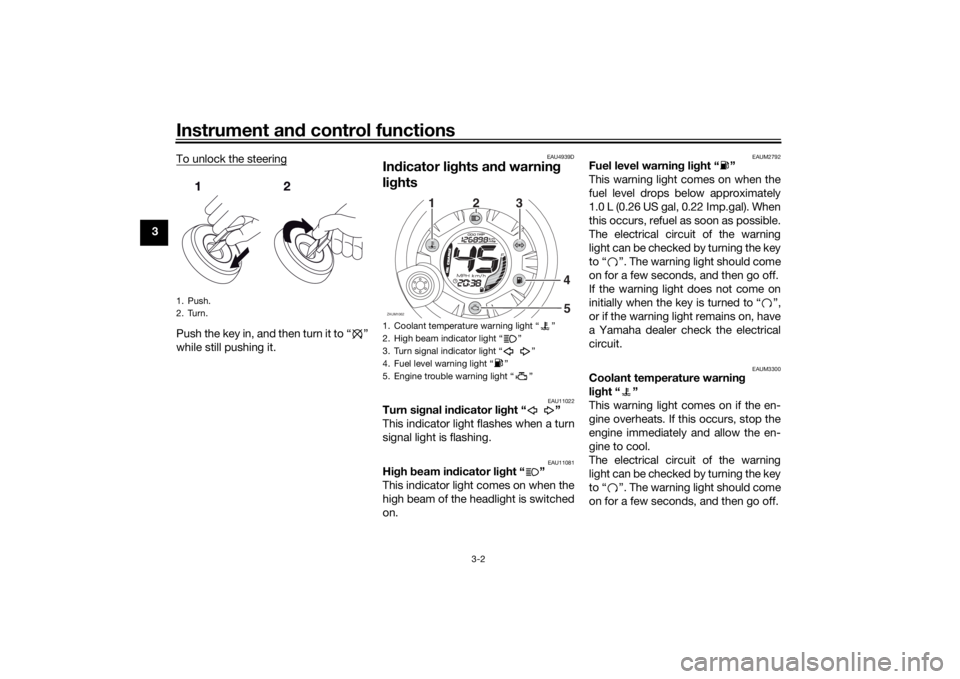
3To unlock the steering
Push the key in, and then turn it to “ ”
while still pushing it.
EAU4939D
Indicator lights and warning
lights
EAU11022
Turn signal indicator light “ ”
This indicator light flashes when a turn
signal light is flashing.
EAU11081
High beam indicator light “ ”
This indicator light comes on when the
high beam of the headlight is switched
on.
EAUM2792
Fuel level warning light “ ”
This warning light comes on when the
fuel level drops below approximately
1.0 L (0.26 US gal, 0.22 Imp.gal). When
this occurs, refuel as soon as possible.
The electrical circuit of the warning
light can be checked by turning the key
to “ ”. The warning light should come
on for a few seconds, and then go off.
If the warning light does not come on
initially when the key is turned to “ ”,
or if the warning light remains on, have
a Yamaha dealer check the electrical
circuit.
EAUM3300
Coolant temperature warning
light “ ”
This warning light comes on if the en-
gine overheats. If this occurs, stop the
engine immediately and allow the en-
gine to cool.
The electrical circuit of the warning
light can be checked by turning the key
to “ ”. The warning light should come
on for a few seconds, and then go off.
1. Push.
2. Turn.
1. Coolant temperature warning light “ ”
2. High beam indicator light “ ”
3. Turn signal indicator light “ ”
4. Fuel level warning light “ ”
5. Engine trouble warning light “ ”ZAUM1062
O
IL CHA
NGE
12
3
4
5
U1GBE1E0.book Page 2 Tuesday, October 17, 2017 11:45 AM
Page 19 of 78

Instrument and control functions
3-3
3 If the warning light does not come on
initially when the key is turned to “ ”,
or if the warning light remains on, have
a Yamaha dealer check the electrical
circuit.
NOTICE
ECA10022
Do not continue to operate the en-
gine if it is overheating.TIPIf the engine overheats, see page 6-30
for further instructions.
EAU78310
Engine trouble warning light “ ”
This warning light comes on if a prob-
lem is detected in the engine or other
vehicle control system. If this occurs,
have a Yamaha dealer check the on-
board diagnostic system.
The electrical circuit of the warning
light can be checked by turning the key
to “ ”. The warning light should come
on for a few seconds, and then go off.
If the warning light does not come on
initially when the key is turned to “ ”,
or if the warning light remains on, have
a Yamaha dealer check the vehicle.
EAUM3131
Multi-function displayTIPThe multi-function display performs
the following self-test for three sec-
onds in order to check the electrical
circuit.
The speedometer digits display
from 0 to 80, and then from 80 to
0 in kilometers. If the speedometer
is set to miles, the digits will dis-
play from 0 to 50, and then from
50 to 0.All LCD segments and warning
lights come on and then go off.
WARNING
EWA12313
Be sure to stop the vehicle before
making any setting changes to the
multi-function display. Changing
settings while riding can distract the
operator and increase the risk of an
accident.The multi-function display is equipped
with the following:
a digital clock
a digital speedometer (which
shows riding speed)
an odometer (which shows the to-
tal distance traveled)
a tripmeter (which shows the dis-
tance traveled since it was last set
to zero)
a fuel reserve tripmeter (which
shows the distance traveled on
the fuel reserve)
an oil change indicator (which
shows when the engine oil should
be changed)
a fuel gauge
a self-diagnosis device
1. Speedometer
2. Oil change indicator “OIL CHANGE”
3. Clock
4. “RESET/SELECT” button
5. Odometer/tripmeters/fuel reserve tripmeter
6. Fuel gaugeZAUM1063
O
I
L CHA
NGE56
1
3
42
U1GBE1E0.book Page 3 Tuesday, October 17, 2017 11:45 AM
Page 25 of 78
Instrument and control functions
3-9
3
ately. If gasoline spills on your skin,
wash with soap and water. If gaso-
line spills on your clothing, change
your clothes.
EAU75320
NOTICE
ECA11401
Use only unleaded gasoline. The use
of leaded gasoline will cause severe
damage to internal engine parts,
such as the valves and piston rings,
as well as to the exhaust system.
TIP
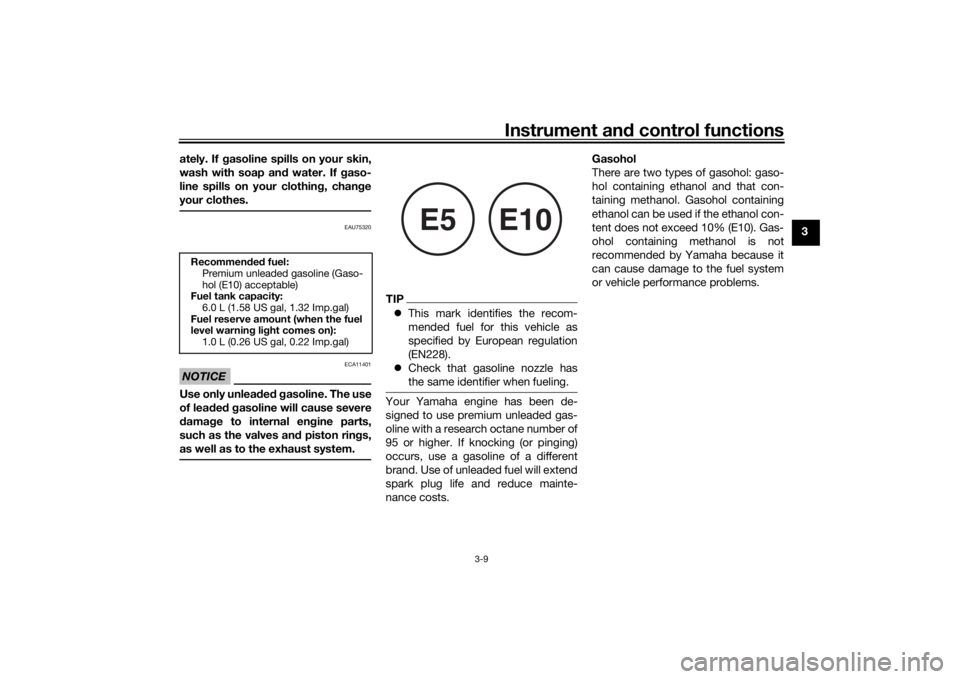
This mark identifies the recom-
mended fuel for this vehicle as
specified by European regulation
(EN228).
Check that gasoline nozzle has
the same identifier when fueling.Your Yamaha engine has been de-
signed to use premium unleaded gas-
oline with a research octane number of
95 or higher. If knocking (or pinging)
occurs, use a gasoline of a different
brand. Use of unleaded fuel will extend
spark plug life and reduce mainte-
nance costs. Gasohol
There are two types of gasohol: gaso-
hol containing ethanol and that con-
taining methanol. Gasohol containing
ethanol can be used if the ethanol con-
tent does not exceed 10% (E10). Gas-
ohol containing methanol is not
recommended by Yamaha because it
can cause damage to the fuel system
or vehicle performance problems.
Recommended fuel:
Premium unleaded gasoline (Gaso-
hol (E10) acceptable)
Fuel tank capacity:
6.0 L (1.58 US gal, 1.32 Imp.gal)
Fuel reserve amount (when the fuel
level warning light comes on):
1.0 L (0.26 US gal, 0.22 Imp.gal)
E5
E10
U1GBE2E0.book Page 9 Tuesday, May 8, 2018 3:34 PM
Page 32 of 78
Operation and important riding points
5-1
5
EAU15952
Read the Owner’s Manual carefully to
become familiar with all controls. If
there is a control or function you do not
understand, ask your Yamaha dealer.
WARNING
EWA10272
Failure to familiarize yourself with
the controls can lead to loss of con-
trol, which could cause an accident
or injury.
EAUM3150
TIPThis model is equipped with a lean an-
gle sensor to stop the engine in case of
a turnover. To start the engine after a
turnover, be sure to turn the main
switch to Ž and then to Ž. Failing
to do so will prevent the engine from
starting even though the engine will
crank when pushing the start switch.
EAUM3161
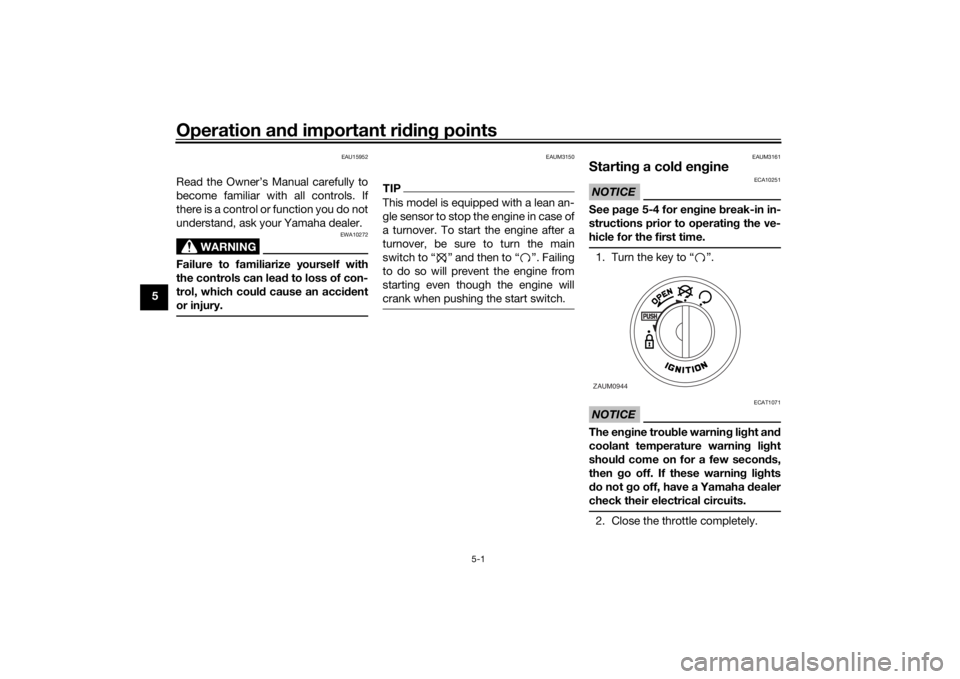
Starting a cold engineNOTICE
ECA10251
See page 5-4 for engine break-in in-
structions prior to operating the ve-
hicle for the first time.1. Turn the key to “ ”.NOTICE
ECAT1071
The engine trouble warning light and
coolant temperature warning light
should come on for a few seconds,
then go off. If these warning lights
do not go off, have a Yamaha dealer
check their electrical circuits.2. Close the throttle completely.ZAUM0944
U1GBE1E0.book Page 1 Tuesday, October 17, 2017 11:45 AM
Page 42 of 78
Periodic maintenance and adjustment
6-7
6
EAUM3252
Checking the spark plugThe spark plug is an important engine
component, which is easy to check.
Since heat and deposits will cause any
spark plug to slowly erode, the spark
plug should be removed and checked
in accordance with the periodic main-
tenance and lubrication chart. In addi-
tion, the condition of the spark plug
can reveal the condition of the engine.
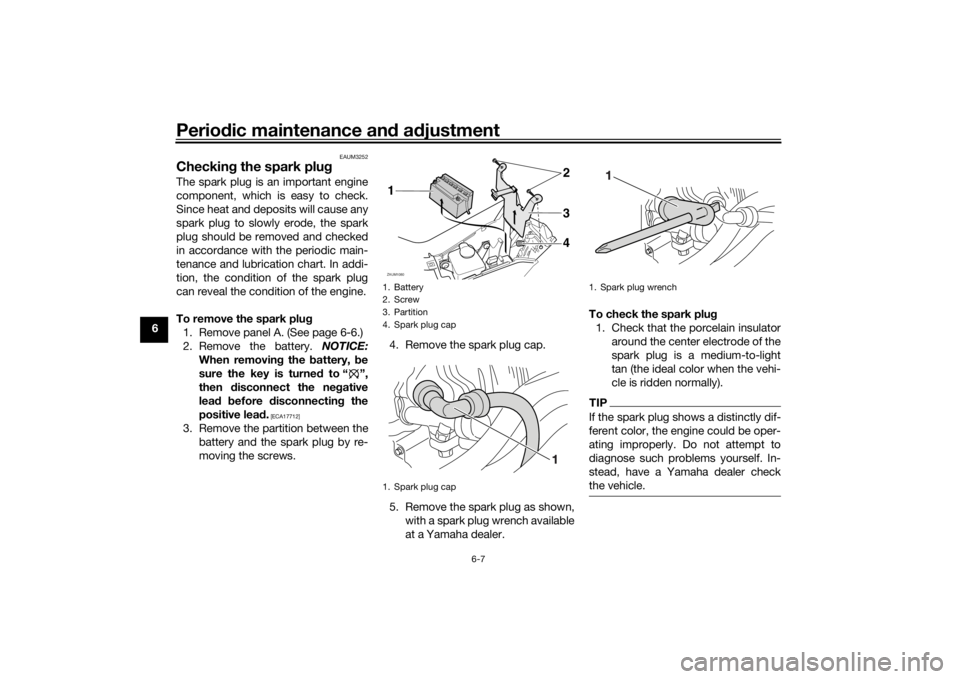
To remove the spark plug
1. Remove panel A. (See page 6-6.)
2. Remove the battery. NOTICE:
When removing the battery, be
sure the key is turned to “ ”,
then disconnect the negative
lead before disconnecting the
positive lead.
[ECA17712]
3. Remove the partition between the
battery and the spark plug by re-
moving the screws.4. Remove the spark plug cap.
5. Remove the spark plug as shown,
with a spark plug wrench available
at a Yamaha dealer.To check the spark plug
1. Check that the porcelain insulator
around the center electrode of the
spark plug is a medium-to-light
tan (the ideal color when the vehi-
cle is ridden normally).
TIPIf the spark plug shows a distinctly dif-
ferent color, the engine could be oper-
ating improperly. Do not attempt to
diagnose such problems yourself. In-
stead, have a Yamaha dealer check
the vehicle.
1. Battery
2. Screw
3. Partition
4. Spark plug cap
1. Spark plug capZAUM1080
3 142
1. Spark plug wrench
U1GBE1E0.book Page 7 Tuesday, October 17, 2017 11:45 AM
Page 44 of 78
Periodic maintenance and adjustment
6-9
6
EAUM3171
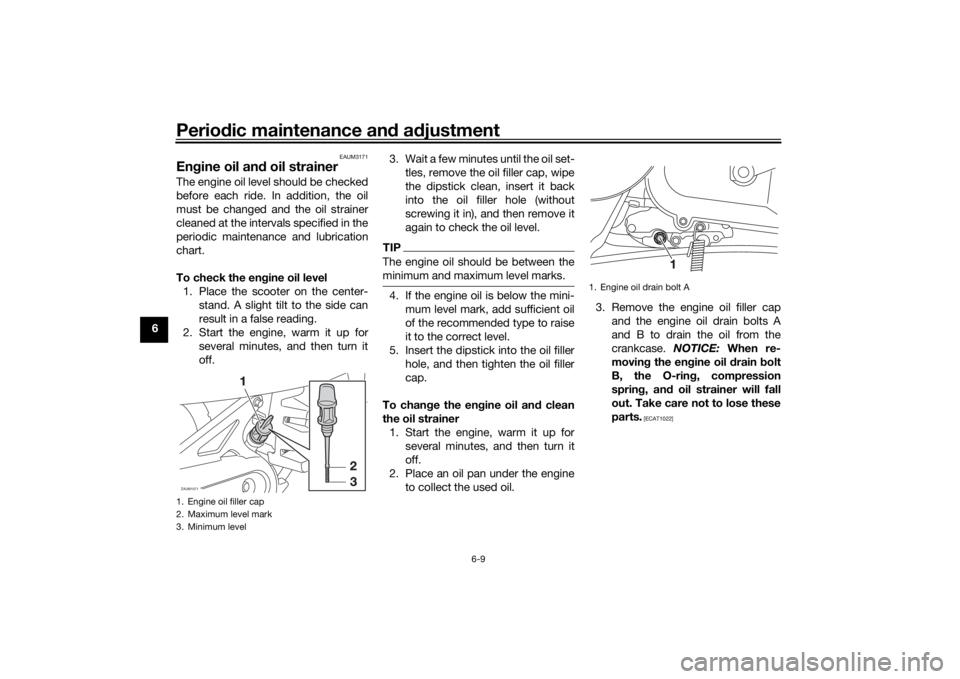
Engine oil and oil strainerThe engine oil level should be checked
before each ride. In addition, the oil
must be changed and the oil strainer
cleaned at the intervals specified in the
periodic maintenance and lubrication
chart.
To check the engine oil level
1. Place the scooter on the center-
stand. A slight tilt to the side can
result in a false reading.
2. Start the engine, warm it up for
several minutes, and then turn it
off.3. Wait a few minutes until the oil set-
tles, remove the oil filler cap, wipe
the dipstick clean, insert it back
into the oil filler hole (without
screwing it in), and then remove it
again to check the oil level.
TIPThe engine oil should be between the
minimum and maximum level marks.4. If the engine oil is below the mini-
mum level mark, add sufficient oil
of the recommended type to raise
it to the correct level.
5. Insert the dipstick into the oil filler
hole, and then tighten the oil filler
cap.
To change the engine oil and clean
the oil strainer
1. Start the engine, warm it up for
several minutes, and then turn it
off.
2. Place an oil pan under the engine
to collect the used oil.3. Remove the engine oil filler cap
and the engine oil drain bolts A
and B to drain the oil from the
crankcase. NOTICE: When re-
moving the engine oil drain bolt
B, the O-ring, compression
spring, and oil strainer will fall
out. Take care not to lose these
parts.
[ECAT1022]
1. Engine oil filler cap
2. Maximum level mark
3. Minimum levelZAUM1071
1. Engine oil drain bolt A
U1GBE1E0.book Page 9 Tuesday, October 17, 2017 11:45 AM
Page 47 of 78
Periodic maintenance and adjustment
6-12
6 7. Check the final transmission case
for oil leakage. If oil is leaking,
check for the cause.
EAU20071
CoolantThe coolant level should be checked
before each ride. In addition, the cool-
ant must be changed at the intervals
specified in the periodic maintenance
and lubrication chart.
EAUM3182
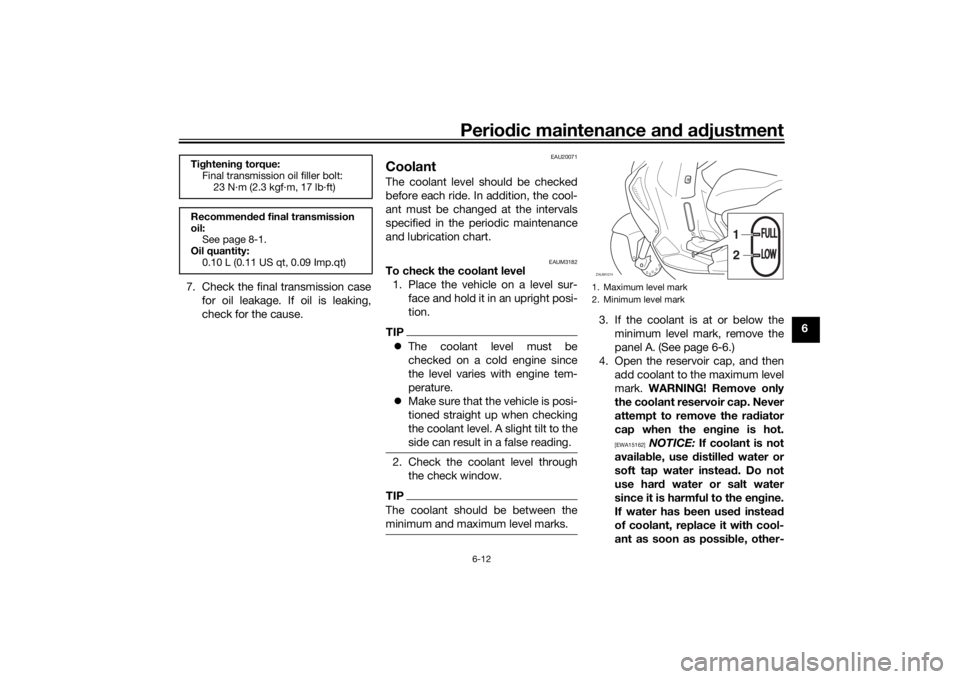
To check the coolant level
1. Place the vehicle on a level sur-
face and hold it in an upright posi-
tion.TIPThe coolant level must be
checked on a cold engine since
the level varies with engine tem-
perature.
Make sure that the vehicle is posi-
tioned straight up when checking
the coolant level. A slight tilt to the
side can result in a false reading.2. Check the coolant level through
the check window.TIPThe coolant should be between the
minimum and maximum level marks.
3. If the coolant is at or below the
minimum level mark, remove the
panel A. (See page 6-6.)
4. Open the reservoir cap, and then
add coolant to the maximum level
mark. WARNING! Remove only
the coolant reservoir cap. Never
attempt to remove the radiator
cap when the engine is hot.
[EWA15162]
NOTICE: If coolant is not
available, use distilled water or
soft tap water instead. Do not
use hard water or salt water
since it is harmful to the engine.
If water has been used instead
of coolant, replace it with cool-
ant as soon as possible, other-
Tightening torque:
Final transmission oil filler bolt:
23 N·m (2.3 kgf·m, 17 lb·ft)
Recommended final transmission
oil:
See page 8-1.
Oil quantity:
0.10 L (0.11 US qt, 0.09 Imp.qt)
1. Maximum level mark
2. Minimum level markZAUM1074
1
2
FULLFULLLOWLOW
U1GBE1E0.book Page 12 Tuesday, October 17, 2017 11:45 AM