2018 YAMAHA AEROX50 battery
[x] Cancel search: batteryPage 6 of 78

Table of contentsSafety information............................ 1-1
Further safe-riding points ............... 1-5
Description....................................... 2-1
Left view ......................................... 2-1
Right view ....................................... 2-2
Controls and instruments ............... 2-3
Instrument and control functions... 3-1
Main switch/steering lock............... 3-1
Indicator lights and warning
lights............................................ 3-2
Multi-function display ..................... 3-3
Handlebar switches ........................ 3-6
Front brake lever ............................ 3-7
Rear brake lever ............................. 3-7
Fuel tank cap .................................. 3-7
Fuel ................................................. 3-8
Catalytic converter ....................... 3-10
Kickstarter .................................... 3-10
Seats ............................................ 3-11
Storage compartment .................. 3-12
For your safety – pre-operation
checks............................................... 4-1
Operation and important riding
points................................................ 5-1
Starting a cold engine .................... 5-1
Starting off ...................................... 5-2
Acceleration and deceleration ........ 5-2Braking ............................................ 5-3
Tips for reducing fuel
consumption ................................ 5-3
Engine break-in ............................... 5-4
Parking ............................................ 5-4
Periodic maintenance and
adjustment........................................ 6-1
Periodic maintenance chart for the
emission control system .............. 6-2
General maintenance and
lubrication chart ........................... 6-3
Removing and installing the
cowling and panel........................ 6-6
Checking the spark plug ................. 6-7
Engine oil and oil strainer ................ 6-9
Final transmission oil..................... 6-11
Coolant.......................................... 6-12
Replacing the air filter element
and cleaning the check hose..... 6-13
Checking the throttle grip free
play ............................................ 6-14
Valve clearance ............................. 6-14
Tires .............................................. 6-15
Cast wheels................................... 6-16
Checking the front and rear brake
lever free play ............................ 6-17
Checking the front and rear brake
pads ........................................... 6-17
Checking the brake fluid level ....... 6-18
Changing the brake fluid ............... 6-19Checking and lubricating the
cables ........................................ 6-19
Checking and lubricating the
throttle grip and cable ............... 6-20
Lubricating the front and rear
brake levers ............................... 6-20
Checking and lubricating the
centerstand ............................... 6-21
Checking the front fork ................. 6-21
Checking the steering................... 6-22
Checking the wheel bearings ....... 6-22
Battery .......................................... 6-23
Replacing the fuse ........................ 6-24
Replacing the headlight bulb ........ 6-25
Replacing the auxiliary light bulb
(for CHE) .................................... 6-26
Replacing the tail/brake light
bulb ........................................... 6-27
Replacing a turn signal light
bulb ........................................... 6-27
License plate light......................... 6-28
Troubleshooting............................ 6-28
Troubleshooting charts................. 6-29
Scooter care and storage................ 7-1
Matte color caution......................... 7-1
Care ................................................ 7-1
Storage ........................................... 7-4U1GBE1E0.book Page 1 Tuesday, October 17, 2017 11:45 AM
Page 15 of 78

Description
2-2
2
EAU10421
Right view
12 3
4
5 6 7 9
8
1. Grab bar (page 5-2)
2. Fuel tank cap (page 3-7)
3. Passenger seat (page 3-11)
4. Rider seat (page 3-11)
5. Main switch/steering lock (page 3-1)
6. Battery/fuse (page 6-23/6-24)
7. Passenger footrest
8. Engine oil filler cap (page 6-9)9. Centerstand (page 6-21)
U1GBE1E0.book Page 2 Tuesday, October 17, 2017 11:45 AM
Page 31 of 78

For your safety – pre-operation checks
4-2
4
Rear brake• Check operation.
• If soft or spongy, have Yamaha dealer bleed hydraulic system.
• Check brake pads for wear.
• Replace if necessary.
• Check fluid level in reservoir.
• If necessary, add specified brake fluid to specified level.
• Check hydraulic system for leakage.6-17, 6-17, 6-18
Throttle grip• Make sure that operation is smooth.
• Check throttle grip free play.
• If necessary, have Yamaha dealer adjust throttle grip free play and lubricate ca-
ble and grip housing.6-14, 6-20
Wheels and tires• Check for damage.
• Check tire condition and tread depth.
• Check air pressure.
• Correct if necessary.6-15, 6-16
Brake levers• Make sure that operation is smooth.
• Lubricate lever pivoting points if necessary.6-20
Centerstand• Make sure that operation is smooth.
• Lubricate pivot if necessary.6-21
Chassis fasteners• Make sure that all nuts, bolts and screws are properly tightened.
• Tighten if necessary.—
Instruments, lights, signals
and switches• Check operation.
• Correct if necessary.—
Battery• Check fluid level.
• Fill with distilled water if necessary.6-23 ITEM CHECKS PAGE
U1GBE1E0.book Page 2 Tuesday, October 17, 2017 11:45 AM
Page 33 of 78

Operation and important riding points
5-2
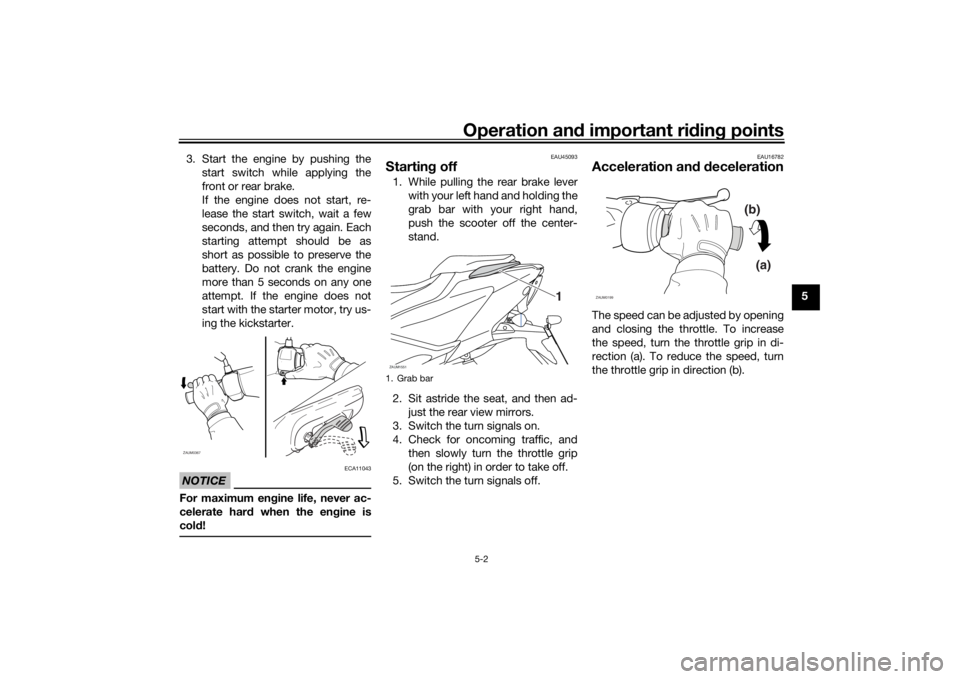
5 3. Start the engine by pushing the
start switch while applying the
front or rear brake.
If the engine does not start, re-
lease the start switch, wait a few
seconds, and then try again. Each
starting attempt should be as
short as possible to preserve the
battery. Do not crank the engine
more than 5 seconds on any one
attempt. If the engine does not
start with the starter motor, try us-
ing the kickstarter.
NOTICE
ECA11043
For maximum engine life, never ac-
celerate hard when the engine is
cold!
EAU45093
Starting off1. While pulling the rear brake lever
with your left hand and holding the
grab bar with your right hand,
push the scooter off the center-
stand.
2. Sit astride the seat, and then ad-
just the rear view mirrors.
3. Switch the turn signals on.
4. Check for oncoming traffic, and
then slowly turn the throttle grip
(on the right) in order to take off.
5. Switch the turn signals off.
EAU16782
Acceleration and decelerationThe speed can be adjusted by opening
and closing the throttle. To increase
the speed, turn the throttle grip in di-
rection (a). To reduce the speed, turn
the throttle grip in direction (b).
ZAUM0367
1. Grab barZAUM1551
1
(b)
(a)
ZAUM0199
U1GBE1E0.book Page 2 Tuesday, October 17, 2017 11:45 AM
Page 38 of 78

Periodic maintenance and adjustment
6-3
6
EAU1771B
General maintenance and lubrication chartNO. ITEM CHECK OR MAINTENANCE JOBODOMETER READING
ANNUAL
CHECK 1000 km
(600 mi)6000 km
(3500 mi)12000 km
(7000 mi)18000 km
(10500 mi)24000 km
(14000 mi)
1*Air filter element• Replace.√√√√√
2 Air filter check hose• Clean.√√√√√
3*Battery• Check electrolyte level and spe-
cific gravity.
• Make sure that the breather hose
is properly routed.√√√√√
4*Front brake• Check operation, fluid level and
vehicle for fluid leakage.√√√√√√
• Replace brake pads. Whenever worn to the limit
5*Rear brake• Check operation, fluid level and
vehicle for fluid leakage.√√√√√√
• Replace brake pads. Whenever worn to the limit
6*Brake hoses• Check for cracks or damage.
• Check for correct routing and
clamping.√√√√√
• Replace. Every 4 years
7*Brake fluid• Change. Every 2 years
8*Wheels• Check runout and for damage.√√√√
9*Tires• Check tread depth and for dam-
age.
• Replace if necessary.
• Check air pressure.
• Correct if necessary.√√√√√
U1GBE1E0.book Page 3 Tuesday, October 17, 2017 11:45 AM
Page 42 of 78

Periodic maintenance and adjustment
6-7
6
EAUM3252
Checking the spark plugThe spark plug is an important engine
component, which is easy to check.
Since heat and deposits will cause any
spark plug to slowly erode, the spark
plug should be removed and checked
in accordance with the periodic main-
tenance and lubrication chart. In addi-
tion, the condition of the spark plug
can reveal the condition of the engine.
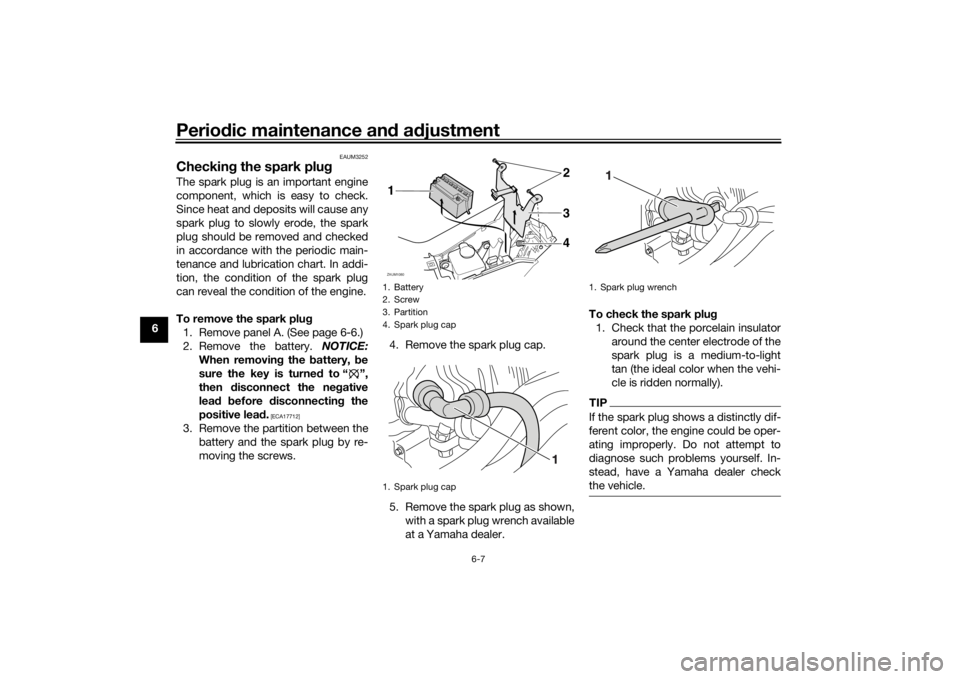
To remove the spark plug
1. Remove panel A. (See page 6-6.)
2. Remove the battery. NOTICE:
When removing the battery, be
sure the key is turned to “ ”,
then disconnect the negative
lead before disconnecting the
positive lead.
[ECA17712]
3. Remove the partition between the
battery and the spark plug by re-
moving the screws.4. Remove the spark plug cap.
5. Remove the spark plug as shown,
with a spark plug wrench available
at a Yamaha dealer.To check the spark plug
1. Check that the porcelain insulator
around the center electrode of the
spark plug is a medium-to-light
tan (the ideal color when the vehi-
cle is ridden normally).
TIPIf the spark plug shows a distinctly dif-
ferent color, the engine could be oper-
ating improperly. Do not attempt to
diagnose such problems yourself. In-
stead, have a Yamaha dealer check
the vehicle.
1. Battery
2. Screw
3. Partition
4. Spark plug cap
1. Spark plug capZAUM1080
3 142
1. Spark plug wrench
U1GBE1E0.book Page 7 Tuesday, October 17, 2017 11:45 AM
Page 43 of 78

Periodic maintenance and adjustment
6-8
6 2. Check the spark plug for electrode
erosion and excessive carbon or
other deposits, and replace it if
necessary.
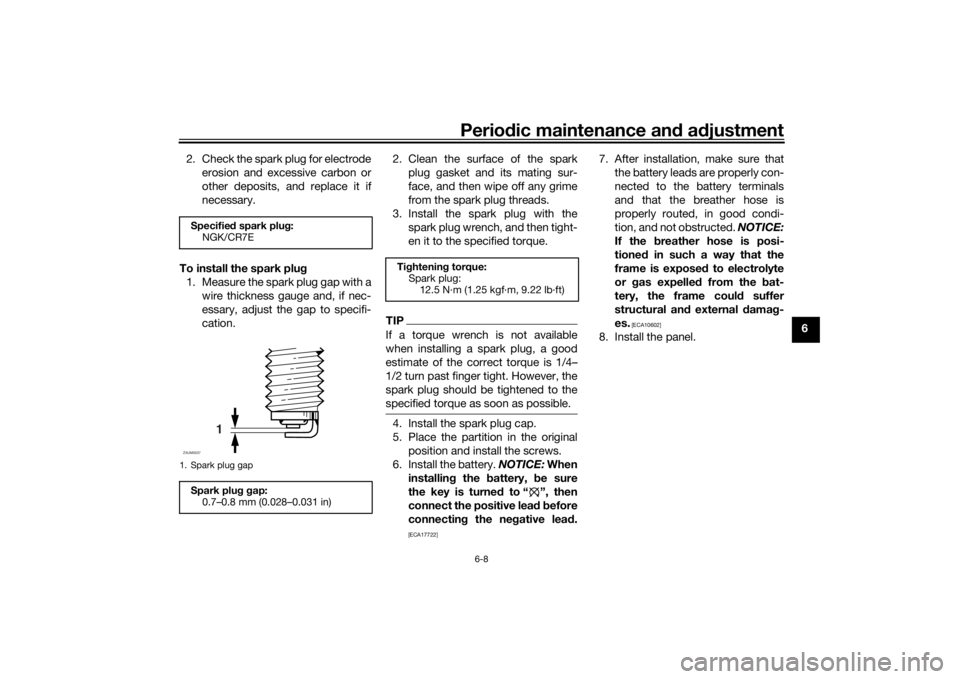
To install the spark plug
1. Measure the spark plug gap with a
wire thickness gauge and, if nec-
essary, adjust the gap to specifi-
cation.2. Clean the surface of the spark
plug gasket and its mating sur-
face, and then wipe off any grime
from the spark plug threads.
3. Install the spark plug with the
spark plug wrench, and then tight-
en it to the specified torque.
TIPIf a torque wrench is not available
when installing a spark plug, a good
estimate of the correct torque is 1/4…
1/2 turn past finger tight. However, the
spark plug should be tightened to the
specified torque as soon as possible.4. Install the spark plug cap.
5. Place the partition in the original
position and install the screws.
6. Install the battery. NOTICE: When
installing the battery, be sure
the key is turned to “ ”, then
connect the positive lead before
connecting the negative lead.
[ECA17722]
7. After installation, make sure that
the battery leads are properly con-
nected to the battery terminals
and that the breather hose is
properly routed, in good condi-
tion, and not obstructed. NOTICE:
If the breather hose is posi-
tioned in such a way that the
frame is exposed to electrolyte
or gas expelled from the bat-
tery, the frame could suffer
structural and external damag-
es.
[ECA10602]
8. Install the panel.
Specified spark plug:
NGK/CR7E1. Spark plug gapSpark plug gap:
0.7–0.8 mm (0.028–0.031 in)
1
ZAUM0037
Tightening torque:
Spark plug:
12.5 N·m (1.25 kgf·m, 9.22 lb·ft)
U1GBE1E0.book Page 8 Tuesday, October 17, 2017 11:45 AM
Page 58 of 78

Periodic maintenance and adjustment
6-23
6
EAUM3281
BatteryA poorly maintained battery will cor-
rode and discharge quickly. The elec-
trolyte level, battery lead connections
and breather hose routing should be
checked before each ride and at the in-
tervals specified in the periodic main-
tenance and lubrication chart.
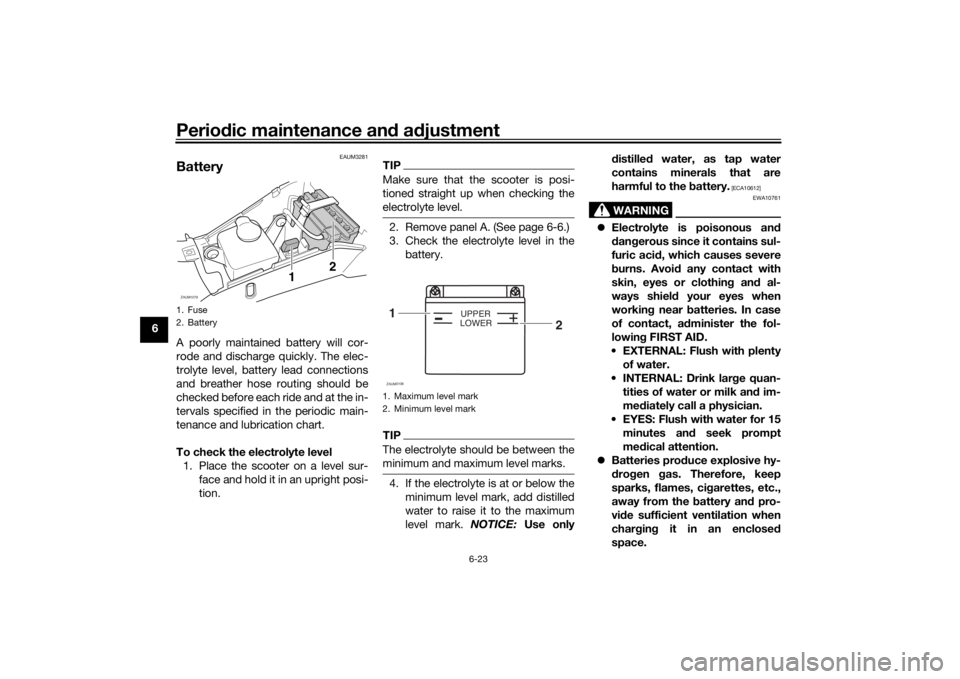
To check the electrolyte level
1. Place the scooter on a level sur-
face and hold it in an upright posi-
tion.
TIPMake sure that the scooter is posi-
tioned straight up when checking the
electrolyte level.2. Remove panel A. (See page 6-6.)
3. Check the electrolyte level in the
battery.TIPThe electrolyte should be between the
minimum and maximum level marks.4. If the electrolyte is at or below the
minimum level mark, add distilled
water to raise it to the maximum
level mark. NOTICE: Use onlydistilled water, as tap water
contains minerals that are
harmful to the battery.
[ECA10612]
WARNING
EWA10761
Electrolyte is poisonous and
dangerous since it contains sul-
furic acid, which causes severe
burns. Avoid any contact with
skin, eyes or clothing and al-
ways shield your eyes when
working near batteries. In case
of contact, administer the fol-
lowing FIRST AID.
EXTERNAL: Flush with plenty
of water.
INTERNAL: Drink large quan-
tities of water or milk and im-
mediately call a physician.
EYES: Flush with water for 15
minutes and seek prompt
medical attention.
Batteries produce explosive hy-
drogen gas. Therefore, keep
sparks, flames, cigarettes, etc.,
away from the battery and pro-
vide sufficient ventilation when
charging it in an enclosed
space.
1. Fuse
2. BatteryZAUM1079
12
1. Maximum level mark
2. Minimum level mark
+
UPPER
LOWER
1
2ZAUM0106
U1GBE1E0.book Page 23 Tuesday, October 17, 2017 11:45 AM