2018 YAMAHA AEROX50 check oil
[x] Cancel search: check oilPage 44 of 78
Periodic maintenance and adjustment
6-9
6
EAUM3171
Engine oil and oil strainerThe engine oil level should be checked
before each ride. In addition, the oil
must be changed and the oil strainer
cleaned at the intervals specified in the
periodic maintenance and lubrication
chart.
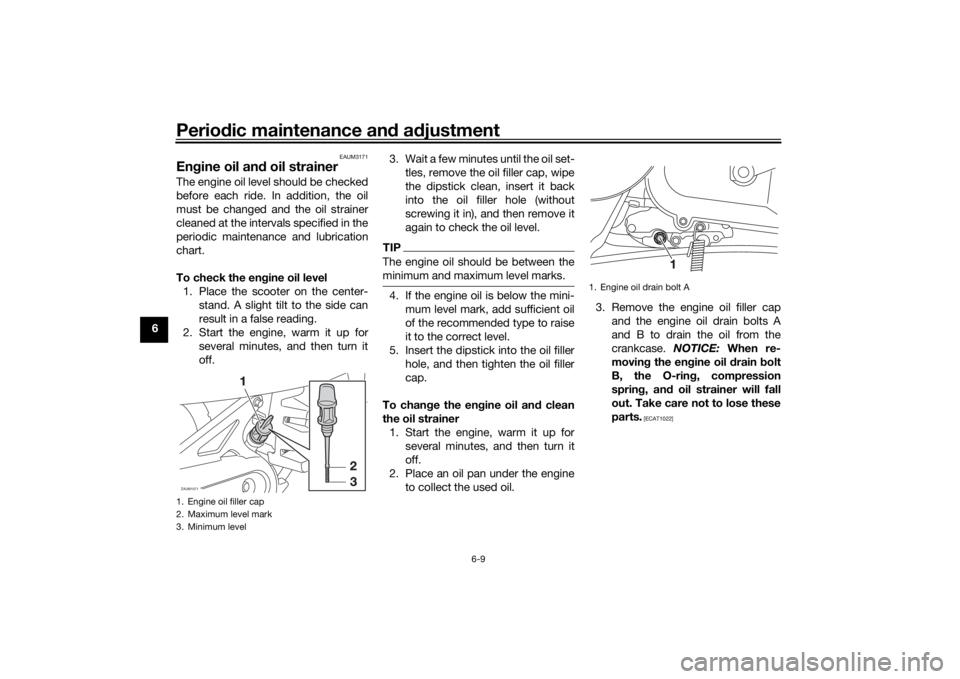
To check the engine oil level
1. Place the scooter on the center-
stand. A slight tilt to the side can
result in a false reading.
2. Start the engine, warm it up for
several minutes, and then turn it
off.3. Wait a few minutes until the oil set-
tles, remove the oil filler cap, wipe
the dipstick clean, insert it back
into the oil filler hole (without
screwing it in), and then remove it
again to check the oil level.
TIPThe engine oil should be between the
minimum and maximum level marks.4. If the engine oil is below the mini-
mum level mark, add sufficient oil
of the recommended type to raise
it to the correct level.
5. Insert the dipstick into the oil filler
hole, and then tighten the oil filler
cap.
To change the engine oil and clean
the oil strainer
1. Start the engine, warm it up for
several minutes, and then turn it
off.
2. Place an oil pan under the engine
to collect the used oil.3. Remove the engine oil filler cap
and the engine oil drain bolts A
and B to drain the oil from the
crankcase. NOTICE: When re-
moving the engine oil drain bolt
B, the O-ring, compression
spring, and oil strainer will fall
out. Take care not to lose these
parts.
[ECAT1022]
1. Engine oil filler cap
2. Maximum level mark
3. Minimum levelZAUM1071
1. Engine oil drain bolt A
U1GBE1E0.book Page 9 Tuesday, October 17, 2017 11:45 AM
Page 45 of 78
Periodic maintenance and adjustment
6-10
6
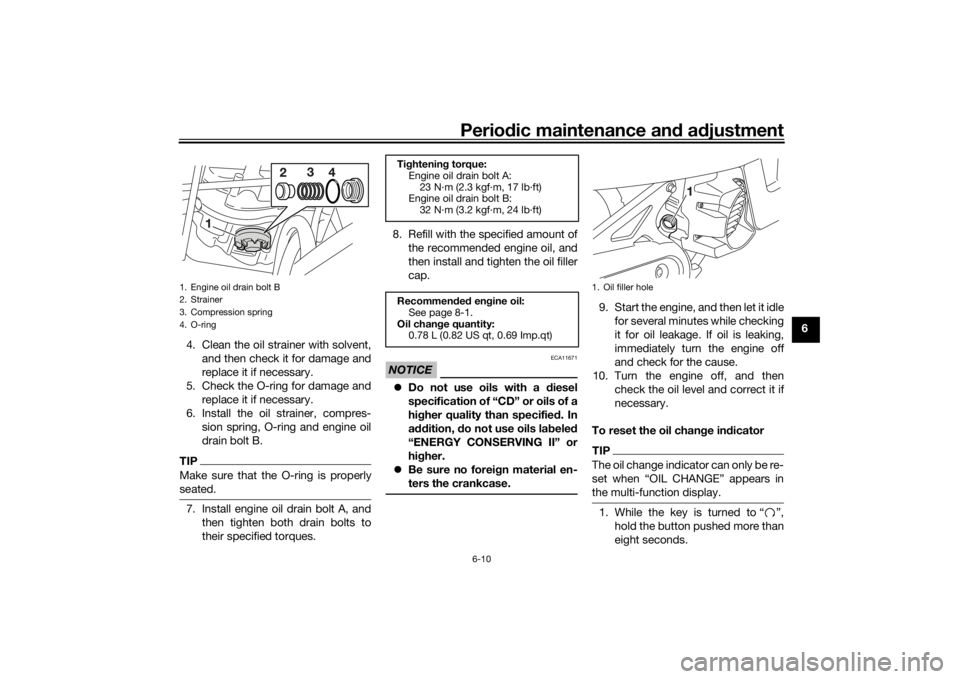
4. Clean the oil strainer with solvent,
and then check it for damage and
replace it if necessary.
5. Check the O-ring for damage and
replace it if necessary.
6. Install the oil strainer, compres-
sion spring, O-ring and engine oil
drain bolt B.
TIPMake sure that the O-ring is properly
seated.7. Install engine oil drain bolt A, and
then tighten both drain bolts to
their specified torques.8. Refill with the specified amount of
the recommended engine oil, and
then install and tighten the oil filler
cap.
NOTICE
ECA11671
Do not use oils with a diesel
specification of “CD” or oils of a
higher quality than specified. In
addition, do not use oils labeled
“ENERGY CONSERVING II” or
higher.
Be sure no foreign material en-
ters the crankcase.
9. Start the engine, and then let it idle
for several minutes while checking
it for oil leakage. If oil is leaking,
immediately turn the engine off
and check for the cause.
10. Turn the engine off, and then
check the oil level and correct it if
necessary.
To reset the oil change indicatorTIPThe oil change indicator can only be re-
set when “OIL CHANGE” appears in
the multi-function display.1. While the key is turned to “ ”,
hold the button pushed more than
eight seconds.
1. Engine oil drain bolt B
2. Strainer
3. Compression spring
4. O-ring
Tightening torque:
Engine oil drain bolt A:
23 N·m (2.3 kgf·m, 17 lb·ft)
Engine oil drain bolt B:
32 N·m (3.2 kgf·m, 24 lb·ft)
Recommended engine oil:
See page 8-1.
Oil change quantity:
0.78 L (0.82 US qt, 0.69 Imp.qt)
1. Oil filler hole
U1GBE1E0.book Page 10 Tuesday, October 17, 2017 11:45 AM
Page 46 of 78
Periodic maintenance and adjustment
6-11
62. Release the button, and the oil
change indicator will go off.
EAUT1563
Final transmission oilThe final transmission case must be
checked for oil leakage before each
ride. If any leakage is found, have a
Yamaha dealer check and repair the
scooter. In addition, the final transmis-
sion oil must be changed as follows at
the intervals specified in the periodic
maintenance and lubrication chart.
1. Start the engine, warm it up by rid-
ing the scooter for several min-
utes, and then stop the engine.
2. Place the scooter on the center-
stand.
3. Place an oil pan under the final
transmission case to collect the
used oil.
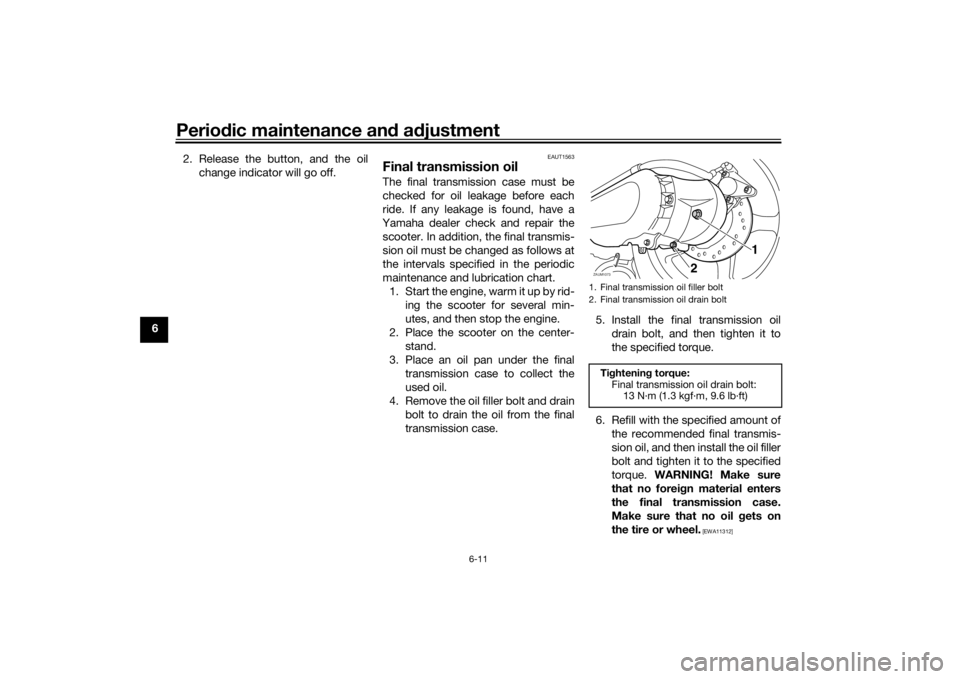
4. Remove the oil filler bolt and drain
bolt to drain the oil from the final
transmission case.5. Install the final transmission oil
drain bolt, and then tighten it to
the specified torque.
6. Refill with the specified amount of
the recommended final transmis-
sion oil, and then install the oil filler
bolt and tighten it to the specified
torque. WARNING! Make sure
that no foreign material enters
the final transmission case.
Make sure that no oil gets on
the tire or wheel.
[EWA11312]
1. Final transmission oil filler bolt
2. Final transmission oil drain boltTightening torque:
Final transmission oil drain bolt:
13 N·m (1.3 kgf·m, 9.6 lb·ft)ZAUM1073
2
1
U1GBE1E0.book Page 11 Tuesday, October 17, 2017 11:45 AM
Page 47 of 78
Periodic maintenance and adjustment
6-12
6 7. Check the final transmission case
for oil leakage. If oil is leaking,
check for the cause.
EAU20071
CoolantThe coolant level should be checked
before each ride. In addition, the cool-
ant must be changed at the intervals
specified in the periodic maintenance
and lubrication chart.
EAUM3182
To check the coolant level
1. Place the vehicle on a level sur-
face and hold it in an upright posi-
tion.TIPThe coolant level must be
checked on a cold engine since
the level varies with engine tem-
perature.
Make sure that the vehicle is posi-
tioned straight up when checking
the coolant level. A slight tilt to the
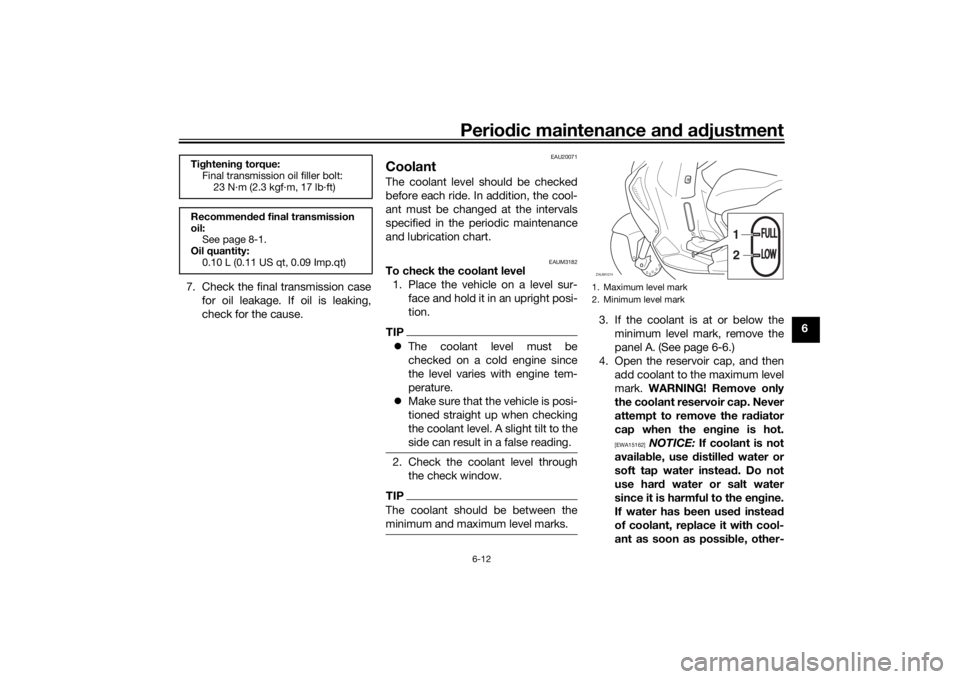
side can result in a false reading.2. Check the coolant level through
the check window.TIPThe coolant should be between the
minimum and maximum level marks.
3. If the coolant is at or below the
minimum level mark, remove the
panel A. (See page 6-6.)
4. Open the reservoir cap, and then
add coolant to the maximum level
mark. WARNING! Remove only
the coolant reservoir cap. Never
attempt to remove the radiator
cap when the engine is hot.
[EWA15162]
NOTICE: If coolant is not
available, use distilled water or
soft tap water instead. Do not
use hard water or salt water
since it is harmful to the engine.
If water has been used instead
of coolant, replace it with cool-
ant as soon as possible, other-
Tightening torque:
Final transmission oil filler bolt:
23 N·m (2.3 kgf·m, 17 lb·ft)
Recommended final transmission
oil:
See page 8-1.
Oil quantity:
0.10 L (0.11 US qt, 0.09 Imp.qt)
1. Maximum level mark
2. Minimum level markZAUM1074
1
2
FULLFULLLOWLOW
U1GBE1E0.book Page 12 Tuesday, October 17, 2017 11:45 AM
Page 54 of 78

Periodic maintenance and adjustment
6-19
6Insufficient brake fluid may al-
low air to enter the brake sys-
tem, reducing braking
performance.
Clean the filler cap before re-
moving. Use only DOT 4 brake
fluid from a sealed container.
Use only the specified brake flu-
id; otherwise, the rubber seals
may deteriorate, causing leak-
age.
Refill with the same type of
brake fluid. Adding a brake fluid
other than DOT 4 may result in a
harmful chemical reaction.
Be careful that water does not
enter the brake fluid reservoir
when refilling. Water will signifi-
cantly lower the boiling point of
the fluid and may result in vapor
lock.
EAUM1362
Changing the brake fluidHave a Yamaha dealer change the
brake fluid at the intervals specified in
the periodic maintenance and lubrica-
tion chart. In addition, have the brake
hose replaced every four years and
whenever it is damaged or leaking.
EAU23098
Checking and lubricating the
cablesThe operation of all control cables and
the condition of the cables should be
checked before each ride, and the ca-
bles and cable ends should be lubri-
cated if necessary. If a cable is
damaged or does not move smoothly,
have a Yamaha dealer check or re-
place it. WARNING! Damage to the
outer housing of cables may result
in internal rusting and cause inter-
ference with cable movement. Re-
place damaged cables as soon as
possible to prevent unsafe condi-
tions.
[EWA10712]
Recommended lubricant:
Yamaha cable lubricant or other
suitable cable lubricant
U1GBE1E0.book Page 19 Tuesday, October 17, 2017 11:45 AM
Page 56 of 78
Periodic maintenance and adjustment
6-21
6
EAU23193
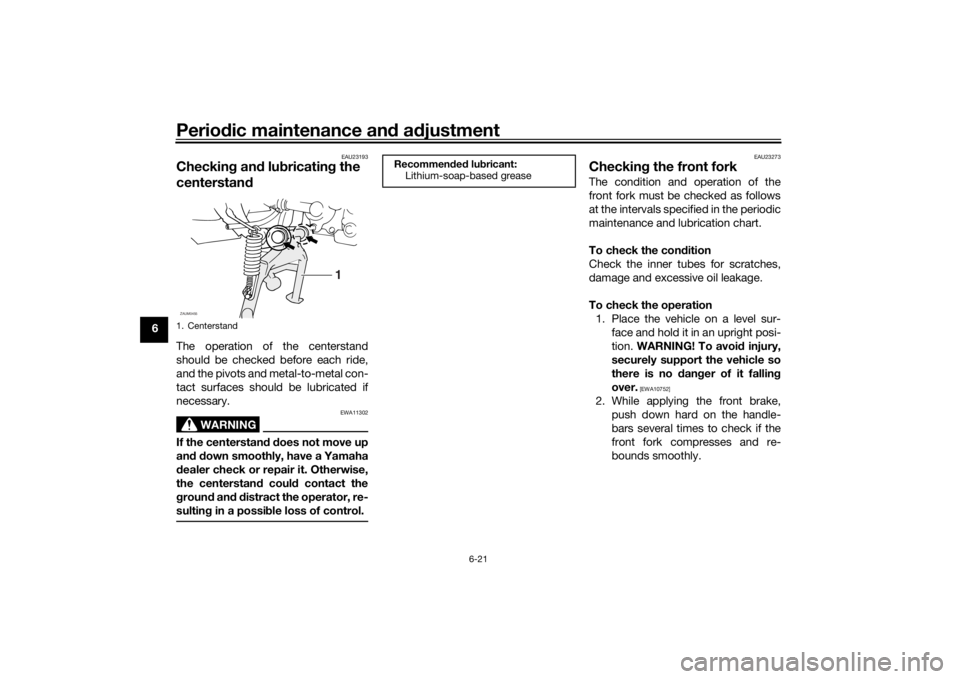
Checking and lubricating the
centerstandThe operation of the centerstand
should be checked before each ride,
and the pivots and metal-to-metal con-
tact surfaces should be lubricated if
necessary.
WARNING
EWA11302
If the centerstand does not move up
and down smoothly, have a Yamaha
dealer check or repair it. Otherwise,
the centerstand could contact the
ground and distract the operator, re-
sulting in a possible loss of control.
EAU23273
Checking the front forkThe condition and operation of the
front fork must be checked as follows
at the intervals specified in the periodic
maintenance and lubrication chart.
To check the condition
Check the inner tubes for scratches,
damage and excessive oil leakage.
To check the operation
1. Place the vehicle on a level sur-
face and hold it in an upright posi-
tion. WARNING! To avoid injury,
securely support the vehicle so
there is no danger of it falling
over.
[EWA10752]
2. While applying the front brake,
push down hard on the handle-
bars several times to check if the
front fork compresses and re-
bounds smoothly.
1. Centerstand
1
ZAUM0455
Recommended lubricant:
Lithium-soap-based grease
U1GBE1E0.book Page 21 Tuesday, October 17, 2017 11:45 AM
Page 60 of 78
Periodic maintenance and adjustment
6-25
6After removing and installing
the main fuse, be sure to turn
the main switch from “ ”
to “ ” three times in 3 seconds
intervals to initialize the idle
speed control system.
[ECAM1130]
3. Turn the key to “ ” and turn on
the electrical circuits to check if
the devices operate.
4. If the fuse immediately blows
again, have a Yamaha dealer
check the electrical system.
EAUS1403
Replacing the headlight bulbIf the headlight bulb burns out, replace
it as follows.NOTICE
ECA10651
Take care not to damage the follow-
ing parts:
Headlight bulb
Do not touch the glass part of
the headlight bulb to keep it free
from oil, otherwise the transpar-
ency of the glass, the luminosity
of the bulb, and the bulb life will
be adversely affected. Thor-
oughly clean off any dirt and fin-
gerprints on the headlight bulb
using a cloth moistened with al-
cohol or thinner.
Headlight lens
Do not affix any type of tinted
film or stickers to the headlight
lens.
Do not use a headlight bulb of a
wattage higher than specified.
NOTICE
ECA10671
It is advisable to have a Yamaha
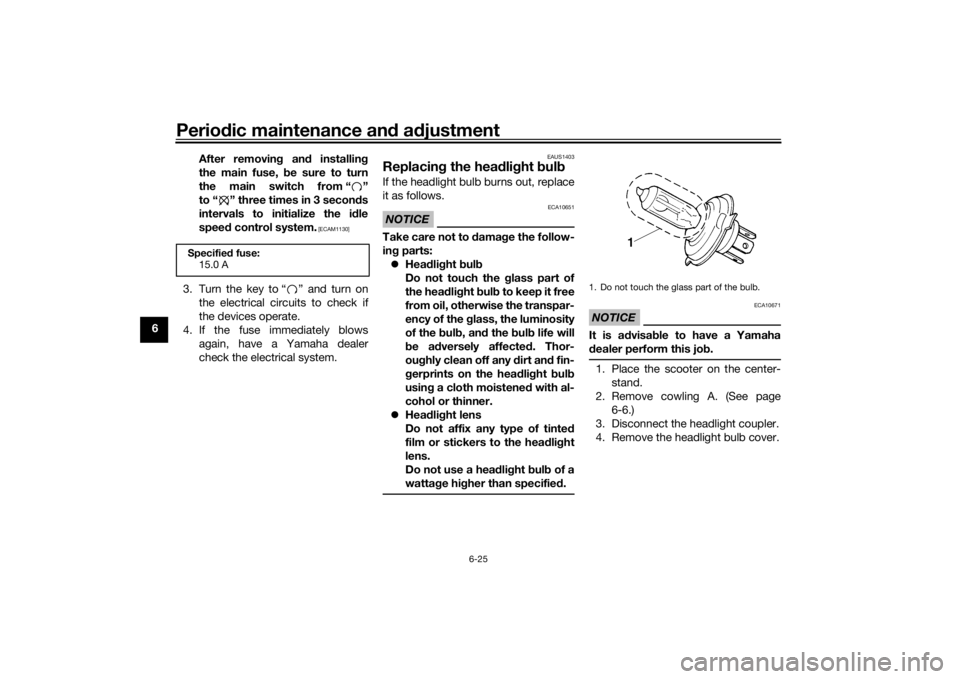
dealer perform this job.1. Place the scooter on the center-
stand.
2. Remove cowling A. (See page
6-6.)
3. Disconnect the headlight coupler.
4. Remove the headlight bulb cover.
Specified fuse:
15.0 A
1. Do not touch the glass part of the bulb.
U1GBE1E0.book Page 25 Tuesday, October 17, 2017 11:45 AM
Page 69 of 78
Scooter care and storage
7-4
7
EAU36564
StorageShort-term
Always store your scooter in a cool, dry
place and, if necessary, protect it
against dust with a porous cover. Be
sure the engine and the exhaust sys-
tem are cool before covering the
scooter.NOTICE
ECA10821
Storing the scooter in a poorly
ventilated room or covering it
with a tarp, while it is still wet,
will allow water and humidity to
seep in and cause rust.
To prevent corrosion, avoid
damp cellars, stables (because
of the presence of ammonia)
and areas where strong chemi-
cals are stored.Long-term
Before storing your scooter for several
months:
1. Follow all the instructions in the
“Care” section of this chapter.2. Fill up the fuel tank and add fuel
stabilizer (if available) to prevent
the fuel tank from rusting and the
fuel from deteriorating.
3. Perform the following steps to
protect the cylinder, piston rings,
etc. from corrosion.
a. Remove the spark plug cap
and spark plug.
b. Pour a teaspoonful of engine
oil into the spark plug bore.
c. Install the spark plug cap onto
the spark plug, and then place
the spark plug on the cylinder
head so that the electrodes are
grounded. (This will limit spark-
ing during the next step.)
d. Turn the engine over several
times with the starter. (This will
coat the cylinder wall with oil.)
e. Remove the spark plug cap
from the spark plug, and then
install the spark plug and the
spark plug cap. WARNING! To
prevent damage or injury
from sparking, make sure to
ground the spark plug elec-
trodes while turning the en-
gine over.
[EWA10952]
4. Lubricate all control cables and
the pivoting points of all levers and
pedals as well as of the side-
stand/centerstand.
5. Check and, if necessary, correct
the tire air pressure, and then lift
the scooter so that both of its
wheels are off the ground. Alterna-
tively, turn the wheels a little every
month in order to prevent the tires
from becoming degraded in one
spot.
6. Cover the muffler outlet with a
plastic bag to prevent moisture
from entering it.
7. Remove the battery and fully
charge it. Store it in a cool, dry
place and charge it once a month.
Do not store the battery in an ex-
cessively cold or warm place [less
than 0 °C (30 °F) or more than 30
°C (90 °F)]. For more information
on storing the battery, see page
6-23.TIPMake any necessary repairs before
storing the scooter.
U1GBE1E0.book Page 4 Tuesday, October 17, 2017 11:45 AM