2018 YAMAHA AEROX50 brake fluid
[x] Cancel search: brake fluidPage 6 of 78

Table of contentsSafety information............................ 1-1
Further safe-riding points ............... 1-5
Description....................................... 2-1
Left view ......................................... 2-1
Right view ....................................... 2-2
Controls and instruments ............... 2-3
Instrument and control functions... 3-1
Main switch/steering lock............... 3-1
Indicator lights and warning
lights............................................ 3-2
Multi-function display ..................... 3-3
Handlebar switches ........................ 3-6
Front brake lever ............................ 3-7
Rear brake lever ............................. 3-7
Fuel tank cap .................................. 3-7
Fuel ................................................. 3-8
Catalytic converter ....................... 3-10
Kickstarter .................................... 3-10
Seats ............................................ 3-11
Storage compartment .................. 3-12
For your safety – pre-operation
checks............................................... 4-1
Operation and important riding
points................................................ 5-1
Starting a cold engine .................... 5-1
Starting off ...................................... 5-2
Acceleration and deceleration ........ 5-2Braking ............................................ 5-3
Tips for reducing fuel
consumption ................................ 5-3
Engine break-in ............................... 5-4
Parking ............................................ 5-4
Periodic maintenance and
adjustment........................................ 6-1
Periodic maintenance chart for the
emission control system .............. 6-2
General maintenance and
lubrication chart ........................... 6-3
Removing and installing the
cowling and panel........................ 6-6
Checking the spark plug ................. 6-7
Engine oil and oil strainer ................ 6-9
Final transmission oil..................... 6-11
Coolant.......................................... 6-12
Replacing the air filter element
and cleaning the check hose..... 6-13
Checking the throttle grip free
play ............................................ 6-14
Valve clearance ............................. 6-14
Tires .............................................. 6-15
Cast wheels................................... 6-16
Checking the front and rear brake
lever free play ............................ 6-17
Checking the front and rear brake
pads ........................................... 6-17
Checking the brake fluid level ....... 6-18
Changing the brake fluid ............... 6-19Checking and lubricating the
cables ........................................ 6-19
Checking and lubricating the
throttle grip and cable ............... 6-20
Lubricating the front and rear
brake levers ............................... 6-20
Checking and lubricating the
centerstand ............................... 6-21
Checking the front fork ................. 6-21
Checking the steering................... 6-22
Checking the wheel bearings ....... 6-22
Battery .......................................... 6-23
Replacing the fuse ........................ 6-24
Replacing the headlight bulb ........ 6-25
Replacing the auxiliary light bulb
(for CHE) .................................... 6-26
Replacing the tail/brake light
bulb ........................................... 6-27
Replacing a turn signal light
bulb ........................................... 6-27
License plate light......................... 6-28
Troubleshooting............................ 6-28
Troubleshooting charts................. 6-29
Scooter care and storage................ 7-1
Matte color caution......................... 7-1
Care ................................................ 7-1
Storage ........................................... 7-4U1GBE1E0.book Page 1 Tuesday, October 17, 2017 11:45 AM
Page 30 of 78

For your safety – pre-operation checks
4-1
4
EAU15599
Inspect your vehicle each time you use it to make sure the vehicle is in safe operating condition. Always follow the inspection
and maintenance procedures and schedules described in the Owner’s Manual.
WARNING
EWA11152
Failure to inspect or maintain the vehicle properly increases the possibility of an accident or equipment damage.
Do not operate the vehicle if you find any problem. If a problem cannot be corrected by the procedures provided in
this manual, have the vehicle inspected by a Yamaha dealer.Before using this vehicle, check the following points:
ITEM CHECKS PAGE
Fuel• Check fuel level in fuel tank.
• Refuel if necessary.
• Check fuel line for leakage.3-8
Engine oil• Check oil level in engine.
• If necessary, add recommended oil to specified level.
• Check vehicle for oil leakage.6-9
Final transmission oil• Check vehicle for oil leakage. 6-11
Coolant• Check coolant level in reservoir.
• If necessary, add recommended coolant to specified level.
• Check cooling system for leakage.6-12
Front brake• Check operation.
• If soft or spongy, have Yamaha dealer bleed hydraulic system.
• Check brake pads for wear.
• Replace if necessary.
• Check fluid level in reservoir.
• If necessary, add specified brake fluid to specified level.
• Check hydraulic system for leakage.6-17, 6-17, 6-18
U1GBE1E0.book Page 1 Tuesday, October 17, 2017 11:45 AM
Page 31 of 78

For your safety – pre-operation checks
4-2
4
Rear brake• Check operation.
• If soft or spongy, have Yamaha dealer bleed hydraulic system.
• Check brake pads for wear.
• Replace if necessary.
• Check fluid level in reservoir.
• If necessary, add specified brake fluid to specified level.
• Check hydraulic system for leakage.6-17, 6-17, 6-18
Throttle grip• Make sure that operation is smooth.
• Check throttle grip free play.
• If necessary, have Yamaha dealer adjust throttle grip free play and lubricate ca-
ble and grip housing.6-14, 6-20
Wheels and tires• Check for damage.
• Check tire condition and tread depth.
• Check air pressure.
• Correct if necessary.6-15, 6-16
Brake levers• Make sure that operation is smooth.
• Lubricate lever pivoting points if necessary.6-20
Centerstand• Make sure that operation is smooth.
• Lubricate pivot if necessary.6-21
Chassis fasteners• Make sure that all nuts, bolts and screws are properly tightened.
• Tighten if necessary.—
Instruments, lights, signals
and switches• Check operation.
• Correct if necessary.—
Battery• Check fluid level.
• Fill with distilled water if necessary.6-23 ITEM CHECKS PAGE
U1GBE1E0.book Page 2 Tuesday, October 17, 2017 11:45 AM
Page 38 of 78

Periodic maintenance and adjustment
6-3
6
EAU1771B
General maintenance and lubrication chartNO. ITEM CHECK OR MAINTENANCE JOBODOMETER READING
ANNUAL
CHECK 1000 km
(600 mi)6000 km
(3500 mi)12000 km
(7000 mi)18000 km
(10500 mi)24000 km
(14000 mi)
1*Air filter element• Replace.√√√√√
2 Air filter check hose• Clean.√√√√√
3*Battery• Check electrolyte level and spe-
cific gravity.
• Make sure that the breather hose
is properly routed.√√√√√
4*Front brake• Check operation, fluid level and
vehicle for fluid leakage.√√√√√√
• Replace brake pads. Whenever worn to the limit
5*Rear brake• Check operation, fluid level and
vehicle for fluid leakage.√√√√√√
• Replace brake pads. Whenever worn to the limit
6*Brake hoses• Check for cracks or damage.
• Check for correct routing and
clamping.√√√√√
• Replace. Every 4 years
7*Brake fluid• Change. Every 2 years
8*Wheels• Check runout and for damage.√√√√
9*Tires• Check tread depth and for dam-
age.
• Replace if necessary.
• Check air pressure.
• Correct if necessary.√√√√√
U1GBE1E0.book Page 3 Tuesday, October 17, 2017 11:45 AM
Page 40 of 78

Periodic maintenance and adjustment
6-5
6
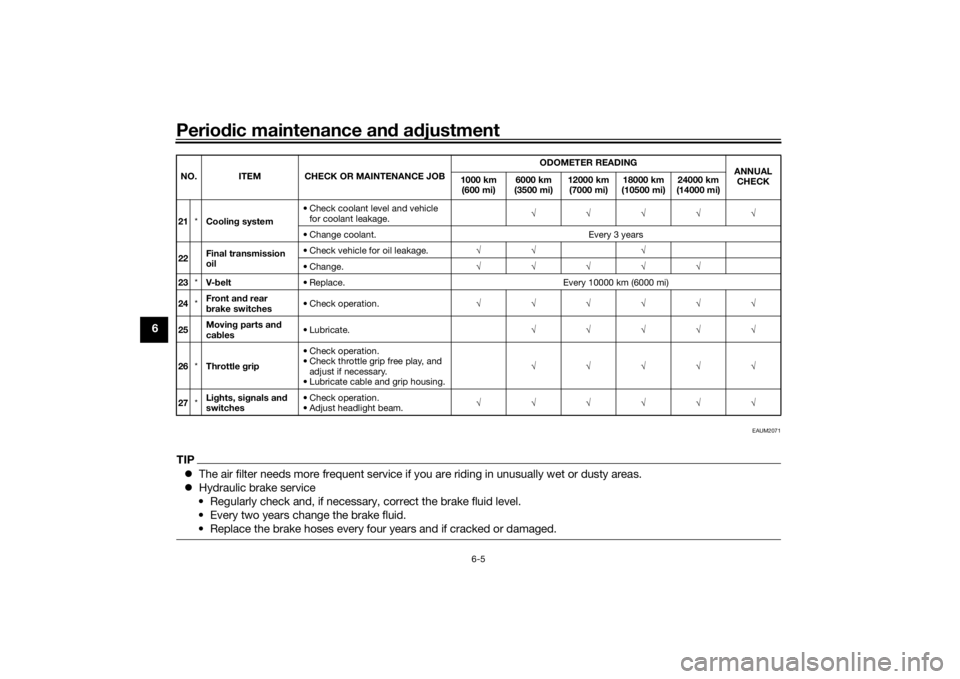
EAUM2071
TIPThe air filter needs more frequent service if you are riding in unusually wet or dusty areas.
Hydraulic brake service
• Regularly check and, if necessary, correct the brake fluid level.
• Every two years change the brake fluid.
• Replace the brake hoses every four years and if cracked or damaged.21*Cooling system• Check coolant level and vehicle
for coolant leakage.√√√√√
• Change coolant. Every 3 years
22Final transmission
oil• Check vehicle for oil leakage.√√ √
• Change.√√√√√
23*V-belt• Replace. Every 10000 km (6000 mi)
24*Front and rear
brake switches• Check operation.√√√√√√
25Moving parts and
cables• Lubricate.√√√√√
26*Throttle grip• Check operation.
• Check throttle grip free play, and
adjust if necessary.
• Lubricate cable and grip housing.√√√√√
27*Lights, signals and
switches• Check operation.
• Adjust headlight beam.√√√√√√ NO. ITEM CHECK OR MAINTENANCE JOBODOMETER READING
ANNUAL
CHECK 1000 km
(600 mi)6000 km
(3500 mi)12000 km
(7000 mi)18000 km
(10500 mi)24000 km
(14000 mi)U1GBE1E0.book Page 5 Tuesday, October 17, 2017 11:45 AM
Page 53 of 78

Periodic maintenance and adjustment
6-18
6 indicator groove has almost disap-
peared, have a Yamaha dealer replace
the brake pads as a set.
EAU22501
Rear brake pads
Check each rear brake pad for damage
and measure the lining thickness. If a
brake pad is damaged or if the lining
thickness is less than 1 mm (0.04 in),
have a Yamaha dealer replace the
brake pads as a set.
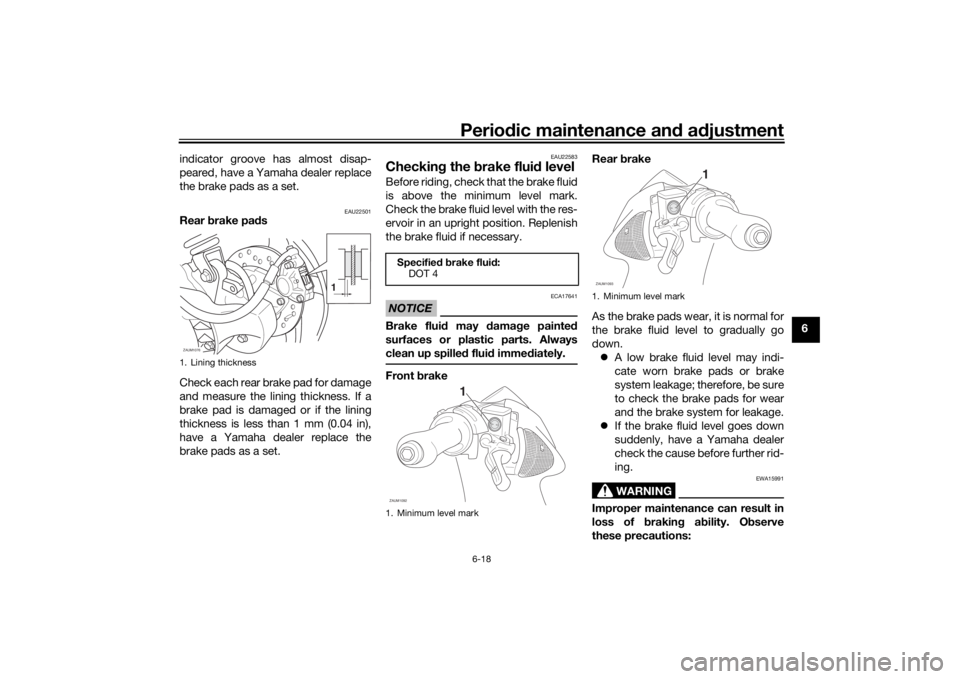
EAU22583
Checking the brake fluid levelBefore riding, check that the brake fluid
is above the minimum level mark.
Check the brake fluid level with the res-
ervoir in an upright position. Replenish
the brake fluid if necessary.NOTICE
ECA17641
Brake fluid may damage painted
surfaces or plastic parts. Always
clean up spilled fluid immediately.Front brakeRear brake
As the brake pads wear, it is normal for
the brake fluid level to gradually go
down.
A low brake fluid level may indi-
cate worn brake pads or brake
system leakage; therefore, be sure
to check the brake pads for wear
and the brake system for leakage.
If the brake fluid level goes down
suddenly, have a Yamaha dealer
check the cause before further rid-
ing.
WARNING
EWA15991
Improper maintenance can result in
loss of braking ability. Observe
these precautions:
1. Lining thickness
1
ZAUM1076
Specified brake fluid:
DOT 4
1. Minimum level mark
1
ZAUM1092
1. Minimum level mark
1
ZAUM1093
U1GBE1E0.book Page 18 Tuesday, October 17, 2017 11:45 AM
Page 54 of 78

Periodic maintenance and adjustment
6-19
6Insufficient brake fluid may al-
low air to enter the brake sys-
tem, reducing braking
performance.
Clean the filler cap before re-
moving. Use only DOT 4 brake
fluid from a sealed container.
Use only the specified brake flu-
id; otherwise, the rubber seals
may deteriorate, causing leak-
age.
Refill with the same type of
brake fluid. Adding a brake fluid
other than DOT 4 may result in a
harmful chemical reaction.
Be careful that water does not
enter the brake fluid reservoir
when refilling. Water will signifi-
cantly lower the boiling point of
the fluid and may result in vapor
lock.
EAUM1362
Changing the brake fluidHave a Yamaha dealer change the
brake fluid at the intervals specified in
the periodic maintenance and lubrica-
tion chart. In addition, have the brake
hose replaced every four years and
whenever it is damaged or leaking.
EAU23098
Checking and lubricating the
cablesThe operation of all control cables and
the condition of the cables should be
checked before each ride, and the ca-
bles and cable ends should be lubri-
cated if necessary. If a cable is
damaged or does not move smoothly,
have a Yamaha dealer check or re-
place it. WARNING! Damage to the
outer housing of cables may result
in internal rusting and cause inter-
ference with cable movement. Re-
place damaged cables as soon as
possible to prevent unsafe condi-
tions.
[EWA10712]
Recommended lubricant:
Yamaha cable lubricant or other
suitable cable lubricant
U1GBE1E0.book Page 19 Tuesday, October 17, 2017 11:45 AM
Page 67 of 78

Scooter care and storage
7-2
7 off any detergent residue using
plenty of water, as it is harmful
to plastic parts.
Do not use any harsh chemical
products on plastic parts. Be
sure to avoid using cloths or
sponges which have been in
contact with strong or abrasive
cleaning products, solvent or
thinner, fuel (gasoline), rust re-
movers or inhibitors, brake fluid,
antifreeze or electrolyte.
Do not use high-pressure wash-
ers or steam-jet cleaners since
they cause water seepage and
deterioration in the following ar-
eas: seals (of wheel and swing-
arm bearings, fork and brakes),
electric components (couplers,
connectors, instruments,
switches and lights), breather
hoses and vents.
For scooters equipped with a
windshield: Do not use strong
cleaners or hard sponges as
they will cause dulling
or
scratching. Some cleaning
compounds for plastic may
leave scratches on the wind-shield. Test the product on a
small hidden part of the wind-
shield to make sure that it does
not leave any marks. If the wind-
shield is scratched, use a quality
plastic polishing compound af-
ter washing.
After normal useRemove dirt with warm water, a mild
detergent, and a soft, clean sponge,
and then rinse thoroughly with clean
water. Use a toothbrush or bottlebrush
for hard-to-reach areas. Stubborn dirt
and insects will come off more easily if
the area is covered with a wet cloth for
a few minutes before cleaning.
After riding in the rain, near the sea oron salt-sprayed roadsSince sea salt or salt sprayed on the
roads during winter are extremely cor-
rosive in combination with water, carry
out the following steps after each ride
in the rain, near the sea or on salt-
sprayed roads.
TIPSalt sprayed on roads in the winter
may remain well into spring.1. Clean the scooter with cold water
and a mild detergent after the en-
gine has cooled down. NOTICE:
Do not use warm water since it
increases the corrosive action
of the salt.
[ECA10792]
2. Apply a corrosion protection spray
on all metal, including chrome-
and nickel-plated, surfaces to pre-
vent corrosion.
Cleaning the windshieldAvoid using any alkaline or strong acid
cleaner, gasoline, brake fluid, or any
other solvent. Clean the windshield
with a cloth or sponge dampened with
a mild detergent, and then wash it off
thoroughly with water. For additional
cleaning, use Yamaha Windshield
Cleaner or another high-quality wind-
shield cleaner. Some cleaning com-
pounds for plastics may leave
scratches on the windshield. Before
using such cleaners, test an area of the
U1GBE1E0.book Page 2 Tuesday, October 17, 2017 11:45 AM