2018 VOLVO XC60 T8 lock
[x] Cancel search: lockPage 190 of 674

SEATS AND STEERING WHEEL
* Option/accessory.
188 •
Adjusting front seat side bolster settings
*
(p. 186)
• Adjusting front seat lumbar support
* (p. 186)
Folding down the rear seatbackrests
The rear seat backrest is split into two sections. The two sections can be folded forward individu-ally.
WARNING
• Adjust the seat and ensure it locks into position before driving. Use caution whenadjusting the seat. Uncontrolled or care-less adjustments could lead to injury.
• Long objects must always be securelytied down to help prevent injury or dam-age in the event of sudden braking.
• Always turn off the engine and apply theparking brake when loading or unloadingthe vehicle.
• Put the gear selector in
P to help prevent
the gear selector from being inadvertentlymoved.
CAUTION
When the backrest is folded down, make sure there are no objects in the rear seat, and theseat belts are not buckled. Otherwise there isa risk of damage to the upholstery.
CAUTION
The armrest * in the center seat must be
raised before the seat backrest is folded down. If the vehicle has private locking, the ski hatch must be closed before the seat backrest isfolded down.
NOTE
The front seats may need to be pushed for- ward and/or the backrest adjusted so that therear seat backrests can be fully lowered.
Page 191 of 674

SEATS AND STEERING WHEEL
}}
* Option/accessory.189
Folding down the backrests
Models with the electric backrest fold-down
function
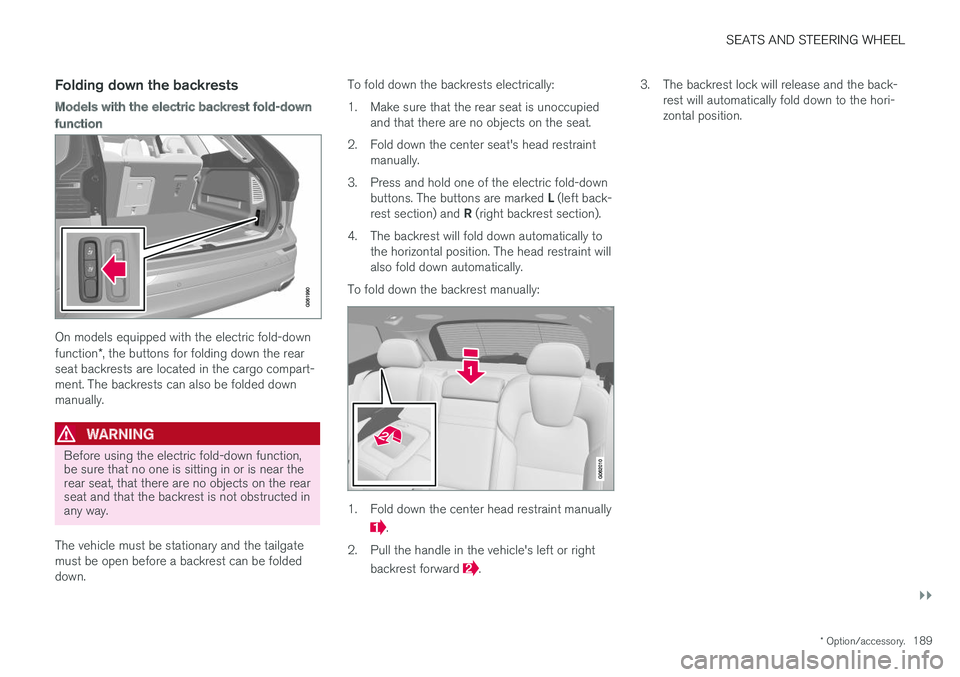
On models equipped with the electric fold-down function*, the buttons for folding down the rear
seat backrests are located in the cargo compart- ment. The backrests can also be folded downmanually.
WARNING
Before using the electric fold-down function, be sure that no one is sitting in or is near therear seat, that there are no objects on the rearseat and that the backrest is not obstructed inany way.
The vehicle must be stationary and the tailgate must be open before a backrest can be foldeddown. To fold down the backrests electrically:
1. Make sure that the rear seat is unoccupied
and that there are no objects on the seat.
2. Fold down the center seat's head restraint manually.
3. Press and hold one of the electric fold-down buttons. The buttons are marked L (left back-
rest section) and R (right backrest section).
4. The backrest will fold down automatically to the horizontal position. The head restraint will also fold down automatically.
To fold down the backrest manually:
1. Fold down the center head restraint manually
.
2. Pull the handle in the vehicle's left or right backrest forward
. 3. The backrest lock will release and the back-
rest will automatically fold down to the hori- zontal position.
Page 192 of 674

||
SEATS AND STEERING WHEEL
190
Models without the electric backrest fold-
down function
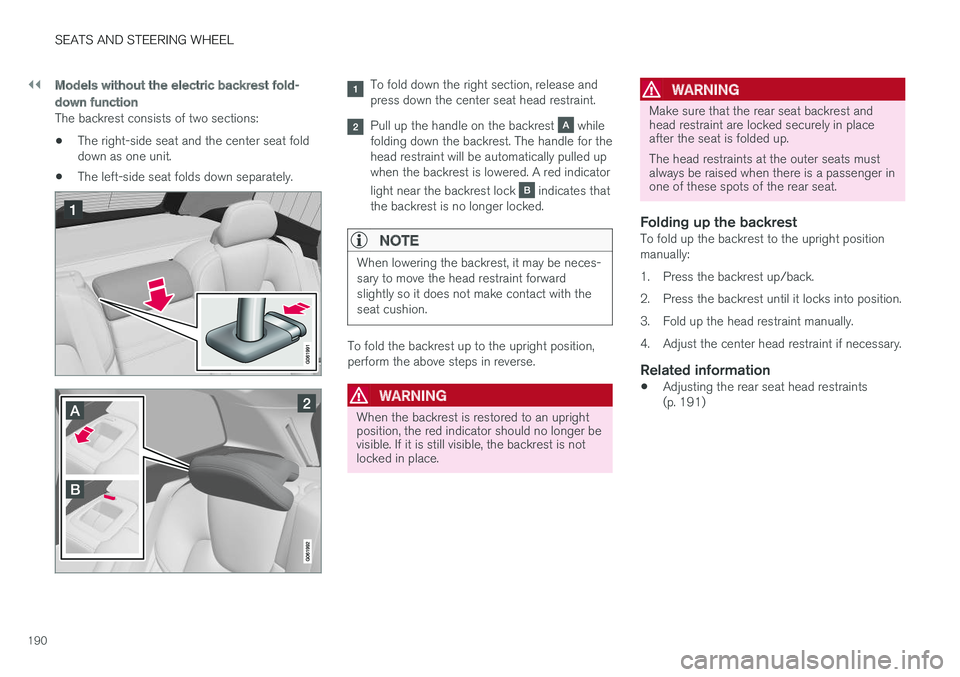
The backrest consists of two sections: •The right-side seat and the center seat fold down as one unit.
• The left-side seat folds down separately.
To fold down the right section, release and press down the center seat head restraint.
Pull up the handle on the backrest while
folding down the backrest. The handle for the head restraint will be automatically pulled upwhen the backrest is lowered. A red indicator light near the backrest lock
indicates that
the backrest is no longer locked.
NOTE
When lowering the backrest, it may be neces- sary to move the head restraint forwardslightly so it does not make contact with theseat cushion.
To fold the backrest up to the upright position, perform the above steps in reverse.
WARNING
When the backrest is restored to an upright position, the red indicator should no longer bevisible. If it is still visible, the backrest is notlocked in place.
WARNING
Make sure that the rear seat backrest and head restraint are locked securely in placeafter the seat is folded up. The head restraints at the outer seats must always be raised when there is a passenger inone of these spots of the rear seat.
Folding up the backrestTo fold up the backrest to the upright position manually:
1. Press the backrest up/back.
2. Press the backrest until it locks into position.
3. Fold up the head restraint manually.
4. Adjust the center head restraint if necessary.
Related information
• Adjusting the rear seat head restraints (p. 191)
Page 194 of 674

||
SEATS AND STEERING WHEEL
* Option/accessory.
192 Tap the
Headrest Fold button
to activate/deactivate folding.
Manually push the head restraint until it clicks into position.
WARNING
Do not lower the head restraint if there are passengers in any of the rear seats.
WARNING
The head restraint must be locked in the upright position after it has been folded up.
Manually folding down the rear seat's outboard head restraints
For models with electrically folding backrests *,
the outboard head restraints are folded manually using the control on the top of the seat (see illus- tration
). For vehicles without electrically fold-
ing backrests, fold down the outboard head restraints using the inner control on the top of the seat (see illustration
).
Related information
• Folding down the rear seat backrests (p. 188)
Steering wheel controls and horn The steering wheel has a horn and controls for e.g. driver support systems and voice control.
Steering wheel keypads and paddles
*.
Driver support system controls 2
.
Paddle * for manually shifting gears (auto-
matic transmission).
Controls for voice commands, adjusting the head-up display, accessing menus and mes-sages, and handling phone calls.
2 Speed limiter *, Cruise Control, Adaptive Cruise Control *, Distance Alert * and Pilot Assist *.
Page 195 of 674

SEATS AND STEERING WHEEL
193
Horn
The horn is located in the center of the steering wheel.
Related information
•Adjusting the steering wheel (p. 193)
Adjusting the steering wheel
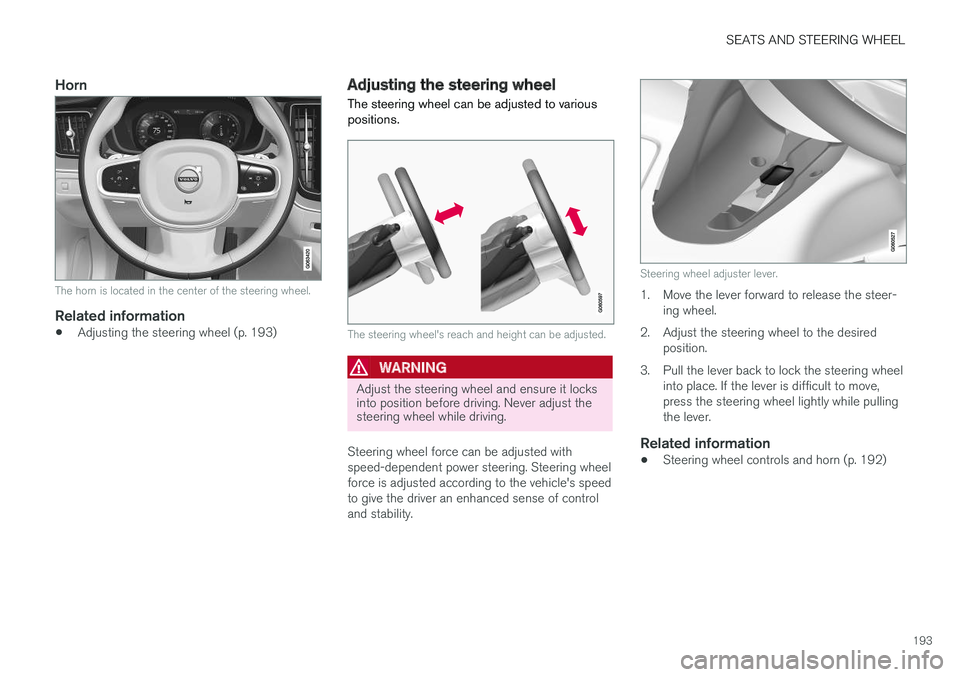
The steering wheel can be adjusted to various positions.
The steering wheel's reach and height can be adjusted.
WARNING
Adjust the steering wheel and ensure it locks into position before driving. Never adjust thesteering wheel while driving.
Steering wheel force can be adjusted with speed-dependent power steering. Steering wheelforce is adjusted according to the vehicle's speedto give the driver an enhanced sense of controland stability.
Steering wheel adjuster lever.
1. Move the lever forward to release the steer- ing wheel.
2. Adjust the steering wheel to the desired position.
3. Pull the lever back to lock the steering wheel into place. If the lever is difficult to move, press the steering wheel lightly while pullingthe lever.
Related information
• Steering wheel controls and horn (p. 192)
Page 198 of 674

CLIMATE CONTROL
* Option/accessory.
196
Climate
The vehicle is equipped with electronic climate control. The climate system cools, heats anddehumidifies the air in the passenger compart-ment.
All of the climate system functions are controlled from the center display and the buttons on thecenter console. Certain rear seat functions can also be controlled from the climate controls * on the rear of the tun-
nel console.
Related information
• Climate zones (p. 196)
• Climate control sensors (p. 196)
• Perceived temperature (p. 197)
• Climate control system voice commands (p. 197)
• Parking climate (p. 220)
• Air quality (p. 198)
• Air distribution (p. 201)
• Climate system controls (p. 208)
Climate zones
The vehicle is divided into climate zones to make it possible to set different temperatures for dif-ferent parts of the passenger compartment.
2-zone climate system
Climate zones with 2-zone climate system.
In 2-zone climate systems, the passenger com- partment temperature can be set separately forthe left and right sides of the vehicle.
Related information
• Climate (p. 196)
Climate control sensors
The climate system has a number of sensors to help regulate the climate settings in the vehicle.
Location of the sensors
Humidity sensor - in the rearview mirror con- sole.
Ambient temperature sensor - in the right- side door mirror.
Sunlight sensors - on the upper side of the dashboard.
Passenger compartment temperature sensor - near the buttons in the center console.
NOTE
Do not cover or block the sensors with cloth- ing or other objects.
Page 202 of 674

CLIMATE CONTROL
* Option/accessory.
200
Clean Zone Interior Package *
Clean Zone Interior Package (CZIP) is a series of modifications that filters even more allergy andasthma-inducing substances from the passengercompartment.
CZIP includes the following:
• An enhanced function that starts the blower when the vehicle is unlocked using theremote key. The blower will then fill the pas-senger compartment with fresh air. The func-tion starts when required and switches offautomatically after a period of time or whenone of the passenger compartment doors isopened. The amount of time the blower runsgradually decreases due to reduced need upuntil the vehicle is 4 years old.
• The fully automatic Interior Air QualitySystem (IAQS).
Related information
•Air quality (p. 198)
• Clean Zone
* (p. 199)
• Interior Air Quality System
* (p. 200)
• Passenger compartment air filter (p. 201)
Interior Air Quality System
*
Interior Air Quality System (IAQS) is a fully auto- matic air quality system that removes gases andparticles to reduce odors and contaminants inthe passenger compartment.
IAQS is part of the Clean Zone Interior Package (CZIP) and removes air contaminants such asparticles, hydrocarbons, nitric oxides and ground-level ozone. If the system's air quality sensors detect contami- nants in the outside air, the air intake closes andair recirculation is activated.
NOTE
To ensure optimal air quality in the passenger compartment, the air quality sensor shouldalways be engaged. Recirculation is limited in cold weather to pre- vent fogging. In the event of fogging, use the defroster functions for the windshield, side windowsand rear window.
Related information
• Activating and deactivating the air quality sensor
* (p. 201)
• Air quality (p. 198)
• Clean Zone
* (p. 199)
• Clean Zone Interior Package
* (p. 200) •
Passenger compartment air filter (p. 201)
Page 226 of 674

||
CLIMATE CONTROL
2244.
Tap
Date to set a time for a specific date.
Tap
Days to set a time for one or more days
of the week. With
Days: Activate/deactivate the repeat
function by selecting/deselecting the
Repeat weekly checkbox.
5. With
Date: Select a date for preconditioning
by scrolling in the date list using the arrows. With
Days: Select days of the week for pre-
conditioning by tapping the buttons for the days.
6. Set the time at which preconditioning should be completed by scrolling using the arrows inthe clock.
7. Tap
Confirm to add a timer setting.
> The timer setting will be added to the list and activated.
Editing a timer setting1. Open Climate view in the center display. 2. Select the
Parking climate tab.
3. Tap the timer setting you would like to change.
> A pop-up window will appear.
4. To edit a timer setting, follow the procedures described under the heading "Adding a timer setting" above.
Activating and deactivatingpreconditioning timer settings
Timer settings in the preconditioning timer can be activated or deactivated as needed.
Timer buttons in the Parking climate tab in Climate
view.
1. Open Climate view in the center display. 2. Select the
Parking climate tab.
3. Activate/deactivate a timer setting by tap- ping the timer button to the right of the set- ting.
> The timer setting is activated/deactivatedand the button lights up/goes out.
Deleting preconditioning timersettings
The button for editing a list/deleting a timer setting in the Parking climate tab in Climate view.
1. Open Climate view in the center display. 2.
Select the
Parking climate tab.
3. Tap
Edit list.
4. Tap the editing icon to the right in the list. >The icon will change to the text
Delete.
5. Tap
Delete to confirm.
> The timer setting will be deleted from the list.