2018 VOLVO XC60 T8 tailgate
[x] Cancel search: tailgatePage 580 of 674

||
LOADING, STORAGE AND PASSENGER COMPARTMENT
* Option/accessory.
578
Extra cargo space
The rear seat backrests can be folded down to increase cargo compartment space and simplifyloading. If the rear seat backrests are foldeddown, make sure that no objects loaded into thevehicle prevent the WHIPS system for the frontseats from functioning correctly. The ski hatch in the rear seat can be folded down to carry skis or other long, thin objects.
Raising/lowering the rear end of the
vehicle *
The rear end of the vehicle can be lowered orraised for easier loading or to facilitate attaching a trailer*.
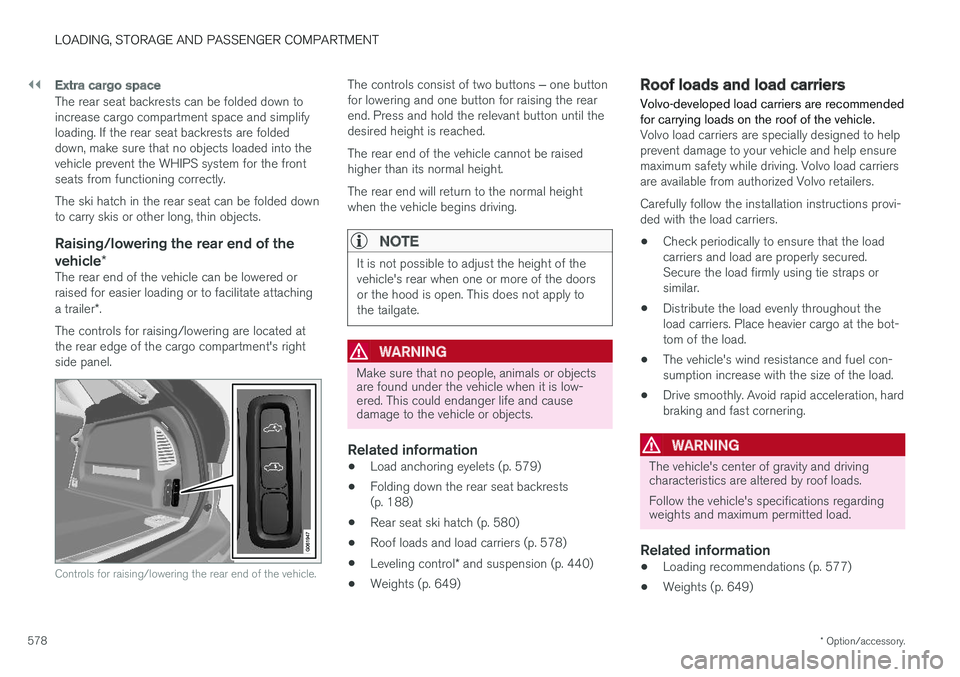
The controls for raising/lowering are located at the rear edge of the cargo compartment's rightside panel.
Controls for raising/lowering the rear end of the vehicle.
The controls consist of two buttons ‒ one button
for lowering and one button for raising the rear end. Press and hold the relevant button until thedesired height is reached. The rear end of the vehicle cannot be raised higher than its normal height. The rear end will return to the normal height when the vehicle begins driving.
NOTE
It is not possible to adjust the height of the vehicle's rear when one or more of the doorsor the hood is open. This does not apply tothe tailgate.
WARNING
Make sure that no people, animals or objects are found under the vehicle when it is low-ered. This could endanger life and causedamage to the vehicle or objects.
Related information
• Load anchoring eyelets (p. 579)
• Folding down the rear seat backrests (p. 188)
• Rear seat ski hatch (p. 580)
• Roof loads and load carriers (p. 578)
• Leveling control
* and suspension (p. 440)
• Weights (p. 649)
Roof loads and load carriers Volvo-developed load carriers are recommended for carrying loads on the roof of the vehicle.
Volvo load carriers are specially designed to help prevent damage to your vehicle and help ensuremaximum safety while driving. Volvo load carriersare available from authorized Volvo retailers. Carefully follow the installation instructions provi- ded with the load carriers. •Check periodically to ensure that the load carriers and load are properly secured.Secure the load firmly using tie straps orsimilar.
• Distribute the load evenly throughout theload carriers. Place heavier cargo at the bot-tom of the load.
• The vehicle's wind resistance and fuel con-sumption increase with the size of the load.
• Drive smoothly. Avoid rapid acceleration, hardbraking and fast cornering.
WARNING
The vehicle's center of gravity and driving characteristics are altered by roof loads. Follow the vehicle's specifications regarding weights and maximum permitted load.
Related information
•Loading recommendations (p. 577)
• Weights (p. 649)
Page 583 of 674

LOADING, STORAGE AND PASSENGER COMPARTMENT
* Option/accessory.581
Fitting the tailgate flap
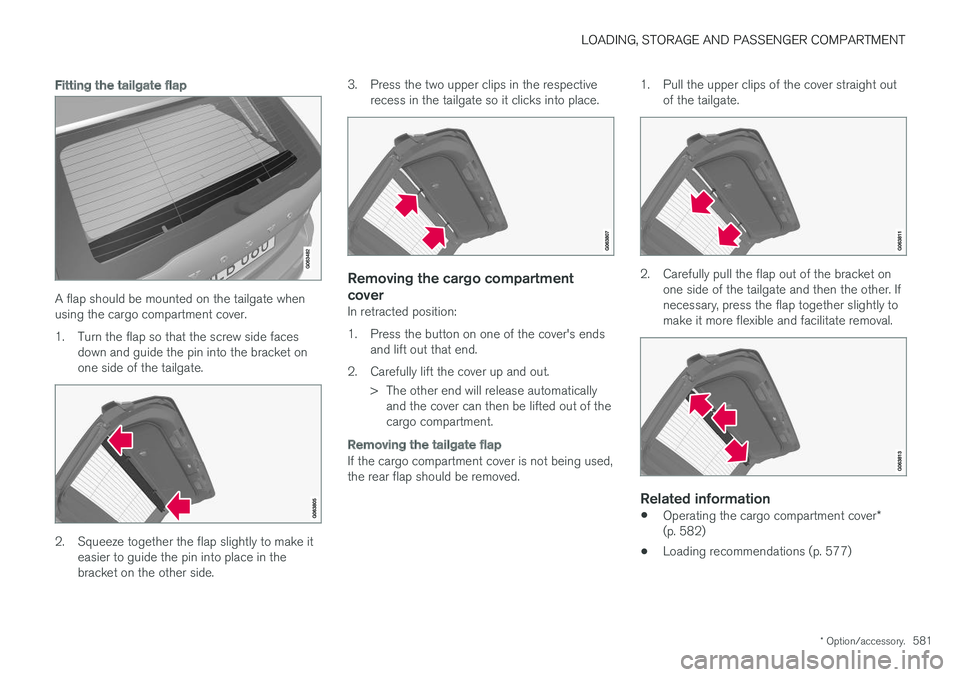
A flap should be mounted on the tailgate when using the cargo compartment cover.
1. Turn the flap so that the screw side faces
down and guide the pin into the bracket on one side of the tailgate.
2. Squeeze together the flap slightly to make iteasier to guide the pin into place in the bracket on the other side. 3. Press the two upper clips in the respective
recess in the tailgate so it clicks into place.
Removing the cargo compartment cover
In retracted position:
1. Press the button on one of the cover's endsand lift out that end.
2. Carefully lift the cover up and out. > The other end will release automaticallyand the cover can then be lifted out of the cargo compartment.
Removing the tailgate flap
If the cargo compartment cover is not being used, the rear flap should be removed. 1. Pull the upper clips of the cover straight out
of the tailgate.
2. Carefully pull the flap out of the bracket onone side of the tailgate and then the other. If necessary, press the flap together slightly tomake it more flexible and facilitate removal.
Related information
• Operating the cargo compartment cover
*
(p. 582)
• Loading recommendations (p. 577)
Page 584 of 674

LOADING, STORAGE AND PASSENGER COMPARTMENT
* Option/accessory.
582
Operating the cargo compartment
cover *
The cover can be used in two positions: fully open to completely cover the cargo compart-ment or partially retracted to make it easier toreach further into the cargo compartment.
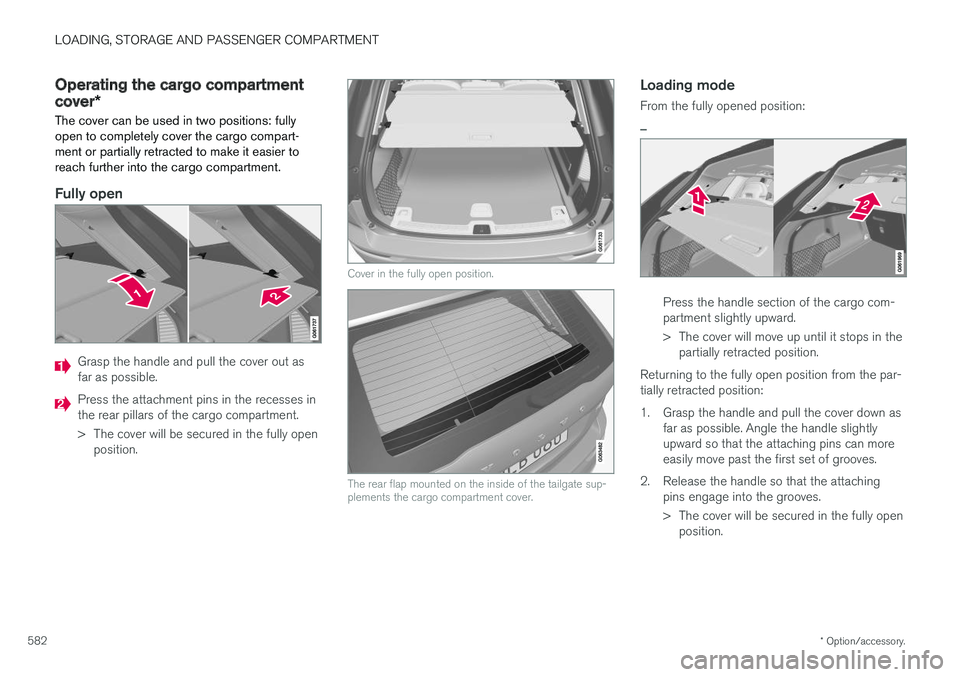
Fully open
Grasp the handle and pull the cover out as far as possible.
Press the attachment pins in the recesses in the rear pillars of the cargo compartment.
> The cover will be secured in the fully open position.
Cover in the fully open position.
The rear flap mounted on the inside of the tailgate sup- plements the cargo compartment cover.
Loading mode
From the fully opened position:
–
Press the handle section of the cargo com- partment slightly upward.
> The cover will move up until it stops in the partially retracted position.
Returning to the fully open position from the par- tially retracted position:
1. Grasp the handle and pull the cover down as far as possible. Angle the handle slightly upward so that the attaching pins can moreeasily move past the first set of grooves.
2. Release the handle so that the attaching pins engage into the grooves.
> The cover will be secured in the fully openposition.
Page 623 of 674

MAINTENANCE AND SERVICE
}}
* Option/accessory.621
Positions
•Fuses 13-17 and 21-36 are "Micro" fuses.
• Fuses 1-12, 18-20 and 37 are "MCase" fuses and should only be replaced by a work- shop 19
.
FunctionAA
Heated rear window 30
– –
Pneumatic suspension * compressor 40
Lock motor for rear seat backrest, right side 15
– –
Lock motor for rear seat backrest, left side15
– –
Control module for reduction of nitrous oxides (diesel)30
Power tailgate
* 25
Power front passenger seat
*20
Towbar
* control module 40
FunctionAA
Seat belt tensioner module (right side) 40
Internal relay windings 5
Control module for reduction of nitrous oxides (diesel)15
Foot movement detection module for opening the power tailgate
*5
USB hub/accessory port –
– –
Towbar
* control module 25
Power driver seat
* 20
Seat belt tensioner module (left side) 40
Park Assist Camera
*5
– –
– –
– –
Feed when ignition is on 10
FunctionAA
Control module for airbags and seat belt tensioners 5
– –
Heated rear seat (left side)
*15
– –
Blind Spot Information (BLIS)
*;
Exterior reverse signal control mod- ule 5
– –
Modules for seat belt tensioners 5
Emissions system actuator (gaso- line, certain engine variants)
5
– –
– –
Heated rear seat (right side)
*15
– –
A
Ampere
19 An authorized Volvo workshop is recommended.
Page 642 of 674

||
MAINTENANCE AND SERVICE
* Option/accessory.
640 The wiper blades will also move out of service position if:
• The windshield wipers are turned on.
• The windshield washers are turned on.
• The rain sensor is activated.
• The vehicle begins moving.
CAUTION
If the wiper arms in service position are raised from the windshield, they must be folded backagainst the windscreen before activating wip-ing, washing or rain sensor as well as beforedeparture. This is to prevent scratching thepaint on the hood.
Related information
• Using the rain sensor (p. 173)
• Using the windshield and headlight washers (p. 175)
• Using automatic rear window wiping whenbacking up (p. 176)
• Heated windshield washer nozzles
* (p. 173)
• Using the rain sensor's memory function(p. 174)
• Using the rear window wiper/washer(p. 176)
• Filling washer fluid (p. 640)
• Replacing windshield wiper blades (p. 638) •
Changing rear window wipers (p. 637)
• Using the windshield wipers (p. 172)
Filling washer fluid
Washer fluid is used to keep the headlights, windshield and rear window clean. Washer fluidcontaining anti-freeze should be used in verycold weather (below-freezing temperatures).
Fill washer fluid into the reservoir with the blue cover. The reservoir is used for the windshieldwasher, tailgate window washer and headlight washer *
NOTE
When there is approximately 1 liter (1 qt) of washer fluid remaining, the message Washer
fluid
Level low, refill and the symbol
will be displayed in the instrument panel.
Page 666 of 674

INDEX
664instrument lighting 159
light bulbs, specifications 604
low beams 151
position lights 150
rear fog light 155
settings 149
Turn signals 154
Lighting, replacing bulbs 603
Limp home 428Load anchoring eyelets cargo compartment 579
Load anchoring hooks 579
Load carriers 578
Load index 544 Loading general 577
load anchoring eyelets 579
long load 578
Lock indication 228 setting 229
Locking/unlocking Tailgate 233, 246
Locking wheel bolts 555 Locks Locking 231
unlocking 231
Long-term storage 411
Low battery charge level start battery 459
Low beams 151
Lower the rear end 578
Low oil level 601
Low-speed driving 443 activate with function button 444
M
Maintained climate comfort 225
start/stop 225
Maintenance 588 corrosion protection 634
Max. axle weight 649
Max. roof load 649
Media player 497, 498, 499 compatible file formats 526, 527
voice control 144
Messages and symbols Adaptive Cruise Control 299
Collision warner with auto-brake 337
Messages in BLIS 343
Messages in display 101, 136 handling 102, 137
saved 103, 138
Mileage 85electric motor 448
Misting condensation in headlights 628, 631
Mood lighting 159
N
Net cargo compartment 584
O
Occupant safety 43
Occupant weight sensor 56
Octane rating 455
Oil, see also Engine oil 652
On-board diagnostics 588
On-board Diagnostic socket 36
Option/accessory 21
Outside temperature gauge 90
Overheating 458, 462
Owner's information 16
OWNER'S MANUAL 21environmental labeling 23
Page 667 of 674

INDEX
665
in cellular phone 20
in the center display 17, 18
P
Paddle at steering wheel 192 Paint
color code 636
paint damage and touch-up 635, 636
Panoramic roof opening and closing 169
pinch protection 162
sun shade 168, 171
ventilation position 170
PAP – Park Assist Pilot 386, 387, 390, 391, 393, 394
Park Assist Camera 377, 378, 379, 381, 382, 384, 385
settings 382
Park Assist Camera limitations 382
Park Assist Pilot 386, 387, 390, 391, 393, 394
function 386, 387, 391, 393, 394
limitations 391
operation 387, 390
Symbols and messages 394
Park Assist Pilot – PAP 386, 387, 390, 391, 393, 394
parking on hills 424
Parking Assist 372, 373, 374, 375, 376 function 372, 373, 374
Parking brake 422 activate and deactivate 423
automatic activation 424
Low battery charge level 425
Parking climate 220 Symbols and messages 226
Passenger compartment filter 201
Passenger compartment interior 570 center console 571
electrical outlet 572
glove compartment 575
sun visor 576
Passenger compartment lighting 158, 159 auto switch 158
Passing assistance 294, 311
personal information (Privacy Policy) 34
Phone 510 changing to another 514
connect 511
connect automatically 513
connect manually 513
delete 515disconnect 514
phone call 515, 517
text message 516
voice control 143
Pilot Assist 301, 304, 305, 306, 307, 309, 311, 312, 313, 314
pass 311
pinch protection 162 resetting 163
PIN code 523
Polishing 629
Position lights 150
Power 651 electric motor 651
Power folding door mirrors 166
Power panoramic roof 168
Power save mode 459
Power seats 181
Power tailgate 251
Power windows 163, 164 pinch protection 162
Preconditioning 221 start/stop 222
timer 223
Pressure wash 632
Privacy Policy 34
Page 670 of 674

INDEX
668Steering assistance at risk of colli-
sion 363, 364, 365, 366, 367, 368, 369, 371 Steering assistance at risk of rear-end col-
lision 368, 369 Steering power level, see Steering wheel
resistance 262 Steering resistance at risk of head-on colli-
sion 366, 367
Steering wheel 192, 193
heating 211, 212
keypad 192
paddle 192
steering wheel adjustment 193
Steering wheel keypad 192
Steering wheel paddles 431 Steering wheel resistance, speed-depend- ent 262
Stone chips and scratches 635, 636
Storage compartments 570 center console 571
glove compartment 575
sun visor 576
Sunroof pinch protection 162
Sun shade panoramic roof 168, 171
pinch protection 162
Sun visor 576mirror lighting 159
Symbols indicator symbols 90
Symbols and messages Adaptive Cruise Control 299
center display's status bar 120
Collision warner with auto-brake 337
hybrid-related 409
parking climate 226
Symbols and messages for Assistance at
risk of collision 371
system updates 591
T
Tailgate locking/unlocking 233, 246
open/close with foot movement 255
power 251
unlocking from inside 249
Technician certification 37 Temperature adjusting 218, 219
perceived 197
Temperature monitoring 401
Temporary spare spare tire 559
Temporary tire sealing system execution, checking 563
Inflating tires 567
location 562
overview 562
sealing compound 562
Terms and conditions services 34
users 526
Tire dimensions 544, 554
Tire pressure decal 549 Tire pressure monitoring calibrating 551
Tires 540 direction of rotation 542
glossary of terms 543
inflation pressure table 655
mounting 558
pressure 655
removal 556
rotation 541
specifications 544, 655
storage 540
tire pressure monitoring 549
tire sealing 562
Tread depth 561