Page 451 of 656

STARTING AND DRIVING
* Option/accessory.449
www.HomeLink.com, www.youtube.com/ HomeLinkGentex or call 1-800-355-3515.
Programming individual buttons
To program an individual HomeLink
®
button:
1. Press and hold the desired button for about 20 seconds.
2. When the indicator light on HomeLink ®
starts flashing slowly, it is possible to pro-gram as usual. Note: If the button you are reprogramming
does not program with a new device, it will return to the previously saved programming.
Resetting the HomeLink ®
buttons
It is only possible to reset all HomeLink ®
buttons
at once. It is not possible to reset individual but-tons. Individual buttons can only be reprogram-med.
–Press and hold the outer buttons (1 and 3) on HomeLink ®
for about 10 seconds.
> When the indicator light goes from a steady glow to flashing, the buttons have been reset and are ready for reprogram-ming.
Related information
• Using HomeLink (p. 449)
• HomeLink ®
* (p. 447)
• Type approval for HomeLink ®
* (p. 450)
Using HomeLink
Once HomeLink ®
is programmed, it can be
used instead of the separate remote controls.
Press and hold the programming button. The garage door, gate, alarm system, etc. will be acti-vated (this may take several seconds). If the but-ton is held down for more than 20 seconds,reprogramming will begin. The indicator light willglow steadily or flash when the button has beenpressed. The original remote controls may be used concurrently with HomeLink ®
if desired.
NOTE
If the ignition is off, HomeLink ®
works for
30 minutes after the driver's door has been opened.
WARNING
• If you use HomeLink ®
to open a garage
door or gate, be sure no one is near the gate or door while it is in motion.
• Do not use HomeLink ®
with any garage
door opener that lacks safety stop andreverse features as required by US fed-eral safety standards (this includes anygarage door opener model manufacturedbefore April 1, 1982). A garage door thatcannot detect an object - signaling thedoor to stop and reverse - does not meetcurrent U.S. federal safety standards. Formore information, contact HomeLink at:www.homelink.com.
Related information
• HomeLink ®
* (p. 447)
• Programming HomeLink ®
* (p. 448)
• Type approval for HomeLink ®
* (p. 450)
Page 453 of 656

STARTING AND DRIVING
}}
* Option/accessory.451
Activating and deactivating thecompass
An integrated compass in the upper right corner of the rearview mirror shows the direction thevehicle is traveling.
Activating and deactivating the compass
The compass is automatically activated when the vehicle is started. To deactivate/activate the compass manually:
–Use a paper clip or similar object to press the button on the bottom of the mirror.
Related information
• Compass (p. 450)
• Calibrating the compass (p. 451)
Calibrating the compass
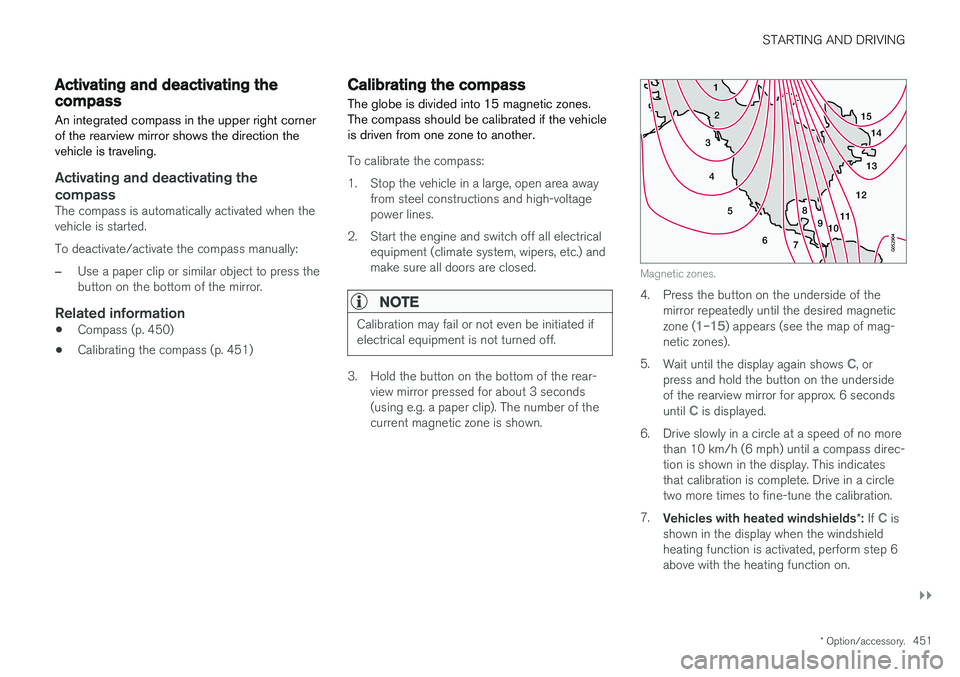
The globe is divided into 15 magnetic zones. The compass should be calibrated if the vehicleis driven from one zone to another.
To calibrate the compass:
1. Stop the vehicle in a large, open area away from steel constructions and high-voltage power lines.
2. Start the engine and switch off all electrical equipment (climate system, wipers, etc.) andmake sure all doors are closed.
NOTE
Calibration may fail or not even be initiated if electrical equipment is not turned off.
3. Hold the button on the bottom of the rear-view mirror pressed for about 3 seconds (using e.g. a paper clip). The number of thecurrent magnetic zone is shown.
15
14
13
12
11
9
8
7
6
5
4
3
2
1
10
Magnetic zones.
4. Press the button on the underside of themirror repeatedly until the desired magnetic zone (
1–15) appears (see the map of mag-
netic zones).
5. Wait until the display again shows
C, or
press and hold the button on the underside of the rearview mirror for approx. 6 seconds until
C is displayed.
6. Drive slowly in a circle at a speed of no more than 10 km/h (6 mph) until a compass direc- tion is shown in the display. This indicatesthat calibration is complete. Drive in a circletwo more times to fine-tune the calibration.
7. Vehicles with heated windshields *: If
C is
shown in the display when the windshield heating function is activated, perform step 6above with the heating function on.
Page 644 of 656

INDEX
642CZIP (Clean Zone Interior Package) 206
D
Data
recording 33 transferring between vehicle and work-
shop 568
Data sharing 504
Daytime running lights 156Decals location of 626
Defrosting 222
Detection of cyclist 333
Dimensions 629
Dipstick, electronic 578
Direction of rotation 520
Disengaging the shiftlock 417
Display lighting 166
Distance Alert 285, 286, 287 limitations 288
DivX ®
480
Door mirrors 173, 175 compass 450, 451
dimming 174
outer 173, 175
power folding 175
resetting 175
Driveline transmission 413
Drive mode 419 changing 421
Driver Alert Control 356 operation 357, 358
Driver Alert Control limitations 358
Driver performance 92, 93
Driver profile 139 edit 141
select 140
Driver support system 266 Driving cooling system 437
with a trailer 440
Driving economy 430
Driving through standing water 432 driving with a trailer towball load 632
towing capacity 632E
ECO climate 421
ECO mode 421
activate with function button 423
Economical driving 421, 430
Electrical outlet 550 use 552
Electrical system 589
Electric parking brake 407
Electronic immobilizer 246
emergency brake lights 163
Emission inspection readiness 566 Engine overheating 437
start 400
Start/Stop 424
turn off 402
Engine compartment coolant 580
engine oil 577
overview 577
Engine drag control 268
Engine oil 577 filling 578
filter 577
grade and volume 634