2018 VOLVO V60 CROSS COUNTRY ABS
[x] Cancel search: ABSPage 319 of 404

WHEELS AND TIRES
}}
317
system that illuminates a low tire pressure telltale (
) when one or more of your tires is signifi-
cantly under-inflated. Accordingly, when the low tire pressure telltale illuminates, you should stopand check your tires as soon as possible, andinflate them to the proper pressure. Driving on a significantly under-inflated tire cau- ses the tire to overheat and can lead to tire fail-ure. Under-inflation also reduces fuel efficiencyand tire tread life, and may affect the vehicle'shandling and stopping ability. Please note that atire pressure monitoring system is not a substi-tute for proper tire maintenance, and it is the driv-er's responsibility to maintain correct tire pres-sure, even if under-inflation has not reached thelevel to trigger illumination of the system's lowtire pressure telltale. Your vehicle has also been equipped with a TPMS malfunction indicator to indicate when thesystem is not operating properly. The monitoringsystem's malfunction indicator is combined withthe low tire pressure telltale. When the system detects a malfunction, the tell- tale will flash for approximately one minute andthen remain continuously illuminated. Thissequence will continue upon subsequent vehiclestart-ups as long as the malfunction exists. Whenthe malfunction indicator is illuminated, the sys-tem may not be able to detect or signal low tirepressure as intended. System malfunctions may occur for a variety ofreasons, including the installation of replacementor alternate tires or wheels on the vehicle thatprevent the tire pressure monitoring system fromfunctioning properly. Always check the system's malfunction telltale after replacing one or more tires or wheels onyour vehicle to ensure that the replacement oralternate tires and wheels allow the system tocontinue to function properly.
NOTE
The system indicates low tire pressure but does not replace normal tire maintenance. Forinformation on correct tire pressure, pleaserefer to the tire inflation decal on the driver'sdoor opening or consult your Volvo retailer.
WARNING
Incorrect inflation pressure could lead to tire failure, resulting in a loss of control of thevehicle.
Related information
•
Tire Monitor - introduction (p. 317)
• Tire Pressure Monitoring System (TPMS) – general information (p. 320)
Tire Monitor - introduction Tire Monitor uses the rotational speed of the tires in combination with signal analysis of theABS sensor signals to determine if they areproperly inflated.
When a tire is under-inflated, its diameter (and consequently also its rotational speed) changes.By comparing the individual tires with each otherit is possible to determine if one or more tires areunder inflated. When low inflation pressure is detected or if the system is not functioning properly, Tire Monitorwill light up the tire pressure warning light (
) (also referred to as a telltale) in the
instrument panel and will display one of several messages in the text window, for example:
Tire
pressure low Check tires. Adjust the inflation
pressure and recalibrate if necessary.
NOTE
If a malfunction occurs in the system, the tire pressure warning light will flash for approxi-mately 1 minute and then remain illuminated.
Tire press. syst Service required will be
displayed.
Page 363 of 404

MAINTENANCE AND SERVICING
}}
* Option/accessory.361
Engine compartment, upper
Engine compartment, front
Engine compartment, lower
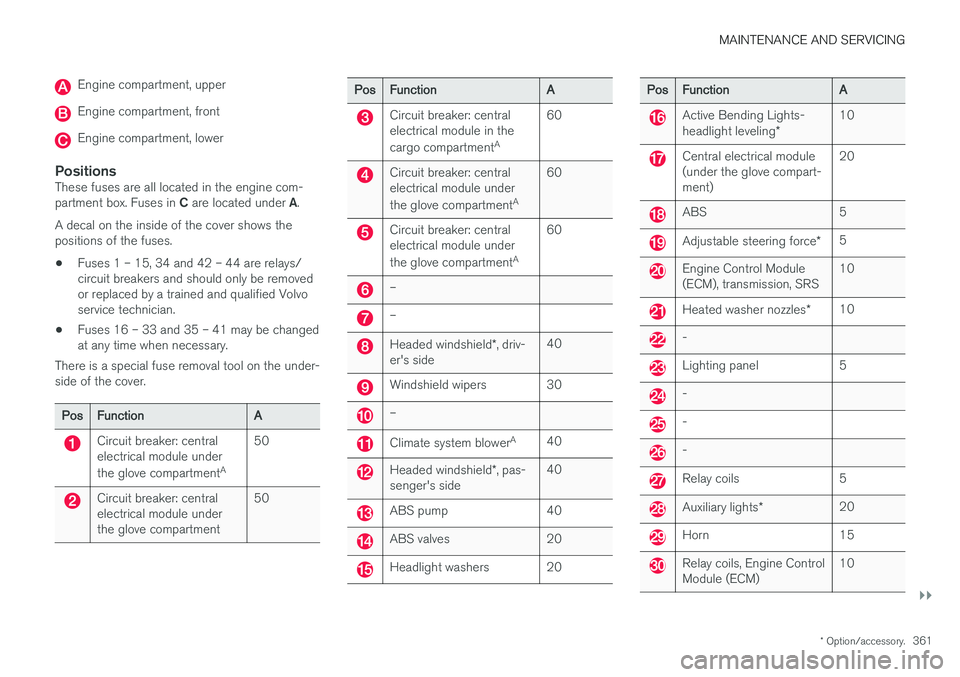
PositionsThese fuses are all located in the engine com- partment box. Fuses in C are located under A.
A decal on the inside of the cover shows the positions of the fuses. • Fuses 1 – 15, 34 and 42 – 44 are relays/ circuit breakers and should only be removedor replaced by a trained and qualified Volvoservice technician.
• Fuses 16 – 33 and 35 – 41 may be changedat any time when necessary.
There is a special fuse removal tool on the under-side of the cover.
Pos Function A
Circuit breaker: central electrical module under the glove compartmentA50
Circuit breaker: central electrical module underthe glove compartment 50
Pos
Function A
Circuit breaker: central electrical module in the cargo compartmentA60
Circuit breaker: central electrical module under the glove compartment
A60
Circuit breaker: central electrical module under the glove compartment
A60
–
–
Headed windshield
*, driv-
er's side 40
Windshield wipers 30
–
Climate system blower
A
40
Headed windshield *, pas-
senger's side 40
ABS pump 40
ABS valves 20
Headlight washers 20
Pos
Function A
Active Bending Lights- headlight leveling*10
Central electrical module (under the glove compart-ment) 20
ABS 5
Adjustable steering force
*5
Engine Control Module (ECM), transmission, SRS 10
Heated washer nozzles
*10
-
Lighting panel 5
-
-
-
Relay coils 5
Auxiliary lights
* 20
Horn 15
Relay coils, Engine Control Module (ECM) 10
Page 374 of 404

||
MAINTENANCE AND SERVICING
372
Leather care
Volvo's leather upholstery is manufactured with a protectant to repel soiling. Over time, sunlight,grease and dirt can break down the protection.Staining, cracking, scuffing, and fading can result. Volvo offers an easy-to-use, non-greasy leather care kit formulated to clean and beautify yourvehicle's leather, and to renew the protectivequalities of its finish. The cleaner removes dirtand oil buildup. The light cream protectantrestores a barrier against soil and sunlight. Volvo also offers a special leather softener that should be applied after the cleaner and protec-tant. It leaves leather soft and smooth, andreduces friction between leather and other fin-ishes in the vehicle. Volvo recommends cleaning, protecting and con- ditioning your vehicle's leather two to four times ayear. Ask your Volvo retailer about Leather CareKit 951 0251 and Leather Softener 943 7429.
Cleaning leather upholstery
1. Pour leather cleaner on a damp sponge andsqueeze it until the cleaner foams.
2. Apply the foam to the stain by moving the sponge with circular movements.
3. Dampen the stain thoroughly with the sponge. Let the sponge absorb the stain, do not rub.
4. Dry the stain with soft paper towels or a towel, and allow the leather to dry completely.
Protecting leather upholstery
1. Put a small amount of protectant cream on acloth and apply a thin coating of cream to the upholstery with light circular movements.
2. Allow the leather to dry for 20 minutes. This will help the leather resist staining and pro- tect against sunlight's harmful UV rays.
CAUTION
• Under no circumstances should gasoline, naphtha or similar cleaning agents beused on the plastic or the leather sincethese can cause damage.
• Take extra care when removing stainssuch as ink or lipstick since the coloringcan spread.
• Use solvents sparingly. Too much solventcan damage the seat padding.
• Start from the outside of the stain andwork toward the center.
• Sharp objects (e.g. pencils or pens in apocket) or Velcro fasteners on clothingmay damage the textile upholstery.
• Clothing that is not colorfast, such asnew jeans or suede garments, may stainthe upholstery.
Cleaning a leather-covered steering wheel
• Remove soil, dust, etc., with a damp sponge and a neutral soap solution.
• Leather should be allowed to breath. Nevercover the steering wheel with a plastic pro-tector.
• Volvo recommends cleaning, protecting andconditioning the steering wheel with Volvo'sLeather Care Kit 951 0251 and LeatherSoftener 943 7429.
If there are stains on the steering wheel: Type 1 (ink, wine, coffee, milk, sweat or blood)
–Use a soft cloth or sponge. Wipe the wheel with a solution with 5% ammonia. For bloodstains, mix approx. 1 cup (2 dl) of water andone ounce (25g) of salt and wipe the stain.
Type 2 (fat, oil, sauces, or chocolate)
1. Same procedure as for type I stains.
2. Finish by rubbing the wheel with absorbent paper or a towel.
Type 3 (dry soil or dust)
1. Remove the soil/dust with a soft brush.
2. Same procedure as for type I stains.
CAUTION
Sharp objects, such as rings, could damage the leather on the steering wheel.
Page 392 of 404

SPECIFICATIONS
* Option/accessory.
390
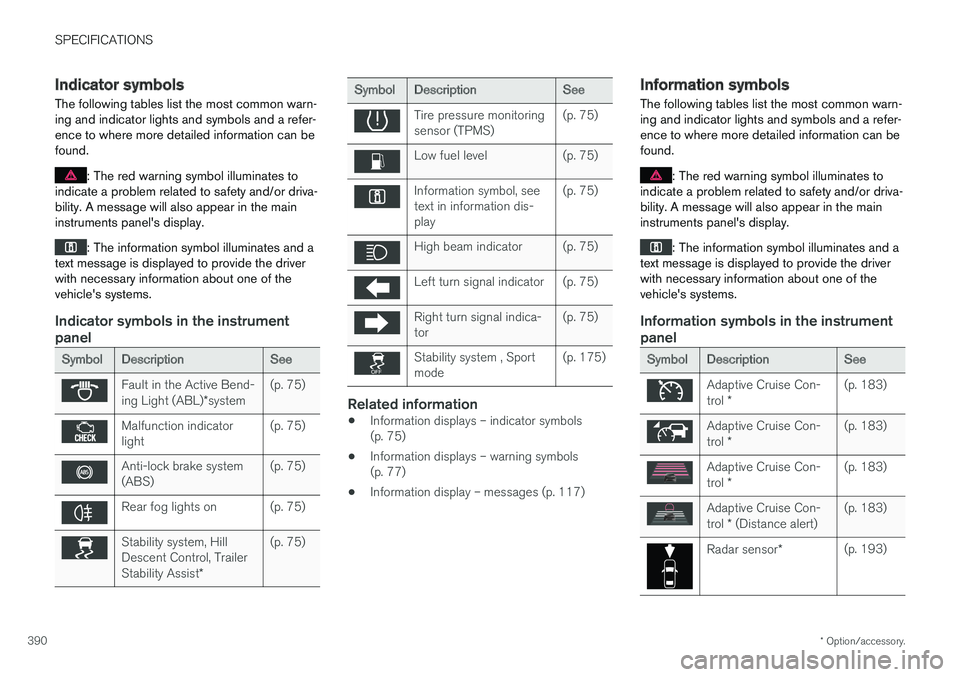
Indicator symbols
The following tables list the most common warn- ing and indicator lights and symbols and a refer-ence to where more detailed information can befound.
: The red warning symbol illuminates to
indicate a problem related to safety and/or driva- bility. A message will also appear in the maininstruments panel's display.
: The information symbol illuminates and a
text message is displayed to provide the driver with necessary information about one of thevehicle's systems.
Indicator symbols in the instrument panel
Symbol Description See
Fault in the Active Bend- ing Light (ABL)*system (p. 75)
Malfunction indicator light
(p. 75)
Anti-lock brake system (ABS)(p. 75)
Rear fog lights on (p. 75)
Stability system, Hill Descent Control, Trailer Stability Assist
*(p. 75)
Symbol
Description See
Tire pressure monitoring sensor (TPMS)(p. 75)
Low fuel level (p. 75)
Information symbol, see text in information dis-play(p. 75)
High beam indicator (p. 75)
Left turn signal indicator (p. 75)
Right turn signal indica- tor
(p. 75)
Stability system , Sport mode(p. 175)
Related information
•
Information displays – indicator symbols (p. 75)
• Information displays – warning symbols(p. 77)
• Information display – messages (p. 117)
Information symbols
The following tables list the most common warn- ing and indicator lights and symbols and a refer-ence to where more detailed information can befound.
: The red warning symbol illuminates to
indicate a problem related to safety and/or driva- bility. A message will also appear in the maininstruments panel's display.
: The information symbol illuminates and a
text message is displayed to provide the driver with necessary information about one of thevehicle's systems.
Information symbols in the instrument panel
Symbol Description See
Adaptive Cruise Con- trol * (p. 183)
Adaptive Cruise Con- trol
* (p. 183)
Adaptive Cruise Con- trol
* (p. 183)
Adaptive Cruise Con- trol
* (Distance alert) (p. 183)
Radar sensor
*(p. 193)
Page 395 of 404

INDEX
393
A
ABS (anti-lock brake system) 279
Accessory installation warning 24
Active high beams 94
Active yaw control 174, 175
Adaptive brake lights 279
Adaptive cruise control 183, 184Airbagsdisconnecting the front passenger