2018 VOLVO S90 tire pressure
[x] Cancel search: tire pressurePage 532 of 640

||
WHEELS AND TIRES
530
CAUTION
Snow chains can be used on the vehicle, with the following restrictions:• Volvo recommends not using snowchains on wheel dimensions larger than18 inches.
• Always follow the manufacturer's installa-tion instructions carefully. Install chainsas tightly as possible and retighten peri-odically.
• Only put snow chains on the front wheels(also applies to all-wheel drive vehicles).
• If accessory, aftermarket or "custom"tires and wheels with different dimen-sions than the original tires and wheelsare used, snow chains in some casesmay NOT be used. Sufficient distancebetween the chains and brakes, suspen-sion and body components must bemaintained.
• Check local regulations regarding the useof snow chains before installing.
• Never exceed the snow chain manufac-turer's specified maximum speed limit.Under no circumstances should youexceed 50 km/h (30 mph).
• Avoid bumps, holes or sharp turns whendriving with snow chains.
• Avoid driving on surfaces without snow as this wears out both the snow chains andthe tires.
• The handling of the vehicle can beadversely affected when driving withchains. Avoid fast or sharp turns as wellas locked wheel braking.
• Some types of strap-on chains affectbrake components and therefore mustNOT be used.
Consult a Volvo retailer for more information about snow chains.
Related information
•
Winter driving (p. 425)
Tire sealing system12
The temporary tire sealing system can be used to seal a puncture in a tire or to check andadjust the pressure in the tire. Models equipped with a spare wheel 13
do not
have the tire sealing system.
The tire sealing system consists of a compressor and a bottle containing sealing compound. Thesealing functions as a temporary repair.
NOTE
The sealing compound effectively seals tires with punctures in the tread but may not beable to fully seal tires with punctures in thesidewall. Do not use the tire sealing systemon tires with large tears, cracks or similardamage.
NOTE
The compressor is intended for temporary tire sealing and is approved by Volvo.
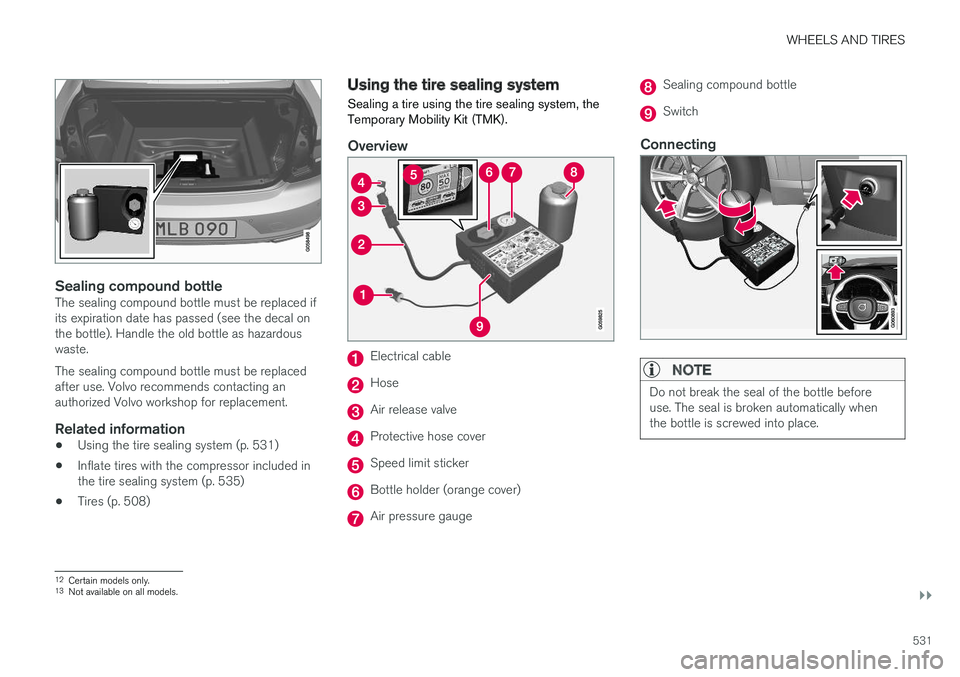
LocationThe tire sealing system is located in a foam block under the floor of the trunk.
Page 533 of 640

WHEELS AND TIRES
}}
531
Sealing compound bottleThe sealing compound bottle must be replaced if its expiration date has passed (see the decal onthe bottle). Handle the old bottle as hazardouswaste. The sealing compound bottle must be replaced after use. Volvo recommends contacting anauthorized Volvo workshop for replacement.
Related information
•Using the tire sealing system (p. 531)
• Inflate tires with the compressor included inthe tire sealing system (p. 535)
• Tires (p. 508)
Using the tire sealing system
Sealing a tire using the tire sealing system, the Temporary Mobility Kit (TMK).
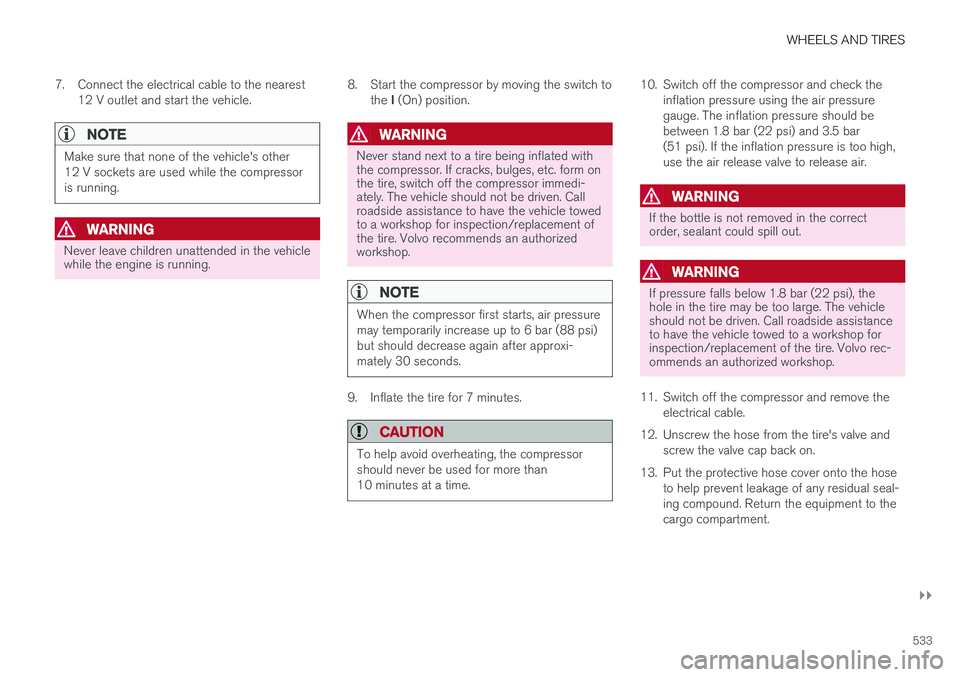
Overview
Electrical cable
Hose
Air release valve
Protective hose cover
Speed limit sticker
Bottle holder (orange cover)
Air pressure gauge
Sealing compound bottle
Switch
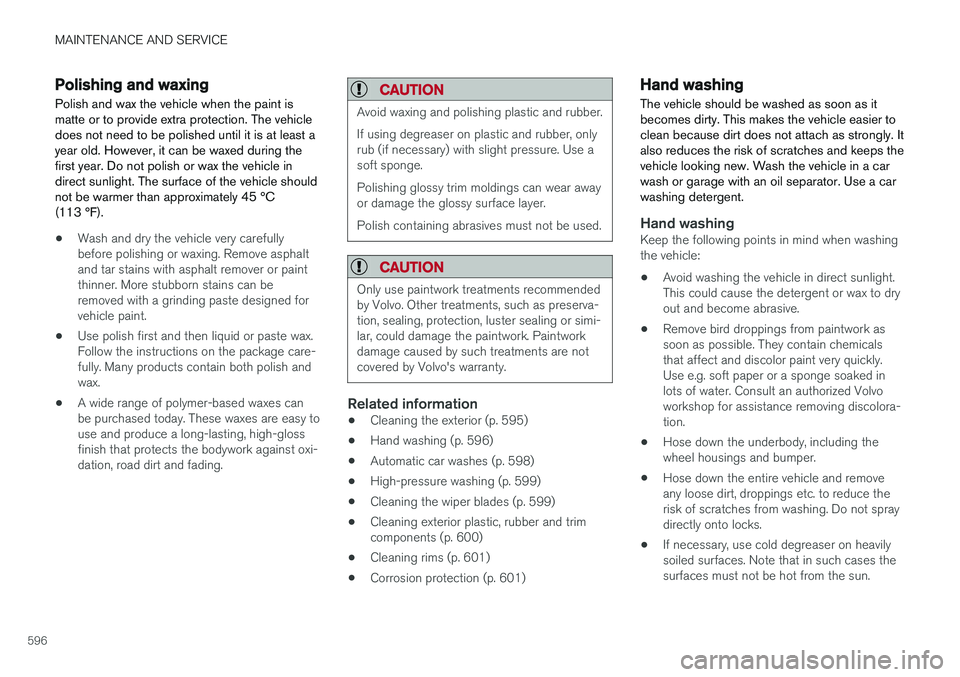
Connecting
NOTE
Do not break the seal of the bottle before use. The seal is broken automatically whenthe bottle is screwed into place.
12 Certain models only.
13 Not available on all models.
Page 535 of 640

WHEELS AND TIRES
}}
533
7. Connect the electrical cable to the nearest
12 V outlet and start the vehicle.
NOTE
Make sure that none of the vehicle's other 12 V sockets are used while the compressoris running.
WARNING
Never leave children unattended in the vehicle while the engine is running. 8. Start the compressor by moving the switch to
the I (On) position.
WARNING
Never stand next to a tire being inflated with the compressor. If cracks, bulges, etc. form onthe tire, switch off the compressor immedi-ately. The vehicle should not be driven. Callroadside assistance to have the vehicle towedto a workshop for inspection/replacement ofthe tire. Volvo recommends an authorizedworkshop.
NOTE
When the compressor first starts, air pressure may temporarily increase up to 6 bar (88 psi)but should decrease again after approxi-mately 30 seconds.
9. Inflate the tire for 7 minutes.
CAUTION
To help avoid overheating, the compressor should never be used for more than10 minutes at a time.
10. Switch off the compressor and check the
inflation pressure using the air pressure gauge. The inflation pressure should bebetween 1.8 bar (22 psi) and 3.5 bar(51 psi). If the inflation pressure is too high,use the air release valve to release air.
WARNING
If the bottle is not removed in the correct order, sealant could spill out.
WARNING
If pressure falls below 1.8 bar (22 psi), the hole in the tire may be too large. The vehicleshould not be driven. Call roadside assistanceto have the vehicle towed to a workshop forinspection/replacement of the tire. Volvo rec-ommends an authorized workshop.
11. Switch off the compressor and remove the electrical cable.
12. Unscrew the hose from the tire's valve and screw the valve cap back on.
13. Put the protective hose cover onto the hose to help prevent leakage of any residual seal- ing compound. Return the equipment to thecargo compartment.
Page 536 of 640

||
WHEELS AND TIRES
53414. Immediately drive the vehicle at least 3 km
(2 miles) at a maximum speed of 80 km/h (50 mph) to allow the sealing compound toseal the tire, and then recheck the inflationpressure.
NOTE
During the tire's first revolution, some sealing compound may spray out of the puncturehole.
WARNING
Before driving away, make sure that no one is near the vehicle who could be sprayed withsealing compound. Make sure no one iswithin 2 meters(7 feet) of the vehicle.
15. Rechecking the inflation pressure Connect the hose to the tire's valve and screw the hose connector onto the valve asfar as possible. The compressor must beswitched off. 16. Check the inflation pressure on the air pres-
sure gauge.
• If the pressure is under 1.3 bar (19 psi),the tire is not sufficiently sealed. The vehi-cle should not be driven. Call roadsideassistance to have the vehicle towed.
• If the inflation pressure is higher than1.3 bar (19 psi), the tire must be inflatedto the inflation pressure specified on thetire pressure decal on the driver's sidedoor pillar (1 bar = 100 kPa = 14.5 psi). Ifthe inflation pressure is too high, use theair release valve to release air.
NOTE
Replace the sealing compound bottle and hose after use. Volvo recommends havingthese replaced by an authorized Volvo work-shop.
WARNING
Check inflation pressure regularly.
Volvo recommends driving to the nearest author- ized Volvo workshop to have the tire replaced/repaired. Inform the workshop that the tire con-tains sealing compound.
WARNING
After using the tire sealing system, the vehicle should not be driven farther than approxi-mately 200 km (120 miles).
NOTE
The compressor is an electric device. Follow local regulations for disposal.
Related information
• Recommended tire pressure (p. 517)
• Tire sealing system (p. 530)
• Inflate tires with the compressor included in the tire sealing system (p. 535)
Page 537 of 640

WHEELS AND TIRES
535
Inflate tires with the compressorincluded in the tire sealing system The vehicle's original tires can be inflated using the compressor in the tire sealing system.
1. The compressor must be switched off. Makesure that the switch is in the 0 (Off) position
and take out the electrical cable and the hose.
2. Unscrew the tire's valve cap and screw the hose's valve connector as far as possibleonto the valve. Be sure the air release valve on the com- pressor's hose is completely closed.
3. Connect the electrical cable to the nearest 12 V outlet and start the vehicle.
WARNING
Inhaling exhaust fumes could lead to serious injury. Never leave the engine running in anenclosed space or a space without sufficientventilation.
WARNING
Never leave children unattended in the vehicle while the engine is running.
4. Start the compressor by moving the switch to the I (On) position.
CAUTION
Risk of overheating. The compressor should not be running for longer than 10 minutes ata time.
5. Inflate the tire to the pressure specified on
the tire pressure decal on the driver's side door pillar. If the inflation pressure is toohigh, use the air release valve to release air.
6. Switch off the compressor. Remove the hose and the electrical cable.
7. Screw the valve cap back onto the tire.
NOTE
• After inflating a tire, always replace the valve cap to help prevent valve damagecaused by gravel, dirt, etc.
• Use plastic valve caps only. Metal capscould corrode and become difficult toremove.
NOTE
The compressor is an electric device. Follow local regulations for disposal.
Related information
• Recommended tire pressure (p. 517)
• Using the tire sealing system (p. 531)
• Tire sealing system (p. 530)
Page 551 of 640

MAINTENANCE AND SERVICE
}}
549
Emission inspection readiness
How do states use OBD II for emission
inspections?
Many states connect a computer directly to a vehicle's OBD II system. The inspector can thenread "faults." In some states, this type of inspec-tion has replaced the tailpipe emission test.
How can my vehicle fail OBD II emission
inspection?
Your vehicle can fail OBD II emission inspection for any of the following reasons:
• If your Check Engine (MIL) light is lit, yourvehicle may fail inspection.
• If your vehicle's Check Engine light was lit,but went out without any action on your part,OBD II will still have a recorded fault. Yourvehicle may pass or fail, depending on theinspection practices in your area.
• If you had recent service that required dis-connecting the battery, OBD II diagnosticinformation may be incomplete and "notready" for inspection. A vehicle that is notready may fail inspection.
How can I prepare for my next OBD II
emission inspection?
• If your Check Engine (MIL) light is lit - or was lit but went out without service, have your vehicle diagnosed and, if necessary, servicedby a qualified Volvo technician.
• If you recently had service for a lit CheckEngine light, or if you had service thatrequired disconnecting the battery, a periodof driving is necessary to bring the OBD IIsystem to "ready" for inspection. Two half-hour trips of mixed stop-and-go/highwaydriving are typically needed to allow OBD II toreach readiness. Your Volvo retailer can pro-vide you with more information on planning atrip.
• Maintain your vehicle in accordance with yourvehicle's maintenance schedule.
Owner maintenancePeriodic maintenance requirements and intervalsare described in your vehicle's Warranty andService Records Information booklet. The following points can be carried out between the normally scheduled maintenance services.
Each time the car is refueled:
•Check the engine oil level.
• Clean the windshield, windshield wipers, headlights, and taillights.
Monthly:
• Check cold tire pressure in all tires. Inspect the tires for wear.
• Check that engine coolant and other fluidlevels are between the indicated "min" and"max" markings.
• Clean interior glass surfaces with a glasscleaner and soft paper towels.
• Wipe driver information displays with a softcloth.
• Visually inspect battery terminals for corro-sion. Corrosion may indicate a loose terminalconnector, or a battery near the end of itsuseful service life. Consult your Volvo retailerfor additional information.
As needed:
Wash the car, including the undercarriage, to reduce wear that can be caused by a buildup ofdirt, and corrosion that can be caused by salt res-idues. Clean leaves and twigs from air intake vents at the base of the windshield, and from other placeswhere they may collect.
NOTE
Complete service information for qualified technicians is available online for purchase orsubscription at www.volvotechinfo.com.
Page 554 of 640

||
MAINTENANCE AND SERVICE
* Option/accessory.
552
Canceling software download
–Tap the checkbox in the activity indicator that replaced the Install button when the down-
load began.
Note that only a download can be cancelled. An installation cannot be cancelled once it hasbegun.
Deactivating the background search for software update
Automatic background searching for softwareupdates is activated as the default factory setting,but the function can be deactivated. 1. Tap
Settings in the center display's Top
view.
2. Tap
SystemDownload Center.
3. Tap to deselect
Auto Software Update.
Related information
• Download Center (p. 551)
• Internet-connected vehicle
* (p. 487)
• Navigating in the center display's views (p. 113)
Vehicle status
The vehicle's general status can be displayed in the center display along with the option to schedule service 3
.
The Car status app is started
from the center display's App view and has four tabs:
•Messages - status messages
•
Status - engine oil level check
•
TPMS - tire inflation pressure check
•
Appointments - appointment information
and vehicle information 3
.
Related information
• Handling messages saved from the instru- ment panel (p. 105)
• Checking and filling engine oil (p. 560)
• Tire pressure monitoring system
* (p. 517)
• Scheduling service and repairs (p. 552)
• Sending vehicle information to the workshop(p. 554)
• Navigating in the center display's views(p. 113)
Scheduling service and repairs4
This service offers a convenient way to schedule service and workshop appoints directly from thevehicle.
When it is time for service, and in certain cases if the vehicle requires repairs, a message will bedisplayed in the instrument panel and at the topof the center display. The time for service isdetermined by how much time has elapsed, thenumber of hours the engine has run, or the dis-tance driven since the last service.
To use the service
• Create a Volvo ID and register the Volvo IDto the vehicle.
• To select a Volvo retailer you would like tocontact, go to www.volvocars.com and log in.
• To send and receive appointment informa-tion, the vehicle must be connected to the Internet 5
.
Book serviceWhen you schedule service from your vehicle, theinformation is sent via your Internet connection 5
.
Submit an appointment request whenever you need service or when a message regarding theneed for service or repairs has been displayed in
3 Certain markets only.
4 Certain markets only.
5 There may be a charge for transmitting data over the Internet, depending on your service plan.
Page 598 of 640

MAINTENANCE AND SERVICE
596
Polishing and waxingPolish and wax the vehicle when the paint is matte or to provide extra protection. The vehicledoes not need to be polished until it is at least ayear old. However, it can be waxed during thefirst year. Do not polish or wax the vehicle indirect sunlight. The surface of the vehicle shouldnot be warmer than approximately 45 °C(113 °F).
• Wash and dry the vehicle very carefully before polishing or waxing. Remove asphaltand tar stains with asphalt remover or paintthinner. More stubborn stains can beremoved with a grinding paste designed forvehicle paint.
• Use polish first and then liquid or paste wax.Follow the instructions on the package care-fully. Many products contain both polish andwax.
• A wide range of polymer-based waxes canbe purchased today. These waxes are easy touse and produce a long-lasting, high-glossfinish that protects the bodywork against oxi-dation, road dirt and fading.
CAUTION
Avoid waxing and polishing plastic and rubber. If using degreaser on plastic and rubber, only rub (if necessary) with slight pressure. Use asoft sponge. Polishing glossy trim moldings can wear away or damage the glossy surface layer. Polish containing abrasives must not be used.
CAUTION
Only use paintwork treatments recommended by Volvo. Other treatments, such as preserva-tion, sealing, protection, luster sealing or simi-lar, could damage the paintwork. Paintworkdamage caused by such treatments are notcovered by Volvo's warranty.
Related information
•
Cleaning the exterior (p. 595)
• Hand washing (p. 596)
• Automatic car washes (p. 598)
• High-pressure washing (p. 599)
• Cleaning the wiper blades (p. 599)
• Cleaning exterior plastic, rubber and trim components (p. 600)
• Cleaning rims (p. 601)
• Corrosion protection (p. 601)
Hand washing
The vehicle should be washed as soon as it becomes dirty. This makes the vehicle easier toclean because dirt does not attach as strongly. Italso reduces the risk of scratches and keeps thevehicle looking new. Wash the vehicle in a carwash or garage with an oil separator. Use a carwashing detergent.
Hand washingKeep the following points in mind when washing the vehicle:
• Avoid washing the vehicle in direct sunlight.This could cause the detergent or wax to dryout and become abrasive.
• Remove bird droppings from paintwork assoon as possible. They contain chemicalsthat affect and discolor paint very quickly.Use e.g. soft paper or a sponge soaked inlots of water. Consult an authorized Volvoworkshop for assistance removing discolora-tion.
• Hose down the underbody, including thewheel housings and bumper.
• Hose down the entire vehicle and removeany loose dirt, droppings etc. to reduce therisk of scratches from washing. Do not spraydirectly onto locks.
• If necessary, use cold degreaser on heavilysoiled surfaces. Note that in such cases thesurfaces must not be hot from the sun.