2018 VOLVO S60 INSCRIPTION steering
[x] Cancel search: steeringPage 287 of 396

STARTING AND DRIVING
285
WARNING
•Bumper-attached trailer hitches must not be used on Volvos, nor should safetychains be attached to the bumper.
• Trailer hitches attaching to the vehiclerear axle must not be used.
• Never connect a trailer's hydraulic brakesystem directly to the vehicle brake sys-tem, nor a trailer's lighting system directlyto the vehicle lighting system. Consultyour nearest authorized Volvo retailer forcorrect installation.
• When towing a trailer, the trailer's safetychains or wire must be correctly fastenedto the attachment points provided in thetrailer hitch on the vehicle. The safetychain or wire must never be fastened toor wound around the towing ball.
Trailer cable
An adapter is required if the vehicle's trailer hitch has a 13-pin connector and the trailer has 7 pins.Use an adapter cable approved by Volvo. Makesure the cable does not drag on the ground.
Related information
•
Loading – general (p. 138)
Trailer Stability Assist (TSA)
Trailer Stability Assist is a system designed to help stabilize a vehicle that is towing a trailerwhen the vehicle and trailer have begun to swayand is part of the stability system. For informationon the stability system, see Stability system –introduction (p. 166)
FunctionA vehicle towing a trailer may begin to sway for various reasons. Normally this only occurs at highspeeds but, for example, if the trailer is overloa-ded or if the load is unevenly distributed in thetrailer, there is risk of swaying at speeds betweenapproximately 45-55 mph (70-90 km/h). Swaying may be caused by factors such as:
• The vehicle and trailer are hit by a sudden, strong crosswind
• The vehicle and trailer are traveling on anuneven road surface or drive over a bump
• Sudden movements of the steering wheel
Facts about TSA
• TSA intervenes at speeds above approxi-mately 40 mph (60 km/h)
• The stability system symbol in the instrumentpanel will flash when TSA is working
• If the driver switches off the stability system'sSpin Control function, TSA will also beswitched off (but will be on again the nexttime the engine is started) •
TSA may not intervene when the vehicle andtrailer begin to sway if the driver tries to com-pensate for the swaying motion by movingthe steering wheel rapidly
How TSA worksOnce swaying has begun, it can be very difficultto stop, which makes it difficult to control thevehicle and trailer. The TSA system continuously monitors the vehi- cle's movements, particularly lateral movement. Ifthe system detects a tendency to sway, thebrakes are applied individually on the frontwheels, which has a stabilizing effect on the vehi-cle and trailer. This is often enough to enable thedriver to regain control of the vehicle. If this is not adequate to stop the swaying motion, the brakes are applied to all of the wheels on thevehicle and on the trailer if it is equipped withbrakes, and engine power is temporarily reduced.As the swaying motion begins to decrease andthe vehicle-trailer have once again become sta-ble, TSA will now stop regulating the brakes/engine power and the driver regains control ofthe vehicle.
Related information
•
Towing a trailer (p. 283)
• Loading – general (p. 138)
Page 289 of 396

STARTING AND DRIVING
}}
287
Attaching the towing eyeletThe towing eyelet is located under the floor of the trunk. This eyelet must be screwedinto the positions provided on the right sidesof either the front or rear bumper (see illus-tration).
There are two different types of covers over the openings for the towing eyelet and theyhave to be opened differently.
• If the cover has a notch, insert a coin, etc.,into the notch and pry open the edge ofthe cover. Open the cover completely andremove it.
• If the cover has a mark along one edge orin a corner, press the mark while pryingout the opposite side/corner using a coin,etc. Open the cover and remove it.
Screw the towing eyelet in place, first by handand then using the tire iron until it is securely inplace. After the vehicle has been towed, the eyelet should be removed and returned to its storagelocation. Press the cover for the attachment point back into position.
WARNING
• When the vehicle is being towed, the igni- tion should be in mode
II (in mode I, all of
the vehicle's airbags are deactivated). For more information, see Ignition modes(p. 74)
• Never remove the remote key from theignition slot when the vehicle is beingtowed. For vehicles with keyless drive, theremote key must remain inside the vehi-cle.
• The power brakes and power steering willnot function when the engine is not run-ning. Approximately 5 times more pres-sure will be required on the brake pedaland the steering wheel will be considera-bly harder to turn.
• The towing eyelets must not be used forpulling the vehicle out of a ditch or forany similar purpose involving severestrain.
Related information
•Towing the vehicle (p. 286)
• Towing by tow truck (p. 287)
Towing by tow truck
When necessary, call for professional help from an authorized towing company. Volvo recom-mends the use of flat bed equipment.
CAUTION
In certain conditions, the towing eyelet may be used to pull the vehicle onto aflatbed tow truck.
• The vehicle's position and ground clear-ance determine if it can be pulled up ontoa flatbed tow truck using the towing eye-let.
• If the angle of the tow truck
Page 319 of 396

WHEELS AND TIRES
}}
* Option/accessory.317
Tire sealing system * – sealing a
hole The tire sealing system can be used to tempo- rarily seal a hole in the tread surface of a tire.
Stage 1: Sealing the hole1. Peel off the speed limit sticker and affix it to the steering wheel hub where it will be clearly visible to the driver.
2. Ensure that the on/off switch is in position 0
(the 0 side of the switch should be pressed
down).
WARNING
Contact with the sealing compound may cause skin irritation. If contact occurs, washthe affected area immediately with soap andwater.
3. Unscrew the orange cover over the bottle holder on the compressor and unscrew the cap on the bottle of sealing compound.
NOTE
Do not break the seal on the bottle. This occurs automatically when the bottle isscrewed into the holder.
4. Screw the bottle into the bottle holder as faras possible.
WARNING
The bottle is equipped with a catch to keep it securely in place and help prevent sealingcompound leakage. Once in place, the bottlecannot be unscrewed. This must be done by atrained and qualified Volvo service technician.
5. Remove the valve cap from the tire
Page 321 of 396

WHEELS AND TIRES
}}
* Option/accessory.319
WARNING
If heavy vibrations, unsteady steering behavior, or noises should occur while driving, reducespeed and park the vehicle in a safe place.Recheck the tire for bumps, cracks, or othervisible damage, and recheck its inflation pres-sure. If the pressure is below 19 psi (1.3 bar),do not continue driving. Have the vehicletowed to a trained and qualified Volvo servicetechnician.
Tire sealing system – checking inflation pressure The tire sealing system can also be used to check the tires' inflation pressure.
Stage 2: Checking inflation pressure1. Reconnect the tire sealing system's hose to
the tire's inflation valve as described in stage
1 , see Tire sealing system * – sealing a hole
(p. 317).
2. Refer to the inflation pressure table in this chapter for the correct inflation pressure. If the tire needs to be inflated, start the tiresealing system
Page 325 of 396

MAINTENANCE AND SERVICING
323
Maintenance – owner maintenance
Periodic maintenance requirements and intervals are described in your vehicle's Warranty andService Records Information booklet. The following points can be carried out between the normally scheduled maintenance services.
Owner maintenance
Each time the car is refueled:
• Check the engine oil level.
• Clean the windshield, windshield wipers, headlights, and taillights.
Monthly:
• Check cold tire pressure in all tires. Inspect the tires for wear.
• Check that engine coolant and other fluidlevels are between the indicated "min" and"max" markings.
• Clean interior glass surfaces with a glasscleaner and soft paper towels.
• Wipe driver information displays with a softcloth.
• Visually inspect battery terminals for corro-sion. Corrosion may indicate a loose terminalconnector, or a battery near the end of itsuseful service life. Consult your Volvo retailerfor additional information.
As needed:
Wash the car, including the undercarriage, to reduce wear that can be caused by a buildup of dirt, and corrosion that can be caused by salt res-idues. Clean leaves and twigs from air intake vents at the base of the windshield, and from other placeswhere they may collect.
NOTE
Complete service information for qualified technicians is available online for purchase orsubscription at www.volvotechinfo.com.
Related information
•
Maintenance – opening/closing hood (p. 327)
• Engine compartment – overview (p. 328)
• Engine compartment – coolant (p. 332)
• Engine compartment – engine oil (p. 329)
• Engine compartment – power steering fluid(p. 333)
• Engine compartment – washer fluid (p. 344)
• Cleaning the interior (p. 361)
• Washing the vehicle (p. 359)
• Tire inflation – checking pressure (p. 299)
• Tires – tread wear indicator (p. 292)
Page 330 of 396

MAINTENANCE AND SERVICING
328
Engine compartment – overviewThe overview shows the main inspection points in the engine compartment.
Coolant expansion tank
Power steering fluid reservoir
Dipstick-engine oil
Filler cap-engine oil
Cover over brake fluid reservoir
Battery
Relay/fuse box
Washer fluid reservoir
Engine compartment - 4-cylinder engines only
Filler cap-engine oil
Coolant expansion tank
Radiator
Brake fluid reservoir
Battery
Relay/fuse box
Washer fluid reservoir
Air cleaner
The appearance of the engine compartment may vary depending on engine model.
WARNING
The cooling fan (located at the front of the engine compartment, behind the radiator) maystart or continue to operate (for up to6 minutes) after the engine has beenswitched off.
WARNING
Before performing any operations in the engine compartment, the ignition should always be completely switched off (in mode 0,
see Ignition modes (p. 74)) and there should be no remote keys in the passenger compart- ment. The gear selector should be in the P
(park) position. If the engine has been run- ning, wait until it has cooled before touchingany components in the engine compartment. The distributor ignition system operates at very high voltages. Special safety precautionsmust be followed to prevent injury. Alwaysturn the ignition off when:
• Replacing distributor ignition components e.g. plugs, coil, etc.
• Do not touch any part of the distributorignition system while the engine is run-ning. This may result in unintended move-ments and body injury.
Page 333 of 396

MAINTENANCE AND SERVICING
* Option/accessory.331
Left: digital instrument panel *, Right: analog instrument
panel
Message
Oil level
The oil level can be checked when the engine is not running by scrolling to the oil level sensorusing the thumb wheel on the left steering wheellever.
CAUTION
• If Oil service required is displayed, the
oil level may be too high. Take the vehicle to an authorized Volvo workshop as soonas possible.
• If the oil level sensor indicates that thelevel is too low, using the correct oil, topup with the amount of oil indicated assoon as possible, see oil specifica-tions (p. 374).
WARNING
Do not allow oil to spill onto or come into con- tact with hot exhaust pipe surfaces.
Electronically checking the oil level
The oil level should be checked at regular inter- vals, particularly during the period up to the firstscheduled maintenance service. To check the oil level:1.
Activate ignition mode II, see Ignition modes
(p. 74).
2. Turn the thumb wheel on the left steering wheel lever until
Oil level is displayed.
> The oil level will be displayed.
NOTE
• The system cannot detect changes in the oil level immediately. The vehicle must bedriven approximately 20 miles (30 km) orhave been parked on level ground withthe engine off for 5 minutes before theoil level reading will be correct.
• If the necessary conditions are not metfor checking the oil level electronically(time interval after the engine wasswitched off, if the vehicle is parked on an incline, etc.),
No value available will
be displayed. This does not indicate a
problem with the oil level sensor.
Page 335 of 396

MAINTENANCE AND SERVICING
}}
333
Engine compartment – brake fluid
The brake fluid should always be between the MIN and MAX marks on the inside of the reser-
voir.
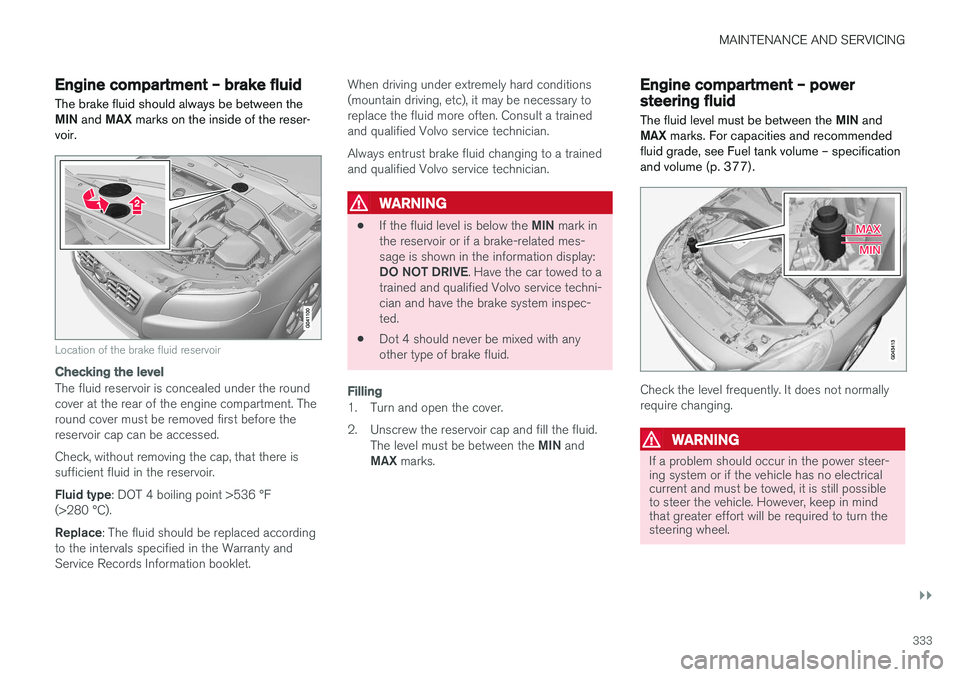
Location of the brake fluid reservoir
Checking the level
The fluid reservoir is concealed under the round cover at the rear of the engine compartment. Theround cover must be removed first before thereservoir cap can be accessed. Check, without removing the cap, that there is sufficient fluid in the reservoir. Fluid type : DOT 4 boiling point >536 °F
(>280 °C).Replace : The fluid should be replaced according
to the intervals specified in the Warranty and Service Records Information booklet. When driving under extremely hard conditions(mountain driving, etc), it may be necessary toreplace the fluid more often. Consult a trainedand qualified Volvo service technician. Always entrust brake fluid changing to a trained and qualified Volvo service technician.
WARNING
•
If the fluid level is below the
MIN mark in
the reservoir or if a brake-related mes- sage is shown in the information display: DO NOT DRIVE . Have the car towed to a
trained and qualified Volvo service techni- cian and have the brake system inspec-ted.
• Dot 4 should never be mixed with anyother type of brake fluid.
Filling
1. Turn and open the cover.
2. Unscrew the reservoir cap and fill the fluid.
The level must be between the MIN and
MAX marks.
Engine compartment – power steering fluid
The fluid level must be between the MIN and
MAX marks. For capacities and recommended
fluid grade, see Fuel tank volume – specification and volume (p. 377).
Check the level frequently. It does not normally require changing.
WARNING
If a problem should occur in the power steer- ing system or if the vehicle has no electricalcurrent and must be towed, it is still possibleto steer the vehicle. However, keep in mindthat greater effort will be required to turn thesteering wheel.