Page 338 of 396

||
MAINTENANCE AND SERVICING
3362. Reinstall the headlight housing and locking
pins. The short locking pin should be closest to the grille. Check that they are correctlyinserted. The headlight housing must be properly in place and the wiring connector correctlyreconnected before the lighting is switchedon or the remote key is inserted into the igni-tion slot.
3. Check that the lights function properly.
Related information
• Bulbs – introduction (p. 334)
• Bulbs – cover (p. 336)
• Bulbs – specifications (p. 341)
Bulbs – cover The larger cover has to be removed in order to change the high/low beam headlight bulbs.
Removing the cover to access the
bulbs
NOTE
Before starting to replace a bulb, see Bulbs – introduction (p. 334).
1. Loosen the cover's four retaining screws (3-4 turns) with a Torx T20 tool (1). The screws should not be removed completely.
2. Push the cover to the side.
3. Remove the cover.Reinstall the cover in the reverse order.
Related information
• Bulbs – headlight housing (p. 335)
• Bulbs – low beam, Halogen (p. 337)
• Bulbs – high beam, Halogen (p. 337)
• Bulbs – extra high beam (p. 338)
Page 340 of 396

MAINTENANCE AND SERVICING
338
Bulbs – extra high beam The extra high beam bulb is concealed by the larger cover.
Extra high beam2
1. Remove the headlight housing from the vehi-
cle (see Bulbs – headlight housing (p. 335)).
2. Remove the cover over the bulbs (see Bulbs – cover (p. 336)).
3. Remove the bulb by turning it counterclock- wise and pulling it straight out.
4. Remove the connector from the bulb.
5. Press the new bulb into the socket and turn it clockwise to put it in place. It can only be secured in one position. 6. Put the cover back into position and reinstall
the headlight housing.
Related information
• Bulbs – specifications (p. 341)
Bulbs – front turn signals The turn signal bulb is concealed behind the smaller cover.
1. Remove the headlight housing from the vehi-
cle (see Bulbs – headlight housing (p. 335)).
2. Remove the cover by pulling it straight out.
3. Pull the holder to access the bulb.
4. Press in the bulb and turn it to remove it from the holder.
5. Press and turn the new bulb into place.
6. Reinsert the bulb holder into the headlight housing.
7. Put the cover back into position and reinstall the headlight housing.
2Models with optional Active Bending Lights only.
Page 341 of 396
MAINTENANCE AND SERVICING
339
Related information
•Bulbs – specifications (p. 341)
Bulbs – location of taillight bulbs
The following illustrations show the location of the bulbs in the taillight cluster.
Taillight lens, right side
Brake light (LEDs)
Side marker light (LEDs)
Brake light
Parking light (LEDs)
Backup light
Turn signal
Rear fog light
Backup lights
1. Open the panel in the trunk.
2. Remove the bulb holder by turning it coun- terclockwise.
3. Remove the defective bulb by pressing it in slightly and turning it counterclockwise before pulling it out.
4. Insert a new bulb, press it in and turn it clockwise.
5. Reinsert the bulb holder by turning it clock- wise.
Related information
• Bulbs – introduction (p. 334)
• Bulbs – specifications (p. 341)
Page 343 of 396

MAINTENANCE AND SERVICING
}}
* Option/accessory.341
Bulbs – trunk lighting
The trunk lighting is located on opposite sides of the trunk.
G021758
1. Insert a screwdriver and gently turn so that the bulb housing comes loose.
2. Replace the bulb.
3. Check that the bulb illuminates and press it back into the bulb housing.
Related information
• Bulbs – specifications (p. 341)
Bulbs – vanity mirror lighting
The vanity mirror bulbs are located behind the lens.
Removing the lens
1. Insert a screwdriver underneath the side of the lens and carefully pry up the lug on the edge.
2. Carefully detach and lift out the lens.
3. Use needle nose pliers to pull the bulb straight to the side. Replace the bulb. Do not exert too much pressure on the bulb with thepliers to help avoid damaging it.
Reinstalling the lens1. Put the lens back into position.
2. Press it into place.
Related information
• Bulbs – specifications (p. 341)
Bulbs – specifications The following bulbs can be replaced by the vehi- cles owner. All other bulbs should only bereplaced by a trained and qualified Volvo servicetechnician.
Lighting function
Wat-
tage Bulb
Extra high beam (models withActive Bending Lights *) 55 H7 LL
Low beam (halo- gen) 55 H11 LL
High beam (halo-gen) 65 H9
Front turn signals 24 PY24W License plate light- ing 5 C5W LL
Vanity mirror light-ing 1.2 W2x4.6d type
T5
Glove compart-ment lighting 5 SV8.5 (length
43mm)
Rear turn signals 21 PY21W LL
Rear fog light 21 H21W LL
Page 346 of 396

MAINTENANCE AND SERVICING
344
Engine compartment – washer fluid
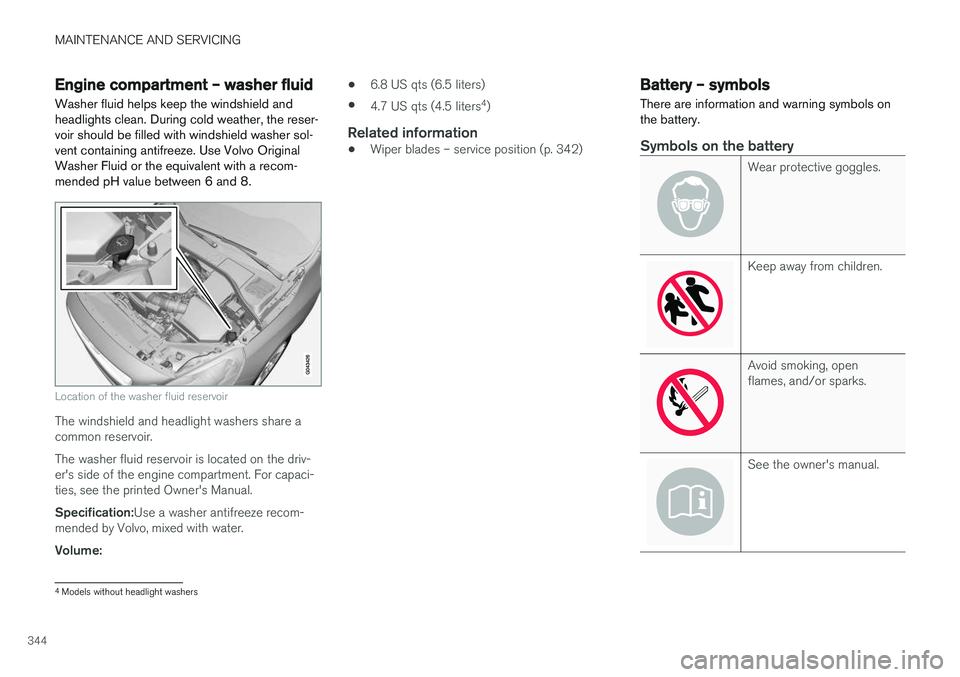
Washer fluid helps keep the windshield and headlights clean. During cold weather, the reser-voir should be filled with windshield washer sol-vent containing antifreeze. Use Volvo OriginalWasher Fluid or the equivalent with a recom-mended pH value between 6 and 8.
Location of the washer fluid reservoir
The windshield and headlight washers share a common reservoir. The washer fluid reservoir is located on the driv- er's side of the engine compartment. For capaci-ties, see the printed Owner's Manual. Specification: Use a washer antifreeze recom-
mended by Volvo, mixed with water.Volume: •
6.8 US qts (6.5 liters)
• 4.7 US qts (4.5 liters 4
)
Related information
• Wiper blades – service position (p. 342)
Battery – symbols
There are information and warning symbols on the battery.
Symbols on the battery
Wear protective goggles.
Keep away from children.
Avoid smoking, open flames, and/or sparks.
See the owner's manual.
4 Models without headlight washers
Page 353 of 396

MAINTENANCE AND SERVICING
}}
* Option/accessory.351
Engine compartment, upper
Engine compartment, front
Engine compartment, lower
PositionsThese fuses are all located in the engine com- partment box. Fuses in C are located under A.
A decal on the inside of the cover shows the positions of the fuses. • Fuses 1 – 15, 34 and 42 – 44 are relays/ circuit breakers and should only be removedor replaced by a trained and qualified Volvoservice technician.
• Fuses 16 – 33 and 35 – 41 may be changedat any time when necessary.
There is a special fuse removal tool on the under-side of the cover.
Pos Function A
Circuit breaker: central electrical module under the glove compartmentA50
Circuit breaker: central electrical module underthe glove compartment 50
Pos
Function A
Circuit breaker: central electrical module in the trunkA 60
Circuit breaker: central electrical module under the glove compartment
A60
Circuit breaker: central electrical module under the glove compartment
A60
–
–
Headed windshield
*, driv-
er's side 40
Windshield wipers 30
–
Climate system blower
A
40
Headed windshield *, pas-
senger's side 40
ABS pump 40
ABS valves 20
Headlight washers 20
Pos
Function A
Active Bending Lights- headlight leveling*10
Central electrical module (under the glove compart-ment) 20
ABS 5
Adjustable steering force
*5
Engine Control Module (ECM), transmission, SRS 10
Heated washer nozzles
*10
-
Lighting panel 5
-
-
-
Relay coils 5
Auxiliary lights
* 20
Horn 15
Relay coils, Engine Control Module (ECM) 10
Page 357 of 396
MAINTENANCE AND SERVICING
* Option/accessory.355
PosFunction A
Accelerator pedal sensor, auto- dim mirror function, heated rear seats* 7.5
-
Brake lights 5
Power moonroof
* 20
Immobilizer 5
Related information
•Fuses – engine compartment (p. 350)
• Fuses – cargo area/trunk (p. 356)
• Fuses – engine compartment cold zone (Start/Stop only) (p. 357)
Page 361 of 396

MAINTENANCE AND SERVICING
}}
* Option/accessory.359
Washing the vehicle
The vehicle should be washed at regular inter- vals since dirt, dust, insects and tar spotsadhere to the paint and may cause damage. Tohelp prevent corrosion, it is particularly importantto wash the car frequently in the wintertime.
The following points should be kept in mind when washing and cleaning the car:
CAUTION
Avoid using car washing detergents with a pH value lower than 3.5 or higher than 11.5.Doing so could result in discoloring of ano-dized aluminum surfaces on e.g., roof rails orthe frames around the side windows.
• Avoid washing your car in direct sunlight. Doing so may cause detergents and wax todry out and become abrasive. To avoidscratching, use lukewarm water to soften thedirt before you wash with a soft sponge, andplenty of sudsy water.
• Bird droppings
: Remove from paintwork as
soon as possible. Otherwise the finish maybe permanently damaged.
• A detergent can be used to facilitate thesoftening of dirt and oil.
• Dry the car with a clean chamois andremember to clean the drain holes in thedoors and rocker panels. •
Tar spots can be removed with tar removerafter the car has been washed.
• A stiff-bristle brush and lukewarm soapywater can be used to clean the wiper blades.Frequent cleaning of the windshield andwiper blades improves visibility considerablyand also helps prolong the service life of thewiper blades.
• Wash off the dirt from the underside (wheelhousings, fenders, etc).
• In areas of high industrial fallout, more fre-quent washing is recommended.
NOTE
When washing the vehicle, remember to remove dirt from the drain holes in the doorsand sills.
CAUTION
•
During high pressure washing, the spray mouthpiece must never be closer to thevehicle than 13" (30 cm). Do not sprayinto the locks.
• Dirt, snow, etc., on the headlights canreduce lighting capacity considerably.Clean the headlights regularly, for exam-ple when refueling.
Special moonroof cautions:
• Always close the moonroof and sunshade before washing your vehicle.
• Never use abrasive cleaning agents onthe moonroof.
• Never use wax on the rubber sealsaround the moonroof.
Exterior componentsVolvo recommends the use of special cleaning products, available at your Volvo retailer, forcleaning colored plastic, rubber, or ornamentalcomponents such as chromed strips on the exte-rior of your vehicle. The instructions for usingthese products should be followed carefully. Sol-vents or stain removers should not be used. The frames around the side windows, roof rails and door frames near the windows
* are made of
anodized aluminum and should only be washed