2018 VOLVO S60 INSCRIPTION park assist
[x] Cancel search: park assistPage 243 of 396

DRIVER SUPPORT
}}
241
Automatic zoom
Automatic zoom is a feature that is available on
models equipped with a trailer hitch and the optional (p. 230)Park assist system. With thisalternative selected, the camera will zoom in onthe trailer hitch automatically if the vehicleapproaches an object/trailer. See also the "Settings" section below.
DeactivationMove the gear selector from R to another gear.
The camera remains active for approx. 5 seconds after the gear selector has been moved from R or
until the vehicle's forward speed exceeds 6 mph/10 km/h (21 mph/35 km/h in reverse).The screen will then revert to the view that was displayed before R was selected.
NOTE
If any button on the center console control panel is pressed, the camera image will disap- pear from the display. Pressing CAM will
return the camera image to the display.
SettingsBy default, PAC is set to activate when the gear selector is moved to R
To change PAC settings when a camera view is displayed: 1.
Press OK/MENU when a camera view is on
the screen. A menu will be displayed.
2. Turn TUNE to scroll to the desired setting.
3. Press OK/MENU to make the setting and
exit the menu by pressing EXIT.
Summary
•Pressing
CAM will activate the camera even
if the gear selector is not in Reverse.
• Toggle between normal view and zoom by pressing
CAM or by turning TUNE.
Related information
•Park assist – introduction (p. 230)
• Park assist – function (p. 230)
• Park assist – troubleshooting (p. 238)
• Park assist – limitations (p. 233)
• Rear Park Assist Camera (PAC) – introduc- tion (p. 239)
Rear Park Assist Camera (PAC) – guiding and marker lines
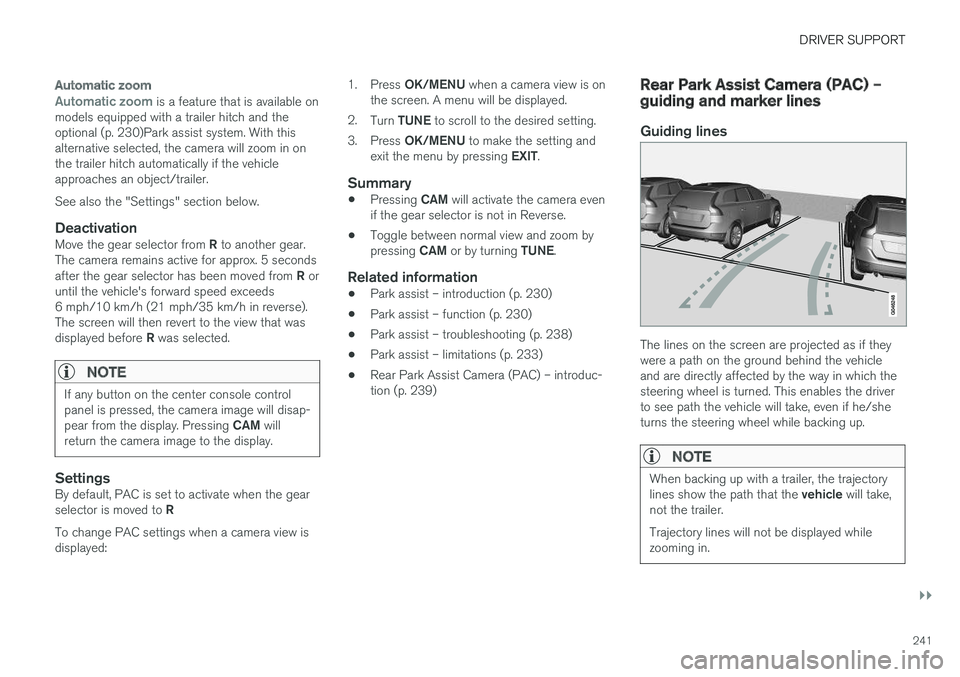
Guiding lines
The lines on the screen are projected as if they were a path on the ground behind the vehicleand are directly affected by the way in which thesteering wheel is turned. This enables the driverto see path the vehicle will take, even if he/sheturns the steering wheel while backing up.
NOTE
When backing up with a trailer, the trajectory lines show the path that the
vehicle will take,
not the trailer. Trajectory lines will not be displayed while zooming in.
Page 244 of 396

||
DRIVER SUPPORT
242
WARNING
Keep in mind that the image on the screen only shows the area behind the vehicle. Thedriver must always watch for people, animals,other vehicles, etc., near the sides of the vehi-cle when turning while backing up.
Marker lines
The PAC system's lines
The unobstructed area behind the vehicle
"Wheel tracks"
The dashed line (1) indicates the clear zone of approximately 5 feet (1.5 m) behind the bumper.These lines also indicate the outermost limits thatany object (door mirrors, corners of the body, etc.)extends out from the vehicle, even when it turns. The "wheel tracks" (2) show where the wheels will roll and can extend up to approximately 10.5 ft (3.2 m) behind the bumper if there are noobjects in the way.
Vehicles equipped with Park Assist
Colored markers (one for each sensor) indicate distance
If the vehicle is equipped with the optional Park Assist system (see Park assist – introduction(p. 230)), the distance to an object will be indi-cated more exactly and colored markers in thedisplay indicate which of the sensor(s) hasdetected the object.
Color
Distance to object
Pale yellow 2.3–5 ft (0.7–1.5 m ) Yellow 1.6–2.3 ft (0.5–0.7 m)
Orange 1–1.6 ft (0.3–0.5 m) Red 0–1 ft (0–0.3 m)
Related information
• Rear Park Assist Camera (PAC) – operation (p. 240)
• Rear Park Assist Camera (PAC) – limitations(p. 243)
Page 245 of 396

DRIVER SUPPORT
}}
* Option/accessory.243
Rear Park Assist Camera (PAC) – limitations
LimitationsEven if a fairly small section of the screen image appears to be obstructed, this may mean that arelatively large area behind the vehicle is hiddenand objects there may not be detected until theyare very near the vehicle.
NOTE
Bicycle carriers or other accessories mounted on the trunk may obstruct the camera's fieldof view.
Keep in mind
•Keep the camera's lens free of dirt, ice and snow. Remove ice and snow carefully toavoid scratching the lens.
• Clean the lens regularly with warm water anda suitable car washing detergent.
Related information
•
Rear Park Assist Camera (PAC) – introduc-tion (p. 239)
• Rear Park Assist Camera (PAC) – operation(p. 240)
• Park assist – introduction (p. 230)
BLIS
* – introduction
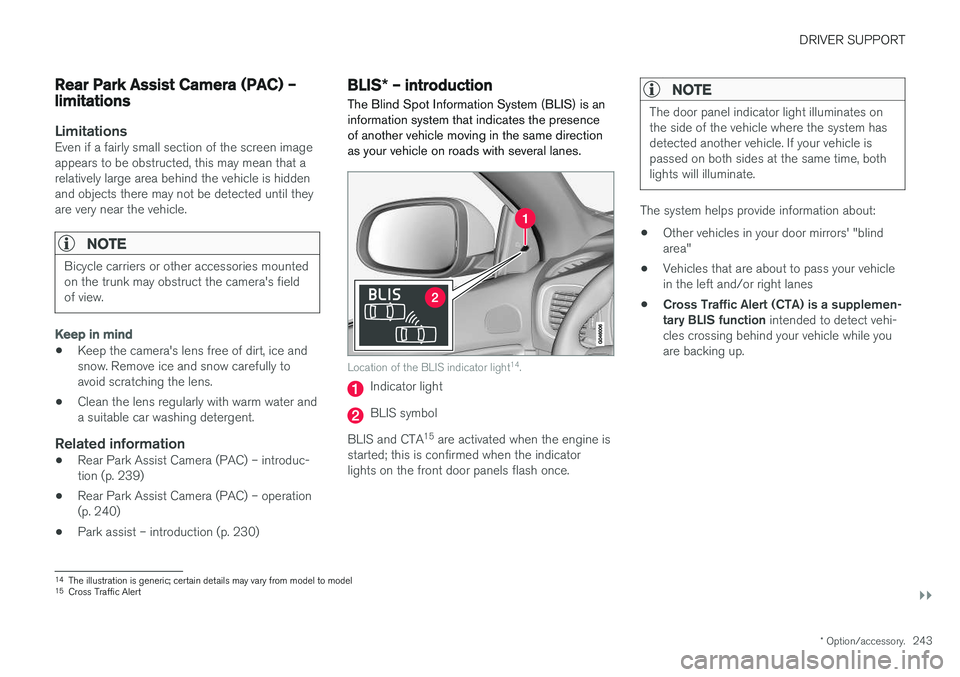
The Blind Spot Information System (BLIS) is an information system that indicates the presenceof another vehicle moving in the same directionas your vehicle on roads with several lanes.
Location of the BLIS indicator light 14
.
Indicator light
BLIS symbol
BLIS and CTA 15
are activated when the engine is
started; this is confirmed when the indicator lights on the front door panels flash once.
NOTE
The door panel indicator light illuminates on the side of the vehicle where the system hasdetected another vehicle. If your vehicle ispassed on both sides at the same time, bothlights will illuminate.
The system helps provide information about:
• Other vehicles in your door mirrors' "blind area"
• Vehicles that are about to pass your vehiclein the left and/or right lanes
• Cross Traffic Alert (CTA) is a supplemen-tary BLIS function
intended to detect vehi-
cles crossing behind your vehicle while youare backing up.
14 The illustration is generic; certain details may vary from model to model
15 Cross Traffic Alert
Page 248 of 396

DRIVER SUPPORT
* Option/accessory.
246
BLIS * – Cross Traffic Alert (CTA)
Cross Traffic Alert (CTA) is a supplementary BLIS 17
function intended to detect vehicles
crossing behind your vehicle while you are back- ing up.
Park assist/CTA button
On vehicles equipped with the optional Park assist system (p. 230), Cross Traffic Alert (CTA)can be deactivated/reactivated by pressing thePark assist button on the center console. TheBLIS indicator lights on the front doors will flashwhen CTA is reactivated by pressing the button.
WARNING
• BLIS and CTA are information systems, NOT warning or safety systems and donot function in all situations.
• BLIS and CTA do not eliminate the needfor you to visually confirm the conditionsaround you, and the need for you to turnyour head and shoulders to make surethat you can safely change lanes or backup.
• As the driver, you have full responsibilityfor changing lanes/backing up in a safemanner.
When does CTA function
How CTA works
CTA supplements BLIS by warning the driver of crossing traffic behind your vehicle, for example,when backing out of a parking space. It is primarily designed to detect another vehicle but in certain cases may also detect pedestriansor smaller objects such as bicycles. CTA is only activated when the vehicle is backing up and is activated automatically when the gearselector is put in reverse.
• An audible signal indicates that CTA hasdetected something that is approaching fromthe side. The signal will come from either theleft or right audio system speakers, depend-ing on which the side of your vehicle theapproaching vehicle/object has beendetected.
• CTA also provides a warning by illuminatingthe BLIS indicator lights.
• An icon will also illuminate in the Park assistgraphic on the center console display.
LimitationsCTA has limitations in certain situations, forexample, the CTA sensors cannot "see" throughother parked vehicles or obstructions. The following are several examples where CTA's "field of vision" may initially be limited andapproaching vehicles cannot be detected untilthey are too close:
17
Blind Spot Information System
Page 256 of 396

STARTING AND DRIVING
254
Jump startingFollow these instructions to jump start your vehi- cle's dead battery or to jump start another vehi-cle's dead battery using your vehicle.
G021347
Connecting the jumper cables
If the 12-volt auxiliary battery to be used is in another vehicle, check that the vehicles are nottouching to prevent premature completion of acircuit. Be sure to follow jump starting instruc-tions provided for the other vehicle. To jump start your vehicle:
1. Switch off the ignition (set the ignition to mode 0, see Ignition modes (p. 74)).
2. First connect the red jumper cable to the auxiliary battery's positive (+) terminal (1). 3. Fold back the cover over the positive (+) ter-
minal on your vehicle's battery (2), marked with a "+" sign, located under a folding cover.
4. Connect the black jumper cable to the auxili- ary battery's negative (–) terminal (3) and tothe ground point in your vehicle's enginecompartment (right engine mount at the top,on the outer screw) (4).
5. Start the engine in the assisting vehicle, then start the engine in the vehicle with dead bat-tery.
6. After the engine has started, first remove the negative (–) terminal jumper cable (black).Then remove the positive (+) terminal jumpercable (red).WARNING
PROPOSITION 65 WARNING! Battery posts, terminals, and related accesso- ries contain lead and lead compounds, chemi-cals known to the state of California to causecancer and reproductive harm. Wash handsafter handling.
CAUTION
Connect the jumper cables carefully to avoid short circuits with other components in theengine compartment.
WARNING
• Do not connect the jumper cable to any part of the fuel system or to any movingparts. Avoid touching hot manifolds.
• Batteries generate hydrogen gas, whichis flammable and explosive.
• Battery fluid contains sulfuric acid. Do notallow battery fluid to contact eyes, skin,fabrics or painted surfaces. If contactoccurs, flush the affected area immedi-ately with water. Obtain medical helpimmediately if eyes are affected.
• Never expose the battery to open flameor electric spark.
• Do not smoke near the battery.
• Failure to follow the instructions for jumpstarting can lead to injury.
Related information
• Starting the engine (p. 250)
Page 271 of 396

STARTING AND DRIVING
269
vehicle has been washed. Do this by braking gen- tly for a short period while the vehicle is moving.
Related information
•
Parking brake – general information (p. 271)
• Emergency Brake Assistance (EBA) (p. 270)
• Brakes – general (p. 267)
• Anti-lock braking system (ABS) (p. 269)
Brakes – symbols
Symbols in the instrument panel
Symbol
Specification
Steady glow – Check the brake fluid level. If the level is low, fill withbrake fluid and check for the causeof the brake fluid loss.
Automatic function check: steady glow for two seconds when theengine is started.
WARNING
If and come on at the same
time and the brake level is below the MIN
mark in the reservoir or if a brake system-rela- ted message is shown in the information dis- play: DO NOT DRIVE . Have the vehicle towed
to a trained and qualified Volvo service techni- cian and have the brake system inspected.
Related information
• Brakes – general (p. 267)
• Parking brake – general information (p. 271)
Anti-lock braking system (ABS) The ABS system helps to improve vehicle con- trol (stopping and steering) during severe brak-ing conditions by limiting brake lockup.
When the system "senses" impending lockup, braking pressure is automatically modulated inorder to help prevent lockup that could lead to askid. The system performs a brief self-diagnostic test when the engine has been started and driverreleases the brake pedal. Another automatic testmay be performed when the vehicle first reachesa speed of approximately 6 mph (10 km/h). Thebrake pedal will pulsate several times and asound may be audible from the ABS controlmodule, which is normal.
Related information
• Parking brake – general information (p. 271)
• Emergency Brake Assistance (EBA) (p. 270)
• Brakes – general (p. 267)
Page 272 of 396

STARTING AND DRIVING
270
Brake lights The brake lights come on automatically when the brakes are applied.
Adaptive brake lights
The adaptive brake lights activate in the event of sudden braking or if the ABS system is activated.This function causes an additional taillight oneach side of the vehicle to illuminate to help alertvehicles traveling behind. The adaptive brake lights activate if:• The ABS system activates for more than approximately a half second
• In the event of sudden braking while thevehicle is moving at speeds above approxi-mately 6 mph (10 km/h).
When the vehicle has come to a stop, the brakelights and additional taillights remain on for aslong as the brake pedal is depressed or untilbraking force on the vehicle is reduced.
Related information
• Brakes – general (p. 267)
• Parking brake – general information (p. 271)
Emergency Brake Assistance (EBA)
EBA is designed to provide full brake effect immediately in the event of sudden, hard brak-ing.
Emergency Brake AssistanceThe EBA system is activated by the speed with which the brake pedal is depressed. When the EBA system is activated, the brake pedal will go down and pressure in the brake sys-tem immediately increases to the maximum level.Maintain full pressure on the brake pedal in orderto utilize the system completely. EBA is automati-cally deactivated when the brake pedal isreleased.
NOTE
• When the EBA system is activated, the brake pedal will go down and pressure inthe brake system immediately increasesto the maximum level. You must maintainfull pressure on the brake pedal in orderto utilize the system completely. Therewill be no braking effect if the pedal isreleased. EBA is automatically deacti-vated when the brake pedal is released.
• When the vehicle has been parked forsome time, the brake pedal may sinkmore than usual when the engine isstarted. This is normal and the pedal willreturn to its usual position when it isreleased.
Related information
• Parking brake – general information (p. 271)
• Brakes – general (p. 267)
• Anti-lock braking system (ABS) (p. 269)
Page 356 of 396

||
MAINTENANCE AND SERVICING
* Option/accessory.
354
Pos Function A
Controls in left rear passenger's door20
Keyless drive
* 7.5
Power driver's seat
*20
Power front passenger's seat
*20
-
Infotainment system display 5
Infotainment system: amplifier, Sir- iusXM
™ satellite radio * 10
Sensus control module 15
Bluetooth hands-free system 5
-
Power moonroof
*
Courtesy lighting, climate system sensor 5
12-volt sockets in tunnel console 15
Heated rear seat
* (passenger's
side) 15
Heated rear seat
* (driver's side) 15
Pos
Function A
-
Heated front passenger's seat*15
Heated driver's seat
*15
Park assist
*
Blind Spot Information System (BLIS) *, park assist camera *5
All Wheel Drive
* control module 15
Active chassis system
*10
Positions: fusebox B
Pos
Function A
-
-
Front courtesy lighting, driver's door power window controls, power seat(s)*, 7.5
Instrument panel 5
Adaptive cruise control/collision warning
* 10
Pos
Function A
Courtesy lighting, rain sensor*,
HomeLInk ®
Wireless Control Sys-
tem * 7.5
Steering wheel module 7.5
Cental locking: fuel filler door 10
Electrically heated steering wheel
*15
Electrically heated windshield
*15
Trunk open 10
Electrical folding rear seat out- board head restraints
*10
Fuel pump 20
Climate system control panel 5
-
Alarm, On-board diagnostic sys- tem
5
Satellite radio
*, audio system
amplifier 10
Airbag system, occupant weight sensor
10
Collision warning system
*5