2018 VOLVO S60 INSCRIPTION mirror
[x] Cancel search: mirrorPage 105 of 396
INSTRUMENTS AND CONTROLS
}}
103
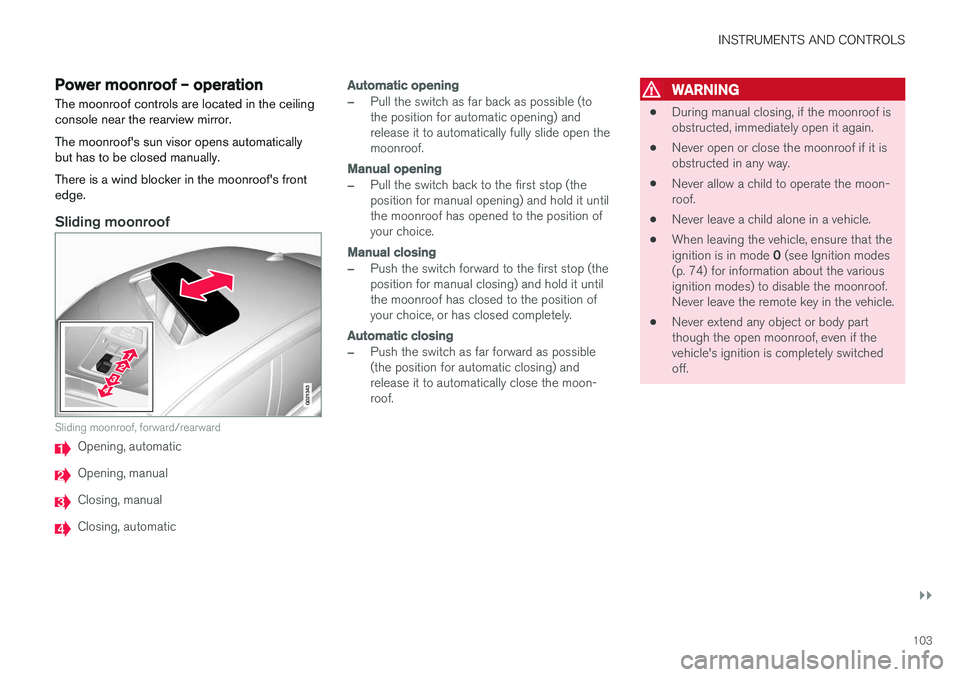
Power moonroof – operationThe moonroof controls are located in the ceiling console near the rearview mirror. The moonroof's sun visor opens automatically but has to be closed manually. There is a wind blocker in the moonroof's front edge.
Sliding moonroof
G021343
Sliding moonroof, forward/rearward
Opening, automatic
Opening, manual
Closing, manual
Closing, automatic
Automatic opening
–Pull the switch as far back as possible (to the position for automatic opening) andrelease it to automatically fully slide open themoonroof.
Manual opening
–Pull the switch back to the first stop (the position for manual opening) and hold it untilthe moonroof has opened to the position ofyour choice.
Manual closing
–Push the switch forward to the first stop (the position for manual closing) and hold it untilthe moonroof has closed to the position ofyour choice, or has closed completely.
Automatic closing
–Push the switch as far forward as possible (the position for automatic closing) andrelease it to automatically close the moon-roof.
WARNING
• During manual closing, if the moonroof is obstructed, immediately open it again.
• Never open or close the moonroof if it isobstructed in any way.
• Never allow a child to operate the moon-roof.
• Never leave a child alone in a vehicle.
• When leaving the vehicle, ensure that the ignition is in mode
0 (see Ignition modes
(p. 74) for information about the various ignition modes) to disable the moonroof.Never leave the remote key in the vehicle.
• Never extend any object or body partthough the open moonroof, even if thevehicle's ignition is completely switchedoff.
Page 123 of 396

CLIMATE
}}
* Option/accessory.121
Climate – sensors
The climate system utilizes a number of sensors to help regulate the temperature and humiditylevel in the passenger compartment.
Sensor location
• The sunlight sensor is located on the top side of the dashboard.
NOTE
The sunlight sensor monitors which side of the car that is most exposed to sunlight. Thiscan mean that the temperature may differbetween the right and left-side air vents, evenif the temperatures set for both sides of thepassenger compartment are the same.
•
The temperature sensor for the passenger compartment is located below the climatecontrol panel.
• The outside (ambient) temperature sensor islocated on the door mirror.
• The humidity sensor
* is located in the interior
rearview mirror.
NOTE
Do not cover or block the sensors with cloth- ing or other objects.
Related information
• Climate – general information (p. 120)
Air quality
The passenger compartment has been designed to be pleasant and comfortable, even for peoplewith asthma and contact allergies.
Passenger compartment filterReplace the cabin air filter with a new one at the recommended intervals. Please refer to your War-ranty and Service Records Information booklet, orconsult a trained and qualified Volvo service tech-nician for these intervals. The filter should bereplaced more often when driving under dirty anddusty conditions. The filter cannot be cleanedand therefore should always be replaced with anew one.
NOTE
There are different types of cabin air filters. Ensure that the correct type is installed.
Interior Air Quality System (IAQS)A multifilter helps reduce gases and particles in the incoming air, thereby reducing the levels ofodors and contaminants entering the vehicle. Theair quality sensor detects increased levels of con-taminants in the outside air. When the air qualitysensor detects contaminated outside air, the airintake closes and the air inside the passengercompartment is recirculated, i.e., no outside airenters the vehicle. The filter also cleans recircula-ted passenger compartment air.
Page 130 of 396
CLIMATE
* Option/accessory.
128
Air conditioning
The air conditioning function cools and dehu- midifies the air in the passenger compartment.
When the indicator light in the button is on, the air condition-ing is controlled automatically.This cools/heats and dehu-midifies the incoming air. Whenthe indicator light in the buttonis off, the air conditioning is
disengaged. Other functions are still controlledautomatically. When maximum defroster (p. 128)is selected, the air conditioning system is set formaximum blower speed and dehumidifies thecabin as quickly as possible.
Related information
• Climate – general information (p. 120)
• Automatic climate control (p. 127)
Max. defroster and electrically heated windshield
*
The heated windshield and max. defroster func- tions are used to clear the windshield and frontside windows of condensation and ice asquickly as possible.
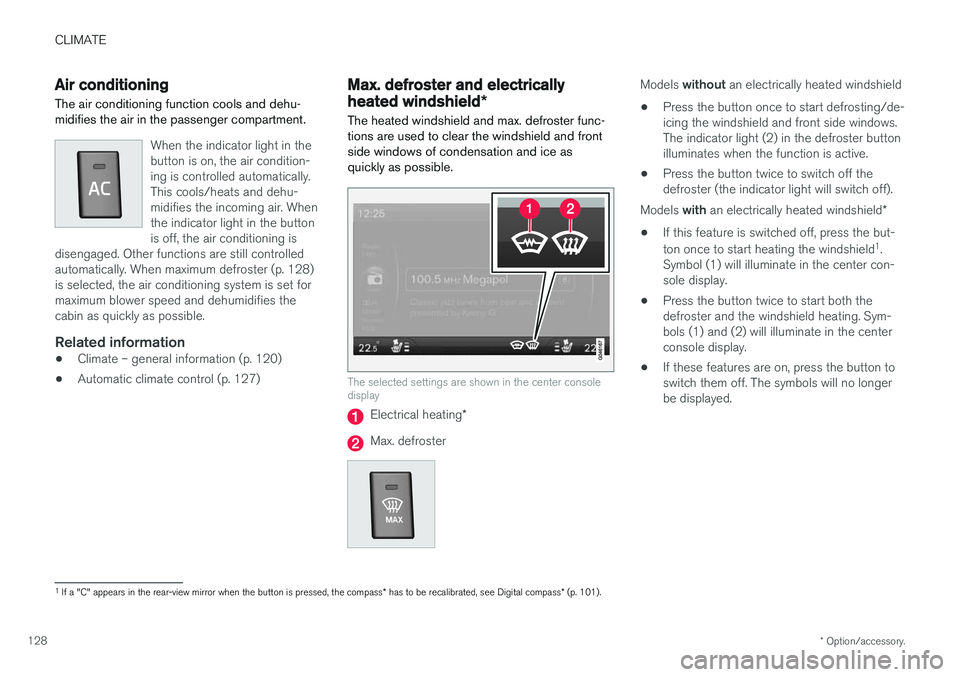
The selected settings are shown in the center console display
Electrical heating *
Max. defroster
Models without an electrically heated windshield
• Press the button once to start defrosting/de- icing the windshield and front side windows.The indicator light (2) in the defroster buttonilluminates when the function is active.
• Press the button twice to switch off thedefroster (the indicator light will switch off).
Models with an electrically heated windshield *
• If this feature is switched off, press the but- ton once to start heating the windshield 1
.
Symbol (1) will illuminate in the center con- sole display.
• Press the button twice to start both thedefroster and the windshield heating. Sym-bols (1) and (2) will illuminate in the centerconsole display.
• If these features are on, press the button toswitch them off. The symbols will no longerbe displayed.
1
If a "C" appears in the rear-view mirror when the button is pressed, the compass * has to be recalibrated, see Digital compass * (p. 101).
Page 131 of 396
CLIMATE
* Option/accessory.129
NOTE
•Triangular areas at the far sides of the windshield are not heated electrically andwill take slightly longer to defrost/de-ice.
• The heated windshield may affect theperformance/range of e.g., transpondersused to automatically pay highway tolls orother communication equipment.
The following occurs when the defroster/wind- shield heating functions have been activated:
• Blower speed increases automatically andthe air conditioning (p. 128) will switch on (ifnot already on and if the passenger compart-ment blower is not turned off) to dehumidifythe air in the passenger compartment. Airconditioning can be switched off by pressing the
AC button.
• Recirculation (p. 130) will not function while defrost is engaged.
The climate system will return to its previous set-tings when the defroster/windshield heatingfunction is switched off. See also Heated windshield *, rear window and
door mirror defrosters (p. 100) for additional information.
Related information
• Climate – general information (p. 120)
• Automatic climate control (p. 127)
Air distribution – function
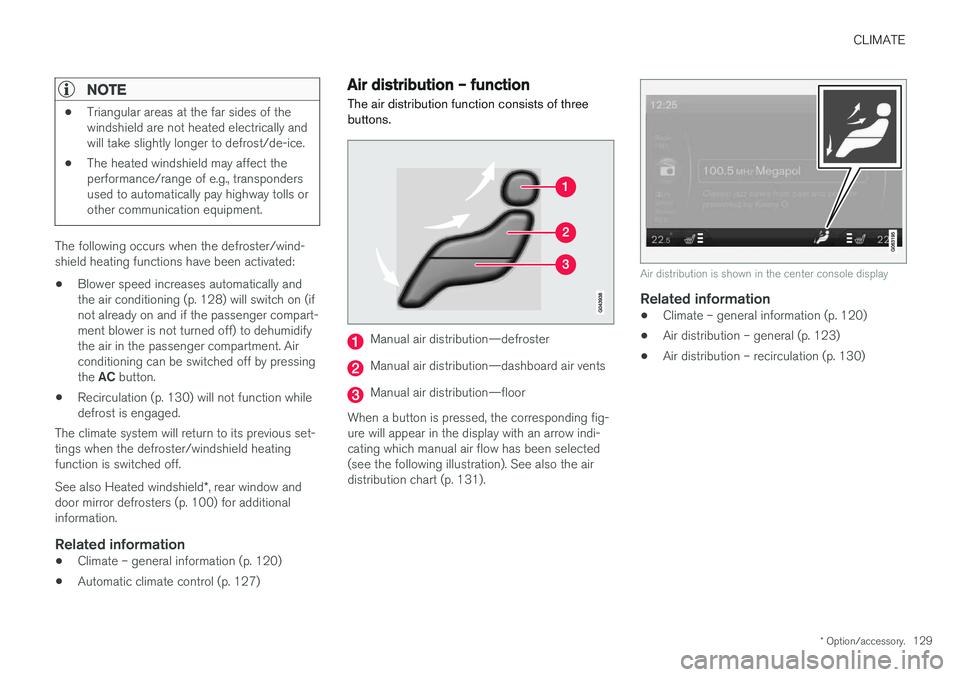
The air distribution function consists of three buttons.
Manual air distribution—defroster
Manual air distribution—dashboard air vents
Manual air distribution—floor
When a button is pressed, the corresponding fig- ure will appear in the display with an arrow indi-cating which manual air flow has been selected(see the following illustration). See also the airdistribution chart (p. 131).
Air distribution is shown in the center console display
Related information
• Climate – general information (p. 120)
• Air distribution – general (p. 123)
• Air distribution – recirculation (p. 130)
Page 137 of 396
LOADING AND STORAGE
* Option/accessory.135
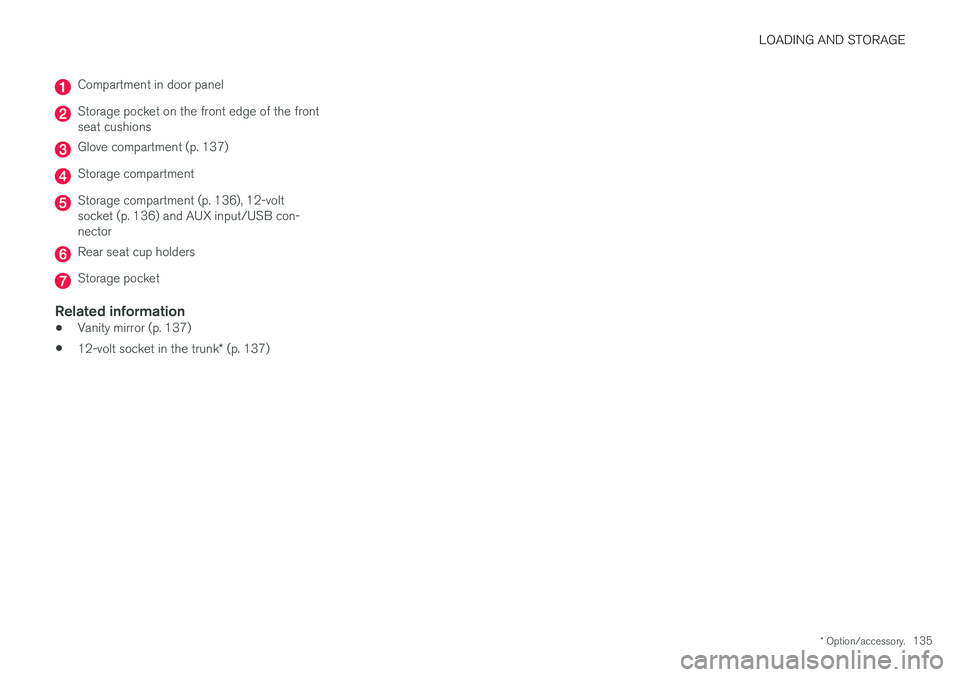
Compartment in door panel
Storage pocket on the front edge of the front seat cushions
Glove compartment (p. 137)
Storage compartment
Storage compartment (p. 136), 12-volt socket (p. 136) and AUX input/USB con-nector
Rear seat cup holders
Storage pocket
Related information
•Vanity mirror (p. 137)
• 12-volt socket in the trunk
* (p. 137)
Page 139 of 396
LOADING AND STORAGE
* Option/accessory.137
Glove compartment
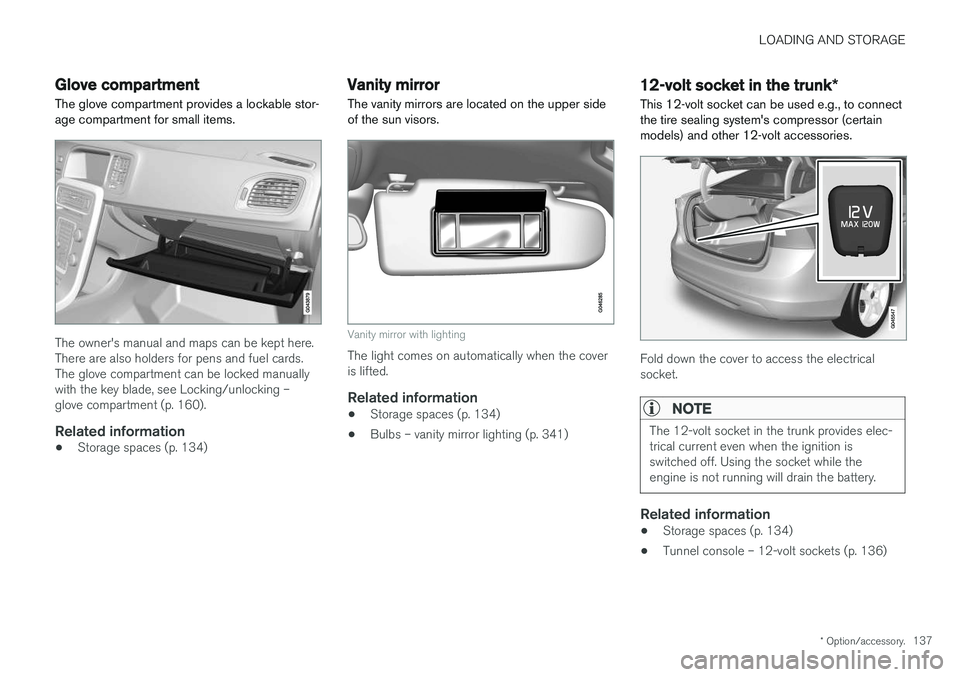
The glove compartment provides a lockable stor- age compartment for small items.
The owner's manual and maps can be kept here. There are also holders for pens and fuel cards.The glove compartment can be locked manuallywith the key blade, see Locking/unlocking –glove compartment (p. 160).
Related information
• Storage spaces (p. 134)
Vanity mirror
The vanity mirrors are located on the upper side of the sun visors.
Vanity mirror with lighting
The light comes on automatically when the cover is lifted.
Related information
• Storage spaces (p. 134)
• Bulbs – vanity mirror lighting (p. 341)
12-volt socket in the trunk
*
This 12-volt socket can be used e.g., to connect the tire sealing system's compressor (certainmodels) and other 12-volt accessories.
Fold down the cover to access the electrical socket.
NOTE
The 12-volt socket in the trunk provides elec- trical current even when the ignition isswitched off. Using the socket while theengine is not running will drain the battery.
Related information
• Storage spaces (p. 134)
• Tunnel console – 12-volt sockets (p. 136)
Page 147 of 396
LOCKS AND ALARM
* Option/accessory.145
Related information
•Remote key – functions (p. 147)
Key memory
The memory in the remote key makes it possible to store certain personal settings.
The position of the side door mirrors, power driv- er's seat * and the selected instrument panel
theme 1
are stored in the remote keys when the
vehicle is locked . The next time the driver's door
is unlocked with the same remote key and the
door is opened within 2 minutes, the power driv-
er's seat and side door mirrors will automatically move to the position that they were in when thedoors were most recently locked with the sameremote key. If the seat/mirrors have not beenreadjusted since the vehicle was locked, they willalready be in the position stored in that particularremote key and will not move. For more informa-tion on this feature, see Front seats – power seat(p. 76). This feature can be activated or deactivated in the vehicle's menu by pressing MY CAR and
going into
SettingsCar settingsCar key
memory. For a description of the menu system,
see My Car – introduction (p. 71).
NOTE
If the vehicle is locked with the remote key or is left unlocked for more than 30 minutes, thekey memory function will be deactivated. To reactivate the key's memory:
• Press the unlock button on the remote key.
For information regarding vehicles with the optional keyless drive, see Keyless drive
*– lock-
ing/unlocking (p. 153).
Related information
• Locking/unlocking confirmation (p. 146)
1
Optional digital instrument panel only
Page 148 of 396
LOCKS AND ALARM
* Option/accessory.
146
Locking/unlocking confirmation Settings can be made in the menu system for audible and visual confirmation when the vehiclehas been locked or unlocked. With these func-tions activated, the following will occur when thevehicle is locked/unlocked:
Locking confirmation
• The turn signals flash once, an audible signal sounds and the door mirrors will fold
* in.
Confirmation will only be given when all doors and the trunk are properly closed and locked.
NOTE
If you do not receive confirmation when lock- ing the vehicle, check whether a door or thetrunk is ajar, or if this feature has been turnedoff in the menu.
Unlocking confirmation
• The turn signals will flash twice and the door mirrors will fold
* out.
Making a setting
Different alternatives for locking/unlocking con- firmation can be selected in the menus by press- ing MY CAR on the center console control panel.
• To activate visual confirmation: go to
SettingsCar settingsLight settingsand select Door lock confirmation light
and/or Unlock confirmation light by
pressing OK/MENU .
• To activate audible confirmation: go to
SettingsCar settingsLock settingsand select Audible confirmation by press-
ing OK/MENU .
For a description of the menu system, see My Car – introduction (p. 71).
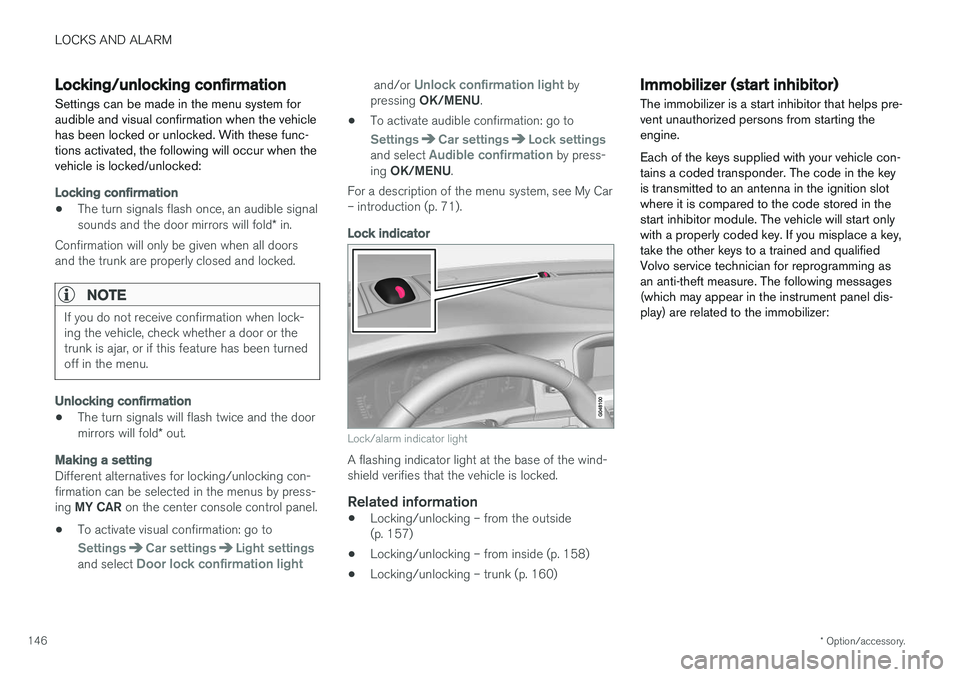
Lock indicator
Lock/alarm indicator light
A flashing indicator light at the base of the wind- shield verifies that the vehicle is locked.
Related information
• Locking/unlocking – from the outside(p. 157)
• Locking/unlocking – from inside (p. 158)
• Locking/unlocking – trunk (p. 160)
Immobilizer (start inhibitor)
The immobilizer is a start inhibitor that helps pre- vent unauthorized persons from starting theengine. Each of the keys supplied with your vehicle con- tains a coded transponder. The code in the keyis transmitted to an antenna in the ignition slotwhere it is compared to the code stored in thestart inhibitor module. The vehicle will start onlywith a properly coded key. If you misplace a key,take the other keys to a trained and qualifiedVolvo service technician for reprogramming asan anti-theft measure. The following messages(which may appear in the instrument panel dis-play) are related to the immobilizer: