Page 139 of 394

LOADING AND STORAGE
* Option/accessory.137
Glove compartment
The glove compartment provides a lockable stor- age compartment for small items.
The owner's manual and maps can be kept here. There are also holders for pens and fuel cards.The glove compartment can be locked manuallywith the key blade, see Locking/unlocking –glove compartment (p. 160).
Related information
• Storage spaces (p. 134)
Vanity mirror
The vanity mirrors are located on the upper side of the sun visors.
Vanity mirror with lighting
The light comes on automatically when the cover is lifted.
Related information
• Storage spaces (p. 134)
• Bulbs – vanity mirror lighting (p. 341)
12-volt socket in the trunk
*
This 12-volt socket can be used e.g., to connect the tire sealing system's compressor (certainmodels) and other 12-volt accessories.
Fold down the cover to access the electrical socket.
NOTE
The 12-volt socket in the trunk provides elec- trical current even when the ignition isswitched off. Using the socket while theengine is not running will drain the battery.
Related information
• Storage spaces (p. 134)
• Tunnel console – 12-volt sockets (p. 136)
Page 152 of 394

LOCKS AND ALARM
150
Detachable key blade – unlockingYour vehicle's remote key (p. 144) contains a metal, detachable key blade that can be used tounlock the driver's door, lock the glove compart-ment, etc.
Driver's door keyhole cover
If the remote key does not function normally (weak battery, etc.), the vehicle can be unlockedwith the detachable key blade.
1. Remove the detachable key blade (p. 149) from the remote key.
2. Press the key blade approx. 0.5 in. (1 cm) straight up in the hole on the underside of the keyhole cover.
> The cover will come off due to the pres-sure exerted when the key blade is pushed upward. 3. Insert the key blade as far as possible in the
driver's door lock. Turn the key blade to unlock the driver's door. This will trigger the
alarm .
4. To turn off the alarm , insert the remote key
in the ignition slot. This also applies to vehi- cles equipped with the optional keyless drive.
5. Press the cover back into place after the door has been unlocked.
Related information
• Remote key and key blade (p. 144)
• Remote key – replacing the battery (p. 151)
Valet locking By utilizing the remote key with the key blade removed, the valet locking feature enables you toblock access to the trunk and glove compart-ment for e.g., valet parking or when the vehicle isbrought to the retailer for service.
G021083
Normal locking/unlocking function
Page 153 of 394

LOCKS AND ALARM
}}
151
G021084
Locking/unlocking points with valet locking activated
With the valet locking function activated:
•The vehicle's doors can be locked or unlocked with the remote
• The engine can be started
• The glove compartment cannot be unlocked
• Access to the trunk is blocked (the trunk lidcannot be unlocked or opened with theremote, and the rear seat backrests cannotbe lowered
Activating the valet locking function
Insert the key blade in the glove compart- ment lock.
Turn the key blade180 degrees clockwise.
Remove the key blade from the lock. A mes- sage will appear in the instrument panel dis-play.
Deactivating the valet locking function
Turn the key blade 180 degrees counterclock- wise in the glove compartment lock to deactivatevalet locking. See locking/unlocking the glove compart- ment (p. 160) for information on locking theglove compartment normally, without activatingthe valet locking function.
Remote key – replacing the battery The remote key can be opened if the battery needs to be replaced.
The battery should be replaced if:
• The information symbol illuminates and
Low
battery in remote control. Please change batteries.
is shown in the display and/or
• if the locks do not react after several attempts to unlock or lock the vehicle.
NOTE
The remote key's range is normally approxi- mately 60 ft (20 m) from the vehicle.
Page 154 of 394

||
LOCKS AND ALARM
152
Opening the remote key
The remote key has one CR 2430, 3V battery only
To open the remote key
Slide the spring loaded catch to the side.
Pull the key blade straight out of the
remote key.
Insert a small screwdriver in the hole
behind the spring loaded catch and carefully pry up the cover. Turn the remote key withthe buttons upward so that the battery doesnot fall out when the cover is removed.
Inserting a new battery
CAUTION
When handling batteries, avoid touching their contact surfaces as this could result in poorbattery function in the remote key.
Note the position of the battery's ( +) or ( –) sides.
1. Use a screwdriver to pry out the old battery. 2. Insert a new one with the ( +) side downward.
Closing the remote key
1. Press the remote key's cover into place.
2. Hold the remote key with the slot for the key
blade up.
3. Carefully slide the key blade into its groove.
4. Gently press the key blade in the groove until it clicks into place.
NOTE
Volvo recommends that the batteries used in the remote control meet the UN Manual ofTest and Criteria, Part III, sub-section 38.3. Batteries installed in the key from the factory and batteries exchanged by an authorizedVolvo workshop fulfill the above criteria. Old batteries should be disposed of properly at a recycling center or at your Volvo retailer.
Related information
• Remote key – functions (p. 147)
Page 156 of 394

||
LOCKS AND ALARM
* Option/accessory.
154
Related information
• Alarm indicator (p. 162)
Keyless drive
* – unlocking with key
blade
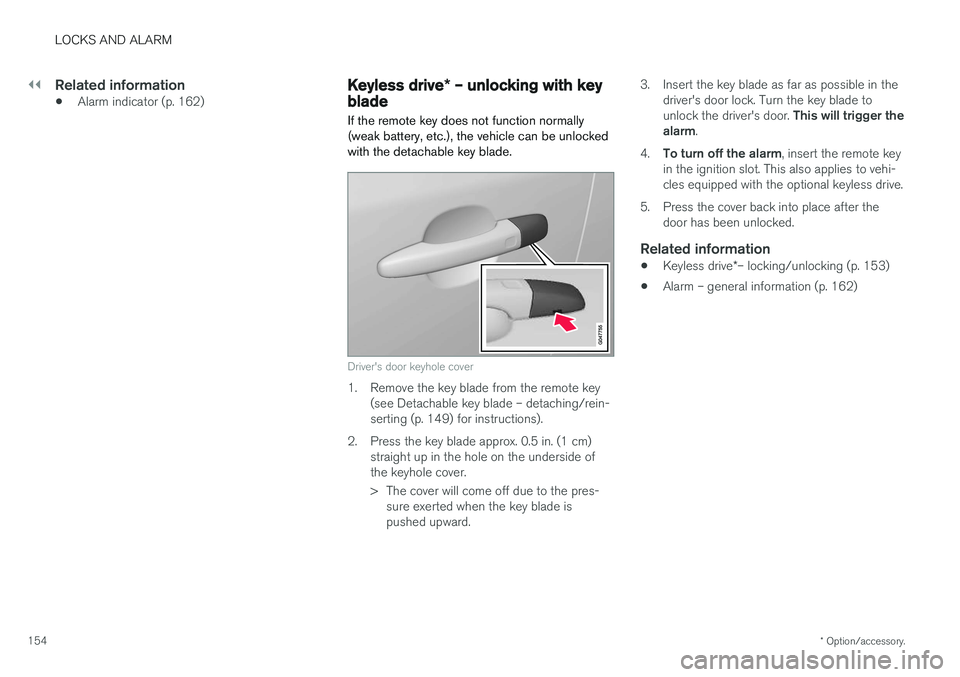
If the remote key does not function normally (weak battery, etc.), the vehicle can be unlockedwith the detachable key blade.
Driver's door keyhole cover
1. Remove the key blade from the remote key (see Detachable key blade – detaching/rein- serting (p. 149) for instructions).
2. Press the key blade approx. 0.5 in. (1 cm) straight up in the hole on the underside ofthe keyhole cover.
> The cover will come off due to the pres-sure exerted when the key blade is pushed upward. 3. Insert the key blade as far as possible in the
driver's door lock. Turn the key blade to unlock the driver's door. This will trigger the
alarm .
4. To turn off the alarm , insert the remote key
in the ignition slot. This also applies to vehi- cles equipped with the optional keyless drive.
5. Press the cover back into place after the door has been unlocked.
Related information
• Keyless drive
*– locking/unlocking (p. 153)
• Alarm – general information (p. 162)
Page 159 of 394

LOCKS AND ALARM
* Option/accessory.157
WARNING
People with implanted pacemakers should not allow the pacemaker to come closer than9 inches (22 cm) to any of the keyless drivesystem's antennas. This is to help preventinterference between the pacemaker and thekeyless drive system.
Related information
•Keyless drive
*– locking/unlocking (p. 153)
Locking/unlocking – from the outside
The remote key (p. 144) is used to lock/unlock all of the doors and the trunk at the same time.Different settings for unlocking the vehicle canbe selected, see Remote key – functions(p. 147). Before the vehicle can be locked from the out- side with the remote key, the driver's door mustbe closed. If the trunk or any other door is open,it will be locked and the alarm will be armed.
NOTE
Be sure the remote key is outside of the vehi- cle before the other doors/trunk are closed tohelp avoid locking the remote inside the vehi-cle.
If the vehicle is equipped with the optional key- less drive system, all doors/trunk must be closedbefore the vehicle can be locked. The first press on the unlock button unlocks the driver's door and a second press unlocks theother doors and the trunk (see also remote keyand key blade (p. 144)). This setting can be changed in the menu system. See MY
CAR (p. 71) for a description.
If the locks repeatedly do not react when the unlock button is pressed, it may be necessary toreplace the battery in the remote, see Remote key – replacing the battery (p. 151). In this casethe vehicle can be unlocked with the detachablekey blade (p. 150).
Related information
•
Locking/unlocking – from inside (p. 158)
Page 160 of 394

LOCKS AND ALARM
158
Manual locking
In certain situations (e.g., if there is no electrical current in the vehicle), the doors can be lockedmanually.
The detachable key blade (p. 149) can be used in the lock cylinder in the driver's door to lockthat door. The other doors do not have lock cylinders and the slot on the rear edge of each door has to beused to lock it. This will lock the door from theoutside but it can still be opened from inside thevehicle. To do so:
Manually locking a door
–Insert the key blade into the slot and turn it 90 degrees to lock that door (the slot in aparticular door locks that door only).
In the horizontal position, the door cannot be opened from the outside.
In the vertical position, the door can be opened from the inside and the outside.
NOTE
If the manual child safety lock (p. 58) is acti- vated for a rear side door and that door isalso locked manually, the door cannot beopened from the outside or inside. The doorcan only be unlocked with the remote key orthe central locking button.
Related information
• Remote key – replacing the battery (p. 151)
Locking/unlocking – from inside
The lock buttons on the door panel can be used to lock or unlock all doors and the trunk at the same time. Press
to lock and to
unlock.
From inside the vehicle (central locking
button)
Central locking button
The lock buttons on the door panel can be used to lock or unlock all doors and the trunk at the same time. Press
to lock and to unlock.
Page 164 of 394

LOCKS AND ALARM
162
Alarm – general information
The alarm system provides a warning if an attempt is made to break into the vehicle. The alarm is automatically armed (p. 163) whenever the vehicle is locked with the remotekey. When armed, the alarm continuously monitors a number of points on the vehicle. The followingconditions will trigger the alarm:
• The hood is forced open.
• The trunk is forced open
• A door is forced open.
• The ignition slot is tampered with.
• An attempt is made to start the vehicle with a non-approved key (a key not coded to thecar's ignition).
• The battery is disconnected (while the alarmis armed).
• The siren is disconnected when the alarm isdisarmed.
A message will appear in the information displayif a fault should occur in the alarm system. Con-tact a trained and qualified Volvo service techni-cian.
NOTE
Do not attempt to repair any of the compo- nents in the alarm system yourself. This couldaffect the insurance policy on the vehicle.
Related information
• Alarm – turning off (p. 164)
• Alarm signal (p. 163)
• Alarm indicator (p. 162)
Alarm indicator
The status of the alarm system is indicated by the red indicator light on the dashboard (seeillustration):
• Indicator light off: the alarm is not armed (p. 163)
• The indicator light flashes at one-secondintervals: the alarm is armed
• The indicator light flashes rapidly before theremote key is inserted in the ignition slot and the ignition is put in mode
I: the alarm has
been triggered.
Related information
• Alarm – general information (p. 162)
• Alarm – turning off (p. 164)
• Alarm signal (p. 163)