Page 332 of 502
If these symptoms occur directly after refuelling, switch off the engine immediately to avoid any
subsequent damage.
Fault in the selective catalytic reduction system
The red refill bottle lamp lights up together with the red spanner lamp.
The engine cannot be restarted.
AdBlue
Page 333 of 502

The yellow catalytic converter lamp lights up or flashes.
Faults in the exhaust system caused by misfiring, which can damage the catalytic converter.
to the nearest qualified workshop immediately.
There may be engine faults and fuel consumption may be higher if the indicator lamps are lit up or
flashing.
If and when
Vehicle toolkit
Introduction
This chapter contains information on the followingsubjects:
Stowage
Vehicle toolkit contents
Observe any country-specific legislation when securing your vehicle in the event of a breakdown.
Vehicle toolkit in the vehicle
In vehicles that are factory-fitted with a spare wheel, emergency spare wheel or winter wheels,
additional vehicle tools may be located in the luggage compartment.
WARNING
In the event of a sudden driving or braking manoeuvre or accident, a loose vehicle toolkit,
breakdown set and spare wheel or temporary spare wheel could be flung though the vehicle and
cause severe injuries.
always secured in the luggage compartment.
WARNING
Unsuitable or damaged tools in the vehicle toolkit can lead to accidents and injuries.
Stowage
Page 335 of 502

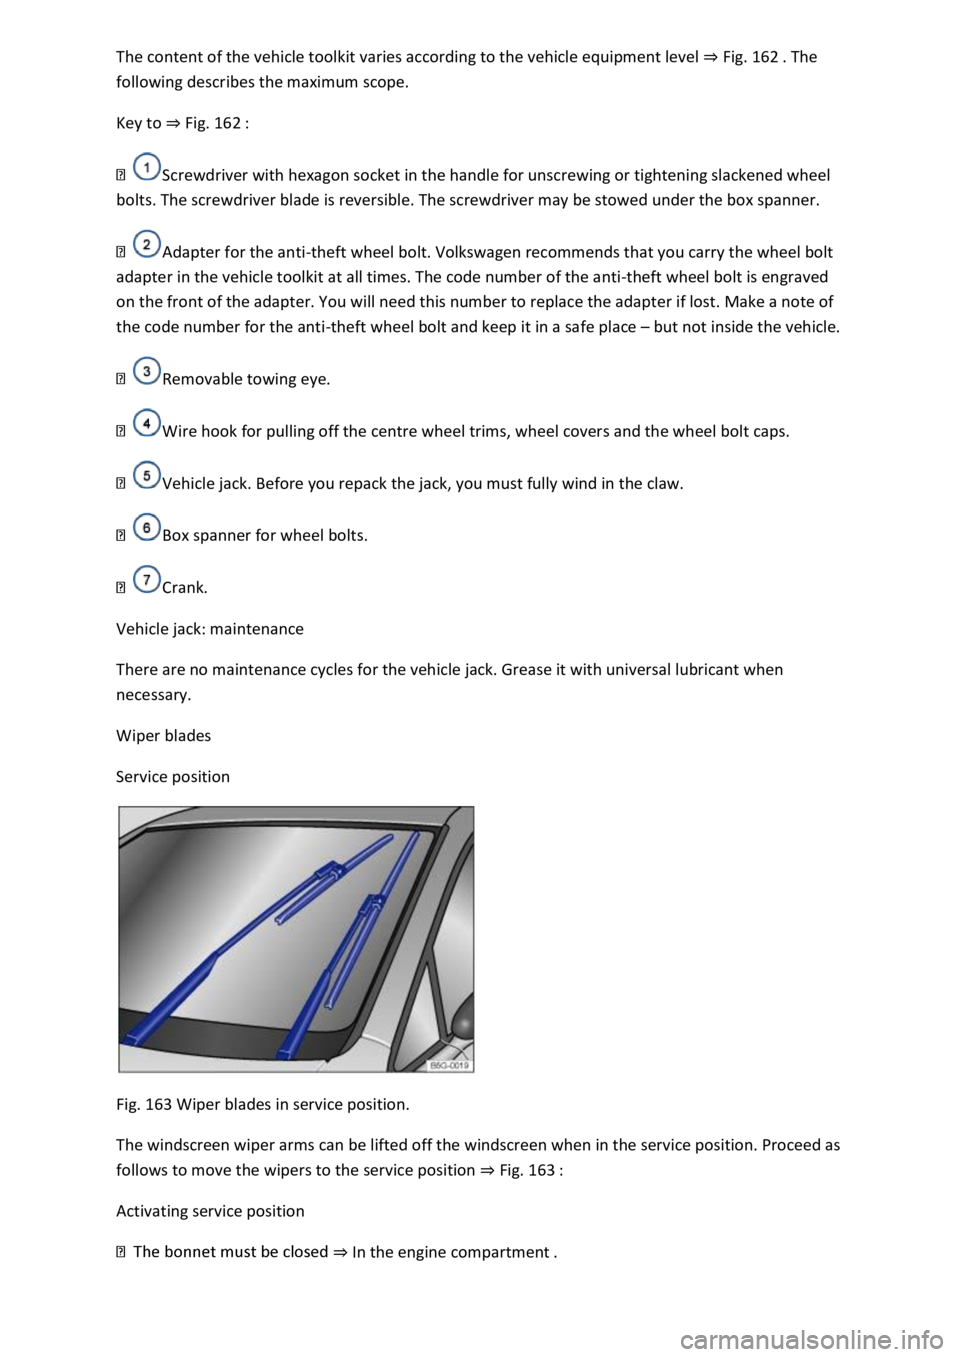
Fig. 162
following describes the maximum scope.
Key to Fig. 162
Screwdriver with hexagon socket in the handle for unscrewing or tightening slackened wheel
bolts. The screwdriver blade is reversible. The screwdriver may be stowed under the box spanner.
Adapter for the anti-theft wheel bolt. Volkswagen recommends that you carry the wheel bolt
adapter in the vehicle toolkit at all times. The code number of the anti-theft wheel bolt is engraved
on the front of the adapter. You will need this number to replace the adapter if lost. Make a note of
the code number for the anti-theft wheel bolt and keep it in a safe place but not inside the vehicle.
Removable towing eye.
Wire hook for pulling off the centre wheel trims, wheel covers and the wheel bolt caps.
Vehicle jack. Before you repack the jack, you must fully wind in the claw.
Box spanner for wheel bolts.
Crank.
Vehicle jack: maintenance
There are no maintenance cycles for the vehicle jack. Grease it with universal lubricant when
necessary.
Wiper blades
Service position
Fig. 163 Wiper blades in service position.
The windscreen wiper arms can be lifted off the windscreen when in the service position. Proceed as
follows to move the wipers to the service position Fig. 163
Activating service position
In the engine compartment
Page 339 of 502

Additional bulb specifications
Some bulbs in headlights or in tail light clusters might have factory specifications that are different to
standard bulbs. The designation is inscribed on the bulb, either on the glass part or on the base.
WARNING
Accidents can occur if roads are not sufficiently illuminated and other road users have difficulty
seeing the vehicle, or cannot see it at all.
WARNING
Changing bulbs incorrectly can cause accidents and serious injuries.
In the
engine compa
injuries can be sustained here.
change a bulb unless you are familiar with the procedure. If you are uncertain of what to
do, the work should be carried out by a qualified workshop.
heat will cause fingerprints to evaporate on the bulb, which in turn will cause the reflector to go
blind.
-edged parts in the headlight housing in the engine compartment and on the tail
light cluster housing. Protect your hands when changing bulbs.
NOTICE
Damage to the electrical system can be caused by water entering the system if the rubber cover or
plastic covers on the headlight housing are not properly mounted after a bulb has been changed.
Checklist Information on changing bulbs
Page 341 of 502
bulb would cause the remaining fingerprint to evaporate and be deposited on the reflector. This will
impair the light output of the headlight.
After changing a bulb, check to ensure that the bulb is working properly. If the bulb is not working
properly, the bulb may not have been inserted properly, may have failed again, or the connector
may have been fitted incorrectly.
Any time you change a bulb at the front of the vehicle, the headlight settings should be checked by a
qualified workshop.
WARNING
Ignoring any of the items on this important safety checklist can lead to accidents and severe injuries.
NOTICE
Always take care when removing or fitting lights to prevent damage to the paintwork or to other
vehicle parts.
Changing bulbs in the front headlights (halogen bulbs)
Fig. 166 In engine compartment: covers on the left-
Page 342 of 502
Fig. 167 In the engine compartment: changing bulbs in the left front headlight.
First read and observe the introductoryinformation and safety warnings
The front headlight does not need to be removed when changing bulbs.
The actions should always be carried out in the specified order:
Fig. 166and Fig. 167
Observe and follow the instructions on the checklist Checklist Information on changing
bulbs
Open the bonnet In the engine compartment
Pull off the rubber cover on the rear side of the headlight. Depending on the version, a hard plastic
cover may be fitted here. Turn the cover anti-clockwise and remove it.
Dipped beam
Main beam
back and out.
Replace the defective bulb with a new bulb of the same type.
Dipped beam it will go.
Main beam
Page 343 of 502

t clockwise as far as it will go.
Close the bonnet In the engine compartment
Changing the bulbs in the headlights (lights with LED technology)
First read and observe the introductoryinformation and safety warnings
These lamps use LED technology. The LEDs cannot be replaced by customers. If some LEDs fail, this
may be an indication that more elements are on the point of failure. In this case, have the lights
checked and renewed if necessary at a qualified workshop.
Changing the front turn signal bulbs
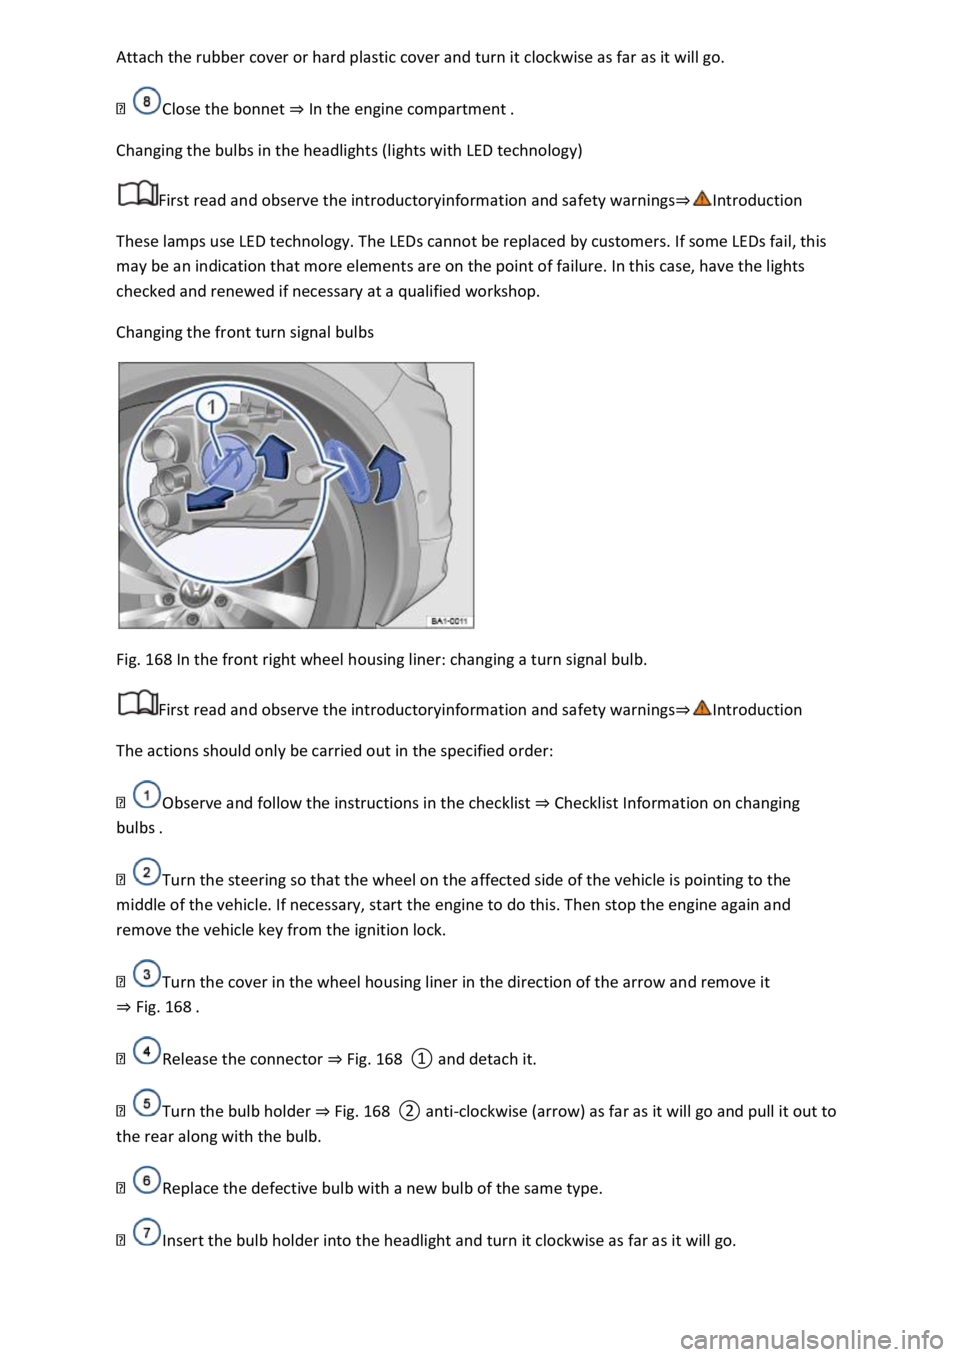
Fig. 168 In the front right wheel housing liner: changing a turn signal bulb.
First read and observe the introductoryinformation and safety warnings
The actions should only be carried out in the specified order:
Observe and follow the instructions in the checklist Checklist Information on changing
bulbs
Turn the steering so that the wheel on the affected side of the vehicle is pointing to the
middle of the vehicle. If necessary, start the engine to do this. Then stop the engine again and
remove the vehicle key from the ignition lock.
Turn the cover in the wheel housing liner in the direction of the arrow and remove it
Fig. 168
Release the connector Fig. 168
Turn the bulb holder Fig. 168clockwise (arrow) as far as it will go and pull it out to
the rear along with the bulb.
Replace the defective bulb with a new bulb of the same type.
Insert the bulb holder into the headlight and turn it clockwise as far as it will go.
Page 346 of 502

Fuses in the engine compartment
Fuse table for fuses in the dash panel
Fuse tables for fuses in the engine compartment
Changing a blown fuse
At the time of publication we are unable to provide an complete overview of the locations of the
fuses for the electrical consumers. This is because the vehicle is under constant development,
because fuses are assigned differently according to the vehicle equipment level and because several
electrical consumers may use a single fuse. You can obtain more information about the fuse
assignment from a Volkswagen dealership.
Several electrical consumers can share a single fuse. Conversely, a single consumer could have more
than one fuse.
Therefore fuses should only be replaced when the cause of the fault has been rectified. If a new fuse
blows shortly after fitting, have the electrical system checked by a qualified workshop.
WARNING
High voltages in the electrical system can cause electric shocks, serious burns and death.
WARNING
Using unsuitable or repaired fuses and bridging an electrical circuit without fuses can cause a fire
and serious injuries.
fuse with the same amp rating (same colour and markings) and size.
NOTICE
electrical consumers off and remove the vehicle key from the ignition before changing a fuse.
pened. Dirt and moisture in the fuse
boxes can damage the electrical system.