2018 VAUXHALL VIVARO Car seat
[x] Cancel search: Car seatPage 172 of 233

170Vehicle care9Danger
Ensure adequate ventilation when
charging the battery. There is a
risk of explosion if gases
generated during charging are
allowed to accumulate!
Jump starting 3 195.
Warning label
Meaning of symbols: ● No sparks, naked flames or smoking.
● Always shield eyes. Explosive gases can cause blindness or
injury.
● Keep the vehicle battery out of reach of children.
● The vehicle battery contains sulfuric acid which could cause
blindness or serious burn
injuries.
● See the Owner's Manual for further information.
● Explosive gas may be present in the vicinity of the battery.Additional battery
Depending on the vehicle's auxiliary
equipment, certain models may have
an additional battery mounted under
the front passenger bench seat.
Notice
The additional battery is
automatically connected to the main vehicle battery only when the engine
is running. It does not need to be
manually disconnected before
Page 177 of 233

Vehicle care1752.Carefully pull lamp assembly from
retaining pins on the outer side
and remove.
3. Detach wiring connector from lamp assembly.
4. Rotate bulb holder anticlockwiseto separate from lamp.
5. Renew bulb.
6. Push to install the bulb holder into
the lamp, then rotate clockwise to secure.
7. Reattach wiring connector to lamp
assembly and check that it is
located correctly.
8. Replace lamp assembly into original position, ensuring that it isseated correctly on retaining pins.
9. Replace the three bolts.
Side turn signal lights
1. Release lamp assembly from wing by depressing clips using a
suitable tool and lift out lamp
assembly from aperture.
2. Remove bulb holder from lamp assembly by rotating
anticlockwise and renew bulb.
3. Install bulb holder in lamp assembly and install lamp
assembly into aperture.
Centre high-mounted brake
light
Rear doors 1. Open the rear doors.
2. Remove the two bolts from inside the rear doors.
Page 185 of 233
Vehicle care183No.Circuit40Rear power outlet41Starting / Body control module42Heated seats43Tachograph44Windscreen wiper45Heating / Air conditioning
After having changed defective fuses,
replace the trim panel.
Vehicle tools
Tools
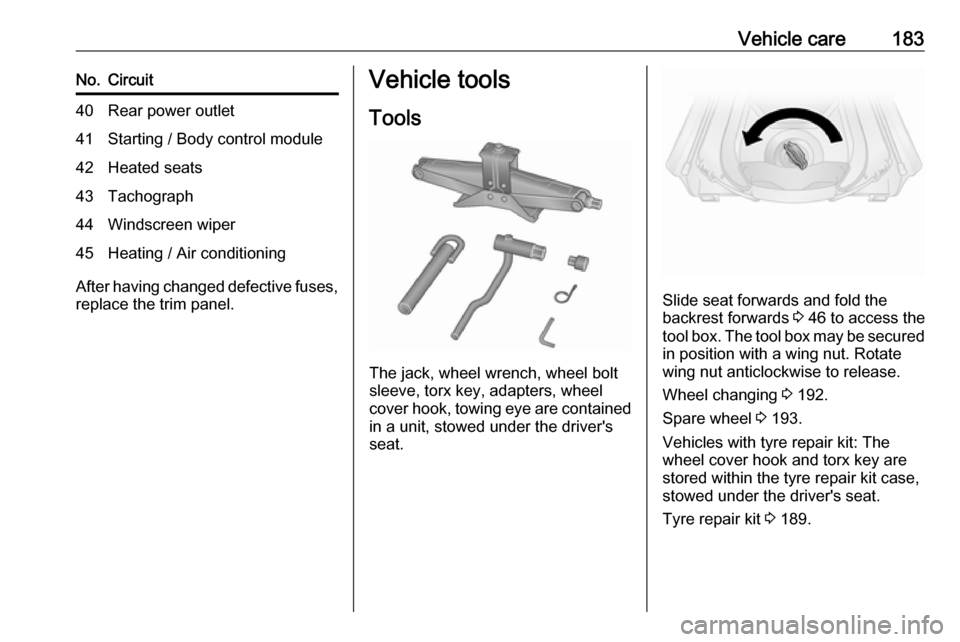
The jack, wheel wrench, wheel bolt
sleeve, torx key, adapters, wheel
cover hook, towing eye are contained
in a unit, stowed under the driver's
seat.
Slide seat forwards and fold the
backrest forwards 3 46 to access the
tool box. The tool box may be secured
in position with a wing nut. Rotate
wing nut anticlockwise to release.
Wheel changing 3 192.
Spare wheel 3 193.
Vehicles with tyre repair kit: The wheel cover hook and torx key are
stored within the tyre repair kit case,
stowed under the driver's seat.
Tyre repair kit 3 189.
Page 191 of 233

Vehicle care189Tyre chains
Tyre chains are only permitted on the
front wheels.
Always use fine mesh chains that add no more than 15 mm to the tyre tread
and the inboard sides (including chain lock).
For tyre size 215/60 R17, consult a
workshop.
9 Warning
Damage may lead to tyre blowout.
Wheel covers on steel wheels may
come into contact with parts of the
chains. In such cases, remove the
wheel covers.
Tyre chains may only be used at
speeds up to 30 mph and, when
travelling on roads that are free of
snow, they may only be used for brief
periods since they are subject to rapid wear on a hard road and may snap.
The use of tyre chains is not permitted on the temporary spare wheel.
Tyre repair kit Minor damage to the tyre tread or
sidewall can be repaired with the tyre
repair kit.
Do not remove foreign bodies from
the tyres.
Tyre damage exceeding four mm or
that is at tyre sidewall near the rim
cannot be repaired with the tyre repair kit.9 Warning
Do not drive faster than 50 mph.
Do not use for a lengthy period.
Steering and handling may be
affected.
If the vehicle has a flat tyre:
Apply the parking brake and engage
first gear or reverse gear.
The tyre repair kit is located under the
driver's seat. Vehicle tools 3 183.
1. Remove the compressor and sealant bottle from the tyre repairkit case.
2. Remove the electrical connection cable and air hose from the
compartments on the underside
of the compressor.
Page 193 of 233

Vehicle care191
12. The prescribed tyre pressureshould be obtained within
15 minutes. Tyre pressure
3 217 . When the correct pressure
is obtained, switch off the
compressor.
If the prescribed tyre pressure is
not obtained within 15 minutes,
remove the tyre repair kit. Move
the vehicle one tyre rotation
(approx. two metres). Reattach
the tyre repair kit and continue the
filling procedure for 15 minutes. If
the prescribed tyre pressure is still not obtained, the tyre is too badly
damaged. Seek the assistance of
a workshop.
Drain excess tyre pressure with
the button beside the pressure
indicator.
Do not run the compressor for
longer than 15 minutes.
13. Detach the tyre repair kit.
14. Remove any excess sealant using a cloth.
15. Take the label indicating maximum permitted speed from
the tyre repair kit and affix in the
driver's field of view.
16. Store the sealant bottle in the plastic bag. Return tyre repair kit
to case and stow under the driver's seat.17. Continue driving immediately so that the sealant is evenlydistributed throughout the tyre.
After driving approx. six miles, but no more than ten minutes, stop
and check tyre pressure using the
compressor. Screw air hose from
compressor directly onto tyre
valve when doing this.
18. If the tyre pressure is more than 2.2 bar (220 kPa/31 psi), set it to
the correct value. Repeat the
procedure until there is no more
loss of pressure.
If the tyre pressure has fallen
below 2.2 bar (220 kPa/31 psi),
the vehicle must not be driven.
Seek the assistance of a
workshop.
19. Detach the tyre repair kit, return to
case and stow under the driver's
seat.9 Warning
Do not allow the sealant to contact
skin, eyes or clothing. If swallowed seek medical assistance
immediately.
Page 199 of 233

Vehicle care197Caution
Do not tow the vehicle from the
rear. The front towing eye must
only be used for towing and not
recovering a vehicle.
Caution
Activate the child locks in the rear
doors if the rear seats are
occupied. Child locks 3 30.
Switch on ignition to permit operation
of brake lights, horn and windscreen
wipers, and move the steering wheel
slightly to release the steering wheel
lock.
Notice
Depending on version, it may be
necessary to switch on the engine to
permit operation of brake lights.
Move the selector lever to neutral.
Release the parking brake.
Caution
Drive slowly. Do not drive jerkily.
Excessive tractive force can
damage the vehicle.
When the engine is not running,
considerably more force is needed to
brake and steer.
Switch on hazard warning flashers
3 109.
To prevent the entry of exhaust fumes
from the towing vehicle, switch on the air recirculation system 3 115 and
close the windows.
Seek the assistance of a workshop.
After towing, unscrew the towing eye
and replace cap.
Towing another vehicle
The fixed towing eye is located under the rear bumper, on the left vehicle
side.
Attach a tow rope - or better still a tow
rod - to the rear towing eye, never to
the rear axle and suspension units.
The rear towing eye must only be
used for towing and not recovering a
vehicle.
Page 202 of 233

200Vehicle carePaintwork damageRectify minor paintwork damage with
a touch-up pen before rust forms.
Have more extensive damage or rust
areas repaired by a workshop.
Underbody Some areas of the vehicle underbody
have a PVC undercoating while other
critical areas have a durable
protective wax coating.
After the underbody is washed, check
the underbody and have it waxed if
necessary.
Bitumen / rubber materials could
damage the PVC coating. Have
underbody work carried out by a
workshop.
Before and after winter, wash the
underbody and have the protective
wax coating checked.
Towing equipment Do not clean the coupling ball bar with
a steam-jet or high-pressure jet
cleaner.Interior care
Interior and upholstery Only clean the vehicle interior,
including the instrument panel fascia
and panelling, with a dry cloth or
interior cleaner.
Clean any leather upholstery with
clear water and a soft cloth. In case of
heavy soiling, use leather care.
The instrument cluster and the
displays should only be cleaned using a soft damp cloth. If necessary use aweak soap solution.
Clean fabric upholstery with a
vacuum cleaner and brush. Remove
stains with an upholstery cleaner.
Clothing fabrics may not be
colourfast. This could cause visible
discolourations, especially on light-
coloured upholstery. Removable
stains and discolourations should be
cleaned as soon as possible.
Clean seat belts with lukewarm water or interior cleaner.Caution
Close Velcro fasteners as open
Velcro fasteners on clothing could damage seat upholstery.
The same applies to clothing with
sharp-edged objects, like zips or
belts or studded jeans.
Plastic and rubber parts
Plastic and rubber parts can be
cleaned with the same cleaner as
used to clean the body. Use interior cleaner if necessary. Do not use any
other agent. Avoid solvents and petrol in particular. Do not use high-
pressure jet cleaners.
Page 226 of 233

224IndexAAbsorptive Glass Mat battery .....169
Accessories and vehicle modifications .......................... 163
Adaptive forward lighting ...........108
AdBlue .................. 98, 103, 139, 202
AdBlue tank ................................ 216
Adjustable air vents ...................125
AGM battery ............................... 169
Airbag and belt tensioners ...........95
Airbag deactivation ................62, 95
Airbag label............................. 57, 62
Airbag system .............................. 57
Air conditioning regular operation ................................ 126
Air conditioning system .............. 115
Air intake .................................... 126
Air recirculation ...................115, 196
Air vents...................................... 125
Alert ............................................ 102
Antifreeze ................................... 167
Antilock brake system ................ 146
Antilock brake system (ABS) .......97
Anti-theft alarm system ................36
Anti-theft bolts............................. 192
Anti-theft locking system .............. 35
Anti-theft security lock ..................24
Appearance care ........................198
Armrest ........................................ 48
Ashtrays ....................................... 88Automatic anti-dazzle ..................41
Automatic fuel cut-off ..................133
Automatic light control ...............107
Automatic locking ........................30
Autostop ............................. 132, 134
Auxiliary heater ........................... 120
B Battery ........................................ 169
Battery discharge protection ......113
Battery, jump starting.................. 195
Belts.............................................. 53 Bench seat.................................... 74
BlueInjection ............................... 139
Bonnet ....................................... 164
Bottle holders................................ 74
Brake and clutch fluid .................202
Brake assist ............................... 147
Brake fluid .................................. 168
Brakes ............................... 145, 168
Brake system ............................... 96
Breakdown.................................. 196 Bulb replacement ....................... 173
C
Capacities .................................. 216
Car Pass ...................................... 20
Catalytic converter .....................138
Central locking system ................24
Centre high-mounted brake light 175
Changing tyre and wheel size ...188