Page 171 of 261

Driving and operating169
Remove the fuel filler cap by turning
it anti-clockwise.
The fuel filler cap can be hung on the lower hook of the fuel filler flap.
For refuelling, fully insert the pump
nozzle and switch it on.
After automatic cut-off, it can be
topped up by operating the pump
nozzle a maximum of two more times.
Caution
Wipe off any overflowing fuel
immediately.
When refuelling is complete, replace
the fuel filler cap and turn it clockwise.
Close the fuel filler flap.
Fuel filler cap
Only use genuine fuel filler caps.
Diesel-engined vehicles have special
fuel filler caps.
Fuel consumption - CO 2-
Emissions The fuel consumption (combined) ofthe model Vauxhall Movano is withina range of approx. 30 to 43 mpg.
The CO 2 emission (combined) is
within a range of approx. 173 to 248 g/km.
For the values specific to your
vehicle, refer to the EEC Certificate of
Conformity provided with your vehicle or other national registration
documents.
General information The official fuel consumption and
specific CO 2 emission figures quoted
relate to the EU base model with
standard equipment.Fuel consumption data and CO 2
emission data are determined
according to regulation R (EC)
No. 715/2007 (in the latest applicable version), taking into consideration the
vehicle weight in running order, as
specified by the regulation.
The figures are provided only for the
purpose of comparison between
different vehicle variants and must
not be taken as a guarantee for the
actual fuel consumption of a
particular vehicle.
Additional equipment may result in
slightly higher results than the stated
consumption and CO 2 figures.
Furthermore, fuel consumption is dependent on personal driving style
as well as road and traffic conditions.
Page 176 of 261
174Vehicle careGeneral Information
Accessories and vehicle modifications
We recommend the use of genuine
parts and accessories and factory
approved parts specific for your
vehicle type. We cannot assess or guarantee reliability of other products
- even if they have a regulatory or
otherwise granted approval.
Any modification, conversion or other changes made to standard vehicle
specifications (including, without
limitation, software modifications,
modifications of the electronic control units) may invalidate the warranty
offered by Vauxhall. Furthermore,
such changes may impact fuel
consumption, CO 2 emissions and
other emissions of the vehicle and
cause the vehicle to no longer
conform to the operating permit,
impacting the validity of your vehicle
registration.Caution
When transporting the vehicle on
a train or on a recovery vehicle, the
mud flaps might be damaged.
Vehicle storage
Storage for a long period of time
If the vehicle is to be stored for several months:
● Wash and wax the vehicle.
● Have the wax in the engine compartment and underbody
checked.
● Clean and preserve rubber seals.
● Change engine oil.
● Drain washer fluid reservoir. ● Check coolant antifreeze and corrosion protection.
● Adjust tyre pressure to the value specified for full load.
● Park vehicle in a dry, well ventilated place. Engage first or
reverse gear. Prevent the vehicle
from rolling.
● Do not apply parking brake.
● Open bonnet, close all doors and
lock the vehicle.
● Disconnect the clamp from the negative terminal of the vehicle
battery. Beware that all systems
are not functional, e.g. anti-theft
alarm system.
Putting back into operation When the vehicle is to be put back into
operation:
● Connect the clamp to the negative terminal of the vehicle
battery. Activate the electronics
of the power windows.
● Check tyre pressure.
● Fill up the washer fluid reservoir. ● Check the engine oil level.
● Check the coolant level.
● Fit the number plate, if necessary.
Page 187 of 261
Vehicle care185High beam
1. Remove headlamp protectivecover.
2. Detach wiring connector from bulb holder.
3. Release spring clip and withdraw bulb holder from reflector
housing.
4. Detach bulb from bulb holder and renew the bulb.
5. Insert bulb holder in reflector housing.
6. Secure with spring clip and attach
wiring connector to bulb holder.
7. Install headlamp protective cover.
Low beam
1. Remove headlamp protective
cover.
2. Detach wiring connector from bulb holder.
3. Rotate bulb holder anti-clockwise to disengage.
4. Withdraw bulb holder from reflector housing.
Page 188 of 261
186Vehicle care
5. Detach bulb from bulb holder andrenew the bulb.
6. Insert the bulb holder, engaging the two lugs in the reflectorhousing and rotate clockwise to
secure.
7. Attach wiring connector to bulb holder.
8. Install headlamp protective cover.
Sidelights
1. Remove protective cover.
2. Detach wiring connector from bulb holder.
3. Rotate bulb holder anti-clockwise to disengage.
4. Withdraw bulb holder from reflector housing.
5. Detach bulb from bulb holder andrenew the bulb.
6. Insert the bulb holder, engaging the two lugs in the reflectorhousing and rotate clockwise to
secure.
7. Attach wiring connector to bulb holder.
8. Install protective cover.
Page 189 of 261
Vehicle care187Adaptive forward lighting
Cornering light
Headlights have separate systems for high beam 1 and low beam 2. The
cornering light 3 is located between
the headlights.
1. Remove protective cover.
2. Detach wiring connector from bulb holder.
3. Rotate bulb holder anti-clockwise to disengage.
4. Withdraw bulb holder from reflector housing.
5. Detach bulb from bulb holder andrenew the bulb.
6. Insert the bulb holder, engaging the two lugs in the reflectorhousing and rotate clockwise to
secure.
7. Attach wiring connector to bulb holder.
8. Install protective cover.
Fog lights
Have the front fog light bulbs replaced
by a workshop.
Front turn signal lights
1. Remove protective cover.
2. Detach wiring connector from bulb holder.
3. Rotate bulb holder anti-clockwise to disengage.
4. Withdraw bulb holder from reflector housing.
Page 190 of 261
188Vehicle care
5. Detach bulb from bulb holder andrenew the bulb.
6. Insert the bulb holder, engaging the two lugs in the reflectorhousing and rotate clockwise to
secure.
7. Attach wiring connector to bulb holder.
8. Install protective cover.
Tail lights
Rear brake, tail, turn signal,
reverse and fog tail lights
1. Remove the upper and lower trim panels from the rear pillar.
2. Unscrew the two nuts from the locating pins on the rear of the
lamp assembly.
3. Withdraw the lamp assembly rearwards from the outer side.
4. Detach wiring connector from lamp assembly.
5. Remove the three screws from the rear of the lamp assembly.
6. Remove bulb holder from the lamp assembly.
Page 191 of 261

Vehicle care1897. Push bulb into socket slightly,rotate anti-clockwise, remove andrenew bulb.
Turn signal light ( 1)
Tail and brake light ( 2)
Reverse light ( 3)
Rear fog light, may be on one side
only ( 4)
8. Replace bulb holder in lamp assembly.
9. Replace the three screws on the rear of the lamp assembly.
10. Reattach wiring connector to lamp
assembly.
11. Replace lamp assembly from the outer side into original position,
ensuring that it is seated correctly.
12. Replace the two nuts onto the locating pins on the rear of the
lamp assembly.
13. Install the upper and lower trim panels to the rear pillar.Crew Cab, Chassis CabRear brake, tail, turn signal, reverse
and fog tail lights
1. Remove the four screws from the lens.
2. Remove lens from the aperture.
3. Push bulb into socket slightly, rotate anti-clockwise, remove and
renew bulb.
Turn signal light ( 1)
Tail and brake light ( 2)
Reverse light ( 3)
Rear fog light, may be on one side only ( 4)
4. Install lens in aperture and replace the four screws.
Page 194 of 261
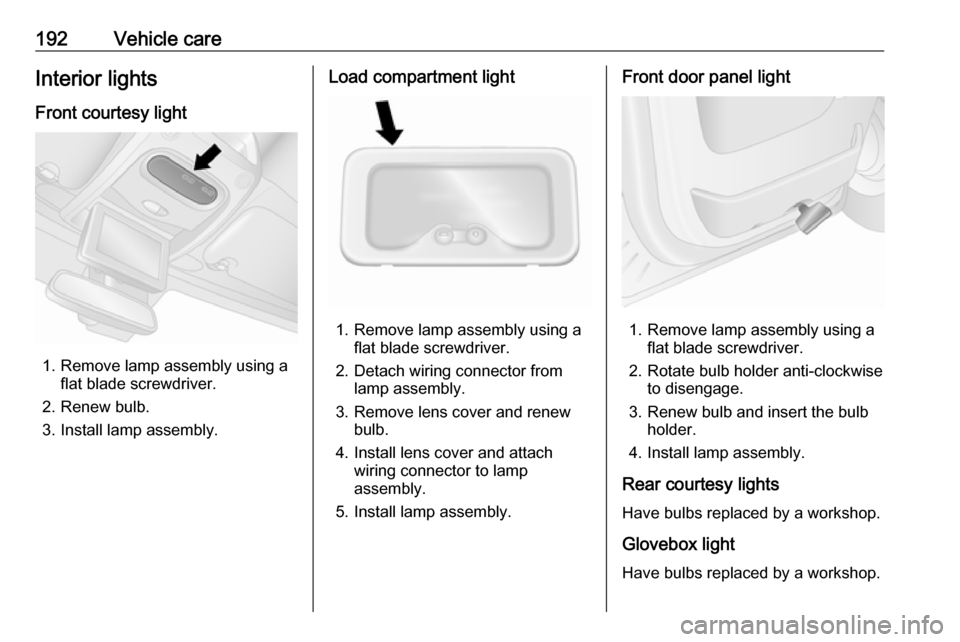
192Vehicle careInterior lightsFront courtesy light
1. Remove lamp assembly using a flat blade screwdriver.
2. Renew bulb.
3. Install lamp assembly.
Load compartment light
1. Remove lamp assembly using a flat blade screwdriver.
2. Detach wiring connector from lamp assembly.
3. Remove lens cover and renew bulb.
4. Install lens cover and attach wiring connector to lamp
assembly.
5. Install lamp assembly.
Front door panel light
1. Remove lamp assembly using a flat blade screwdriver.
2. Rotate bulb holder anti-clockwise to disengage.
3. Renew bulb and insert the bulb holder.
4. Install lamp assembly.
Rear courtesy lights
Have bulbs replaced by a workshop.
Glovebox light
Have bulbs replaced by a workshop.