Page 212 of 261

210Vehicle care
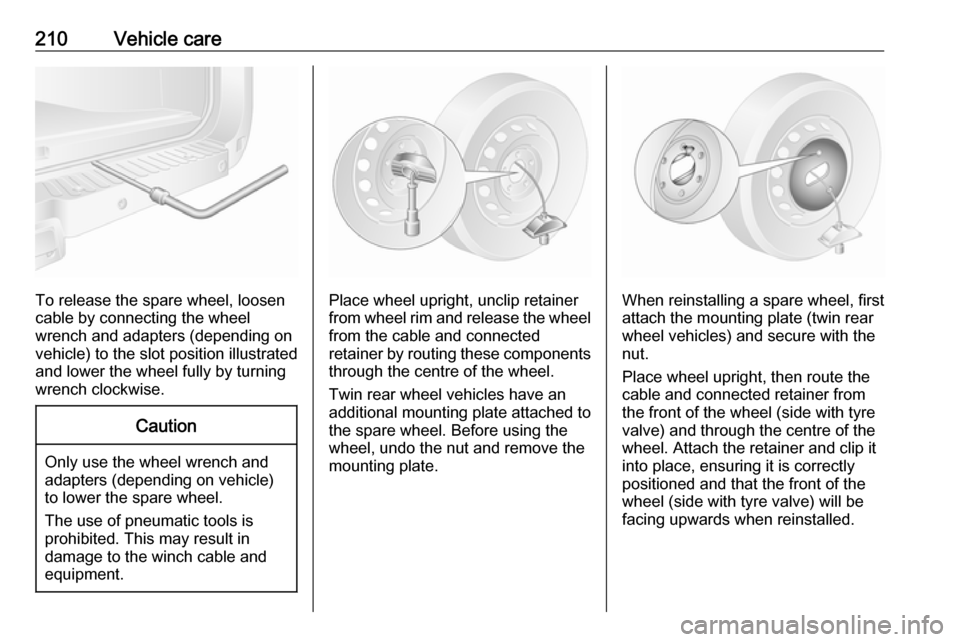
To release the spare wheel, loosen
cable by connecting the wheel
wrench and adapters (depending on
vehicle) to the slot position illustrated
and lower the wheel fully by turning
wrench clockwise.
Caution
Only use the wheel wrench and
adapters (depending on vehicle)
to lower the spare wheel.
The use of pneumatic tools is
prohibited. This may result in
damage to the winch cable and
equipment.
Place wheel upright, unclip retainer
from wheel rim and release the wheel
from the cable and connected
retainer by routing these components through the centre of the wheel.
Twin rear wheel vehicles have an
additional mounting plate attached to
the spare wheel. Before using the
wheel, undo the nut and remove the
mounting plate.When reinstalling a spare wheel, first
attach the mounting plate (twin rear
wheel vehicles) and secure with the
nut.
Place wheel upright, then route the
cable and connected retainer from
the front of the wheel (side with tyre
valve) and through the centre of the
wheel. Attach the retainer and clip it
into place, ensuring it is correctly
positioned and that the front of the
wheel (side with tyre valve) will be
facing upwards when reinstalled.
Page 213 of 261

Vehicle care211
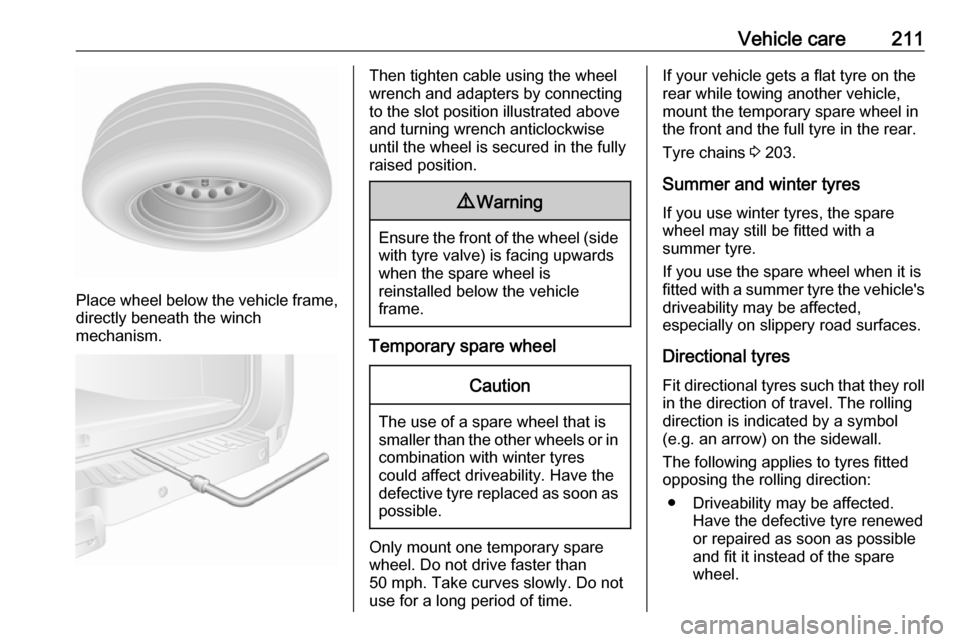
Place wheel below the vehicle frame,
directly beneath the winch
mechanism.
Then tighten cable using the wheel
wrench and adapters by connecting
to the slot position illustrated above
and turning wrench anticlockwise
until the wheel is secured in the fully
raised position.9 Warning
Ensure the front of the wheel (side
with tyre valve) is facing upwards
when the spare wheel is
reinstalled below the vehicle
frame.
Temporary spare wheel
Caution
The use of a spare wheel that is smaller than the other wheels or in combination with winter tyres
could affect driveability. Have the defective tyre replaced as soon as
possible.
Only mount one temporary spare
wheel. Do not drive faster than
50 mph. Take curves slowly. Do not
use for a long period of time.
If your vehicle gets a flat tyre on the
rear while towing another vehicle,
mount the temporary spare wheel in
the front and the full tyre in the rear.
Tyre chains 3 203.
Summer and winter tyres
If you use winter tyres, the spare
wheel may still be fitted with a
summer tyre.
If you use the spare wheel when it is
fitted with a summer tyre the vehicle's driveability may be affected,
especially on slippery road surfaces.
Directional tyres Fit directional tyres such that they rollin the direction of travel. The rolling
direction is indicated by a symbol
(e.g. an arrow) on the sidewall.
The following applies to tyres fitted
opposing the rolling direction:
● Driveability may be affected. Have the defective tyre renewed
or repaired as soon as possible
and fit it instead of the spare
wheel.
Page 216 of 261

214Vehicle care
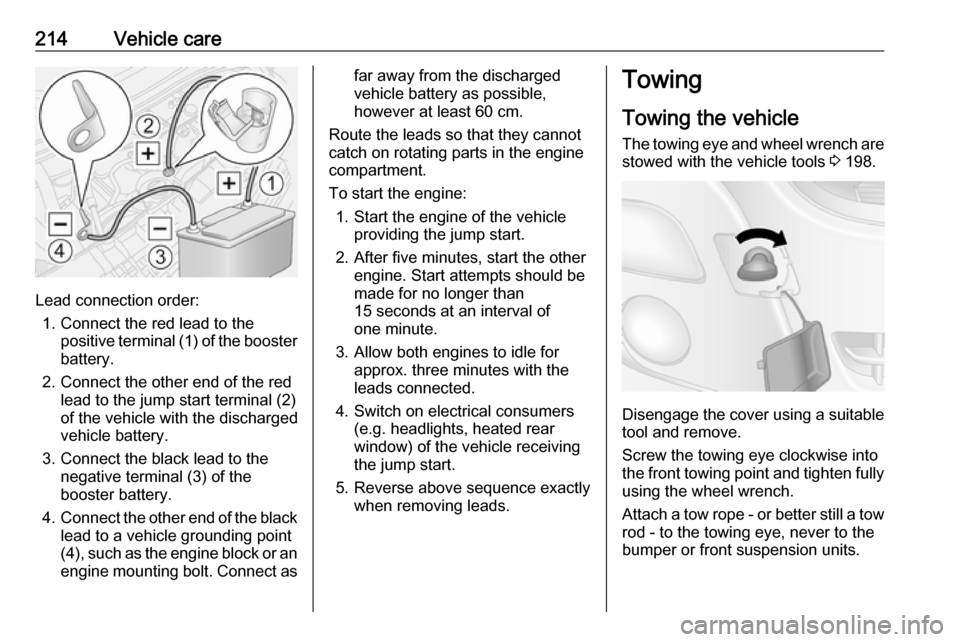
Lead connection order:1. Connect the red lead to the positive terminal (1) of the booster
battery.
2. Connect the other end of the red lead to the jump start terminal (2)
of the vehicle with the discharged
vehicle battery.
3. Connect the black lead to the negative terminal (3) of the
booster battery.
4. Connect the other end of the black
lead to a vehicle grounding point
(4), such as the engine block or an
engine mounting bolt. Connect as
far away from the discharged
vehicle battery as possible,
however at least 60 cm.
Route the leads so that they cannot
catch on rotating parts in the engine
compartment.
To start the engine: 1. Start the engine of the vehicle providing the jump start.
2. After five minutes, start the other engine. Start attempts should be
made for no longer than
15 seconds at an interval of
one minute.
3. Allow both engines to idle for approx. three minutes with the
leads connected.
4. Switch on electrical consumers (e.g. headlights, heated rear
window) of the vehicle receiving
the jump start.
5. Reverse above sequence exactly when removing leads.Towing
Towing the vehicle The towing eye and wheel wrench are
stowed with the vehicle tools 3 198.
Disengage the cover using a suitable
tool and remove.
Screw the towing eye clockwise into
the front towing point and tighten fully using the wheel wrench.
Attach a tow rope - or better still a tow
rod - to the towing eye, never to the
bumper or front suspension units.
Page 255 of 261

253Charging system .......................... 96
Child locks ................................... 26
Child restraint installation locations ................................... 64
Child restraints.............................. 61
Child restraint systems ................61
Cigarette lighter ........................... 88
Cleaning the vehicle ...................216
Climate control ............................. 15
Climate control systems .............115
Clock ............................................ 86
Coat hooks ................................... 72
Collision damage repair ..............250
Control indicators.......................... 92
Control of the vehicle .................132
Controls ........................................ 83
Convex shape .............................. 34
Coolant ....................................... 178
Coolant and antifreeze ...............220
Coolant heater ............................ 122
Cornering light ....................110, 187
Coupling ball bar ........................171
Cruise control ....................100, 158
Cupholders .................................. 72
D Danger, Warnings and Cautions ...4
Dashboard .................................... 10
Daytime running lights ...............109
Declaration of conformity ............246DEF............................................ 142
Demisting and defrosting ..............15
Diesel exhaust fluid ....................142
Diesel fuel ................................... 167
Diesel fuel filter .......................... 182
Diesel fuel system bleeding .......183
Diesel particle filter ....................141
Door locks..................................... 21
Door open .................................. 100
Doors ............................................ 27
DPF (diesel particle filter) ...........141
Drink holders ................................ 72
Driver assistance systems ..........158
Driver Information Centre ...........101
Driving characteristics and towing tips .............................. 170
Driving economically................... 132
Driving hints ................................ 132
E ECO mode .................................. 132
ecoScoring.................................. 103
Electric adjustment ......................35
Electrical accessories ...................86
Electrical system......................... 193
Electronic climate control system 117
Electronic driving programmes ..151
Electronic Stability Program 98,
156, 171
Electronic Stability Program off ...98Emergency exit .......................38, 40
End-of-life vehicle recovery .......175
Engine compartment fuse box ...194
Engine coolant ........................... 178
Engine coolant temperature ........98
Engine coolant temperature gauge ....................................... 90
Engine data ............................... 225
Engine Drag Torque Control ......156
Engine exhaust .......................... 141
Engine identification ...................223
Engine oil ...........176, 220, 224, 243
Engine oil additives ....................220
Engine oil level monitor ................91
Engine oil pressure ......................99
Engine oil viscosity grades .........220
Enhanced Traction function....... ................................ 155, 156, 158
Event data recorders ..................250
Exhaust gases ............................ 141
Exit lighting ................................ 114
Exterior care .............................. 216
Exterior light ............................... 100
Exterior lighting ....................12, 107
Exterior mirrors ............................. 34
F
Fault ........................................... 152
Fire extinguisher ........................... 79
First aid ......................................... 79
Page:
< prev 1-8 9-16 17-24