Page 111 of 261

Lighting109Notice
Use of the system does not relieve
the driver from full responsibility for
vehicle operation.
Deactivation
Pull the turn signal lever again.
Control indicator í extinguishes.
High beam assist is also deactivated
when the outer light switch is moved
out of the AUTO position.
Notice
Depending on version, the system
can be also be deactivated via the
Infotainment system. Refer to
Infotainment manual for further
information.
General information
Performance of the system can be
affected due to the following:
● Extreme weather conditions, e.g.
heavy rain, fog or snow.
● The front camera or the windscreen is obstructed, e.g. bya portable navigation system.
● Oncoming or preceding vehicle lights are not detected.● Headlights are not adjustedcorrectly.
● Various reflective surfaces may also cause the system to fail to
detect other vehicles.
Headlight flash
To activate the headlight flash, pull
lever.
Headlight range adjustment
Manual headlight range
adjustment With low beam switched on, adapt the
headlight range to suit the vehicle
load to prevent dazzling of oncoming
traffic.
Turn knurled wheel to required
position:0:front seat occupied4:loaded up to permissible
maximum weight
Headlights when driving
abroad
The asymmetrical headlight beam
extends visibility at the edge of the
road at the passenger side.
However, when driving in countries
where traffic drives on the opposite
side of the road, adjust the headlights
to prevent dazzling of oncoming
traffic.
Have the headlights adjusted by a
workshop.
Daytime running lights
Daytime running lights increase
visibility of the vehicle during daylight.
Page 112 of 261

110LightingThe lights operate automatically
when the ignition is switched on.
If the vehicle is equipped with the
automatic light control function, the
system switches between daytime
running lights and headlights
automatically depending on the
lighting conditions. Automatic light
control 3 107.
Adaptive forward lighting
Cornering light Depending on the steering angle,
vehicle speed and gear selected
when cornering, an additional light
will illuminate the corner of the road
on the respective side when the
headlights are switched on.
The cornering light is switched off
automatically after prolonged use and
at vehicle speeds above 25 mph.Hazard warning flashers
Operated by pressing ¨.
In the event of hard braking, the
hazard warning flashers may turn on automatically. Switch off by pressing
¨ .
Turn and lane-change
signalslever up:right turn signallever down:left turn signal
A resistance point can be felt when
moving the lever.
Constant flashing is activated when
the lever is moved beyond the
resistance point. It is deactivated
when the steering wheel is moved in
the opposite direction or lever is
manually moved back to its neutral
position.
Page 113 of 261
Lighting111Activate temporary flashing by
holding the lever just before the
resistance point. Turn signal lights will
flash until lever is released.
To activate three flashes, tap the lever briefly without passing the
resistance point.
Front fog lights
Turn inner switch to position >
and
release.
Front fog lights operate with engine
running and headlights switched on.
Rear fog lights
Turn inner switch to position ø and
release.
Rear fog lights operate with engine
running and headlights switched on.
Reversing lights
The reversing lights come on when
the ignition is on and reverse gear is
selected.
Misted light covers
The inside of the light covers may mist up briefly in poor, wet and cold
weather conditions, in heavy rain or
after washing.The mist disappears
quickly by itself; to help, switch on the
headlights.
Page 116 of 261
114LightingLighting featuresExit lighting
Headlights come on for approx.
30 seconds after the vehicle is parked
and the system is activated.
Activating 1. Switch off ignition.
2. Remove ignition key.
3. Pull turn signal lever towards steering wheel.
This action can be repeated up to
four times.
The headlights are turned off immediately by turning the light switch
to any position and returning to 7.
Battery discharge protection To prevent discharge of the vehicle
battery when the ignition is switched
off, some interior lights may be
switched off automatically after some
time.
Page 125 of 261

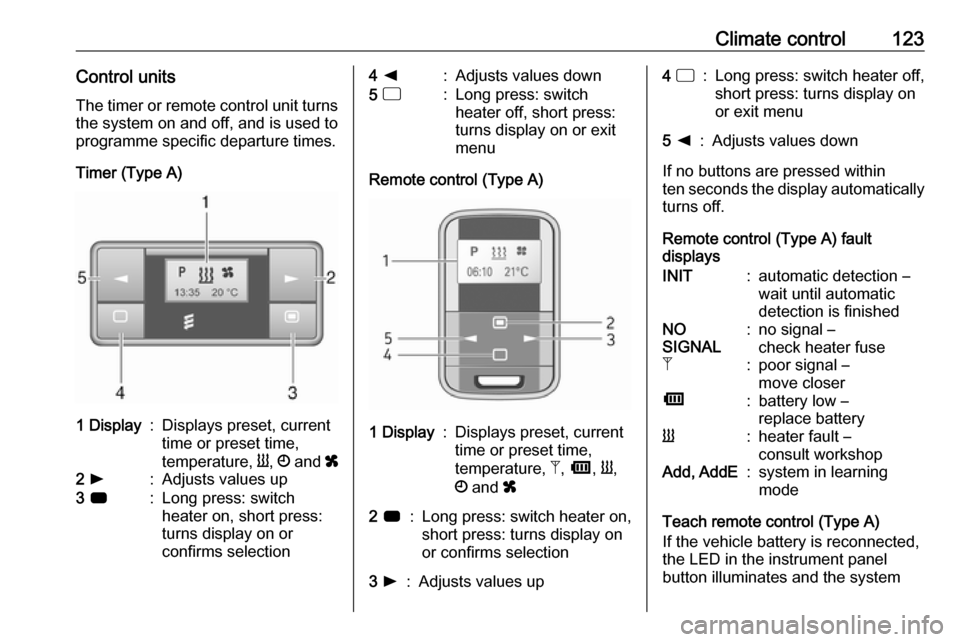
Climate control123Control unitsThe timer or remote control unit turns
the system on and off, and is used to
programme specific departure times.
Timer (Type A)1 Display:Displays preset, current
time or preset time,
temperature, Y, Ö and x2 l:Adjusts values up3 7:Long press: switch
heater on, short press:
turns display on or
confirms selection4 k:Adjusts values down5 d:Long press: switch
heater off, short press:
turns display on or exit
menu
Remote control (Type A)
1 Display:Displays preset, current
time or preset time,
temperature, Z, Ü , Y ,
Ö and x2 7:Long press: switch heater on,
short press: turns display on
or confirms selection3 l:Adjusts values up4 d:Long press: switch heater off,
short press: turns display on
or exit menu5 k:Adjusts values down
If no buttons are pressed within
ten seconds the display automatically
turns off.
Remote control (Type A) fault
displays
INIT:automatic detection –
wait until automatic
detection is finishedNO
SIGNAL:no signal –
check heater fuseZ:poor signal –
move closerÜ:battery low –
replace batteryY:heater fault –
consult workshopAdd, AddE:system in learning
mode
Teach remote control (Type A)
If the vehicle battery is reconnected,
the LED in the instrument panel
button illuminates and the system
Page 126 of 261

124Climate controlconfigures the remote control menuautomatically. If the LED flashes,
select Add or AddE and confirm.
Additional remote control units may
also be configured. Press the button
until LED flashes, switch on the
remote control, select Add and
confirm.
AddE teaches the current remote
control unit exclusively and blocks all
previously configured units. Add
teaches up to four remote control
units, but only one unit can operate the system at any one time.
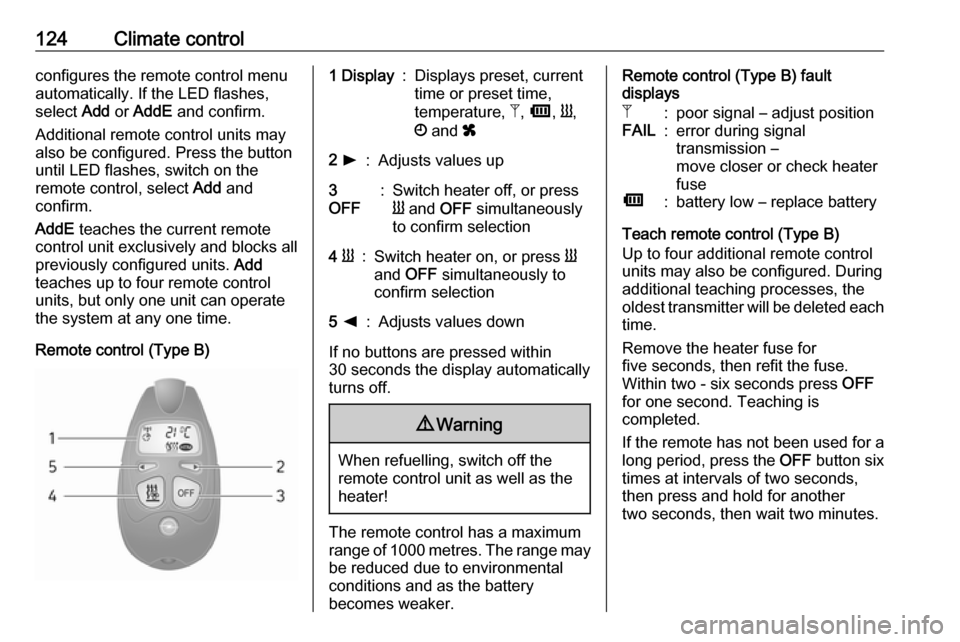
Remote control (Type B)1 Display:Displays preset, current
time or preset time,
temperature, Z, Ü , Y ,
Ö and x2 l:Adjusts values up3
OFF:Switch heater off, or press
Y and OFF simultaneously
to confirm selection4 Y:Switch heater on, or press Y
and OFF simultaneously to
confirm selection5 k:Adjusts values down
If no buttons are pressed within
30 seconds the display automatically
turns off.
9 Warning
When refuelling, switch off the
remote control unit as well as the
heater!
The remote control has a maximum
range of 1000 metres. The range may
be reduced due to environmental
conditions and as the battery
becomes weaker.
Remote control (Type B) fault
displaysZ:poor signal – adjust positionFAIL:error during signal
transmission –
move closer or check heater
fuseÜ:battery low – replace battery
Teach remote control (Type B)
Up to four additional remote control
units may also be configured. During
additional teaching processes, the
oldest transmitter will be deleted each
time.
Remove the heater fuse for
five seconds, then refit the fuse.
Within two - six seconds press OFF
for one second. Teaching is
completed.
If the remote has not been used for a long period, press the OFF button six
times at intervals of two seconds,
then press and hold for another
two seconds, then wait two minutes.
Page 168 of 261

166Driving and operating● the rear doors/tailgate are notclosed correctly
● the vehicle had a rear-end accident
● there are extreme temperature changes
Lane departure warning The lane departure warning system
uses a front camera to observe the
lane markings between which the
vehicle is driving. The system detects
lane changes and warns the driver in
the event of an unintended lane
change via visual and acoustic
signals.
Criteria for the detection of an
unintended lane change are:
● no operation of turn and lane- change signals
● no active steering
If the driver is performing these
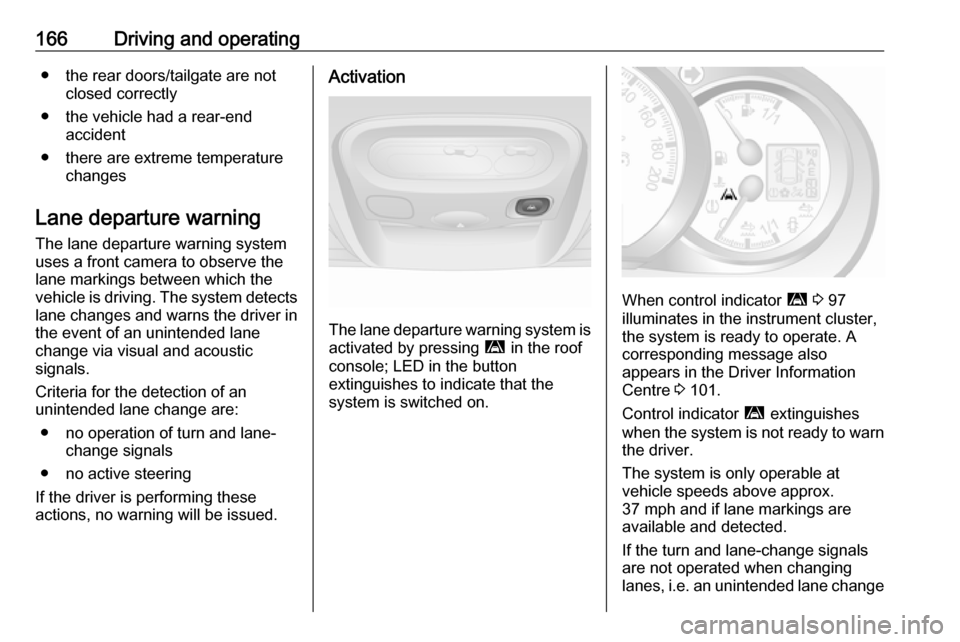
actions, no warning will be issued.Activation
The lane departure warning system is activated by pressing ì in the roof
console; LED in the button
extinguishes to indicate that the
system is switched on.
When control indicator ì 3 97
illuminates in the instrument cluster,
the system is ready to operate. A
corresponding message also
appears in the Driver Information
Centre 3 101.
Control indicator ì extinguishes
when the system is not ready to warn the driver.
The system is only operable at
vehicle speeds above approx.
37 mph and if lane markings are
available and detected.
If the turn and lane-change signals
are not operated when changing
lanes, i.e. an unintended lane change
Page 173 of 261

Driving and operating171In the case of trailer loads of
1200 kg or more, the vertical coupling
load should not be less than 50 kg.
Rear axle loadWhen the trailer is coupled and the
towing vehicle fully loaded (including all occupants), the permissible rear
axle load (see identification plate or
vehicle documents) must not be
exceeded.
Towing equipmentCaution
When operating without a trailer,
remove the coupling ball bar.
Towing equipment audible
warning
For vehicles fitted with towing
equipment, when connected to a
trailer the pitch of the audible warning
changes upon operation of the turn
signals.
The pitch of the audible warning will
change if a turn signal light on the
trailer or the towing vehicle fails.
Trailer stability assist
If the system detects snaking
movements, engine power is reduced
and the vehicle/trailer combination is
selectively braked until the snaking ceases. While the system is working,keep steering wheel as still as
possible.
Trailer stability assist (TSA) is a
function of the Electronic Stability
Program (ESP) 3 156.Auxiliary features
Power take-off
Activation
To activate the power take-off, with
the vehicle stationary and the engine
idling:
● Set the gearshift lever to neutral (vehicles with manual
transmission automated:
selector lever in position N).
● Depress the clutch pedal.