Page 113 of 261
Lighting111Activate temporary flashing by
holding the lever just before the
resistance point. Turn signal lights will
flash until lever is released.
To activate three flashes, tap the lever briefly without passing the
resistance point.
Front fog lights
Turn inner switch to position >
and
release.
Front fog lights operate with engine
running and headlights switched on.
Rear fog lights
Turn inner switch to position ø and
release.
Rear fog lights operate with engine
running and headlights switched on.
Reversing lights
The reversing lights come on when
the ignition is on and reverse gear is
selected.
Misted light covers
The inside of the light covers may mist up briefly in poor, wet and cold
weather conditions, in heavy rain or
after washing.The mist disappears
quickly by itself; to help, switch on the
headlights.
Page 116 of 261
114LightingLighting featuresExit lighting
Headlights come on for approx.
30 seconds after the vehicle is parked
and the system is activated.
Activating 1. Switch off ignition.
2. Remove ignition key.
3. Pull turn signal lever towards steering wheel.
This action can be repeated up to
four times.
The headlights are turned off immediately by turning the light switch
to any position and returning to 7.
Battery discharge protection To prevent discharge of the vehicle
battery when the ignition is switched
off, some interior lights may be
switched off automatically after some
time.
Page 167 of 261

Driving and operating165Infotainment system display screen
In vehicles with Navigation system,
the rear view camera display is shown
on the Infotainment system display
screen.
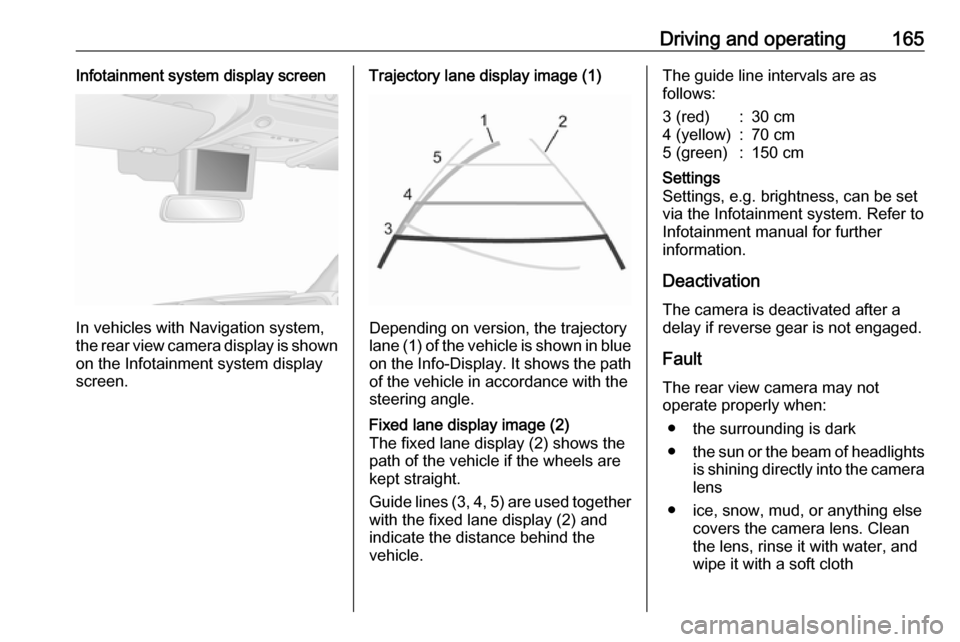
Trajectory lane display image (1)
Depending on version, the trajectory
lane (1) of the vehicle is shown in blue
on the Info-Display. It shows the path of the vehicle in accordance with the
steering angle.
Fixed lane display image (2)
The fixed lane display (2) shows the
path of the vehicle if the wheels are
kept straight.
Guide lines (3, 4, 5) are used together
with the fixed lane display (2) and indicate the distance behind the
vehicle.The guide line intervals are as
follows:3 (red):30 cm4 (yellow):70 cm5 (green):150 cmSettings
Settings, e.g. brightness, can be set
via the Infotainment system. Refer to
Infotainment manual for further
information.
Deactivation
The camera is deactivated after a
delay if reverse gear is not engaged.
Fault
The rear view camera may not
operate properly when:
● the surrounding is dark
● the sun or the beam of headlights
is shining directly into the camera lens
● ice, snow, mud, or anything else covers the camera lens. Clean
the lens, rinse it with water, and
wipe it with a soft cloth
Page 175 of 261

Vehicle care173Vehicle careGeneral Information...................174
Accessories and vehicle modifications .......................... 174
Vehicle storage ........................174
End-of-life vehicle recovery .....175
Vehicle checks ........................... 175
Performing work ......................175
Bonnet ..................................... 175
Engine oil ................................. 176
Engine coolant ......................... 178
Power steering fluid .................178
Washer fluid ............................ 179
Brakes ..................................... 180
Brake fluid ............................... 180
Vehicle battery ......................... 180
Diesel fuel filter ........................182
Diesel fuel system bleeding .....183
Wiper blade replacement ........183
Bulb replacement .......................184
Headlights ............................... 184
Adaptive forward lighting .........187
Fog lights ................................. 187
Front turn signal lights .............187
Tail lights ................................. 188
Side turn signal lights ..............190Centre high-mounted brake
light ......................................... 190
Number plate light ...................191
Interior lights ............................ 192
Instrument panel illumination ...193
Electrical system ........................193
Fuses ....................................... 193
Engine compartment fuse box . 194
Instrument panel fuse box .......195
Load compartment fuse box ....196
Vehicle tools .............................. 198
Tools ........................................ 198
Wheels and tyres .......................199
Tyres ....................................... 199
Winter tyres ............................. 199
Tyre designations ....................199
Tyre pressure .......................... 199
Tyre pressure monitoring system .................................... 200
Tread depth ............................. 202
Changing tyre and wheel size . 203 Wheel covers ........................... 203
Tyre chains .............................. 203
Tyre repair kit .......................... 204
Wheel changing .......................207
Spare wheel ............................ 209
Jump starting ............................. 212Towing....................................... 214
Towing the vehicle ...................214
Towing another vehicle ...........215
Appearance care .......................216
Exterior care ............................ 216
Interior care ............................. 218
Page 185 of 261

Vehicle care183The filter is drained as soon as diesel
fuel emerges from the knurled screw
at the bottom. Retighten the two
screws.
Check diesel fuel filter at shorter
intervals if the vehicle is subjected to
extreme operating conditions.
Diesel fuel system bleeding
If the fuel tank has been run dry, it willbe necessary to air vent or bleed the
diesel fuel system.
Fill the tank with fuel and proceed as
follows:
1. Place a suitable container underneath the fuel filter vent
screw to collect fuel.
2. Loosen the vent screw (arrowed) by one turn.
3. Manually operate the in-line supply pump slowly and steadily
until fuel discharging from the
loosened vent screw is free of air
bubbles.
4. Retighten the vent screw.
In vehicles without an in-line supply
pump, fill the tank with fuel and
proceed as follows:Caution
Do not turn ignition key to position 3 before beginning the bleeding
procedure.
Ignition switch positions 3 133.
1. Turn ignition key to position 2 and
hold for five seconds.
2. Turn key back to position 1 and
wait for three seconds.
3. Repeat Step 1 and 2 multiple times.
4. Turn key to position 3, then return
to 0.
If the engine cannot be started after
several attempts to bleed the diesel
fuel system, seek the assistance of a
workshop.
Wiper blade replacement
Wiper blades on the windscreen If required, use the step located below
the headlights to reach the
windscreen wiper.
Page 186 of 261
184Vehicle careLift wiper arm, press retaining clip
towards wiper arm and detach wiper
blade.
Attach the wiper blade slightly angled to the wiper arm and push until it
engages.
Lower wiper arm carefully.Bulb replacement
Ensure the ignition is switched off
completely (the vehicle must not be in
an Autostop 3 135) and turn off the
relevant switch or close the doors.
Only hold a new bulb at the base. Do not touch the bulb glass with bare
hands.
Use only the same bulb type for
replacement.
Bulb check
After a bulb replacement, switch on
the ignition, operate and check the
lights.
Performing work 3 175.Headlights
Headlights have separate systems for
high beam 1 and low beam 2.
Page 189 of 261
Vehicle care187Adaptive forward lighting
Cornering light
Headlights have separate systems for high beam 1 and low beam 2. The
cornering light 3 is located between
the headlights.
1. Remove protective cover.
2. Detach wiring connector from bulb holder.
3. Rotate bulb holder anti-clockwise to disengage.
4. Withdraw bulb holder from reflector housing.
5. Detach bulb from bulb holder andrenew the bulb.
6. Insert the bulb holder, engaging the two lugs in the reflectorhousing and rotate clockwise to
secure.
7. Attach wiring connector to bulb holder.
8. Install protective cover.
Fog lights
Have the front fog light bulbs replaced
by a workshop.
Front turn signal lights
1. Remove protective cover.
2. Detach wiring connector from bulb holder.
3. Rotate bulb holder anti-clockwise to disengage.
4. Withdraw bulb holder from reflector housing.
Page 216 of 261

214Vehicle care
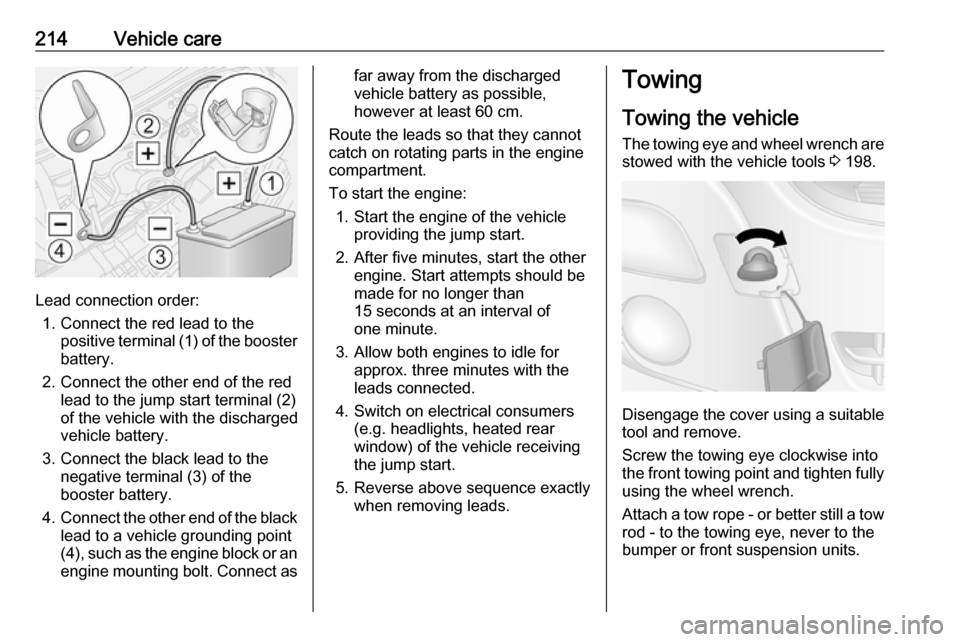
Lead connection order:1. Connect the red lead to the positive terminal (1) of the booster
battery.
2. Connect the other end of the red lead to the jump start terminal (2)
of the vehicle with the discharged
vehicle battery.
3. Connect the black lead to the negative terminal (3) of the
booster battery.
4. Connect the other end of the black
lead to a vehicle grounding point
(4), such as the engine block or an
engine mounting bolt. Connect as
far away from the discharged
vehicle battery as possible,
however at least 60 cm.
Route the leads so that they cannot
catch on rotating parts in the engine
compartment.
To start the engine: 1. Start the engine of the vehicle providing the jump start.
2. After five minutes, start the other engine. Start attempts should be
made for no longer than
15 seconds at an interval of
one minute.
3. Allow both engines to idle for approx. three minutes with the
leads connected.
4. Switch on electrical consumers (e.g. headlights, heated rear
window) of the vehicle receiving
the jump start.
5. Reverse above sequence exactly when removing leads.Towing
Towing the vehicle The towing eye and wheel wrench are
stowed with the vehicle tools 3 198.
Disengage the cover using a suitable
tool and remove.
Screw the towing eye clockwise into
the front towing point and tighten fully using the wheel wrench.
Attach a tow rope - or better still a tow
rod - to the towing eye, never to the
bumper or front suspension units.