Page 31 of 576

YARIS iA_OM_OM99Q46z_(U)
311-2. Seat Belt Systems
1
Essential Safety Equipment
WARNING
■Do not wear twisted seat belts
Twisted seat belts are dangerous. In a collision, the full width of the belt is
not available to absorb the impact. This puts more force on the bones
beneath the belt, which could cause serious injury or death. So, if your seat
belt is twisted, you must straighten the seat belt to remove any twists and to
allow the full width of the belt to be used.
■ Never use one seat belt on more than one person at a time
Using one seat belt for more than one person at a time is dangerous. A seat
belt used in this way cannot spread the impact forces properly and the two
passengers could be crushed together and seriously injured or even killed.
Never use one belt for more than one person at a time and always operate
the vehicle with each occupant properly restrained.
■ Do not operate a vehicle with a damaged seat belt
Using a damaged seat belt is dangerous. An accident could damage the
belt webbing of the seat belt in use. A damaged seat belt cannot provide
adequate protection in a collision. Have your Toyota dealer inspect all seat
belt systems in use during an accident before they are used again.
■ Have your seat belts changed immediat ely if the pretensioner or load
limiter has been expended
Always have your Toyota dealer immediately inspect the seat belt preten-
sioners and air bags after any collision. Like the air bags, the seat belt\
pre-
tensioners and load limiters will only function once and must be replaced
after any collision that caused them to deploy. A seat belt with an expended
pretensioner or load limiter is still better than wearing no seat belt at all;
however, if the seat belt pretensioners and load limiters are not replaced,
the risk of injury in a collision will increase.
■ Positioning the Shoulder Po rtion of the Seat Belt
Improper positioning of the shoulder portion of the seat belt is dangerous.
Always make sure the shoulder portion of the seat belt is positioned across
your shoulder and near your neck, but never under your arm, on your neck,
or on your upper arm.
■ Positioning the Lap Portion of the Seat Belt
The lap portion of the seat belt worn too high is dangerous. In a collision,
this would concentrate the impact force directly on the abdominal area,
causing serious injury. Wear the lap portion of the belt snugly and as low as
possible.
Page 226 of 576

226
YARIS iA_OM_OM99Q46z_(U)
3-13. Rear View Monitor
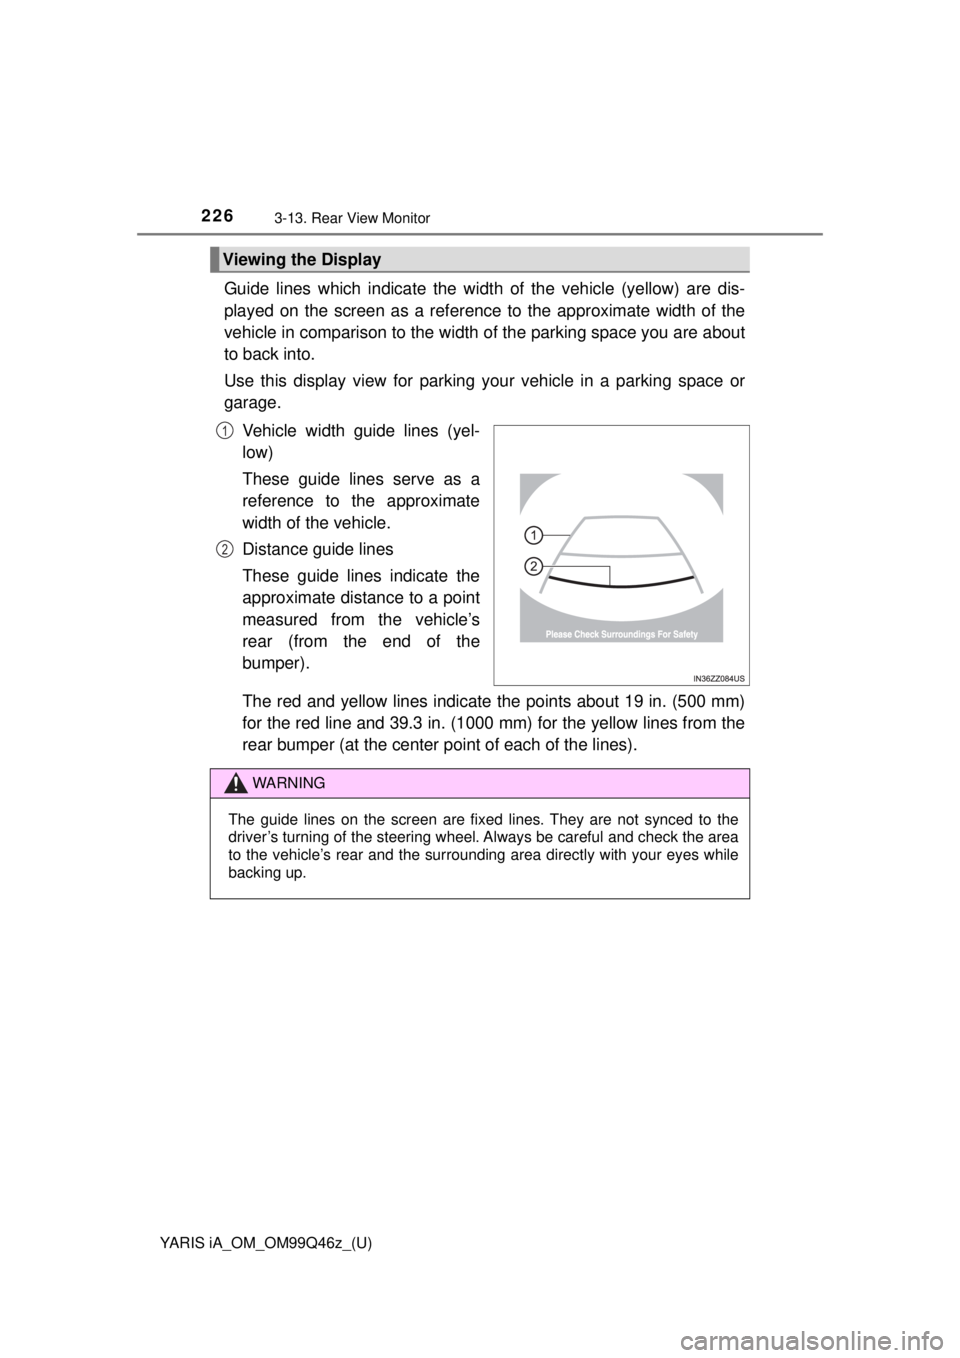
Guide lines which indicate the width of the vehicle (yellow) are dis-
played on the screen as a referenc e to the approximate width of the
vehicle in comparison to the width of the parking space you are about
to back into.
Use this display view for parking your vehicle in a parking space or
garage.
Vehicle width guide lines (yel-
low)
These guide lines serve as a
reference to the approximate
width of the vehicle.
Distance guide lines
These guide lines indicate the
approximate distance to a point
measured from the vehicle’s
rear (from the end of the
bumper).
The red and yellow lines indicate the points about 19 in. (500 mm)
for the red line and 39.3 in. (1000 mm) for the yellow lines from the
rear bumper (at the center point of each of the lines).
Viewing the Display
1
2
WARNING
The guide lines on the screen are fixed lines. They are not synced to the
driver’s turning of the steering wheel. Always be careful and check the area
to the vehicle’s rear and the surrounding area directly with your eyes while
backing up.
Page 227 of 576

YARIS iA_OM_OM99Q46z_(U)
2273-13. Rear View Monitor
3
When Driving
The operation of the rear view monitor when reversing the vehicle var-
ies depending on the traffic, road, and vehicle conditions. The amount
of steering and the timing also varies depending on conditions, so
confirm the surrounding conditions directly with your eyes and steer
the vehicle in accordance with the conditions.
Be well aware of the above cautions prior to using the rear view moni-
tor.
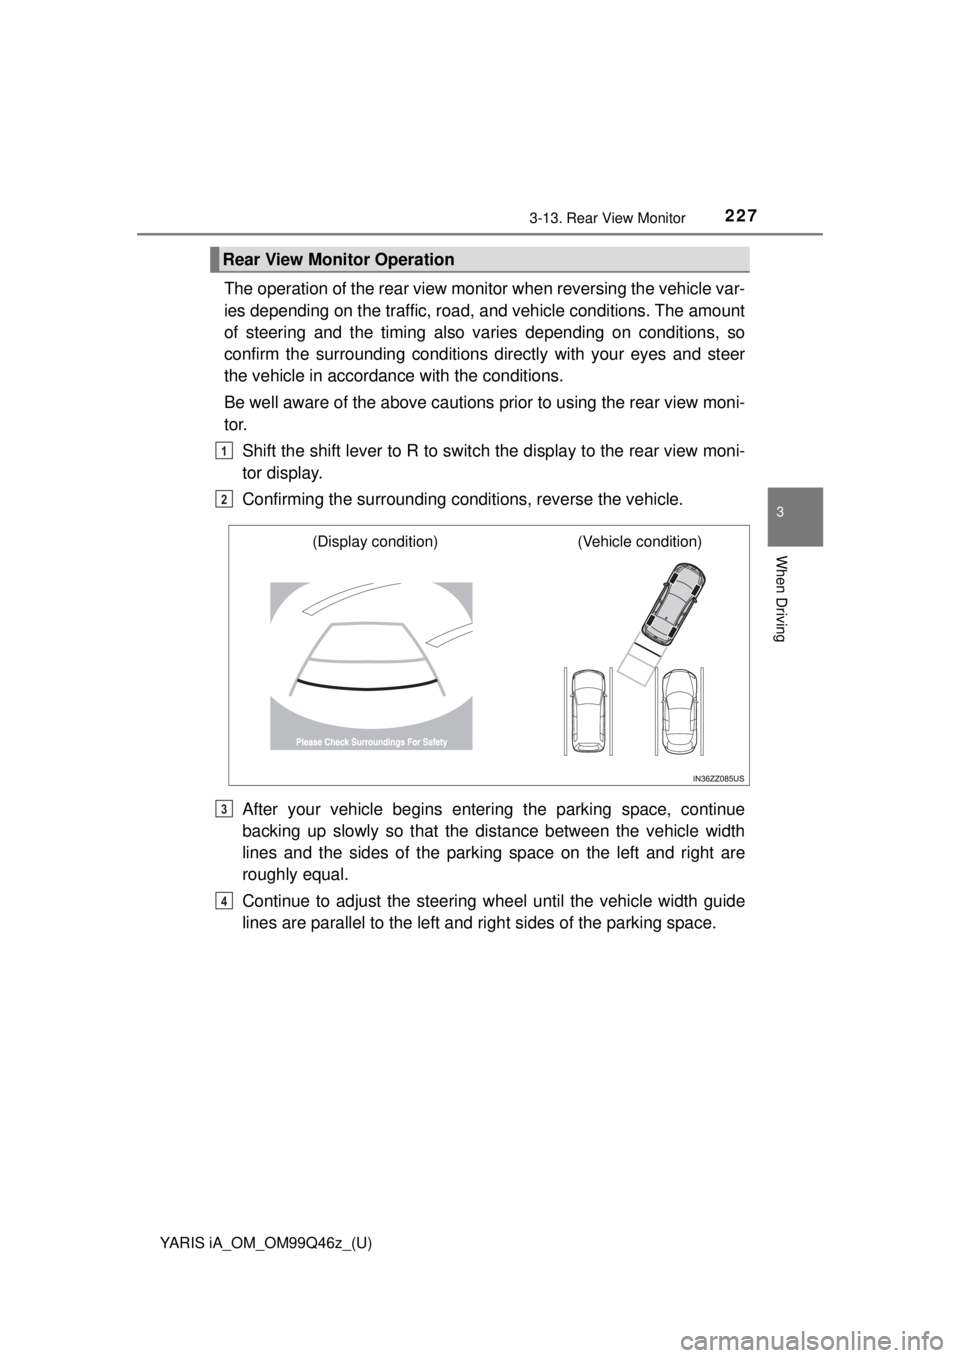
Shift the shift lever to R to switch the display to the rear view moni-
tor display.
Confirming the surrounding conditions, reverse the vehicle.
After your vehicle begins enter ing the parking space, continue
backing up slowly so that the di stance between the vehicle width
lines and the sides of the parking space on the left and right are
roughly equal.
Continue to adjust the steering wh eel until the vehicle width guide
lines are parallel to the left and right sides of the parking space.
Rear View Monitor Operation
1
2
(Display condition) (Vehicle condition)
3
4
Page 228 of 576

228
YARIS iA_OM_OM99Q46z_(U)
3-13. Rear View Monitor
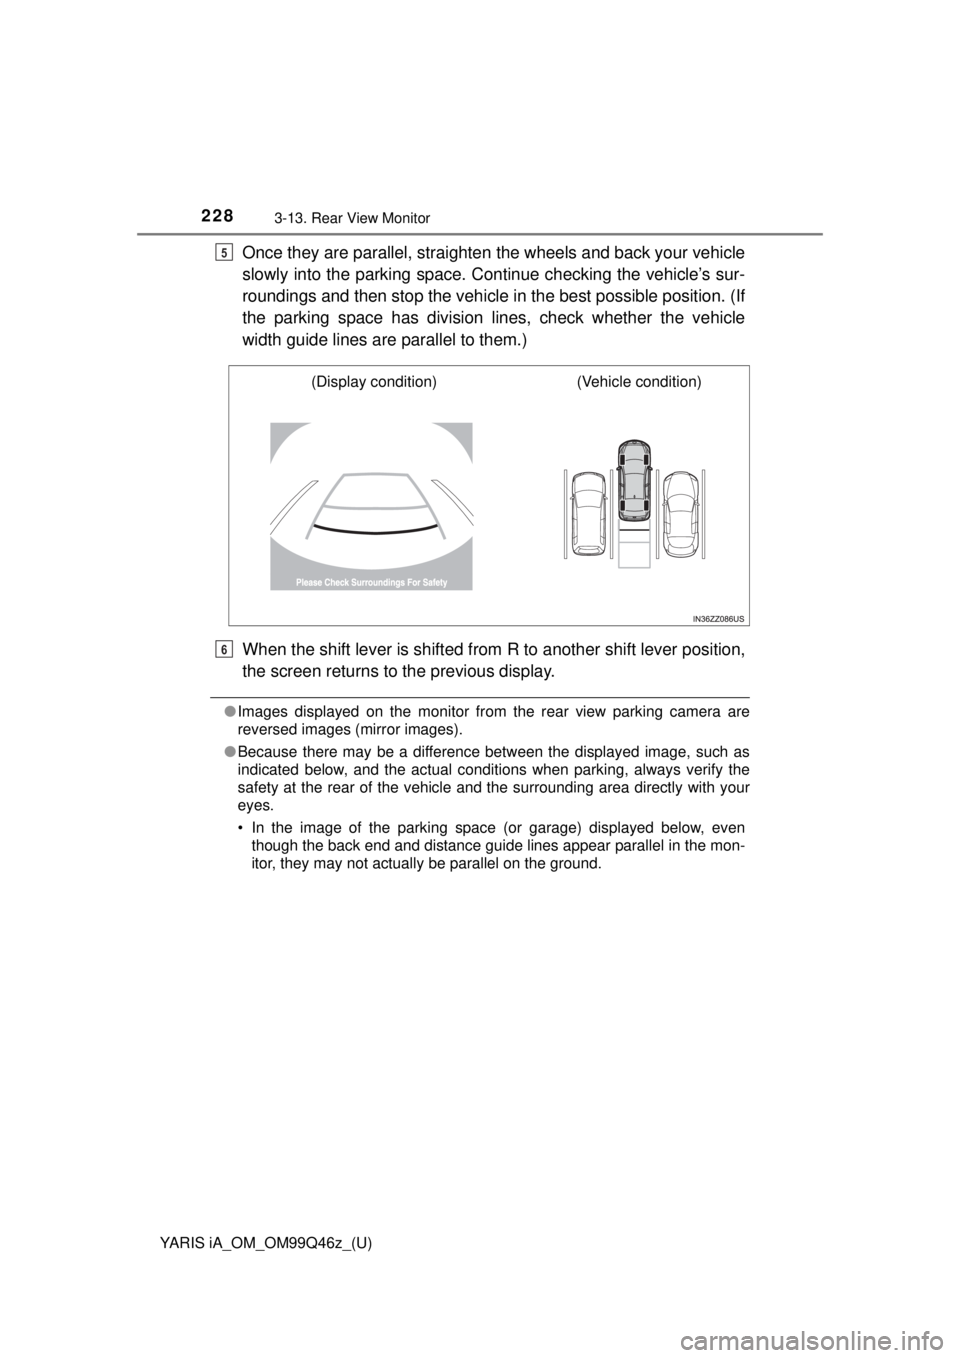
Once they are parallel, straighten the wheels and back your vehicle
slowly into the parking space. Continue checking the vehicle’s sur-
roundings and then stop the vehicle in the best possible position. (If
the parking space has division lines, check whether the vehicle
width guide lines are parallel to them.)
When the shift lever is shifted from R to another shift lever position,
the screen returns to the previous display.
● Images displayed on the monitor from the rear view parking camera are
reversed images (mirror images).
● Because there may be a difference between the displayed image, such as
indicated below, and the actual conditions when parking, always verify the
safety at the rear of the vehicle and the surrounding area directly with your
eyes.
• In the image of the parking space (or garage) displayed below, even
though the back end and distance guide lines appear parallel in the mon-
itor, they may not actually be parallel on the ground.
5
(Display condition) (Vehicle condition)
6
Page 229 of 576
YARIS iA_OM_OM99Q46z_(U)
2293-13. Rear View Monitor
3
When Driving
Some variance occurs between the actual road and the displayed
road. Such variance in distance perspective could lead to an accident.
Note the following conditions that may cause a variance in distance
perspective.
■When the vehicle is tilted due to the weight of passengers and
load
When the vehicle rear is lower ed, the object displayed on the
screen appears farther than the actual distance.
• When parking in a space with a divi-
sion line on only one side of the park-
ing space, the division line and the
vehicle width guide line may appear
parallel on the monitor, but they may
not actually be parallel on the ground.
Variance Between Actual Road Conditions and Displayed Image
Object
Variance
Page 443 of 576

YARIS iA_OM_OM99Q46z_(U)
4435-3. Owner Maintenance
5
Maintenance and Care
Inspect the temporary spare tire at least monthly to make sure it is
properly inflated and stored.
The temporary spare tire is easier to handle because of its construc-
tion which is lighter and smaller th an a conventional tire. This tire
should be used only for an emergen cy and only for a short distance.
Use the temporary spare tire on ly until the conventional tire is
repaired, which should be as soon as possible.
Refer to Tires on P. 560.
●The temporary spare tire condition gradually deteriorates even if it has
not been used.
●Tires degrade over time, even when they are not being used on the
road. It is recommended that tires gen erally be replaced when they are
6 years or older. Heat caused by ho t climates or frequent high loading
conditions can accelerate the aging process. You should replace the
spare tire when you replace the other road tires due to the aging of the
spare tire. The period in which the tire was manufactured (both week
and year) is indicated by a 4-digit number.
Refer to Tire Labeling on P. 532.
Proper tire balancing provides the best riding comfort and helps
reduce tread wear. Out-of-balance tires can cause vibration and
uneven wear, such as cupping and flat spots.
When replacing a wheel, make sure the new one is the same as the orig-
inal factory wheel in diameter, rim width, and offset (inset/outset).
For details, contact your Toyota dealer.
Temporary Spare Tire
NOTICE
●Do not use your temporary spare tire rim with a snow tire or a conven-
tional tire. Neither will properly fit and could damage both tire and rim.
●The temporary spare tire has a tread life of less than 3,000 miles
(5,000 km). The tread life may be shorter depending on driving condi-
tions.
●The temporary spare tire is for limited use, however, if the tread wear
solid-band indicator appears, replace the tire with the same type of
temporary spare (→ P. 443).
Replacing a Wheel
Page 531 of 576
YARIS iA_OM_OM99Q46z_(U)
5317-6. Uniform Tire Quality Grading System (UTQGS)
7
Customer Information and Reporting Safety Defects
Quality grades can be found where applicable on the tire sidewall
between tread shoulder and maximum section width.
For example:
TREADWEAR 200 TRACTION AA TEMPERATURE A
UTQGS MARK (example):
UNIFORM TIRE QUALITY GRADING
TREADWEAR 200 TRACTION
AA TEMPERATURE A
Page 532 of 576
532
YARIS iA_OM_OM99Q46z_(U)
7-7. Tire Information (U.S.A.)
Tire Labeling
Please refer to the sample below.
Federal law requires tire manufacturers to place standardized
information on the sidewall of all tires. This information identi-
fies and describes the fundamental characteristics of the tire
and also provides a tire identification number for safety stan-
dard certification and in case of a recall.
Information on Passenger Vehicle Tires
TIN: U.S. DOT tire identification
number
Passenger car tire
Nominal width of tire in millime-
ters
Ratio of height to width (aspect
ratio)
Radial
Run-flat tire
Rim diameter code Load index & speed symbol
Severe snow conditions
Tire ply composition and
materials used
Max. load rating
Tread wear, traction and tem-
perature grades
Max. permissible inflation
pressure
SAFETY WARNING1
2
3
4
5
6
7
8
9
10
11
12
13
14