Page 9 of 64

91-1. AUTO ACCESS SEAT
SIENNA_AAS_OM08023U_(U)
1
AUTO ACCESS SEAT
WARNING
Observe the following precautions.
Failing to do so may cause death or serious injury in the event of sudden
braking, sudden swerving or an accident.
■Wearing a seat belt
Read and follow the explanations and precautions under the “Seat belts”
headings in Section 1-1 of the “OWNER’S MANUAL”.
■ Child restraint lock func tion belt precaution
Read and follow the explanations and precautions under the “Seat belts”
headings in Section 1-1 of the “OWNER’S MANUAL”.
■ When installing a child restrain t system to the AUTO ACCESS SEAT
Read and follow the explanations and precautions under the “Installing child
restraints” headings in Section 1-1 of the “OWNER’S MANUAL”.
■ Seatback angle adjustment
Do not recline the seat more than necessary when the vehicle is in motion
to reduce the risk of sliding under the lap belt during a collision.
If the seat is too reclined, the lap belt may slide past the hips and apply
restraint forces directly to the abdomen or your neck may contact the shoul-
der belt.
NOTICE
■To prevent seat damage
Release the switch once the adjustment operation has been completed.
If you continue to press the switch once the operation has been completed,
a fault may occur.
Page 10 of 64
101-1. AUTO ACCESS SEAT
SIENNA_AAS_OM08023U_(U)
Head restraint
Up
Pull the head restraint up.
Down
Push the head restraint down while
pressing the lock release button.
■Removing the head restraint
■ Installing the head restraint
Head restraint is provided for the AUTO ACCESS SEAT.
Lock
release
button
1
2
Pull the head restraint up while pressing
the lock release button.
Align the head restraint with the installa-
tion holes and push it down to the lock
position.
Press and hold the lock release button
when lowering the head restraint.
Lock release button
Lock release button
Page 11 of 64
111-1. AUTO ACCESS SEAT
SIENNA_AAS_OM08023U_(U)
1
AUTO ACCESS SEAT
■Adjusting the height of the head restraint
Make sure that the head restraint is
adjusted so that the center of the head
restraint is closest to the top of your ears.
WARNING
■ Head restraint precautions
Observe the following precautions regarding the head restraint.
Failure to do so may result in death or serious injury.
● Use the head restraint designed for AUTO ACCESS SEAT.
● Adjust the head restraint to the correct position at all times.
● After adjusting the head restraint, push down on it and make sure it is
locked in position.
● Do not drive with the head restraint removed.
Page 18 of 64

181-1. AUTO ACCESS SEAT
SIENNA_AAS_OM08023U_(U)■
Conditions affecting operation
If you use the wireless remote control to operate the AUTO ACCESS SEAT at
the same time as doing any of the following, the AUTO ACCESS SEAT may
not operate properly:
●Operating the AUTO ACCESS SEAT using another wireless remote control
● Operating the AUTO ACCESS SEAT using the seat raise/lower switch
● Using the smart key system
● Unlocking and locking the doors using the wireless remote control
■ When replacing either the transmitter or the receiver of the wireless
remote control
It is necessary to replace both the transmitter and the receiver. Contact your
Toyota dealer.
■ Certification for the wi reless remote control
U.S.A.
FCC ID: HYQ12BDF
FCC ID: HYQ13BDH
NOTE:
This device complies with part 15 of the FCC Rules. Operation is subject to
the following two conditions: (1) This device may not cause harmful interfer-
ence, and (2) this device must accept any interference received, including
interference that may cause undesired operation.
FCC WARNING:
Changes or modifications not expressly approved by the party responsible for
compliance could void the user’s authority to operate the equipment.
Canada
NOTE:
Operation is subject to the following two conditions: (1) this device may not
cause interference, and (2) this device must accept any interference, includ-
ing interference that may cause undesired operation of the device.
Page 45 of 64
453. When you think a malfunction has occurred
SIENNA_AAS_OM08023U_(U)
3
When trouble arises
ReasonCorrection procedure
The engine is not running.
Start the engine.
If the AUTO ACCESS SEAT is operated
while the engine is stopped and the vehi-
cle battery is low, the AUTO ACCESS
SEAT may stop during operation.
The switch is being pressed
repeatedly.Push and hold the switch.
The fuse has blown.Check if the fuse has blown and replace
it as necessary.
The vehicle battery has been
removed while the AUTO
ACCESS SEAT was operating.
Reconnect the battery and refer to P. 47.
If the right-hand sliding door will not close and the beep sounds
twice
ReasonCorrection procedure
The AUTO ACCESS SEAT has
not been locked in place after
being stowed.
Press and hold the seat raise switch on
the wireless remote control or the raise
side of the seat raise/lower switch, and
confirm that the AUTO ACCESS SEAT
stops automatically and the beep sounds
once. Then, try closing the sliding door
again.
Page 46 of 64

463. When you think a malfunction has occurred
SIENNA_AAS_OM08023U_(U)
If the AUTO ACCESS SEAT retreats a little and then stops
ReasonCorrection procedure
The AUTO ACCESS SEAT has
hit an obstacle, or operation
has been otherwise obstructed.Remove the obstacle and try operating
the AUTO ACCESS SEAT again.
If the shift lever cannot be moved from P
ReasonCorrection procedure
The AUTO ACCESS SEAT has
not been locked in place after
being stowed.
Press and hold the seat raise switch on
the wireless remote control or the raise
side of the seat raise/lower switch, and
confirm that the AUTO ACCESS SEAT
stops automatically and the beep sounds
once. Then, try shifting the shift lever
again.
If the seat position or the seatback angle of the AUTO ACCESS
SEAT cannot be adjusted
ReasonCorrection procedure
An attempt has been made to
adjust the AUTO ACCESS
SEAT while it is raising, lower-
ing or rotating, or while it is out-
side the vehicle.Press and hold the seat raise switch on
the wireless remote control or the raise
side of the seat raise/lower switch, and
confirm that the AUTO ACCESS SEAT
stops automatically and the beep sounds
once. Then, try adjusting the seat again.
Page 56 of 64
563. When you think a malfunction has occurred
SIENNA_AAS_OM08023U_(U)
Turn the bolt with yellow mark-
ing clockwise using the combi-
nation wrench, and slide the
seat until the marks are aligned
as shown in the illustration.
If you are unable to slide the seat
until the marks are aligned
because the right edge of the seat
cushion interferes with the sliding
door, carry out steps and and
slide the seat until the marks are
aligned as shown in the illustration.
Use the combination wrench to
loosen the two bolts, then slide
the motor out of the way and
disconnect it from the gear.
Rotate the seat into a position
which does not cause the left
edge of the seat cushion to
make contact with the vehicle
body.
12
1314
13
14
Page 57 of 64

573. When you think a malfunction has occurred
SIENNA_AAS_OM08023U_(U)
3
When trouble arises
Turn the power sliding door main switch off and close the right-hand
sliding door manually.
Have the seat inspected by your Toyota dealer immediately.
The power sliding door will not operate if the AUTO ACCESS SEAT has
been stowed inside the vehicle manually.
For information regarding the power sliding door, refer to the “OWNER’S
MANUAL”.
Contact your Toyota dealer.
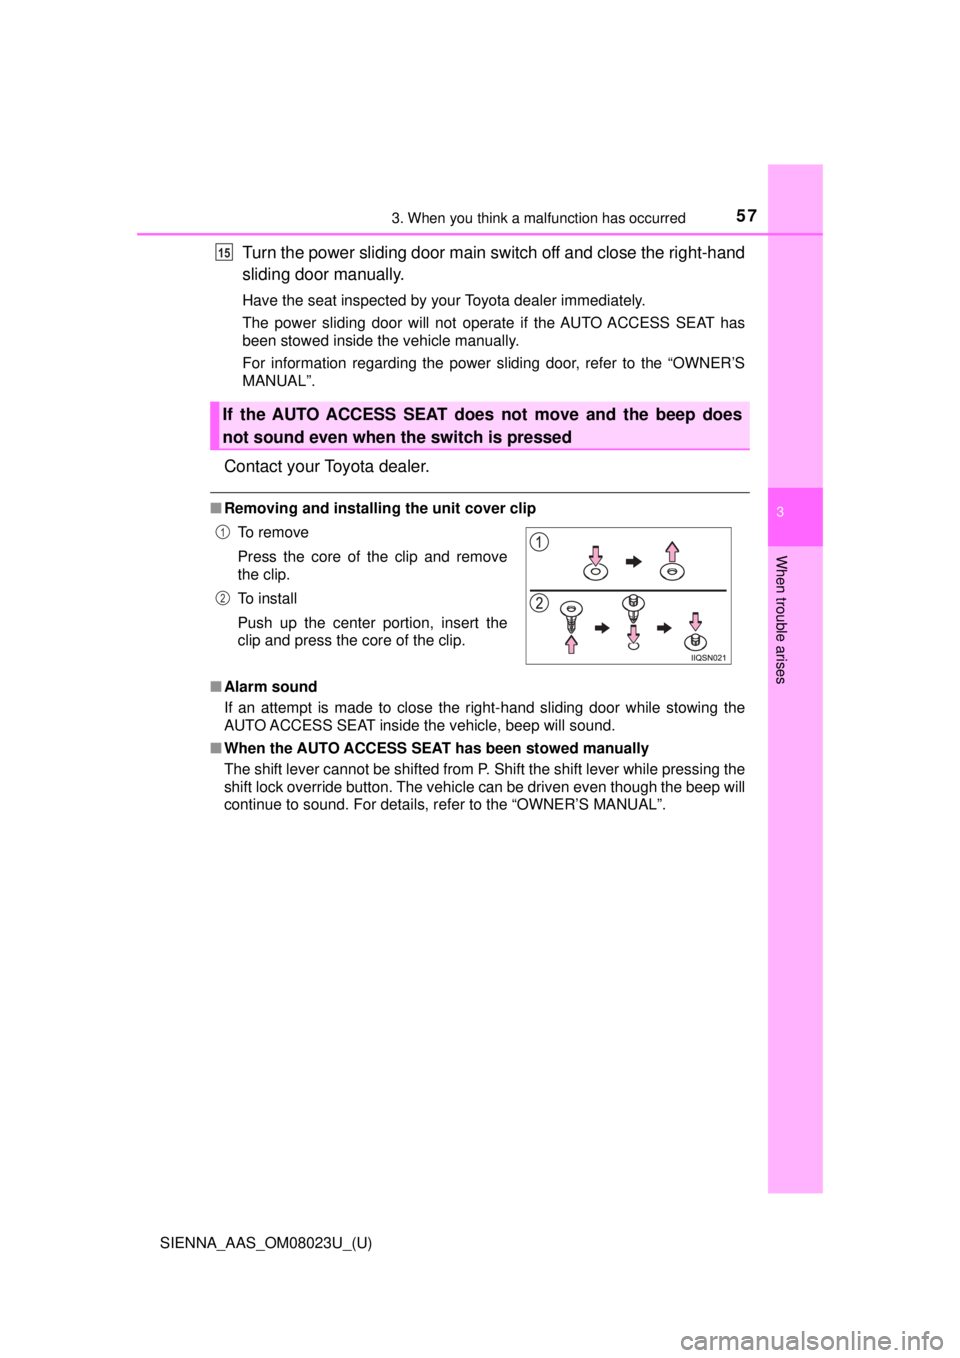
■Removing and installing the unit cover clip
■ Alarm sound
If an attempt is made to close the right-hand sliding door while stowing the
AUTO ACCESS SEAT inside the vehicle, beep will sound.
■ When the AUTO ACCESS SEAT has been stowed manually
The shift lever cannot be shifted from P. Shift the shift lever while pressing the
shift lock override button. The vehicle can be driven even though the beep will
continue to sound. For details, refer to the “OWNER’S MANUAL”.
If the AUTO ACCESS SEAT does not move and the beep does
not sound even when the switch is pressed
To r e m o v e
Press the core of the clip and remove
the clip.
To install
Push up the center portion, insert the
clip and press the core of the clip.
15
1
2